Introduction
Removing a web browser from your device may become necessary for various reasons, such as performance issues, security concerns, or simply the need to switch to a different browser. Whether you're using Google Chrome, Mozilla Firefox, Safari, Microsoft Edge, or any other popular browser, the process of removing it involves more than just uninstalling the application. This comprehensive guide will walk you through the steps to effectively remove a web browser, clear its data, and ensure a clean transition to a new browser or a fresh installation of the same one.
By following the steps outlined in this guide, you can ensure that no residual data or settings are left behind, thereby achieving a complete removal of the browser from your system. Additionally, we will explore the importance of removing browser extensions and resetting browser settings to optimize the removal process. Whether you're a tech-savvy individual or a casual user, this guide is designed to provide clear and actionable steps to help you seamlessly remove a web browser from your device.
Now, let's dive into the step-by-step process of removing a web browser and ensuring that your device is ready for a fresh start or a new browser installation.
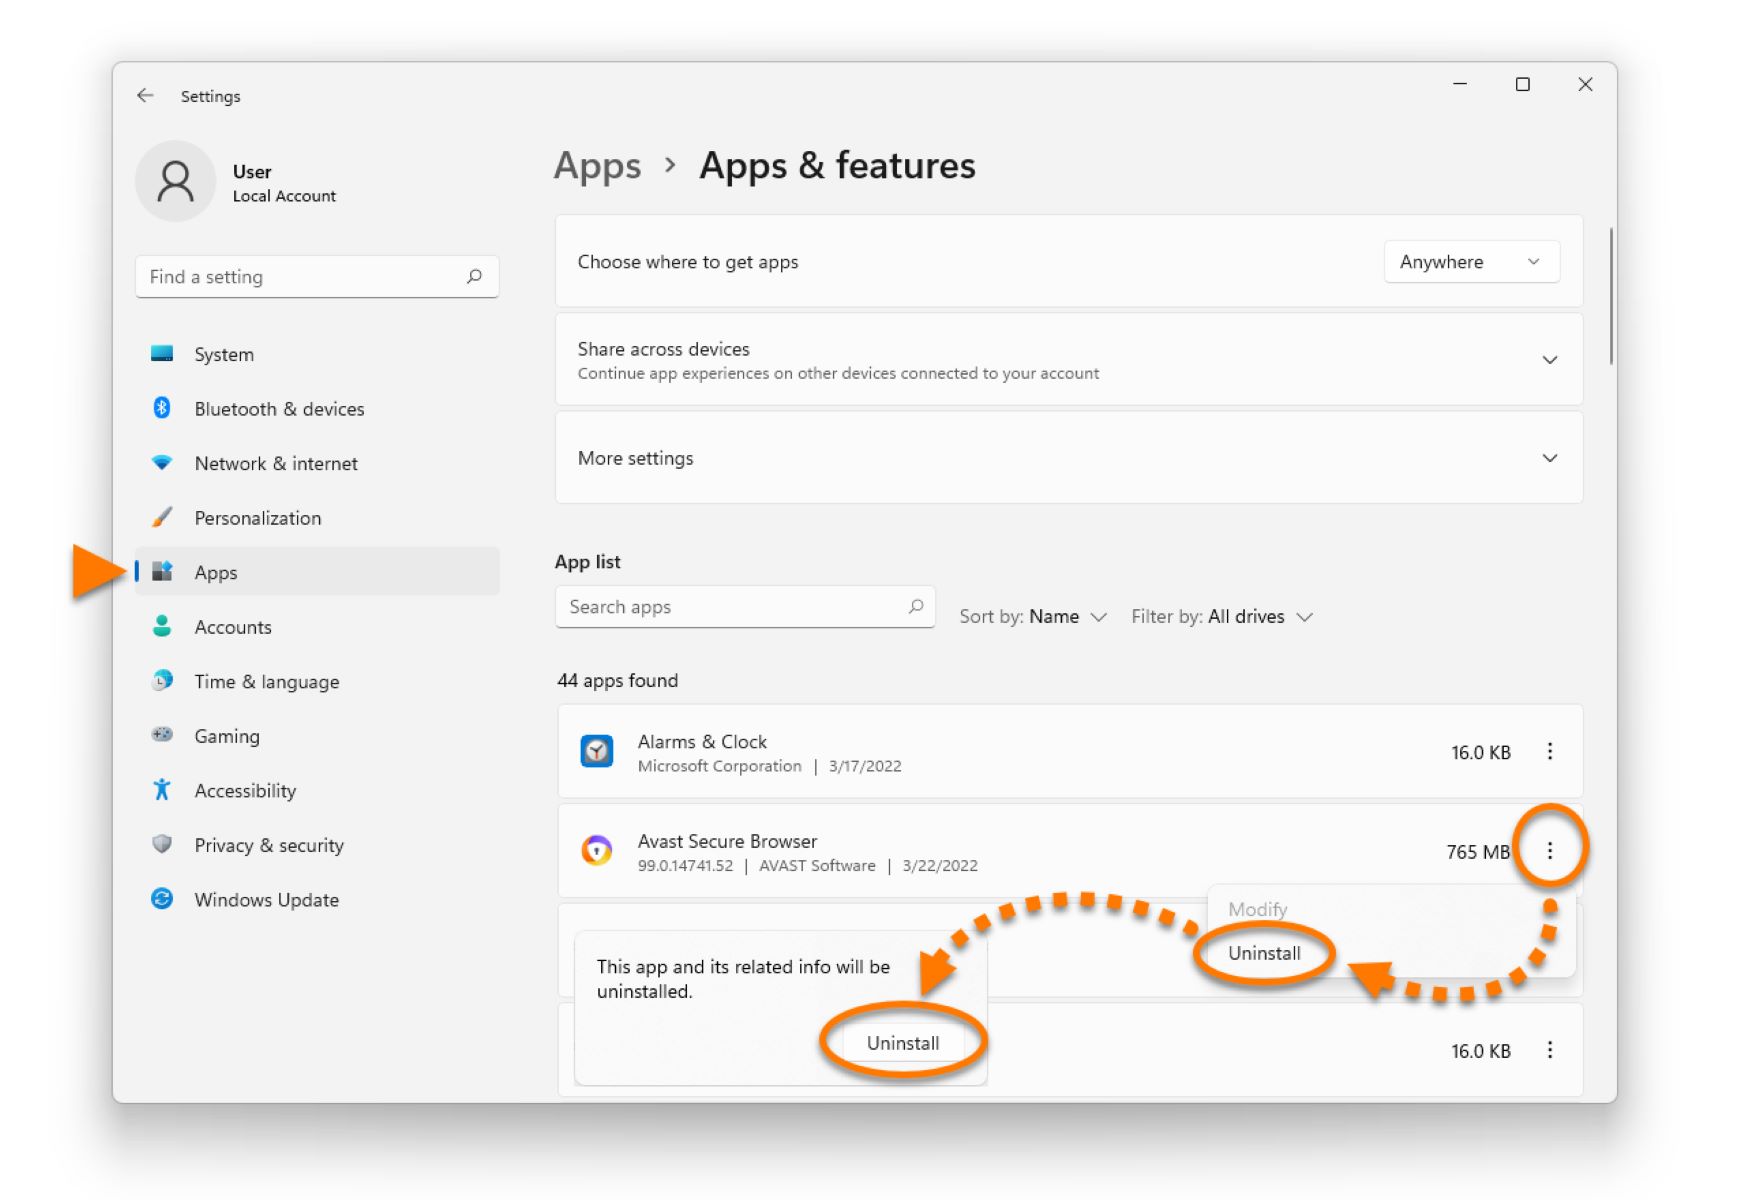
Step 1: Uninstalling the Browser
Uninstalling a web browser is the initial step in the process of removing it from your device. The method for uninstallation may vary slightly depending on the operating system you are using, but the fundamental steps remain consistent.
Windows:
-
Open Control Panel: Click on the "Start" button, then select "Control Panel."
-
Access Programs and Features: In the Control Panel, navigate to "Programs" and then click on "Programs and Features."
-
Select the Browser: Scroll through the list of installed programs to find your web browser. Click on it to select, then choose the "Uninstall" option.
-
Follow Uninstallation Wizard: A prompt will appear, guiding you through the uninstallation process. Follow the on-screen instructions to complete the removal.
macOS:
-
Open Finder: Click on the Finder icon in the Dock to open a Finder window.
-
Navigate to Applications: In the Finder window, locate and click on "Applications" in the sidebar.
-
Drag the Browser to Trash: Find the web browser in the Applications folder, then drag it to the Trash icon in the Dock.
-
Empty Trash: Right-click on the Trash icon and select "Empty Trash" to permanently remove the browser.
Linux:
-
Use Package Manager: Depending on the Linux distribution, you can use the package manager to uninstall the browser. For example, in Ubuntu, you can use the following command in the terminal:
sudo apt-get remove <browser-name>. -
Enter Administrator Password: You may be prompted to enter the administrator password to confirm the uninstallation.
-
Follow Terminal Instructions: Follow the instructions in the terminal to complete the uninstallation process.
After successfully uninstalling the web browser, it's important to restart your device to ensure that all associated processes are terminated. This step sets the stage for the subsequent actions of clearing browser data, removing extensions, and resetting browser settings, which collectively ensure a thorough removal of the browser from your system.
By following these steps, you can effectively uninstall a web browser from your device, paving the way for a clean transition to a new browser or a fresh installation of the same one.
Step 2: Clearing Browser Data
Once you have uninstalled the web browser from your device, it's essential to clear the browser data to ensure that no residual information is left behind. Browser data includes a wide range of information such as browsing history, cache, cookies, saved passwords, and form data. Clearing this data not only helps in maintaining your privacy but also ensures a clean slate for a new browser installation or a fresh start with the same browser.
Clearing Browser Data in Google Chrome:
-
Open Chrome Settings: Click on the three-dot menu in the top-right corner of the Chrome window, then select "Settings."
-
Access Clear Browsing Data: In the Settings menu, scroll down and click on "Privacy and security," then select "Clear browsing data."
-
Choose Data to Clear: You can choose the time range for which you want to clear the data. Select the types of data you want to clear, such as browsing history, cookies, and cached images and files.
-
Clear Data: Once you've made your selections, click on "Clear data" to initiate the process.
Clearing Browser Data in Mozilla Firefox:
-
Open Firefox Options: Click on the three-line menu in the top-right corner of the Firefox window, then select "Options."
-
Navigate to Privacy & Security: In the Options menu, click on "Privacy & Security" in the left-hand sidebar.
-
Clear Data: Under the "Cookies and Site Data" section, click on "Clear Data." You can choose to clear cookies and site data, as well as cached web content.
-
Confirm Clearing Data: After making your selections, click on "Clear" to confirm the clearing of browser data.
Clearing Browser Data in Safari:
-
Access Safari Preferences: Click on "Safari" in the top menu bar, then select "Preferences."
-
Navigate to Privacy Tab: In the Preferences window, click on the "Privacy" tab.
-
Manage Website Data: Click on "Manage Website Data" to view and remove stored website data, including cookies and cached files.
-
Remove Data: You can select individual websites or click "Remove All" to clear all stored website data.
By clearing browser data, you ensure that no remnants of your browsing activity or personal information are left behind after uninstalling the browser. This step is crucial in maintaining your privacy and preparing your device for a fresh browsing experience with a new browser or a reinstallation of the same one.
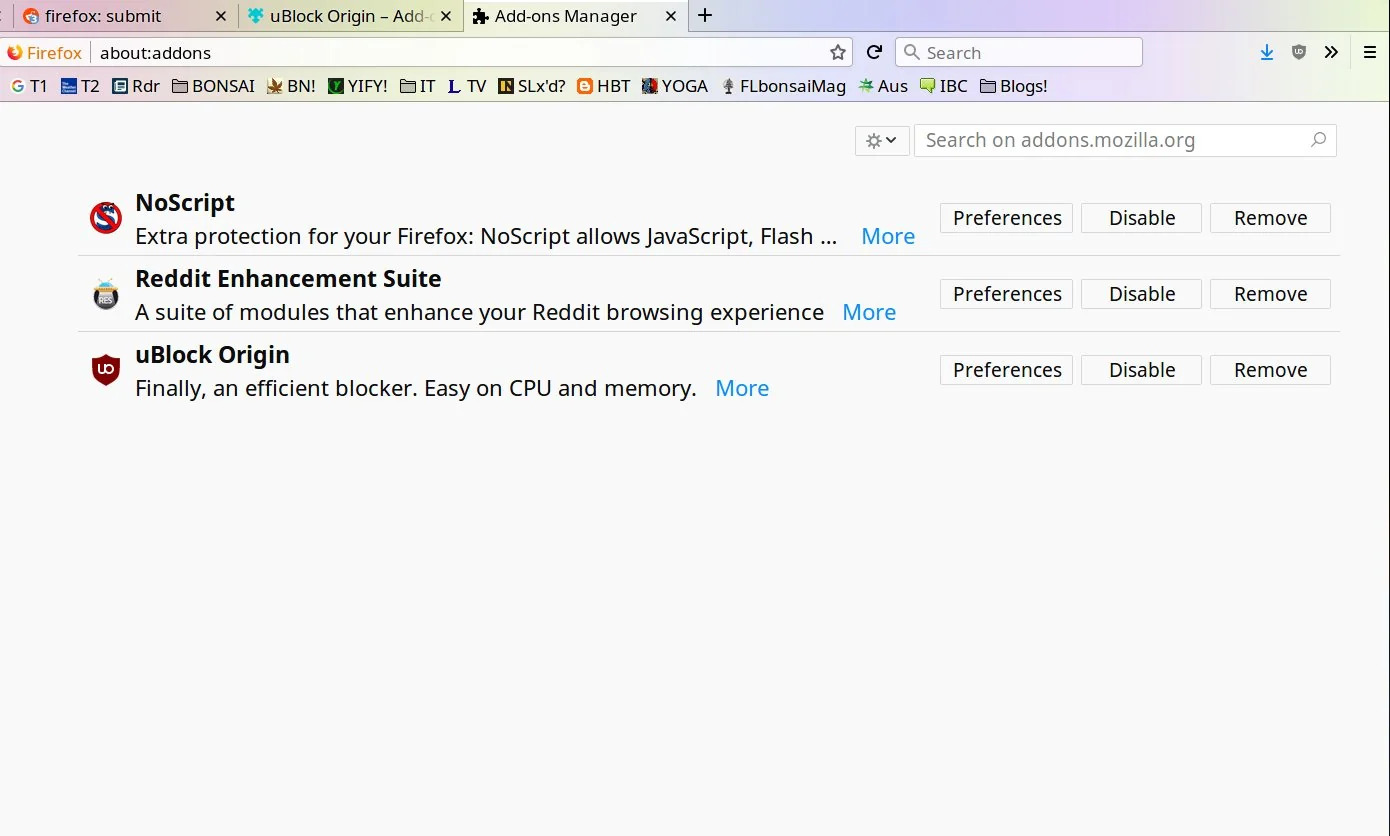
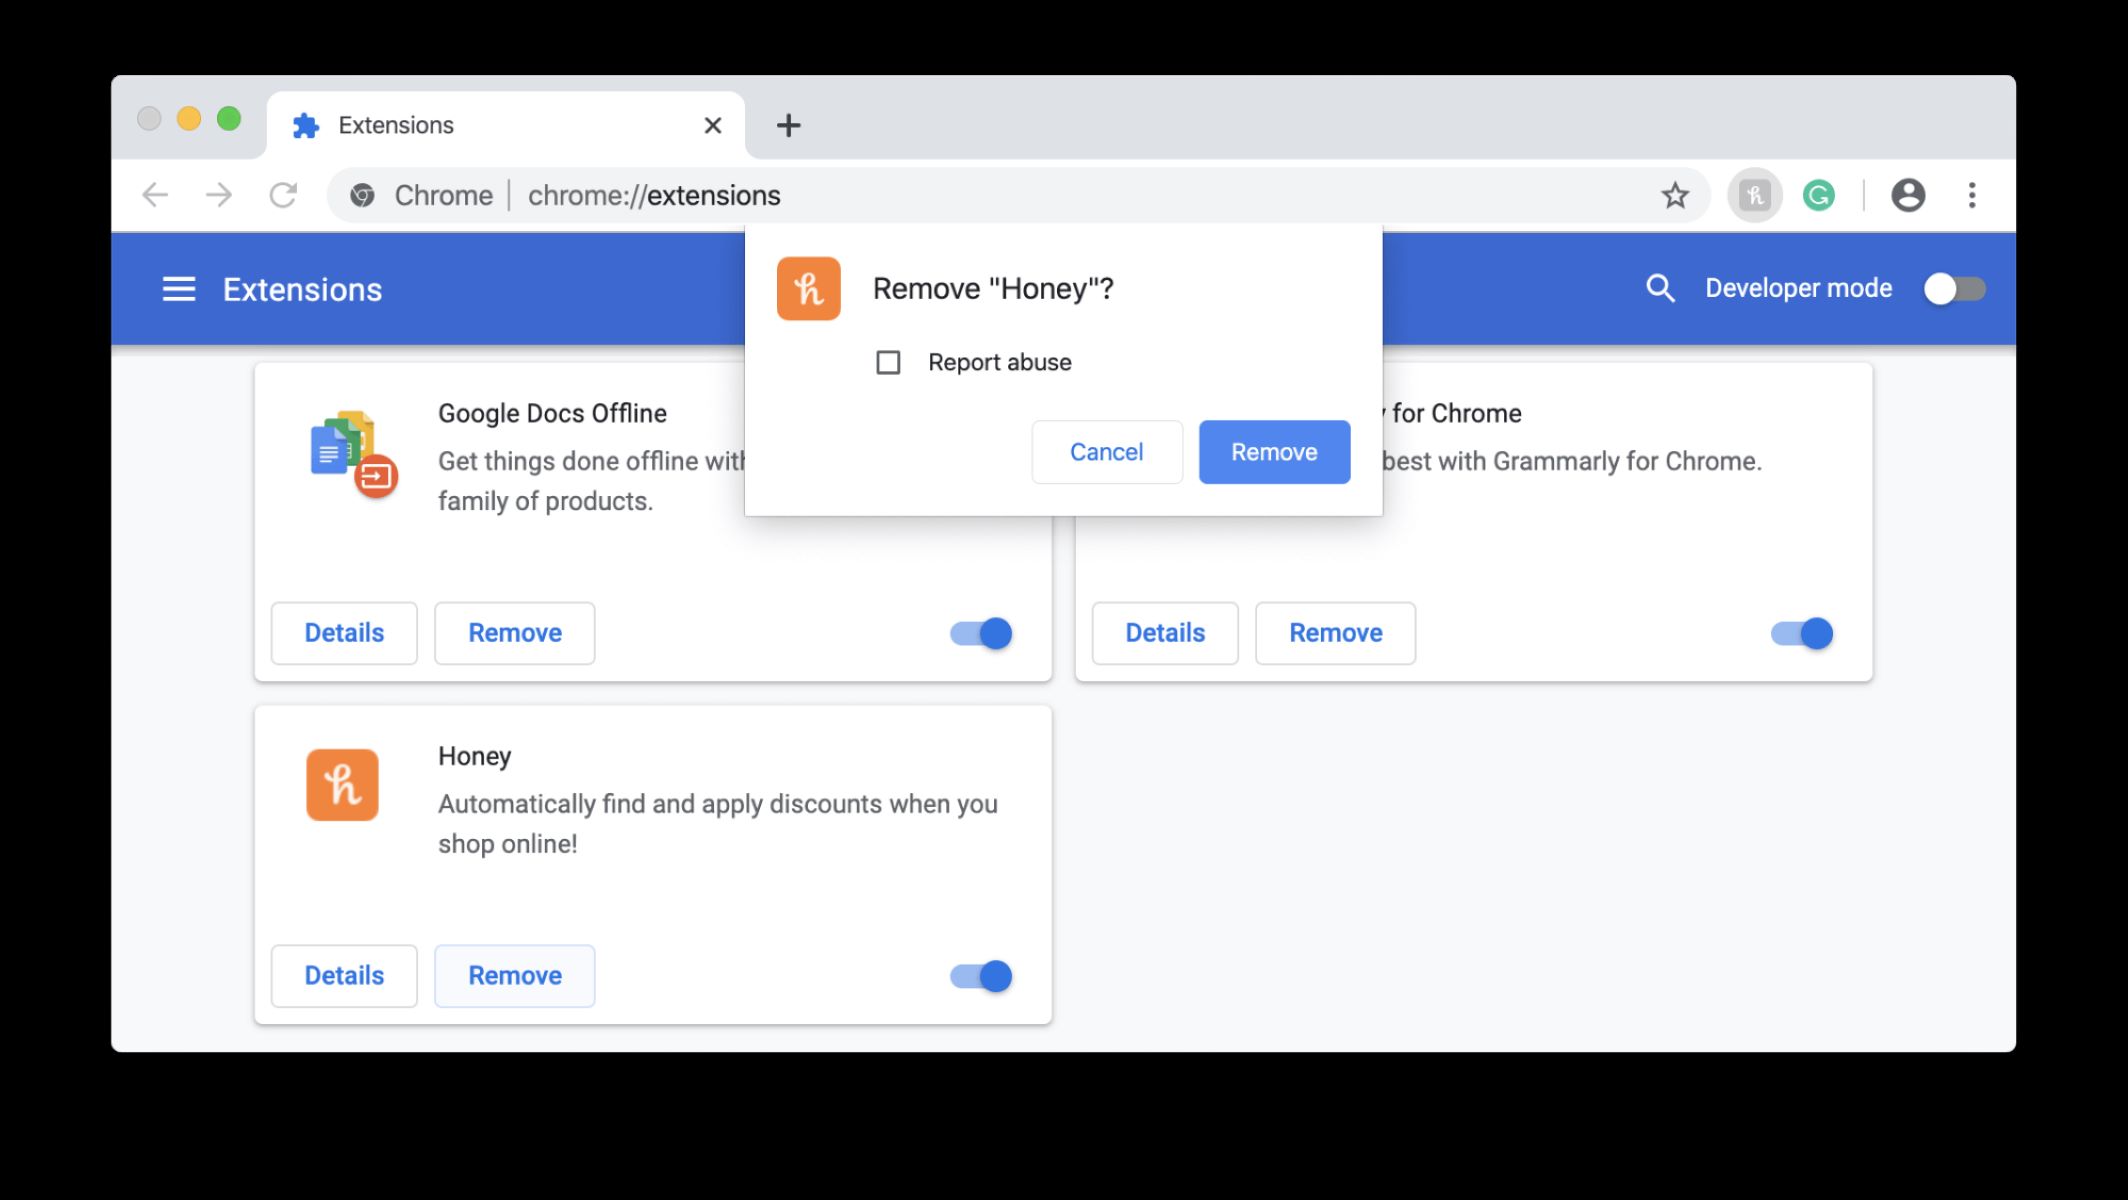
Step 3: Removing Browser Extensions
Browser extensions, also known as add-ons or plugins, enhance the functionality of web browsers by providing additional features and customization options. While these extensions can be beneficial, they may also impact browser performance and security. Therefore, when removing a web browser from your device, it's essential to address the associated extensions to ensure a thorough cleanup.
Here's how you can effectively remove browser extensions from popular web browsers:
Removing Extensions in Google Chrome:
- Open Chrome Extensions: Click on the three-dot menu in the top-right corner of the Chrome window, then navigate to "More tools" and select "Extensions."
- Review Installed Extensions: In the Extensions tab, you'll see a list of installed extensions. Review the list to identify the extensions you want to remove.
- Remove Extensions: Click on the "Remove" button next to the extension you wish to uninstall. Confirm the removal when prompted.
Removing Extensions in Mozilla Firefox:
- Access Firefox Add-ons: Click on the three-line menu in the top-right corner of the Firefox window, then select "Add-ons."
- Manage Extensions: In the Add-ons Manager, click on the "Extensions" tab to view all installed extensions.
- Remove Extensions: Locate the extension you want to remove and click on the "Remove" button. Confirm the removal when prompted.
Removing Extensions in Microsoft Edge:
- Open Edge Extensions: Click on the three-dot menu in the top-right corner of the Edge window, then select "Extensions."
- Manage Extensions: In the Extensions menu, you can view all installed extensions and their details.
- Remove Extensions: Click on the "Remove" button next to the extension you want to uninstall. Confirm the removal when prompted.
By removing browser extensions, you not only declutter your browser but also mitigate potential security risks associated with certain extensions. This step contributes to a comprehensive removal of the web browser and sets the stage for the final step of resetting browser settings.
Removing browser extensions is a vital part of the browser removal process, ensuring that no lingering extensions interfere with the performance and security of your device, especially when transitioning to a new browser or preparing for a fresh installation.
Step 4: Resetting Browser Settings
Resetting the browser settings is a crucial step in the process of removing a web browser from your device. When a browser is uninstalled, certain settings and preferences may still persist in the system, potentially impacting the performance and user experience. By resetting the browser settings, you can ensure that all residual configurations are cleared, providing a clean slate for a new browser installation or a fresh start with the same browser.
Here's how you can effectively reset browser settings in popular web browsers:
Resetting Browser Settings in Google Chrome:
- Open Chrome Settings: Click on the three-dot menu in the top-right corner of the Chrome window, then select "Settings."
- Scroll to Advanced Settings: In the Settings menu, scroll down and click on "Advanced" to expand the advanced settings options.
- Reset Settings: Under the "Reset and clean up" section, click on "Restore settings to their original defaults."
- Confirm Reset: A confirmation dialog will appear, outlining the settings that will be reset. Click on "Reset settings" to initiate the process.
Resetting Browser Settings in Mozilla Firefox:
- Open Firefox Options: Click on the three-line menu in the top-right corner of the Firefox window, then select "Options."
- Navigate to Privacy & Security: In the Options menu, click on "Privacy & Security" in the left-hand sidebar.
- Scroll to the Bottom: Scroll down to the bottom of the Privacy & Security settings and click on "Restore Defaults" under the "Settings" section.
- Confirm Reset: A dialog will appear, prompting you to confirm the reset. Click on "Restore Defaults" to reset the browser settings.
Resetting Browser Settings in Microsoft Edge:
- Open Edge Settings: Click on the three-dot menu in the top-right corner of the Edge window, then select "Settings."
- Choose Reset Settings: In the Settings menu, navigate to the "Reset settings" section.
- Reset Settings: Click on "Restore settings to their default values."
- Confirm Reset: A confirmation dialog will appear. Click on "Reset" to initiate the process.
By resetting the browser settings, you ensure that all customizations, preferences, and potentially problematic configurations are reverted to their default state. This step plays a pivotal role in preparing your device for a seamless transition to a new browser or a fresh installation of the same one.
Resetting browser settings is the final step in the comprehensive process of removing a web browser from your device. It ensures that no residual settings or preferences interfere with the performance and user experience, setting the stage for a clean and optimized browsing environment.
Conclusion
In conclusion, the process of removing a web browser from your device involves a series of essential steps to ensure a thorough cleanup and prepare the system for a fresh browsing experience. By following the steps outlined in this guide, you can effectively remove a web browser, clear its data, address associated extensions, and reset browser settings, thereby achieving a comprehensive removal and optimization of your browsing environment.
Uninstalling the web browser marks the initial step, and the method may vary based on the operating system. Whether you're using Windows, macOS, or Linux, the uninstallation process sets the stage for the subsequent actions of clearing browser data, removing extensions, and resetting settings. This step ensures that the browser application and its associated processes are completely removed from your device.
Clearing browser data is crucial for maintaining privacy and ensuring a clean slate for a new browser installation. By removing browsing history, cookies, and cached files, you mitigate the risk of residual information impacting your browsing experience or privacy.
Addressing browser extensions is equally important, as it allows you to declutter the browser and mitigate potential security risks associated with certain extensions. By removing unnecessary or problematic extensions, you optimize the performance and security of your browsing environment.
Finally, resetting the browser settings ensures that all residual configurations are cleared, providing a clean slate for a new browser installation or a fresh start with the same browser. This step plays a pivotal role in optimizing the browsing environment and ensuring a seamless transition to a new browser.
By completing these steps, you not only remove the web browser from your device but also optimize the system for a fresh browsing experience. Whether you're transitioning to a new browser or preparing for a reinstallation, the thorough removal process outlined in this guide sets the stage for an optimized and secure browsing environment.
In essence, the process of removing a web browser goes beyond simple uninstallation, encompassing data clearance, extension management, and settings optimization. By following these steps, you can ensure that your device is ready for a seamless transition to a new browser or a fresh installation, free from residual data and configurations.