Introduction
Safari is a popular web browser known for its sleek interface and user-friendly features. While it offers a seamless browsing experience, there are times when you may want to add an extra layer of security to your browsing activities. One effective way to achieve this is by putting a lock on Safari, which allows you to control and restrict access to certain websites. Whether you want to limit access for yourself or for others using your device, adding a lock to Safari can provide peace of mind and a safer browsing environment.
In this guide, we will walk you through the step-by-step process of putting a lock on Safari. By following these simple instructions, you can take control of your browsing experience and ensure that access to specific websites is restricted as desired. Whether you're a concerned parent looking to safeguard your child's online activities or an individual aiming to limit distractions and enhance productivity, the ability to lock Safari can be a valuable tool in maintaining a secure and focused browsing environment.
Now, let's delve into the details of how to effectively put a lock on Safari, empowering you to customize your browsing experience and create a safer online environment for yourself and others.
Step 1: Open Safari Preferences
To begin the process of putting a lock on Safari, the first step is to open the Safari Preferences. This allows you to access the settings and make the necessary adjustments to enable website restrictions and set a passcode.
Here's how to open Safari Preferences:
-
Launch Safari: Start by opening the Safari browser on your Mac or iOS device. The Safari icon is typically located in the dock or the Applications folder on a Mac, and on the home screen of an iOS device.
-
Access Preferences: Once Safari is open, navigate to the top-left corner of the screen on a Mac or the bottom-right corner on an iOS device to find the "Safari" menu. Click on "Safari" to reveal a drop-down menu, and then select "Preferences" from the options listed. This action will open the Preferences window, where you can customize various settings related to Safari's functionality.
-
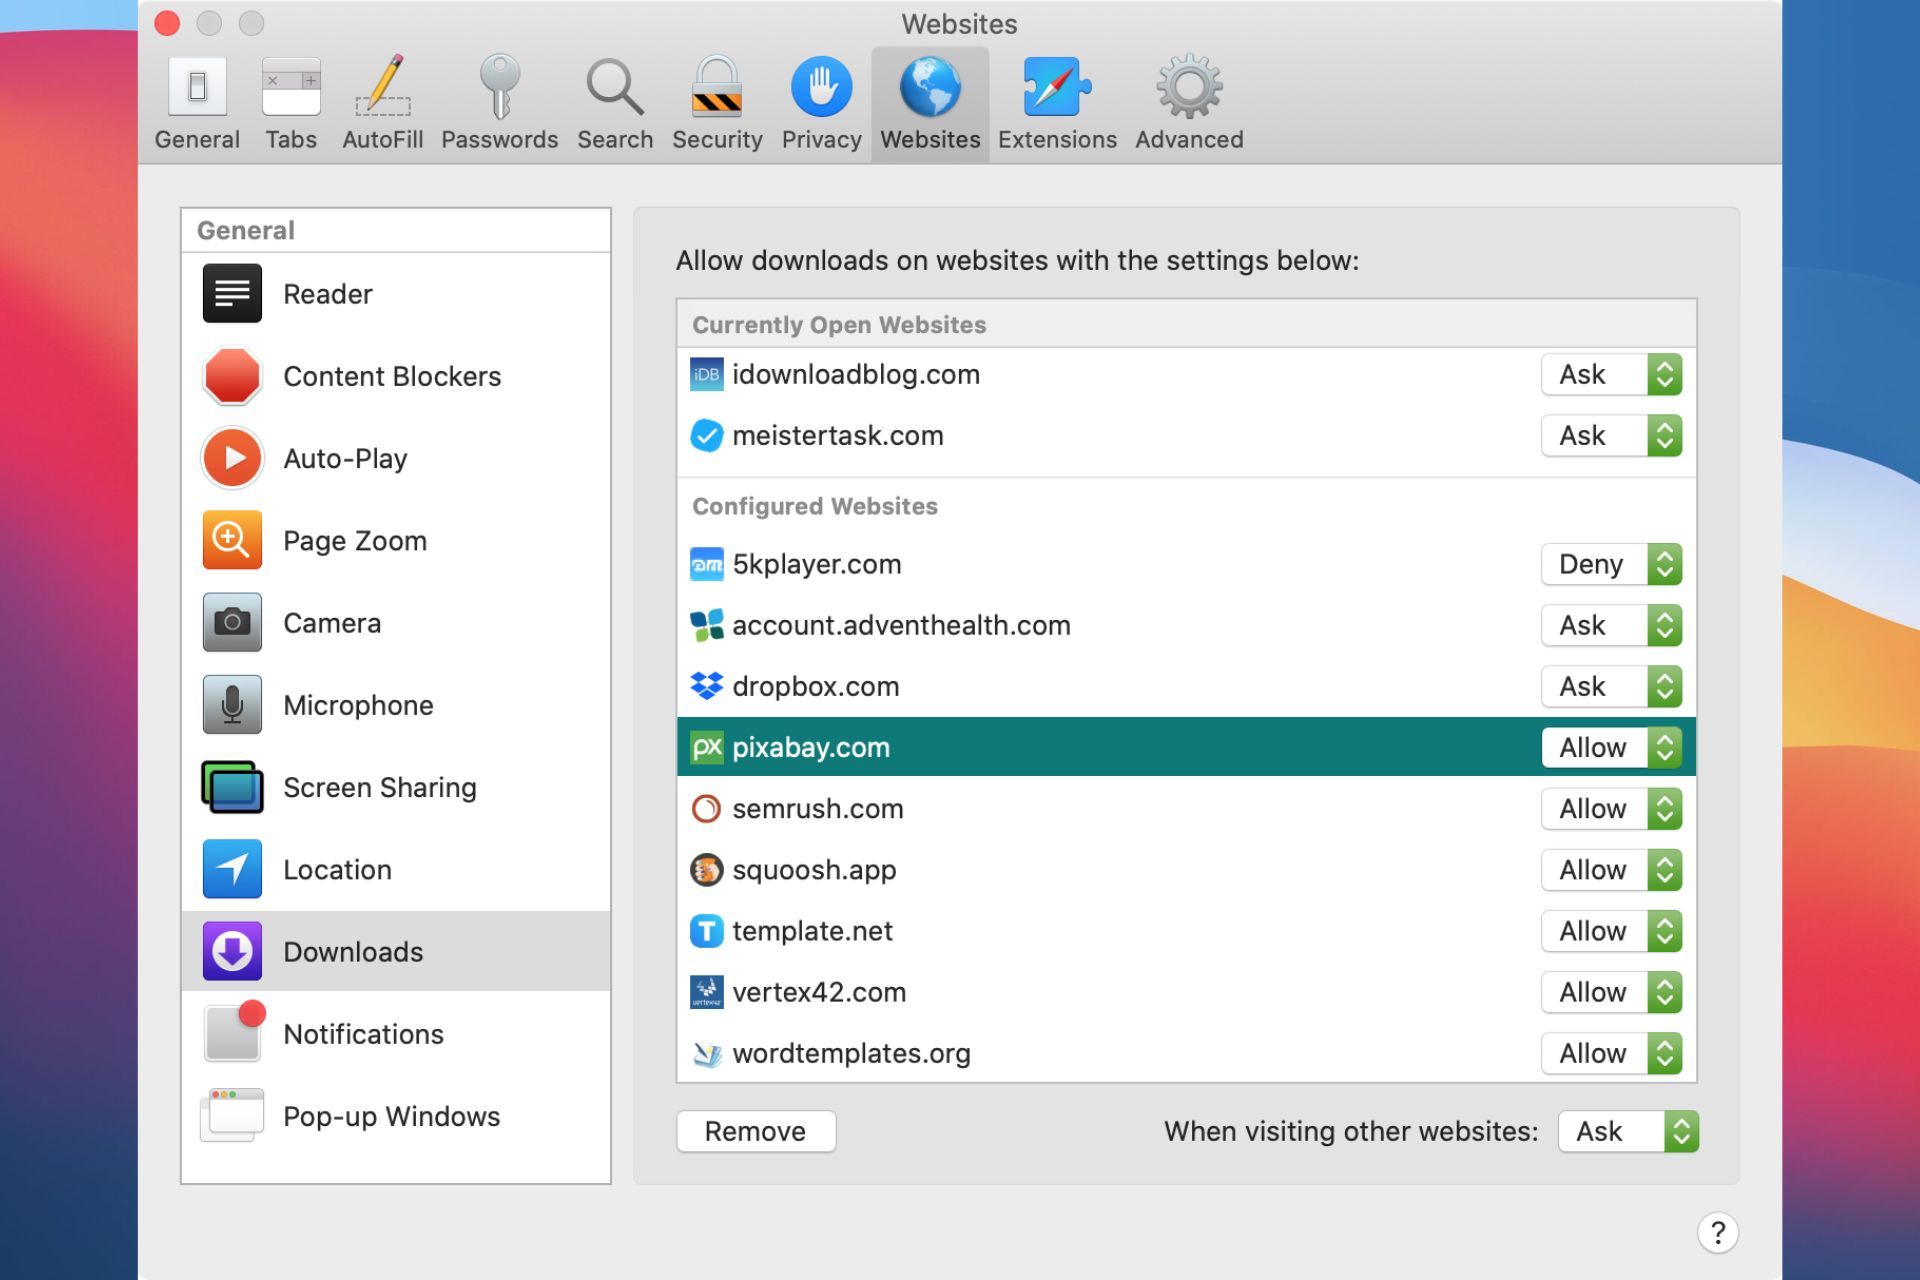
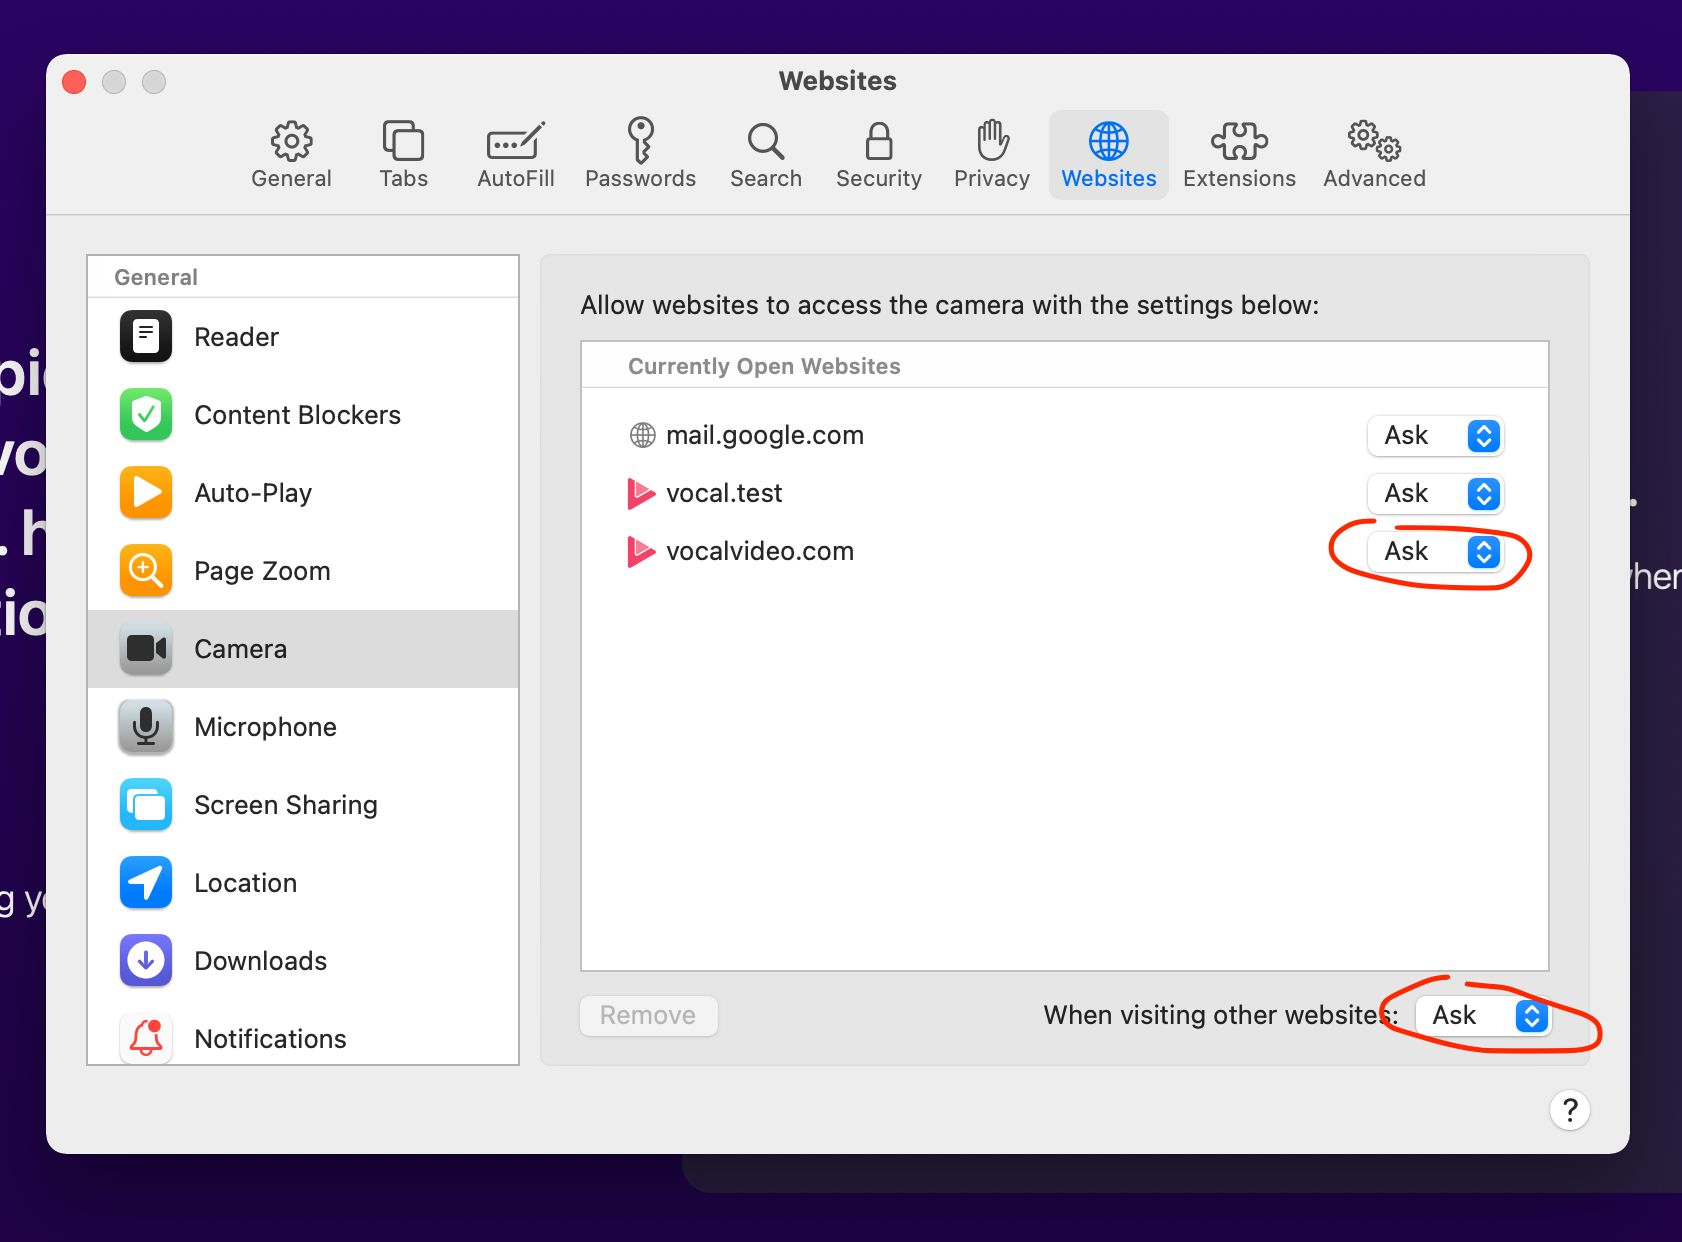
Explore Preferences: Upon opening the Preferences window, you will find a range of tabs at the top, including General, Tabs, Search, and Security, among others. To put a lock on Safari, you will need to navigate to the "Security" tab, which is where you can manage website restrictions and set a passcode to control access to specific websites.
By following these simple steps, you can easily access the Safari Preferences and proceed to the next steps in the process of putting a lock on Safari. Opening the Preferences is the initial stage that sets the foundation for customizing your browsing experience and enhancing the security of your online activities.
With Safari Preferences now accessible, you are ready to move on to the next step in the process, which involves navigating to the Security settings to enable website restrictions and further enhance the security measures within the Safari browser.
Step 2: Go to Security Settings
After accessing the Safari Preferences, the next crucial step in putting a lock on Safari involves navigating to the Security settings. This is where you can enable website restrictions and set a passcode to control access to specific websites, thereby enhancing the security and control over your browsing activities.
To proceed to the Security settings, follow these steps:
-
Navigate to the Security Tab: Within the Safari Preferences window, locate and click on the "Security" tab at the top of the window. This action will direct you to the Security settings, where you can manage various security-related features and customize your browsing experience to align with your preferences.
-
Enable Website Restrictions: Within the Security settings, you will find the option to enable website restrictions. By checking this box, you can initiate the process of restricting access to specific websites. This feature is particularly valuable for controlling the content that can be accessed, especially in environments where internet usage needs to be monitored and regulated, such as in educational or parental settings.
-
Set a Passcode: In the same Security settings section, you will have the opportunity to set a passcode that will serve as the key to unlocking the website restrictions. This passcode ensures that only authorized individuals can make changes to the website restrictions and access the restricted websites. It adds an extra layer of security and control, allowing you to manage the browsing activities effectively.
-
Explore Additional Security Options: While in the Security settings, take the time to explore any additional security options that Safari offers. This may include options to block pop-up windows, enable fraudulent website warnings, and manage website settings related to plugins and extensions. By familiarizing yourself with these security features, you can optimize the browsing experience and safeguard against potential security threats.
By navigating to the Security settings and enabling website restrictions while setting a passcode, you are taking proactive steps to enhance the security and control over your browsing activities. This level of customization empowers you to create a safer and more regulated online environment, whether for personal use or to ensure a secure browsing experience for others using your device. With the Security settings configured, you are now ready to proceed to the next step of customizing the website restrictions and setting specific parameters to align with your browsing preferences.
Step 3: Enable Website Restrictions
Enabling website restrictions within Safari is a pivotal aspect of putting a lock on the browser, as it empowers you to control and regulate access to specific websites. By activating this feature, you can effectively manage the content that can be accessed, providing a safer and more controlled browsing environment. Whether you aim to restrict certain websites for yourself or for others using your device, enabling website restrictions is a valuable tool in customizing the browsing experience.
To enable website restrictions in Safari, follow these steps:
-
Navigate to the Security Tab: Within the Safari Preferences window, locate and click on the "Security" tab at the top of the window. This action will direct you to the Security settings, where you can manage various security-related features and customize your browsing experience to align with your preferences.
-
Enable Website Restrictions: Within the Security settings, you will find the option to enable website restrictions. By checking this box, you initiate the process of restricting access to specific websites. This feature is particularly valuable for controlling the content that can be accessed, especially in environments where internet usage needs to be monitored and regulated, such as in educational or parental settings.
-
Customize Website Restrictions: Once the website restrictions are enabled, you have the flexibility to customize the list of restricted websites. You can add specific URLs to the restricted list, ensuring that access to those websites is limited. This level of customization allows you to tailor the browsing experience according to your preferences, ensuring that only approved websites can be accessed.
-
Implementing Time-Based Restrictions: Safari also offers the option to implement time-based restrictions, allowing you to specify certain time periods during which access to specific websites is restricted. This feature is particularly beneficial for managing internet usage, such as limiting access to certain websites during study or work hours.
By enabling website restrictions within Safari, you gain the ability to curate a safer and more controlled browsing environment. Whether it's for personal use, parental control, or managing internet access in educational settings, this feature provides a valuable tool for regulating online activities. With website restrictions in place, you can ensure that access to specific websites is limited, promoting a secure and focused browsing experience.
Step 4: Set a Passcode
Setting a passcode within Safari is a crucial step in the process of putting a lock on the browser, as it adds an additional layer of security and control over the website restrictions. By establishing a passcode, you ensure that only authorized individuals can make changes to the restricted websites and access the full browsing capabilities. This feature is particularly valuable in scenarios where multiple users have access to the same device, such as in family settings or shared work environments, as it allows the primary user to regulate and monitor the browsing activities effectively.
To set a passcode within Safari, follow these steps:
-
Navigate to the Security Tab: Within the Safari Preferences window, locate and click on the "Security" tab at the top of the window. This action will direct you to the Security settings, where you can manage various security-related features and customize your browsing experience to align with your preferences.
-
Set a Passcode: Within the Security settings section, you will find the option to set a passcode. Click on the "Change Passcode" or "Set Passcode" button to initiate the process of establishing a passcode. You will be prompted to enter and confirm the new passcode, ensuring that it meets the specified criteria for security and reliability.
-
Confirm Passcode: After entering the new passcode, Safari will prompt you to confirm the passcode by re-entering it. This step is essential to ensure that the passcode is accurately recorded and can be used to unlock the website restrictions when necessary.
-
Remember the Passcode: Once the passcode is set and confirmed, it is crucial to remember and securely store the passcode. Since the passcode serves as the key to unlocking the website restrictions, it is essential to keep it confidential and accessible only to authorized individuals who are responsible for managing the browsing activities.
By setting a passcode within Safari, you establish a secure barrier that prevents unauthorized changes to the website restrictions and ensures that access to specific websites is regulated effectively. This feature provides peace of mind and control over the browsing environment, allowing you to manage internet access and content visibility according to your preferences. Whether it's for parental control, shared device management, or personal browsing regulation, the ability to set a passcode within Safari is a valuable tool in creating a safer and more controlled online experience.
Step 5: Customize Website Restrictions
Customizing website restrictions within Safari allows you to tailor the browsing experience according to your specific preferences and requirements. By adding a personalized touch to the website restrictions, you can effectively control the content that can be accessed, ensuring a safer and more regulated browsing environment. Whether you aim to limit access to certain websites for yourself or for others using your device, the ability to customize website restrictions empowers you to curate a browsing experience that aligns with your needs.
To customize website restrictions in Safari, follow these steps:
-
Add Specific URLs: Within the website restrictions settings, you have the flexibility to add specific URLs to the restricted list. This means that you can pinpoint individual websites that you want to restrict access to, providing a granular level of control over the browsing experience. Whether it's social media platforms, entertainment websites, or other content that you wish to limit, adding specific URLs allows you to tailor the restrictions to your preferences.
-
Remove Unnecessary Restrictions: Safari also enables you to remove unnecessary restrictions by editing the list of restricted websites. If there are websites that no longer need to be restricted or if you wish to adjust the access permissions, you can easily remove them from the restricted list. This feature ensures that you have the flexibility to adapt the website restrictions based on evolving needs and preferences.
-
Implement Whitelisting: In addition to restricting specific websites, Safari offers the option to implement whitelisting, which allows you to specify a list of approved websites that can be accessed while restricting all others. This approach is particularly beneficial for creating a focused and controlled browsing environment, as it ensures that only pre-approved websites are accessible, promoting a secure and productive online experience.
-
Review and Refine Restrictions: Regularly reviewing and refining the website restrictions is essential to ensure that the browsing environment remains aligned with your preferences. By periodically assessing the restricted websites and making adjustments as needed, you can maintain a tailored and effective browsing experience that promotes security and control.
Customizing website restrictions within Safari empowers you to create a personalized and secure browsing environment. Whether it's for managing internet access in educational settings, promoting a focused work environment, or ensuring a safer browsing experience for yourself or others, the ability to customize website restrictions provides valuable control over the content that can be accessed. By leveraging these customization options, you can curate a browsing experience that reflects your specific needs and preferences, fostering a secure and regulated online environment.
Conclusion
In conclusion, the process of putting a lock on Safari is a valuable tool for enhancing the security and control over your browsing activities. By following the step-by-step guide outlined in this article, you can effectively customize the website restrictions, set a passcode, and curate a safer and more regulated browsing environment. Whether you seek to limit access to specific websites for yourself, manage internet usage in educational settings, or ensure a secure browsing experience for others using your device, the ability to put a lock on Safari empowers you to tailor the browsing environment according to your preferences.
By opening the Safari Preferences and navigating to the Security settings, you gain access to a range of features that enable you to enable website restrictions and set a passcode. These foundational steps lay the groundwork for customizing the browsing experience and promoting a safer online environment. Enabling website restrictions allows you to control the content that can be accessed, while setting a passcode adds an additional layer of security, ensuring that only authorized individuals can make changes to the website restrictions.
Furthermore, customizing website restrictions within Safari provides a personalized touch to the browsing experience, allowing you to add specific URLs to the restricted list, remove unnecessary restrictions, and implement whitelisting to specify approved websites. This level of customization empowers you to curate a browsing environment that aligns with your specific needs and promotes a secure and focused online experience.
In today's digital age, where internet usage is prevalent across various aspects of life, the ability to put a lock on Safari offers a proactive approach to managing online activities. Whether it's for parental control, shared device management, or personal browsing regulation, the features within Safari enable you to create a secure and regulated browsing environment that reflects your preferences and priorities.
By implementing the steps outlined in this guide, you can take control of your browsing experience and ensure a safer and more focused online environment. The ability to put a lock on Safari not only enhances security but also promotes productivity and peace of mind, empowering you to navigate the digital landscape with confidence and control.