Introduction
When it comes to browsing the web, Google Chrome stands out as one of the most popular and versatile web browsers available. Its user-friendly interface and extensive range of features make it a top choice for millions of users worldwide. One such feature that Chrome offers is the ability to access and utilize your device's camera for various purposes, such as video calls, online meetings, and live streaming. However, ensuring that Chrome has the necessary permissions to access your camera is crucial for seamless functionality.
In this comprehensive guide, we will delve into the intricacies of granting Chrome access to your camera. Whether you're a seasoned Chrome user or just getting started with this powerful browser, understanding how to manage camera access can significantly enhance your browsing experience. We will explore the step-by-step process of checking and granting camera access in Chrome, as well as troubleshooting common issues that may arise along the way.
By the end of this guide, you will have a clear understanding of how to navigate Chrome's settings to manage camera permissions effectively. Whether you're eager to engage in video calls with friends and family, participate in virtual meetings, or simply explore the myriad of camera-enabled web applications, you'll be well-equipped to make the most of Chrome's camera access capabilities.
So, let's embark on this journey to unlock the full potential of your browsing experience by ensuring that Chrome has the necessary access to your device's camera. Whether you're using a desktop, laptop, or mobile device, the process of managing camera access in Chrome is designed to be straightforward and user-friendly. Let's dive in and discover how to give Chrome the access it needs to harness the power of your camera for a seamless and immersive browsing experience.
Checking Camera Access in Chrome Settings
To ensure that Chrome has the necessary permissions to access your camera, it's essential to navigate through the browser's settings and verify the current camera access status. Here's a step-by-step guide to checking camera access in Chrome settings:
-
Open Chrome Settings: Begin by launching the Chrome browser on your device. In the top-right corner of the browser window, click on the three-dot menu icon to access the Chrome menu. From the dropdown menu, select "Settings" to proceed to the browser's settings page.
-
Navigate to Privacy and Security: Within the Settings menu, locate and click on the "Privacy and security" option in the left-hand sidebar. This will expand a list of privacy and security-related settings for Chrome.
-
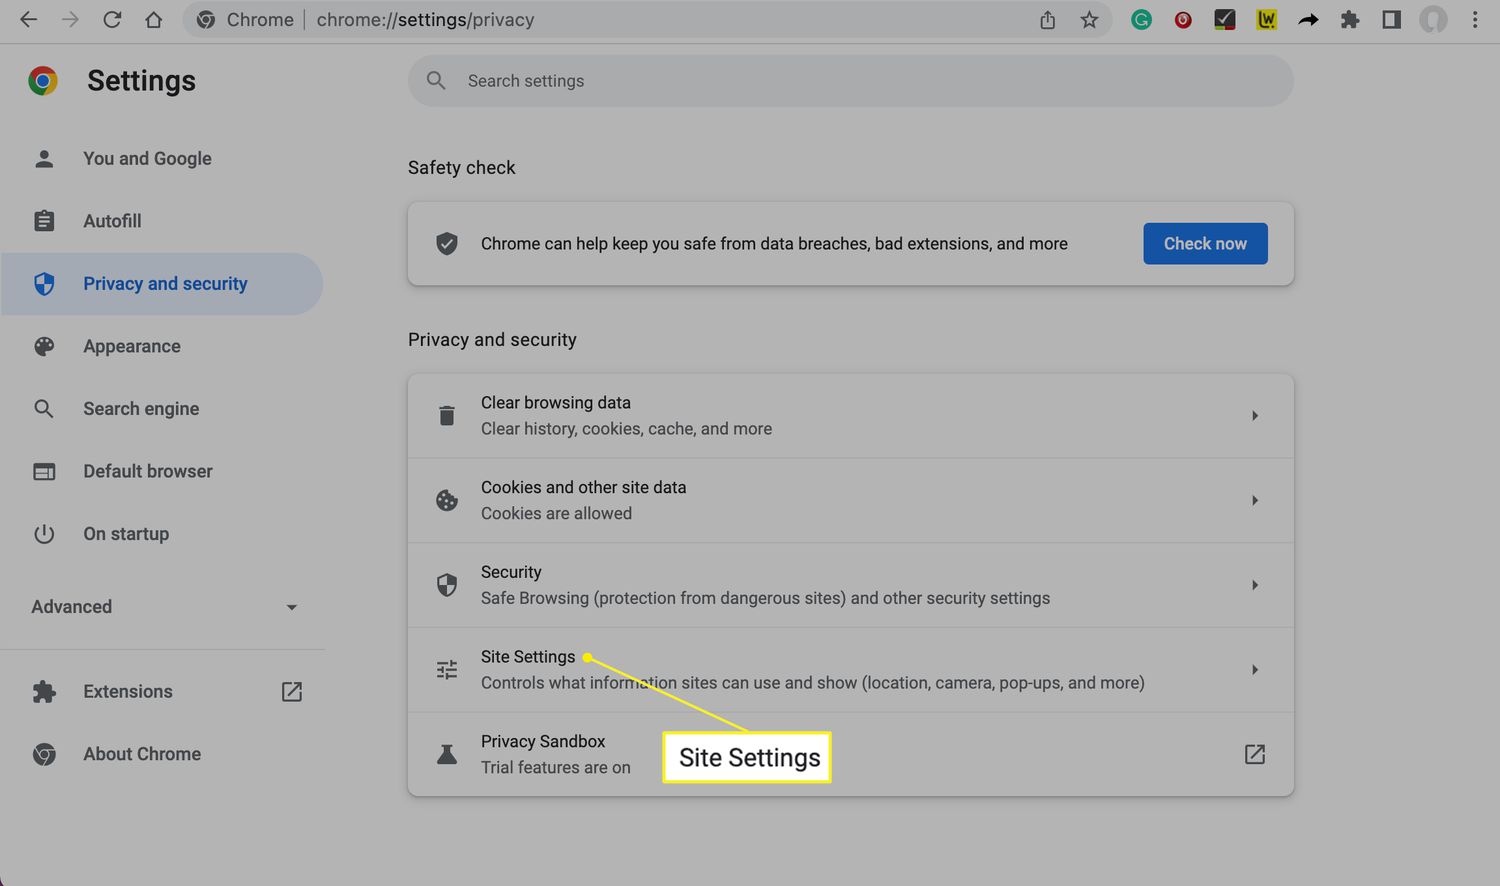
Access Site Settings: Under the "Privacy and security" section, select "Site settings" to delve into the specific permissions granted to websites by Chrome. This includes camera access, among other permissions such as location, microphone, and notifications.
-
Check Camera Permissions: Within the Site settings, locate and click on the "Camera" option to view the current camera access permissions. Here, you can review which websites have been granted access to your camera and manage these permissions accordingly.
-
Verify Camera Access Status: Upon selecting the "Camera" option, you will be presented with a list of websites that have requested or been granted camera access. You can review the status of camera permissions for each website and make adjustments as needed.
By following these steps, you can effectively check the camera access status in Chrome settings and gain insight into which websites have been granted access to your camera. This level of transparency and control empowers you to manage camera permissions in a manner that aligns with your privacy and security preferences.
With a clear understanding of how to check camera access in Chrome settings, you are now equipped to navigate the browser's settings with confidence and ensure that your camera access is managed in a manner that suits your browsing needs and preferences. This foundational knowledge sets the stage for seamlessly managing camera permissions and harnessing the full potential of Chrome's camera access capabilities.
Granting Camera Access to Chrome
Granting camera access to Chrome is a straightforward process that empowers you to utilize your device's camera for a wide range of web-based activities. Whether you're engaging in video calls, participating in virtual meetings, or exploring interactive web applications, ensuring that Chrome has the necessary permissions to access your camera is essential for a seamless and immersive browsing experience.
To grant camera access to Chrome, follow these simple steps:
-
Access Chrome Settings: Begin by launching the Chrome browser on your device. In the top-right corner of the browser window, click on the three-dot menu icon to access the Chrome menu. From the dropdown menu, select "Settings" to proceed to the browser's settings page.
-
Navigate to Privacy and Security: Within the Settings menu, locate and click on the "Privacy and security" option in the left-hand sidebar. This will expand a list of privacy and security-related settings for Chrome.
-
Access Site Settings: Under the "Privacy and security" section, select "Site settings" to delve into the specific permissions granted to websites by Chrome. This includes camera access, among other permissions such as location, microphone, and notifications.
-
Grant Camera Access: Within the Site settings, locate and click on the "Camera" option to manage camera access permissions. Here, you can review the list of websites that have requested or been granted camera access. To grant camera access to a specific website, click on the "Add" button next to the "Allow" section and enter the website's URL. This action will grant the website permission to access your camera when needed.
By following these steps, you can effectively grant camera access to Chrome, allowing you to harness the full potential of your device's camera for various web-based activities. This level of control and transparency empowers you to manage camera permissions in a manner that aligns with your browsing preferences and privacy considerations.
With camera access granted to Chrome, you can seamlessly engage in video calls, participate in virtual events, and explore camera-enabled web applications with confidence, knowing that your browsing experience is enriched by the seamless integration of your device's camera capabilities.
Troubleshooting Camera Access Issues in Chrome
Encountering camera access issues in Chrome can be a frustrating experience, especially when you're eager to engage in video calls, virtual meetings, or other camera-dependent activities. However, understanding how to troubleshoot these issues empowers you to overcome potential obstacles and ensure seamless camera functionality within the browser.
Here are some effective troubleshooting steps to address camera access issues in Chrome:
-
Check Camera Permissions: Begin by revisiting the camera permissions within Chrome settings. Navigate to the "Site settings" section and verify that the specific website or application requiring camera access has been granted the necessary permissions. If the website is not listed or lacks the required permissions, you can manually add it to the list of allowed sites.
-
Review Browser Extensions: Certain browser extensions or add-ons may interfere with camera functionality in Chrome. Disable any recently installed extensions and test the camera access again. If the issue is resolved after disabling a specific extension, consider removing or updating it to prevent future conflicts.
-
Clear Browsing Data: Accumulated browsing data, such as cookies and cached images, can impact the performance of web features, including camera access. Clearing your browsing data in Chrome can help resolve potential conflicts and improve overall browser functionality. Navigate to the Chrome settings, access the "Privacy and security" section, and select "Clear browsing data" to initiate the process.
-
Update Chrome: Ensuring that you are using the latest version of Chrome is essential for optimal performance and compatibility with camera-related features. Check for available updates by accessing the Chrome settings and navigating to the "About Chrome" section. If an update is available, follow the prompts to install it and enhance the browser's functionality.
-
Check Device Settings: If the camera access issue persists, it's advisable to review the device's camera settings and permissions. Ensure that the camera is properly connected and recognized by the operating system. Additionally, verify that other applications can access the camera without any issues, which can help isolate the problem to Chrome specifically.
By following these troubleshooting steps, you can effectively address camera access issues in Chrome and restore seamless functionality for camera-dependent activities. These proactive measures empower you to navigate potential obstacles with confidence, ensuring that your browsing experience remains enriched by the seamless integration of your device's camera capabilities within the Chrome browser.