Introduction
When it comes to browsing the web, privacy and security are paramount. Whether you're researching a surprise gift for a loved one, planning a surprise vacation, or simply exploring personal interests, you may not want your browsing history to be visible to others who use the same computer. Fortunately, Firefox, one of the most popular web browsers, offers a straightforward way to erase your browsing history and maintain your privacy.
In this guide, we'll walk you through the steps to erase your browsing history on Firefox. Whether you're using a desktop computer, laptop, or mobile device, the process is relatively similar, making it easy to maintain your privacy across different platforms. By following these steps, you can ensure that your browsing history remains your own private affair, free from prying eyes.
So, if you're ready to take control of your browsing history and keep your online activities private, let's dive into the simple yet effective process of erasing your history on Firefox. Whether you're a seasoned Firefox user or new to the browser, you'll find that managing your browsing history is a breeze with the right guidance. Let's get started!
Step 1: Open Firefox
To begin the process of erasing your browsing history on Firefox, the first step is to open the Firefox web browser on your device. Whether you're using a Windows PC, Mac, or mobile device, launching Firefox is the initial action that sets the stage for managing your browsing history.
If you're using a desktop computer or laptop, you can typically find the Firefox icon on your desktop or in the taskbar. Simply double-click on the icon to open the browser. Alternatively, you can access Firefox from the Start menu on a Windows PC or the Applications folder on a Mac. Once you've located the Firefox icon, a single click will launch the browser, ready for you to proceed with managing your browsing history.
For mobile devices such as smartphones and tablets, the process of opening Firefox may vary slightly depending on the operating system. On Android devices, you can find the Firefox app in your list of installed applications or on the home screen. Tapping the Firefox icon will open the browser, allowing you to move on to the next steps. Similarly, on iOS devices, you can locate the Firefox app on the home screen or in the app library, and tapping the icon will launch the browser.
Once Firefox is open and ready for use, you're one step closer to taking control of your browsing history. With the browser at your fingertips, you can proceed to the next steps to clear your history and ensure your online activities remain private.
By following these simple instructions to open Firefox, you've set the stage for managing your browsing history with ease. With the browser up and running, you're ready to move on to the next steps and take charge of your online privacy.
Step 2: Access History
Now that Firefox is open and ready for use, the next step is to access your browsing history within the browser. Firefox provides a convenient way to view your browsing history, allowing you to review the sites you've visited and take necessary actions to manage this information.
To access your browsing history in Firefox, follow these simple steps:
-
Open the Menu: Look for the three horizontal lines, also known as the "hamburger" icon, located in the top-right corner of the Firefox window. Clicking on this icon will open the main menu, providing access to various browser features and settings.
-
Select History: Within the main menu, you'll find the "History" option. Click on "History" to reveal a dropdown menu with additional history-related options.
-
Choose Show All History: From the history dropdown menu, select "Show All History." This action will open a new tab within the Firefox browser, displaying your complete browsing history in a user-friendly interface.
Upon accessing your browsing history, you'll be presented with a chronological list of websites you've visited, organized by date and time. This comprehensive view allows you to review your browsing activity and identify specific items you may want to remove from your history.
By following these steps to access your browsing history in Firefox, you've gained insight into your past online activities and are now prepared to proceed with managing this information. With your browsing history readily available, you're ready to move on to the next steps and take control of your privacy within the Firefox browser.
Accessing your browsing history is the crucial first step in the process of managing your online activities. With this information at your fingertips, you're well-equipped to proceed with the subsequent steps and ensure that your browsing history remains private and secure.
Step 3: Clear Browsing History
Once you've accessed your browsing history in Firefox, the next essential step is to clear this information to maintain your privacy and keep your online activities confidential. Clearing your browsing history ensures that the websites you've visited are no longer visible within the browser, offering a clean slate for your future browsing sessions.
To clear your browsing history in Firefox, follow these straightforward steps:
-
Select Items to Remove: Within the browsing history tab, review the list of websites you've visited. Identify the specific items or time range you want to remove from your history. Firefox provides the flexibility to select individual entries or clear your entire browsing history, depending on your preferences.
-
Click on the Context Menu: For each entry in your browsing history, right-click (or press and hold, on touch-enabled devices) to open the context menu. This menu offers various options for managing individual history items, including the ability to delete specific entries.
-
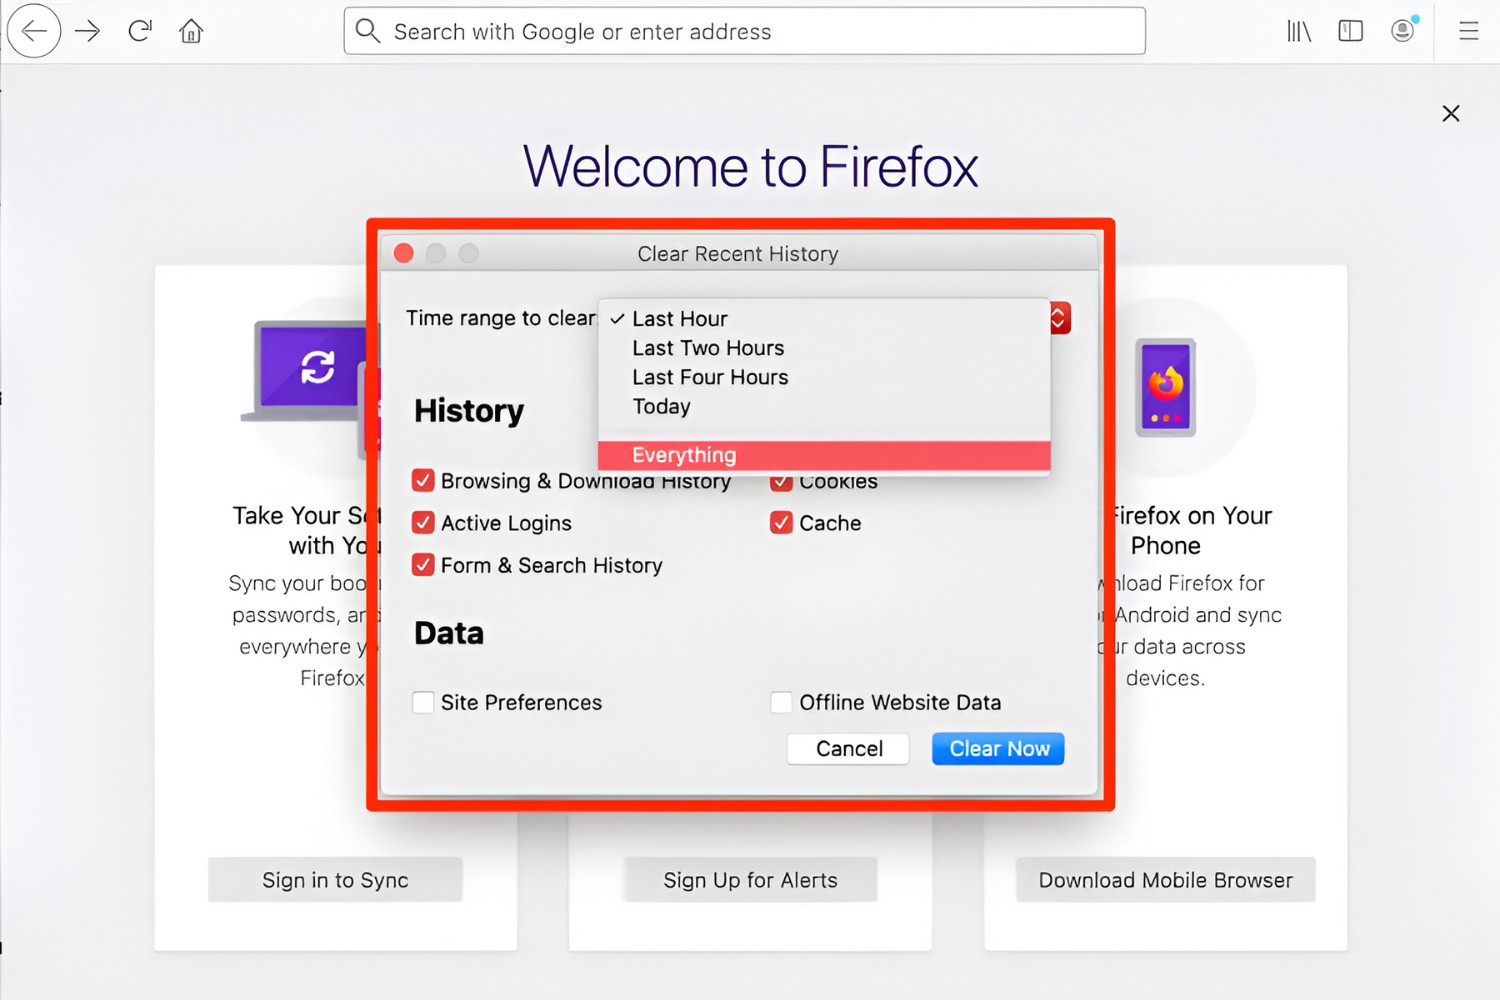
Choose Delete: From the context menu, select the "Delete" option to remove the chosen entry from your browsing history. Alternatively, if you prefer to clear your entire browsing history, you can choose the "Clear Recent History" option from the main menu, allowing you to specify the time range for which you want to clear your history.
-
Confirm Deletion: After selecting the "Delete" option, Firefox will prompt you to confirm the deletion of the chosen history item. Confirm the action to remove the selected entry from your browsing history. If you've opted to clear your entire history, Firefox will present a confirmation dialog to ensure that you want to proceed with clearing your browsing history.
By following these steps, you can effectively clear your browsing history in Firefox, ensuring that your online activities remain private and secure. Whether you're removing specific entries or clearing your entire history, Firefox provides a user-friendly interface that empowers you to take control of your browsing history with ease.
Clearing your browsing history is a proactive step towards safeguarding your privacy while using the Firefox browser. By regularly managing your browsing history, you can maintain a sense of confidentiality and control over your online activities, ensuring that your browsing habits remain your own private affair.
Step 4: Customize History Settings
Customizing history settings in Firefox allows you to tailor your browsing experience and privacy preferences to align with your specific needs. By adjusting these settings, you can exert greater control over how Firefox manages your browsing history, cookies, and other site data. This level of customization empowers you to enhance your privacy and security while using the browser, ensuring that your online activities remain confidential and personalized to your preferences.
To customize your history settings in Firefox, follow these steps:
-
Access Privacy & Security Settings: Start by clicking on the three horizontal lines in the top-right corner of the Firefox window to open the main menu. From the menu, select "Preferences" (on Mac) or "Options" (on Windows). This action will open the Firefox settings interface, allowing you to access various browser customization options.
-
Navigate to Privacy & Security: Within the settings interface, locate and click on the "Privacy & Security" tab. This section houses a range of privacy-related settings that enable you to manage your browsing history, cookies, and other site data.
-
Customize History Settings: Under the "History" section within the Privacy & Security tab, you'll find options to customize how Firefox handles your browsing history. Here, you can choose to clear your history upon exiting the browser, adjust the number of days Firefox retains your history, and enable or disable the browsing history feature altogether.
-
Manage Cookies and Site Data: In addition to history settings, the Privacy & Security tab allows you to manage cookies and site data. You can choose to block all cookies, block third-party cookies, or create exceptions for specific websites. This level of customization empowers you to control how websites track your online behavior and store data on your device.
-
Enhance Tracking Protection: Firefox offers enhanced tracking protection to safeguard your privacy while browsing. Within the Privacy & Security tab, you can customize the level of tracking protection, allowing you to block known trackers and control how Firefox handles your online privacy.
By customizing your history settings in Firefox, you can tailor your browsing experience to align with your privacy preferences and ensure that your online activities remain private and secure. This level of customization empowers you to take control of your browsing history, cookies, and site data, creating a personalized and secure environment for your online activities.
Conclusion
In conclusion, managing your browsing history on Firefox is a fundamental aspect of maintaining your online privacy and security. By following the simple yet effective steps outlined in this guide, you can take control of your browsing history and ensure that your online activities remain confidential and secure.
From opening Firefox and accessing your browsing history to clearing specific entries or your entire history, the process of managing your browsing history is straightforward and user-friendly. With the ability to customize history settings and privacy preferences, Firefox empowers you to tailor your browsing experience to align with your specific needs, enhancing your online privacy and security.
By regularly clearing your browsing history and customizing history settings, you can maintain a sense of confidentiality and control over your online activities. This proactive approach allows you to safeguard your privacy while using the Firefox browser, ensuring that your browsing habits remain your own private affair.
Furthermore, the ability to manage cookies and site data within Firefox's privacy and security settings provides an additional layer of control over your online privacy. By adjusting these settings, you can dictate how websites track your online behavior and store data on your device, creating a personalized and secure environment for your browsing activities.
In today's digital age, where online privacy and security are of utmost importance, taking charge of your browsing history is a proactive step towards safeguarding your personal information and maintaining confidentiality. Whether you're conducting research, shopping online, or simply exploring your interests, the ability to manage your browsing history on Firefox empowers you to maintain control over your online activities and ensure that your privacy remains intact.
By implementing the steps outlined in this guide and customizing your history settings within Firefox, you can navigate the web with confidence, knowing that your online activities are kept private and secure. With these tools at your disposal, you can enjoy a personalized browsing experience while maintaining the peace of mind that comes with knowing your online privacy is in your hands.