Introduction
Deactivating your Facebook account on Safari can be a prudent decision if you're looking to take a break from social media or simply reassess your online presence. By deactivating your account, you can temporarily suspend your profile, making it invisible to others while retaining the option to reactivate it later. This process can be easily accomplished through the Safari browser on your desktop or mobile device. Whether you're seeking a digital detox, a hiatus from social interactions, or a break from the constant stream of information, deactivating your Facebook account via Safari provides a straightforward solution.
In the following steps, we will guide you through the process of deactivating your Facebook account on Safari, ensuring that you can navigate this procedure with ease. Whether you're a seasoned Safari user or new to the platform, these steps are designed to be accessible and user-friendly, allowing you to take control of your online presence in just a few simple clicks. Let's embark on this journey to temporarily deactivate your Facebook account, providing you with the freedom to step back from the digital realm and focus on other aspects of your life.
Step 1: Open Safari browser
To begin the process of deactivating your Facebook account on Safari, the first step is to open the Safari browser on your desktop or mobile device. Safari is a popular web browser known for its sleek interface, robust performance, and seamless integration with Apple devices. Whether you're using a Mac, iPhone, iPad, or any other compatible device, launching Safari is the initial step towards gaining access to your Facebook account and initiating the deactivation process.
If you're using a Mac, you can easily locate the Safari browser by navigating to the Applications folder or using the Spotlight search feature. Once located, simply click on the Safari icon to launch the browser. On the other hand, if you're using an iPhone or iPad, you can find the Safari app on your home screen or within the app library. Tap on the Safari icon to open the browser and proceed with the deactivation process.
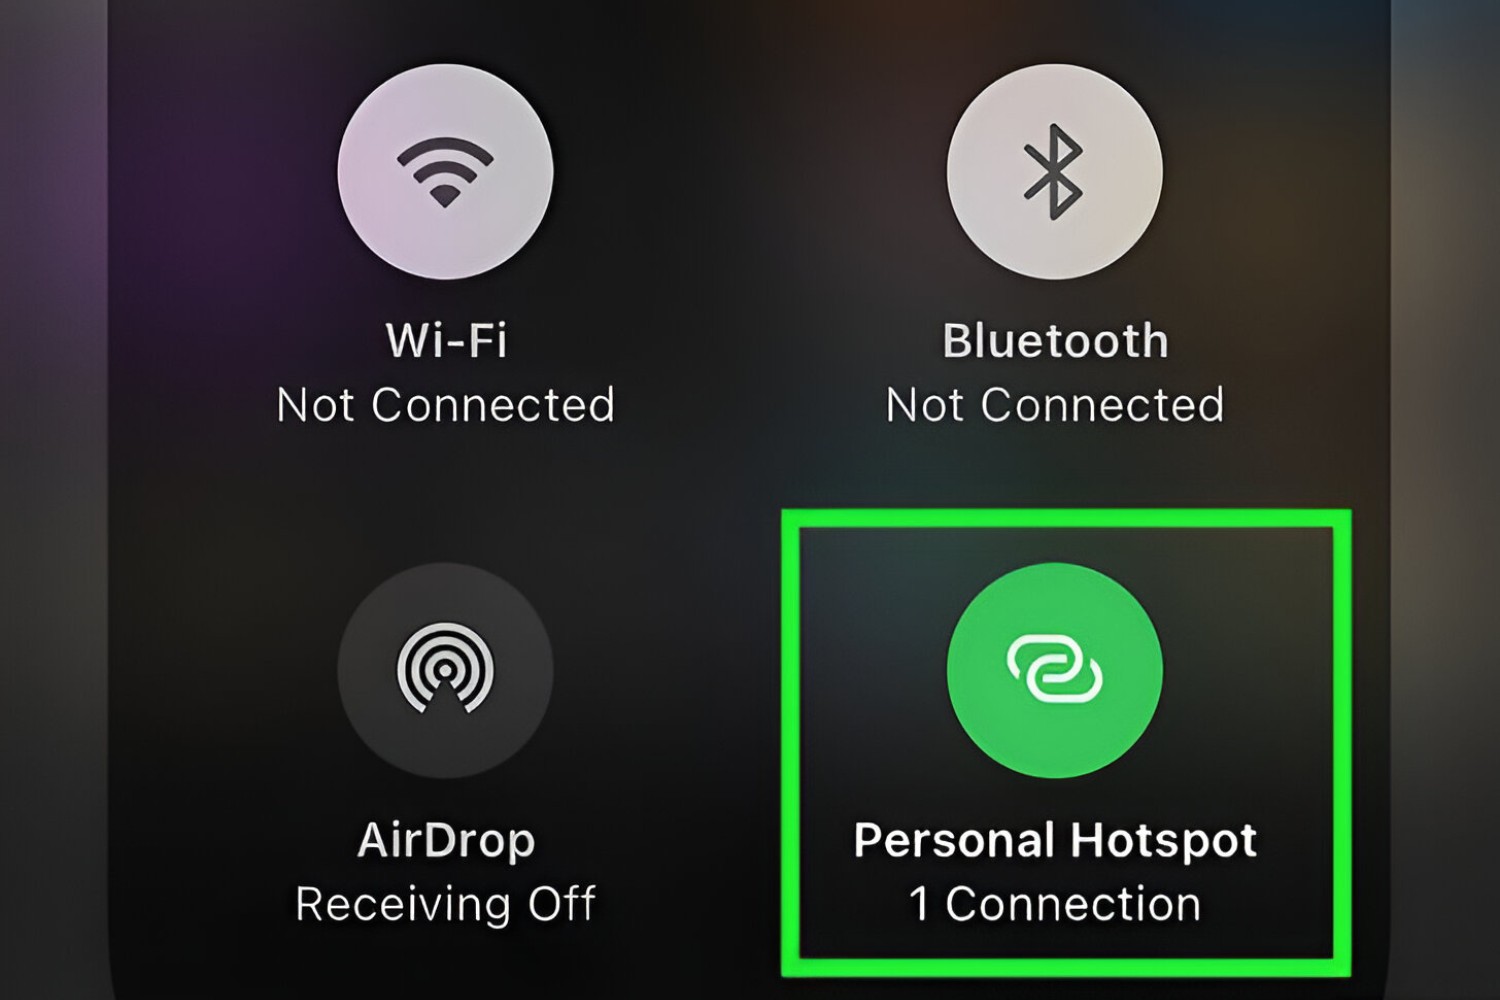
Upon opening Safari, ensure that you have a stable internet connection to access the Facebook website. Whether you're connected to a Wi-Fi network or using cellular data, a reliable internet connection is essential for a smooth and uninterrupted experience. Once Safari is launched and you're connected to the internet, you're ready to move on to the next step of logging in to your Facebook account.
By following these simple instructions, you can seamlessly open the Safari browser and prepare to navigate to the Facebook website, setting the stage for the subsequent steps in the deactivation process. With Safari at your fingertips, you're one step closer to taking control of your online presence and embarking on the journey to temporarily deactivate your Facebook account.
Step 2: Log in to your Facebook account
After successfully launching the Safari browser, the next pivotal step in deactivating your Facebook account is to log in to your account. This process ensures that you have access to the necessary settings and options required to initiate the deactivation procedure.
To log in to your Facebook account via Safari, follow these straightforward steps:
-
Navigate to the Facebook website: In the address bar at the top of the Safari browser, type in "www.facebook.com" and press Enter. This action will direct you to the official Facebook website, where you will be prompted to enter your login credentials.
-
Enter your login details: On the Facebook homepage, you will encounter the login fields, typically consisting of two input boxes for your email address or phone number and your password. Carefully enter the email address or phone number associated with your Facebook account in the first field. Then, input your account password in the second field. Take your time to ensure the accuracy of the information entered, as any discrepancies may hinder the login process.
-
Click on the "Log In" button: Once you have entered your login credentials, click on the "Log In" button located below the input fields. This action will initiate the login process, allowing Facebook to authenticate your credentials and grant you access to your account.
-
Complete any additional security checks: Depending on your account settings and Facebook's security protocols, you may be prompted to complete additional security checks, such as entering a verification code sent to your registered email or phone number. Follow the on-screen instructions to fulfill these requirements and proceed with the login process.
Upon successfully completing these steps, you will be logged in to your Facebook account via the Safari browser, gaining access to your profile, news feed, and account settings. This pivotal step sets the stage for the subsequent actions required to deactivate your Facebook account, empowering you to take control of your online presence and make informed decisions about your social media usage.
By carefully navigating through the login process, you can ensure that you have the necessary access to your Facebook account, paving the way for the upcoming steps in the deactivation journey. With your Facebook account successfully accessed through Safari, you're now prepared to proceed to the next phase of the deactivation process, bringing you closer to the temporary suspension of your profile and the freedom to step back from the digital realm.
Step 3: Go to Facebook settings
Once you have successfully logged in to your Facebook account via the Safari browser, the next crucial step in the process of deactivating your account is to navigate to the Facebook settings. This step provides access to the specific controls and options required to initiate the deactivation procedure, allowing you to tailor the settings according to your preferences.
To access the Facebook settings on Safari, follow these simple instructions:
-
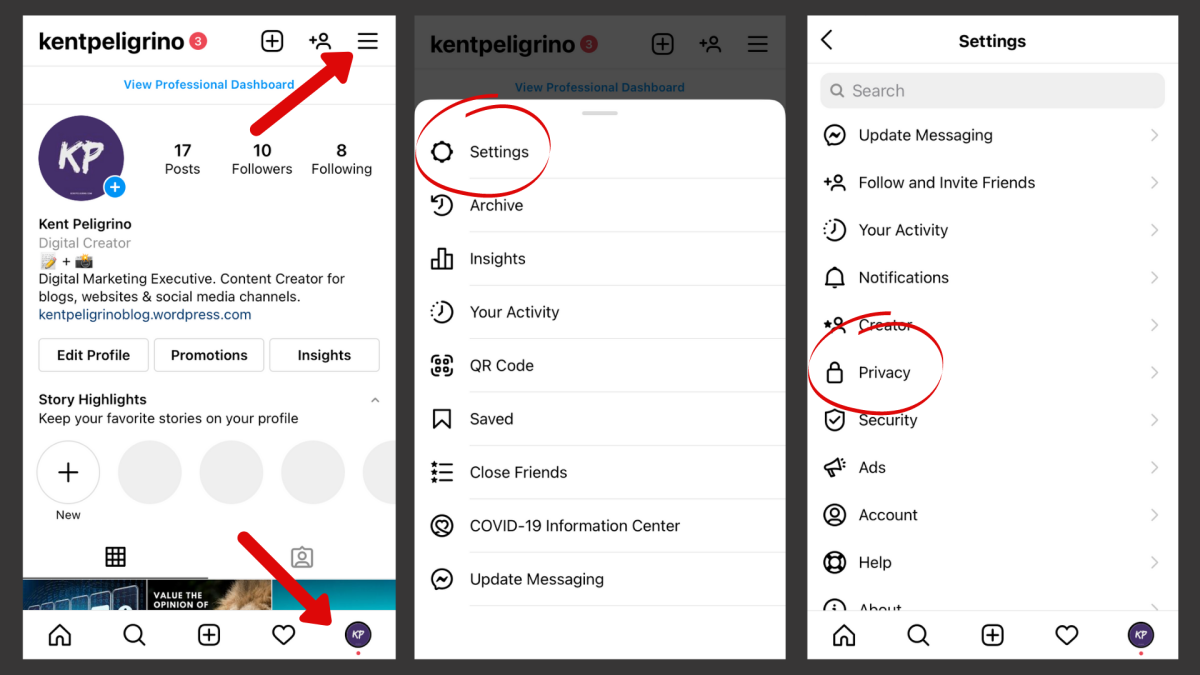
Locate the Settings Menu: After logging in to your Facebook account, look for the settings menu, typically represented by a small downward-facing arrow or three horizontal lines located at the top-right corner of the Facebook homepage. Click on this icon to reveal a dropdown menu containing various options and settings.
-
Navigate to Settings & Privacy: Within the dropdown menu, you will find the "Settings & Privacy" section, which serves as a gateway to a range of account customization and privacy options. Click on "Settings & Privacy" to unveil a submenu with additional choices.
-
Access General Account Settings: From the "Settings & Privacy" submenu, select "Settings" to access the general account settings. This section encompasses a wide array of controls related to your account, privacy, security, and more, providing you with the flexibility to manage your Facebook experience according to your preferences.
-
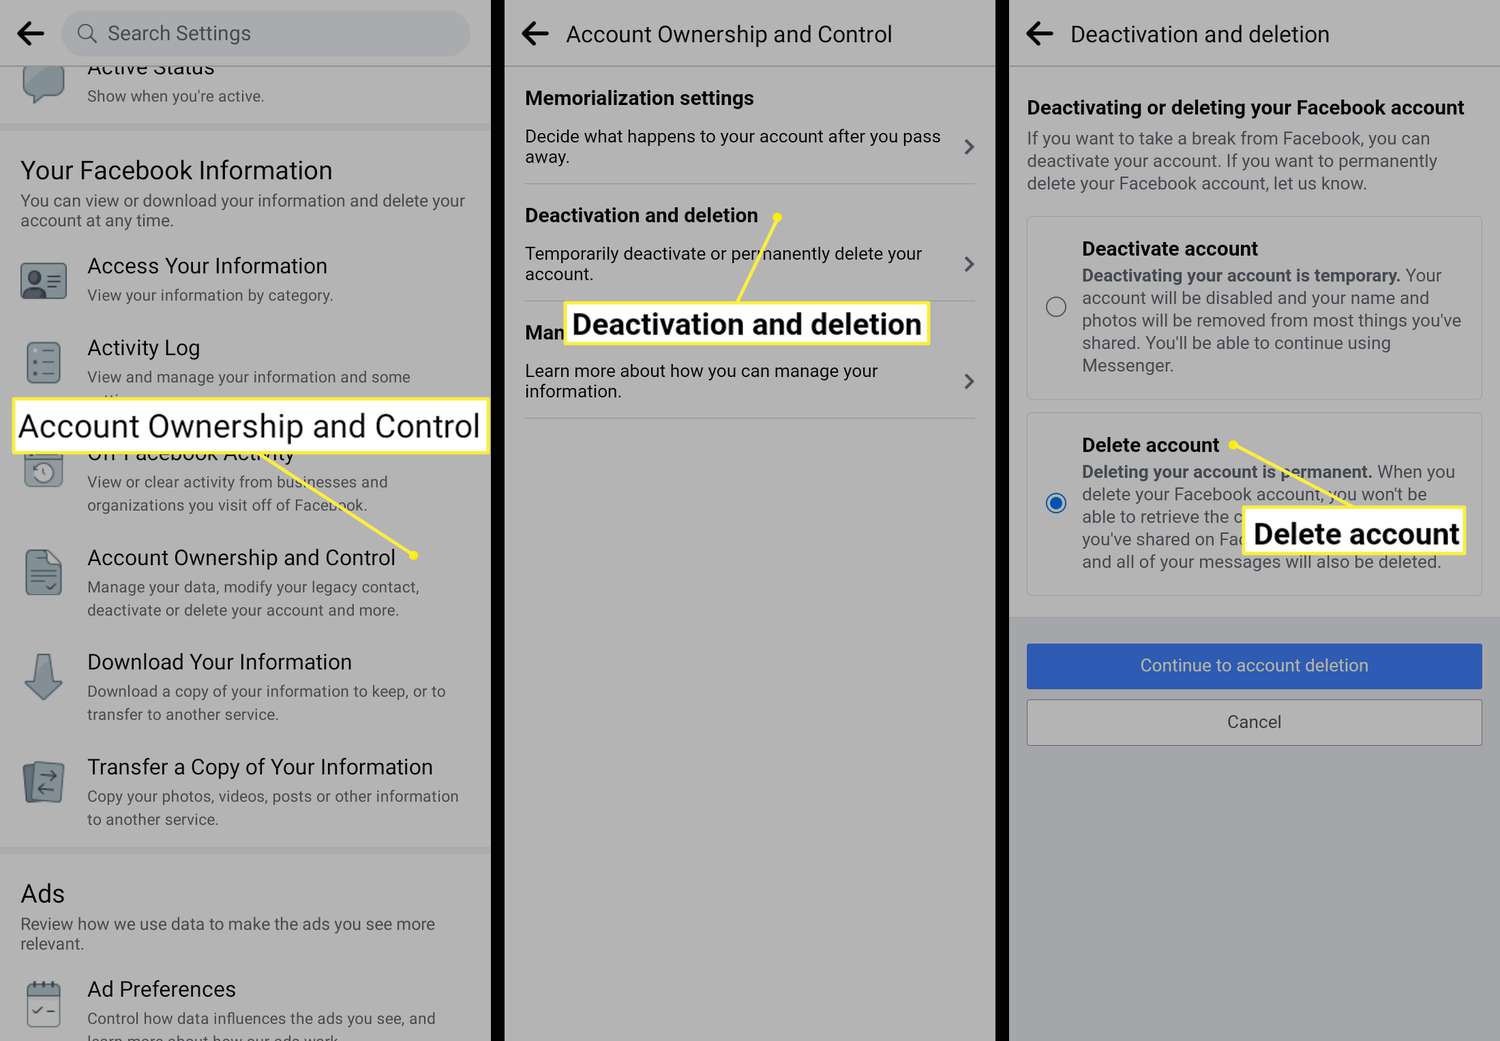
Explore Deactivation and Deletion: Within the general account settings, you will find the "Your Facebook Information" category, which includes options for managing your information on Facebook. Click on "Your Facebook Information" to explore the available choices, including the ability to deactivate or delete your account.
By following these steps, you can seamlessly navigate to the Facebook settings on Safari, gaining access to the essential controls and options necessary to proceed with the deactivation process. This pivotal stage empowers you to tailor your account settings in alignment with your intentions, paving the way for the subsequent steps required to deactivate your Facebook account and take a temporary break from the platform.
With the Facebook settings readily accessible through Safari, you are now poised to advance to the next phase of the deactivation process, bringing you closer to the temporary suspension of your profile and the freedom to step back from the digital realm.
Step 4: Deactivate your account
After successfully navigating to the Facebook settings on Safari, you are now ready to embark on the pivotal step of deactivating your account. Deactivating your Facebook account is a deliberate action that temporarily suspends your profile, rendering it invisible to other users while retaining your data for potential reactivation in the future. This process allows you to take a break from the platform without permanently deleting your account, providing the flexibility to step back from social interactions and the digital sphere.
To deactivate your Facebook account via Safari, follow these essential steps:
-
Initiate the Deactivation Process: Within the Facebook settings, locate the option for deactivating your account. This choice is typically found within the "Your Facebook Information" section, allowing you to exercise control over the status of your account. Click on the "Deactivation and Deletion" category to access the deactivation option.
-
Select Deactivate Account: Upon accessing the deactivation settings, you will be presented with the option to deactivate your account. Click on this choice to initiate the deactivation process. Facebook may provide additional information about the implications of deactivating your account, offering insights into the temporary nature of this action and its impact on your profile and interactions.
-
Provide a Reason and Confirm: As part of the deactivation process, Facebook may prompt you to provide a reason for deactivating your account. This step is designed to gather feedback and understand the motivations behind your decision. Select a reason that aligns with your intentions, whether it's a desire for a temporary break, privacy concerns, or other considerations. After providing a reason, proceed to confirm the deactivation of your account.
-
Enter Your Password: To finalize the deactivation process, Facebook may require you to enter your account password as a security measure. This step ensures that only authorized users can initiate changes to their account status, adding an extra layer of protection to the deactivation procedure. Carefully input your account password to confirm the deactivation of your Facebook profile.
By following these steps, you can seamlessly deactivate your Facebook account via Safari, empowering you to take a temporary hiatus from the platform while retaining the option to reactivate your profile in the future. This deliberate action provides you with the freedom to step back from social interactions, recalibrate your online presence, and focus on other aspects of your life, all within a few simple clicks on Safari.
With your Facebook account successfully deactivated, you have taken a proactive step towards managing your digital well-being and reclaiming control over your online interactions. This process underscores the flexibility and user-centric approach offered by Facebook, allowing individuals to make informed decisions about their social media usage and the visibility of their profiles.
Step 5: Confirm deactivation
After initiating the deactivation process of your Facebook account on Safari, the final step involves confirming the deactivation, ensuring that your account is temporarily suspended and rendered invisible to other users. This pivotal stage serves as the definitive action that solidifies your decision to take a break from the platform, providing you with the assurance that your profile is no longer accessible to others while retaining your data for potential reactivation in the future.
Upon selecting the option to deactivate your account and providing a reason for your decision, Facebook may prompt you to confirm the deactivation. This confirmation step is designed to reaffirm your choice and ensure that the deactivation process is deliberate and intentional. To confirm the deactivation of your account, you may encounter the following steps:
-
Review the Deactivation Information: Before confirming the deactivation, Facebook may present you with additional information regarding the implications of this action. This may include details about the visibility of your profile, the retention of your data, and the impact on your interactions with other users. Take a moment to review this information, ensuring that you are fully informed about the temporary suspension of your account.
-
Acknowledge the Consequences: As part of the confirmation process, Facebook may outline the consequences of deactivating your account, emphasizing the temporary nature of this action and its impact on your profile, posts, and interactions. By acknowledging these consequences, you affirm your understanding of the implications of deactivation, reinforcing the deliberate nature of your decision.
-
Confirm the Deactivation: After reviewing the information and acknowledging the consequences, you will be prompted to confirm the deactivation of your account. This confirmation step typically involves clicking on a button or selecting an option that explicitly confirms your choice to deactivate your profile. By taking this final step, you solidify your decision to temporarily suspend your account, marking the culmination of the deactivation process.
Upon confirming the deactivation of your Facebook account, you have successfully taken a proactive step towards managing your online presence and reclaiming control over your digital interactions. This deliberate action provides you with the freedom to step back from social interactions, recalibrate your online presence, and focus on other aspects of your life, all within the user-friendly interface of Safari.
With the confirmation of deactivation completed, you have effectively navigated through the process of temporarily suspending your Facebook account, demonstrating the flexibility and user-centric approach offered by the platform. This empowering journey underscores the importance of informed decision-making and the ability to tailor your social media experience according to your preferences, all within the familiar and accessible environment of Safari.
Conclusion
In conclusion, the process of deactivating your Facebook account on Safari is a straightforward and empowering journey that enables you to take control of your online presence with ease. By following the simple steps outlined in this guide, you have gained the knowledge and confidence to navigate through the deactivation process, allowing you to take a temporary hiatus from the platform while retaining the option to reactivate your profile in the future.
The journey began with the essential step of opening the Safari browser, providing you with access to the familiar and user-friendly interface that sets the stage for managing your Facebook account. From there, you seamlessly logged in to your Facebook account, ensuring that you have the necessary access to initiate the deactivation process.
Navigating to the Facebook settings on Safari empowered you to tailor your account controls according to your preferences, laying the groundwork for the pivotal step of deactivating your account. By carefully initiating the deactivation process and confirming your decision, you have taken a deliberate action that temporarily suspends your profile, providing you with the freedom to step back from social interactions and the digital realm.
The confirmation of deactivation marks the culmination of this journey, reaffirming your intentional decision to manage your digital well-being and reclaim control over your online interactions. By acknowledging the consequences and confirming the deactivation, you have demonstrated the ability to make informed decisions about your social media usage, all within the familiar and accessible environment of Safari.
As you embark on this temporary break from Facebook, it's important to recognize the value of digital well-being and the freedom to recalibrate your online presence according to your preferences. Whether you're seeking a digital detox, a hiatus from social interactions, or a break from the constant stream of information, the ability to deactivate your Facebook account on Safari provides you with the flexibility and autonomy to tailor your social media experience.
With your Facebook account successfully deactivated, you now have the freedom to focus on other aspects of your life, engage in offline activities, and prioritize your well-being without the constant presence of social media. This deliberate action underscores the user-centric approach offered by Facebook, allowing individuals to make informed decisions about their online presence and the visibility of their profiles.
By navigating through the deactivation process on Safari, you have embraced the power to manage your digital footprint, setting the stage for a rejuvenating break from the digital realm. As you embark on this journey, remember that the option to reactivate your account remains available, providing you with the flexibility to return to the platform when the time is right.
In essence, the process of deactivating your Facebook account on Safari is a testament to the user empowerment and flexibility offered by the platform, allowing you to take a proactive step towards digital well-being and reclaim control over your online interactions. With the knowledge and confidence gained from this guide, you are now equipped to navigate the deactivation process with ease, ensuring that your online presence aligns with your intentions and preferences.