Introduction
Clearing the cache in Google Chrome on your Mac can be a simple yet effective way to resolve various browsing issues and enhance the browser's performance. The cache is a collection of temporary internet files stored by the browser to speed up the loading of web pages. However, over time, this cache can become cluttered with outdated or corrupted files, potentially leading to slow browsing speeds, page loading errors, or even security vulnerabilities. Therefore, regularly clearing the cache can help address these issues and ensure a smoother browsing experience.
In this guide, we will walk through the step-by-step process of clearing the cache in Chrome on your Mac. Whether you're encountering website loading problems, experiencing sluggish performance, or simply aiming to maintain a clean and optimized browsing environment, understanding how to clear the cache in Chrome can be a valuable skill. By following the instructions provided, you'll be able to navigate the browser's settings with ease and effectively clear the cache to resolve common browsing issues.
Now, let's delve into the specific steps required to clear the cache in Chrome on your Mac, empowering you to take control of your browsing experience and optimize the performance of your favorite web browser.
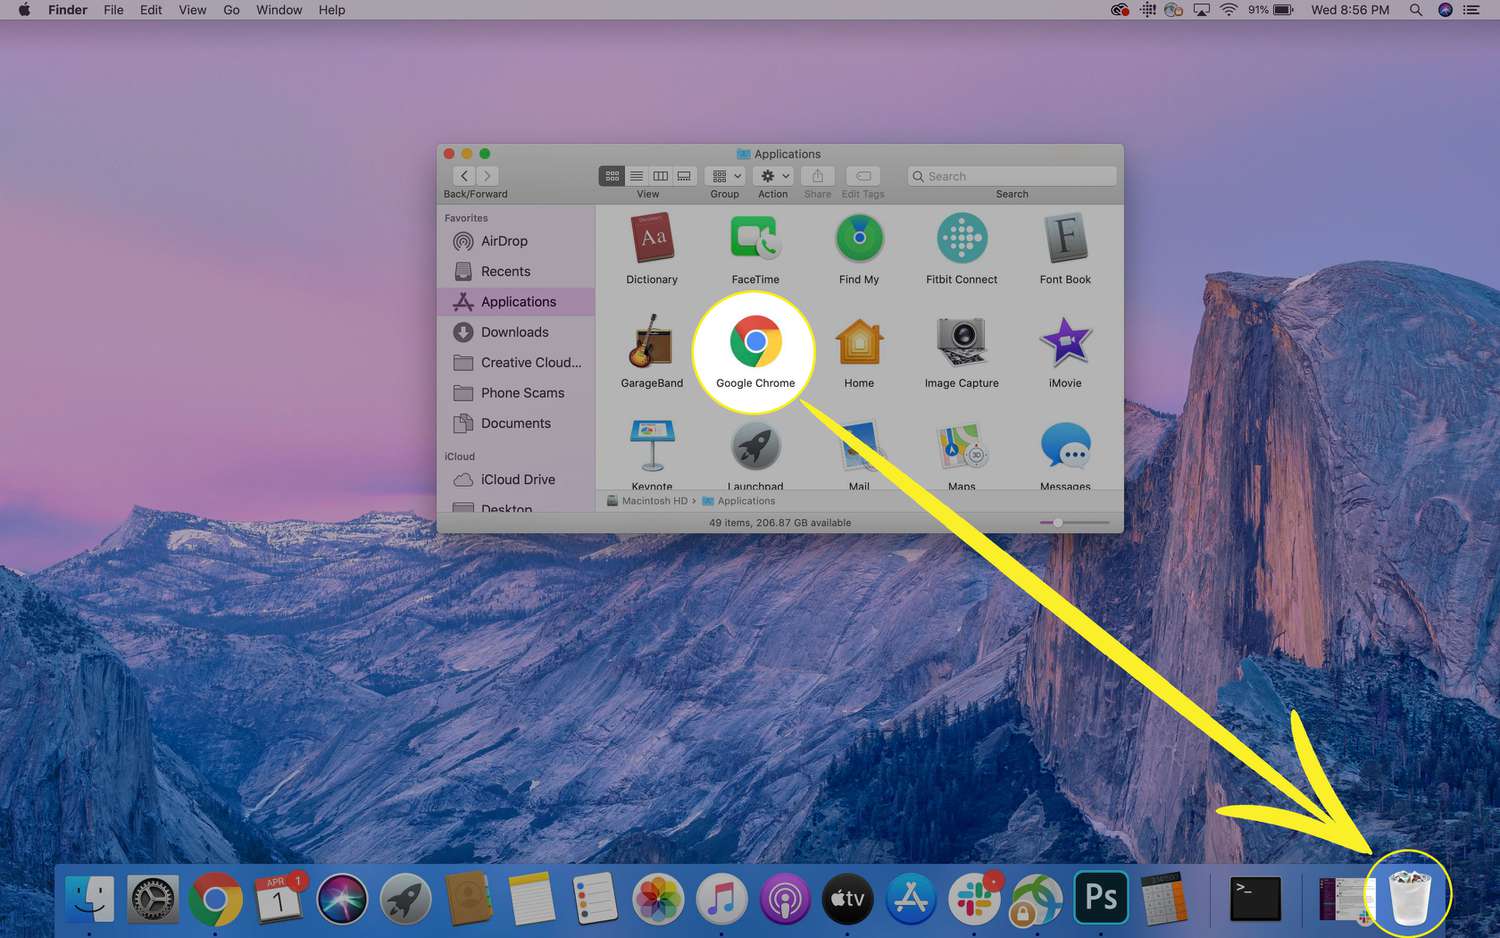
Step 1: Open Chrome
To begin the process of clearing the cache in Google Chrome on your Mac, you first need to launch the Chrome browser. Here's a step-by-step guide to help you open Chrome on your Mac:
-
Locate the Chrome Icon: Look for the Google Chrome icon on your Mac's desktop, dock, or applications folder. The icon typically features a circular design in vibrant colors, making it easily recognizable amidst other applications.
-
Click to Open: Once you've located the Chrome icon, simply click on it using your mouse or trackpad. Alternatively, you can also use the spotlight search feature on your Mac by pressing Command + Spacebar, typing "Chrome," and hitting Enter to launch the browser.
-
Wait for Chrome to Load: After clicking on the Chrome icon, the browser will initiate its loading process. Depending on your Mac's performance and internet connection speed, Chrome should open within a few seconds, presenting you with its familiar interface and the homepage or tabs from your previous browsing session.
-
Verify the Browser Window: Upon successfully opening Chrome, you should see the browser window displayed on your screen, showcasing the address bar, navigation buttons, and any existing tabs or web pages. This indicates that Chrome is now active and ready for you to proceed with the cache-clearing process.
By following these simple steps, you can easily open Google Chrome on your Mac, setting the stage for the subsequent actions required to clear the browser's cache. With Chrome now accessible, you're ready to move on to the next step in the cache-clearing process, which involves accessing the "Clear Browsing Data" menu.
Step 2: Access the Clear Browsing Data menu
Once you have successfully opened Google Chrome on your Mac, the next step in clearing the cache involves accessing the "Clear Browsing Data" menu. This menu provides you with the necessary options to manage and clear various types of browsing data, including the cache. Here's a detailed guide on how to access this menu:
-
Navigate to the Menu Icon: At the top-right corner of the Chrome window, you will find the menu icon, typically represented by three vertical dots arranged in a column. Click on this icon to reveal a dropdown menu containing various browser settings and options.
-
Select "Settings": From the dropdown menu, locate and click on the "Settings" option. This action will redirect you to the Chrome Settings page, where you can customize and manage different aspects of the browser's functionality.
-
Access the "Privacy and Security" Section: Within the Settings page, you will find a list of categories on the left-hand side. Look for the category labeled "Privacy and Security" and click on it to expand the available options.
-
Choose "Clear Browsing Data": Under the "Privacy and Security" section, you will find the "Clear browsing data" option. Click on this to access the menu dedicated to managing your browsing data, including the cache.
-
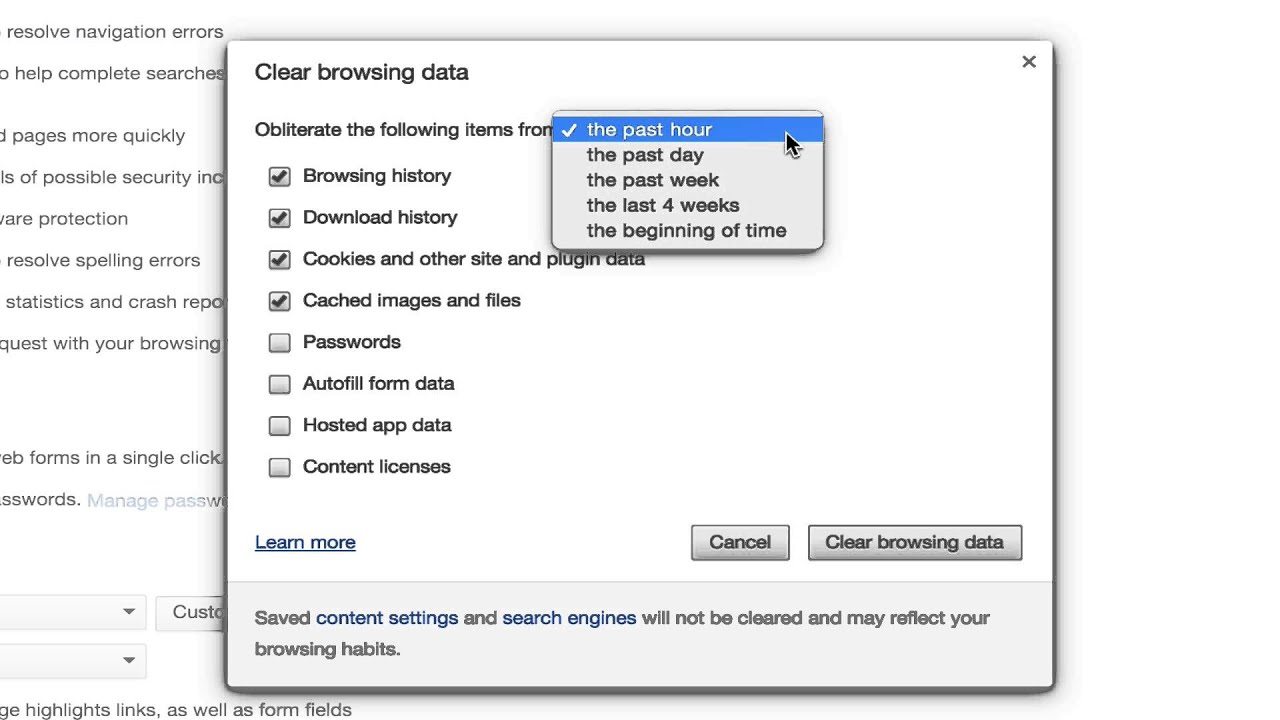
Customize Data Clearing Preferences: Upon selecting "Clear browsing data," a new tab or window will open, presenting you with a range of data types that can be cleared, such as browsing history, cookies, and cached images and files. Here, you can customize which types of data you want to clear by checking the corresponding boxes.
-
Select "Cached Images and Files": To specifically clear the cache, ensure that the checkbox next to "Cached images and files" is selected. This indicates that you intend to clear the cached data from your browsing history.
By following these steps, you can effectively access the "Clear Browsing Data" menu within Google Chrome on your Mac. This sets the stage for the subsequent actions required to choose what data to clear, including the cache, as part of the cache-clearing process.
Step 3: Choose what to clear
After accessing the "Clear Browsing Data" menu in Google Chrome on your Mac, the next crucial step involves choosing what specific data to clear. This step allows you to customize the clearing process based on your preferences and requirements. Here's a detailed walkthrough of how to choose what to clear in the browsing data menu:
-
Select Data Types: Within the "Clear Browsing Data" menu, you will encounter a list of data types that can be cleared, including browsing history, cookies, cached images and files, download history, and more. Each data type serves a distinct purpose in your browsing experience, and you have the flexibility to choose which ones to clear based on your needs.
-
Customize Clearing Preferences: To begin the customization process, carefully review the available data types and consider the impact of clearing each one. For example, clearing browsing history can enhance privacy and remove clutter, while clearing cookies may log you out of websites and reset website preferences. By understanding the implications of clearing each data type, you can make informed decisions about the data you want to remove.
-
Check Relevant Boxes: To choose what to clear, simply check the boxes next to the data types you wish to remove from your browsing data. For the purpose of clearing the cache, ensure that the "Cached images and files" option is selected. This action signifies your intent to clear the temporary internet files stored by Chrome, which can contribute to improved browsing performance and data privacy.
-
Review Selections: Before proceeding with the clearing process, take a moment to review your selections and ensure that they align with your objectives. Double-check the boxes next to the chosen data types to confirm that you are clearing the desired data while retaining any essential information that you wish to preserve.
-
Consider Additional Options: Depending on your browsing habits and preferences, you may also explore additional options within the "Clear Browsing Data" menu, such as the time range for which data should be cleared. Chrome offers the flexibility to clear data from the past hour, day, week, month, or all time, allowing you to tailor the clearing process to specific timeframes.
By carefully choosing what data to clear in the browsing data menu, you can effectively customize the cache-clearing process to align with your browsing preferences and privacy considerations. This level of control empowers you to maintain a clean and optimized browsing environment while preserving essential data that contributes to a seamless online experience.
Step 4: Clear the cache
Once you have customized the data clearing preferences in the "Clear Browsing Data" menu, the final step involves clearing the cache in Google Chrome on your Mac. This crucial action removes the accumulated temporary internet files, including cached images and files, to refresh your browsing environment and optimize performance. Here's a comprehensive guide on how to clear the cache:
-
Initiate the Clearing Process: After customizing your data clearing preferences, look for the "Clear Data" or "Clear Browsing Data" button at the bottom or top-right of the menu. Click on this button to initiate the cache-clearing process. Upon clicking, Chrome will begin clearing the selected data types, including the cache, based on your preferences.
-
Wait for the Clearing Process: Once you've triggered the cache-clearing process, Chrome will commence removing the temporary internet files from your browsing data. Depending on the volume of cached data and your Mac's performance, this process may take a few moments to complete. It's essential to allow Chrome to finish clearing the cache to ensure the effective removal of outdated or unnecessary files.
-
Confirmation and Feedback: After the cache-clearing process is complete, Chrome may provide a confirmation message or visual feedback to indicate that the selected data types, including the cache, have been successfully cleared. This confirmation serves as an assurance that the browser has executed the clearing process according to your preferences.
-
Verify the Cleared Cache: To confirm that the cache has been successfully cleared, you can perform a visual check within the "Clear Browsing Data" menu. Review the list of data types and ensure that the checkbox next to "Cached images and files" no longer displays a tick, indicating that the cache has been cleared as intended.
By following these steps, you can effectively clear the cache in Google Chrome on your Mac, promoting a cleaner and more optimized browsing experience. This proactive approach helps mitigate potential browsing issues stemming from outdated cache files, ultimately contributing to improved performance and data privacy within the Chrome browser.
Conclusion
In conclusion, mastering the process of clearing the cache in Google Chrome on your Mac empowers you to proactively manage your browsing environment, address performance issues, and enhance data privacy. By following the step-by-step guide outlined in this article, you've gained valuable insights into the essential steps required to clear the cache effectively. From opening Chrome and accessing the "Clear Browsing Data" menu to customizing data clearing preferences and executing the cache-clearing process, you've navigated the intricacies of optimizing your browsing experience.
Clearing the cache serves as a proactive measure to address common browsing issues, such as slow loading times, page rendering errors, and privacy concerns. By removing outdated or unnecessary temporary internet files, you can create a cleaner and more efficient browsing environment within Chrome. This not only contributes to improved performance but also aligns with best practices for maintaining data privacy and security while navigating the web.
Furthermore, understanding the nuances of choosing what data to clear within the "Clear Browsing Data" menu provides you with a level of control over the cache-clearing process. By customizing your preferences and considering the implications of clearing specific data types, you can tailor the clearing process to align with your browsing habits and privacy considerations. This level of customization ensures that you retain essential data while effectively removing clutter from your browsing history.
As you navigate the cache-clearing process in Chrome, it's important to recognize the broader impact on your browsing experience. By regularly clearing the cache, you contribute to a smoother and more responsive browsing environment, reducing the likelihood of encountering performance-related issues. Additionally, the proactive management of cached data aligns with the principles of data privacy and security, reflecting a conscientious approach to maintaining a clean and optimized browsing environment.
In essence, the ability to clear the cache in Google Chrome on your Mac is a valuable skill that empowers you to take control of your browsing experience. By incorporating this practice into your routine maintenance of the browser, you can mitigate potential issues, optimize performance, and uphold data privacy, ultimately contributing to a seamless and secure online journey.