Introduction
Accessing Wi-Fi hotspots has become an integral part of our modern-day connectivity. Whether you're a student, a professional, or a casual internet user, the convenience of connecting to a Wi-Fi hotspot while on the go cannot be overstated. Cox Communications, a leading provider of internet services, offers a vast network of Wi-Fi hotspots across the country, allowing its subscribers to stay connected wherever they are.
In this comprehensive guide, we will walk you through the seamless process of logging into a Cox Wi-Fi hotspot. By following the step-by-step instructions provided, you will be able to effortlessly connect to a Cox Wi-Fi hotspot and enjoy the benefits of high-speed internet access.
So, whether you're at a coffee shop, a public park, or any other location with a Cox Wi-Fi hotspot, this guide will equip you with the knowledge to make the most of this convenient service. Let's dive into the details and ensure that you can easily connect to Cox Wi-Fi hotspots whenever the need arises.
Step 1: Finding a Cox Wi-Fi Hotspot
Finding a Cox Wi-Fi hotspot is the first step to gaining access to high-speed internet while on the go. Cox Communications has strategically placed its hotspots in numerous public locations, making it convenient for subscribers to stay connected outside their homes. To locate a Cox Wi-Fi hotspot, follow these simple steps:
-
Use the Cox Hotspots App: Cox provides a dedicated mobile app, Cox Hotspots, which offers a user-friendly interface for locating nearby hotspots. Simply download the app from the App Store or Google Play Store, install it on your smartphone, and launch it to initiate the hotspot search.
-
Check the Cox Website: Alternatively, you can visit the official Cox website using your mobile browser or computer. The website features a hotspot locator tool that allows you to search for nearby hotspots by entering your current location or a specific address.
-
Explore Public Locations: Cox Wi-Fi hotspots are commonly available in public places such as shopping centers, restaurants, cafes, parks, and transportation hubs. When you're in these areas, look for the "Cox Wi-Fi" network in your available Wi-Fi networks list on your device.
-
Ask Local Businesses: If you're unable to locate a hotspot using the app or website, consider asking the staff at local businesses. Many establishments partner with Cox to provide Wi-Fi access to their patrons, so they can guide you to the nearest hotspot.
Once you've successfully located a Cox Wi-Fi hotspot, you're ready to proceed to the next step and connect to the network. By following these simple methods, you can quickly find a Cox Wi-Fi hotspot and enjoy the benefits of seamless internet connectivity wherever you are.
Step 2: Connecting to the Hotspot
Once you have located a Cox Wi-Fi hotspot, the next step is to connect your device to the network. This process is straightforward and can be completed in a few simple steps, allowing you to swiftly gain access to high-speed internet. Here's how to connect to a Cox Wi-Fi hotspot:
-
Enable Wi-Fi: Ensure that the Wi-Fi feature on your smartphone, tablet, or laptop is turned on. This can usually be done through the device's settings or quick access menu.
-
Select the Cox Wi-Fi Network: From the list of available Wi-Fi networks on your device, look for the "Cox Wi-Fi" network. Once you've located it, select the network to initiate the connection process.
-
Enter Your Cox Account Credentials (Optional): In some cases, you may be prompted to log in using your Cox account credentials to access the hotspot. If required, enter your Cox username and password to proceed. If you're unsure about your account details, you can find them on your Cox account profile or contact Cox customer support for assistance.
-
Accept Terms of Service (If Applicable): Upon connecting to the Cox Wi-Fi network, you may encounter a terms of service or usage agreement page. Review the terms and conditions, and if you agree, proceed by accepting the terms to gain access to the network.
-
Wait for Connection Confirmation: After completing the previous steps, your device will attempt to establish a connection to the Cox Wi-Fi hotspot. Once connected, you will see a confirmation message or Wi-Fi icon on your device indicating a successful connection.
By following these steps, you can seamlessly connect to a Cox Wi-Fi hotspot and begin enjoying high-speed internet access. It's important to note that the specific steps for connecting to a Wi-Fi network may vary slightly depending on the type of device you're using. However, the general process remains consistent across most smartphones, tablets, and laptops, ensuring a hassle-free connection experience.
With your device successfully connected to the Cox Wi-Fi network, you're now ready to proceed to the next crucial step: logging in with your Cox account to gain full access to the hotspot and enjoy uninterrupted internet connectivity.
Step 3: Logging In with Your Cox Account
Logging in with your Cox account is a pivotal step that grants you full access to the Cox Wi-Fi hotspot and its array of internet services. By utilizing your Cox account credentials, you can enjoy a seamless and secure connection, ensuring that your online activities are protected and personalized to your preferences. Here's a detailed guide on how to log in with your Cox account and make the most of the Wi-Fi hotspot:
-
Open Your Web Browser: Once your device is connected to the Cox Wi-Fi network, launch your preferred web browser. This could be Safari, Chrome, Firefox, or any other browser installed on your device.
-
Navigate to the Cox Wi-Fi Login Page: Upon opening the web browser, you may be automatically redirected to the Cox Wi-Fi login page. If not, attempt to visit a website or enter any web address, which should trigger the login page to appear. Alternatively, you can manually enter the following URL in the browser's address bar: "www.cox.com/wifi".
-
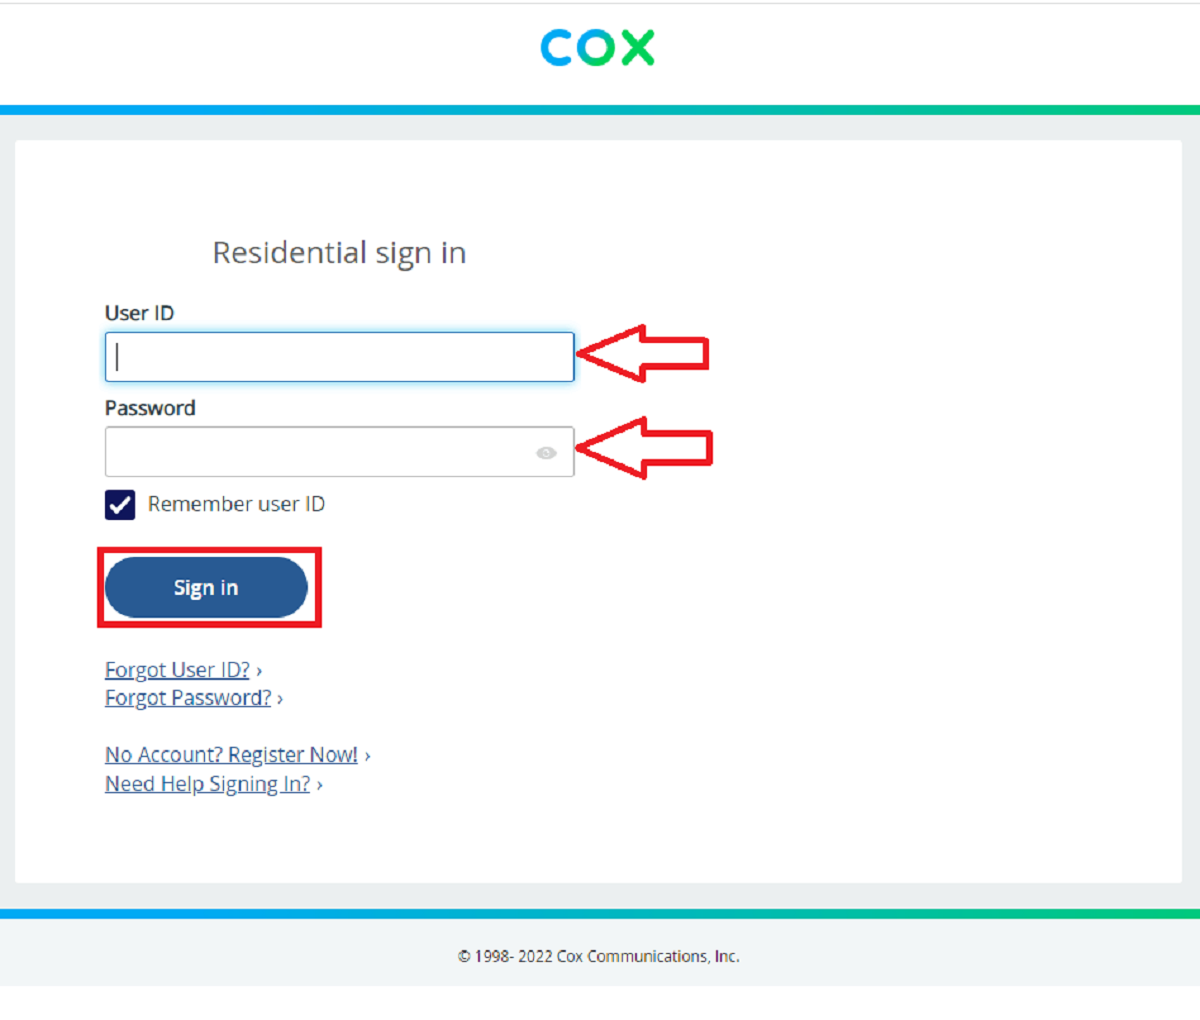
Enter Your Cox Account Credentials: On the Cox Wi-Fi login page, you will be prompted to enter your Cox username and password. Carefully input the required information, ensuring that the credentials are accurate and up to date. If you have forgotten your Cox account details, you can utilize the "Forgot User ID or Password?" option to initiate the account recovery process.
-
Complete the Authentication Process: After entering your Cox account credentials, proceed to authenticate your login details. This may involve clicking a "Sign In" or "Log In" button on the login page. Once submitted, the system will verify your credentials and grant access to the Cox Wi-Fi hotspot upon successful authentication.
-
Confirmation and Full Access: Upon successful authentication, you will receive confirmation that you are now logged in with your Cox account. This signifies that you have gained full access to the Cox Wi-Fi hotspot, allowing you to browse the internet, stream content, and engage in online activities with the assurance of a secure and reliable connection.
By following these steps, you can effortlessly log in with your Cox account and unlock the full potential of the Cox Wi-Fi hotspot. This seamless process ensures that you can enjoy uninterrupted internet access while benefiting from the personalized features and security measures associated with your Cox account. With the login completed, you are now fully equipped to make the most of the Cox Wi-Fi hotspot and all it has to offer.
Step 4: Enjoying Cox Wi-Fi Access
With your device successfully connected to the Cox Wi-Fi hotspot and your Cox account logged in, you are now poised to fully embrace the benefits of high-speed internet access. As you immerse yourself in the seamless connectivity provided by Cox Wi-Fi, a world of possibilities opens up, allowing you to engage in a myriad of online activities with ease and convenience.
Whether you're browsing the web for research, streaming your favorite music or videos, staying connected with friends and family through social media, or attending virtual meetings, Cox Wi-Fi empowers you to do so with unparalleled reliability and speed. The robust network infrastructure ensures that you can enjoy a responsive and uninterrupted online experience, enhancing your productivity and leisure activities while on the go.
Furthermore, Cox Wi-Fi access extends beyond basic internet connectivity, offering additional value-added services and features to enrich your online endeavors. From advanced security measures to protect your digital presence to customizable settings that cater to your specific preferences, Cox Wi-Fi is designed to elevate your internet usage to new heights.
As you revel in the seamless connectivity provided by Cox Wi-Fi, you can explore a vast array of online content, engage in collaborative projects, and stay informed and entertained, all with the assurance of a stable and secure connection. The flexibility and convenience offered by Cox Wi-Fi enable you to adapt to various environments, ensuring that you can leverage the power of high-speed internet wherever your ventures take you.
In essence, enjoying Cox Wi-Fi access transcends mere connectivity; it encapsulates the freedom to explore, create, and connect in a digital landscape that is rich with opportunities. Whether you're a student, a professional, or an avid internet user, the seamless and reliable connectivity provided by Cox Wi-Fi empowers you to thrive in an increasingly interconnected world.
As you navigate through your online experiences with Cox Wi-Fi, you can revel in the knowledge that you are backed by a robust and dependable network that is dedicated to enhancing your digital lifestyle. With Cox Wi-Fi access at your fingertips, the possibilities are limitless, and the online world becomes a seamless extension of your daily endeavors, ensuring that you can stay connected, informed, and entertained with unparalleled ease and efficiency.