Introduction
Connecting your Fire Tablet to a hotspot can provide you with the flexibility to access the internet and enjoy your favorite content on the go. Whether you're traveling, at a café, or in a location without a reliable Wi-Fi connection, linking your Fire Tablet to a hotspot allows you to stay connected and entertained.
In this step-by-step guide, you will learn how to seamlessly connect your Fire Tablet to a hotspot. By following these instructions, you can ensure a smooth and hassle-free process, enabling you to make the most of your Fire Tablet's capabilities no matter where you are.
Stay tuned as we delve into the simple yet essential steps to access the Settings menu, select the Wi-Fi option, choose the hotspot network, enter the hotspot password, and successfully connect to the hotspot. With these instructions at your fingertips, you'll be able to effortlessly establish a connection between your Fire Tablet and a hotspot, opening up a world of possibilities for browsing, streaming, and staying connected while on the move. Let's get started!
Step 1: Accessing the Settings Menu
Accessing the Settings menu on your Fire Tablet is the first crucial step in connecting to a hotspot. This menu serves as the control center for various device configurations, including network connections. To begin, ensure your Fire Tablet is powered on and unlocked. Once you have access to the home screen, locating the Settings menu is straightforward.
-
Locate the Settings Icon: The Settings icon typically resembles a gear or cogwheel and is commonly found on the home screen or within the app drawer. It may also be accessible from the notification panel by swiping down from the top of the screen and tapping the gear icon.
-
Open the Settings Menu: Tap on the Settings icon to open the menu. Upon entering the Settings menu, you will be presented with a range of options to customize your Fire Tablet's settings, including display, sound, and, most importantly for this guide, network and internet settings.
-
Navigate to the Network & Internet Section: Within the Settings menu, scroll or swipe to find the "Network & Internet" section. This is where you can manage all aspects of your Fire Tablet's network connections, including Wi-Fi, Bluetooth, and hotspot configurations.
-
Access the Wi-Fi Settings: Once in the "Network & Internet" section, tap on the "Wi-Fi" option. This will open the Wi-Fi settings, allowing you to view available networks and configure Wi-Fi connections.
By successfully accessing the Settings menu and navigating to the Network & Internet section, you have completed the first step in connecting your Fire Tablet to a hotspot. This foundational step sets the stage for the subsequent actions, enabling you to seamlessly proceed with selecting the hotspot network and establishing a secure connection. With the Settings menu at your fingertips, you are now ready to move on to the next step and continue the process of connecting your Fire Tablet to a hotspot.
Step 2: Selecting the Wi-Fi Option
After successfully accessing the Settings menu and navigating to the Network & Internet section on your Fire Tablet, the next pivotal step is to select the Wi-Fi option. This step is essential for initiating the process of connecting your Fire Tablet to a hotspot and gaining access to the internet on the go.
Upon tapping the "Wi-Fi" option within the "Network & Internet" section, you will be presented with a list of available Wi-Fi networks. This includes nearby hotspots, home Wi-Fi networks, and other public or private networks within range of your Fire Tablet's Wi-Fi receiver.
At this juncture, it is crucial to identify and select the specific Wi-Fi network that corresponds to the hotspot you intend to connect to. The list of available networks will typically display the network names (also known as SSIDs) along with signal strength indicators, allowing you to discern nearby networks and their respective signal strengths.
When selecting the Wi-Fi network corresponding to the hotspot you wish to connect to, it is essential to ensure that the network is secure and reliable. Look for familiar network names or check with the hotspot provider for the correct SSID to avoid inadvertently connecting to an unsecured or unauthorized network.
Once you have identified the correct Wi-Fi network representing the hotspot, tap on the network name to proceed with the connection process. This action will prompt your Fire Tablet to initiate the connection sequence, preparing it to establish a secure link with the selected hotspot network.
By successfully selecting the Wi-Fi option and identifying the specific hotspot network within the list of available networks, you have taken a significant stride toward connecting your Fire Tablet to the hotspot. This crucial selection paves the way for the subsequent steps, leading you closer to establishing a seamless and reliable connection that empowers you to stay connected and enjoy the benefits of internet access wherever you go.
With the Wi-Fi option selected and the hotspot network identified, you are now primed to move forward with the next steps in the process of connecting your Fire Tablet to the hotspot. This includes choosing the hotspot network and entering the required password to finalize the connection, culminating in a seamless and secure link between your Fire Tablet and the chosen hotspot.
Step 3: Choosing the Hotspot Network
Upon selecting the Wi-Fi option and accessing the list of available networks on your Fire Tablet, the pivotal next step is to choose the specific hotspot network to which you intend to connect. This step is crucial for ensuring that your Fire Tablet establishes a secure and reliable connection, enabling you to access the internet seamlessly while on the move.
As you peruse the list of available Wi-Fi networks, it is essential to locate the SSID (Service Set Identifier) that corresponds to the hotspot you wish to connect to. The SSID serves as the unique identifier for the hotspot network, allowing you to distinguish it from other nearby networks. When choosing the hotspot network, it is imperative to verify the network name and, if necessary, confirm it with the hotspot provider to ensure that you are selecting the correct network for connection.
In addition to identifying the correct hotspot network, it is advisable to consider the signal strength and security of the network. Signal strength indicators displayed alongside the network names provide valuable insights into the proximity and strength of each network, aiding in the selection of a reliable and stable connection. Furthermore, prioritizing secure networks, such as those with WPA2 or WPA3 encryption, helps safeguard your data and privacy while using the hotspot for internet access.
Once you have identified the specific hotspot network from the available options and verified its security and reliability, proceed to tap on the network name to initiate the connection process. This action signals your Fire Tablet to establish a connection with the chosen hotspot network, paving the way for the subsequent steps in the connection process.
By choosing the hotspot network with careful consideration for accuracy, signal strength, and security, you are taking a significant step toward ensuring a seamless and dependable connection between your Fire Tablet and the selected hotspot. This deliberate selection sets the stage for the final steps in the connection process, including entering the required password to authenticate and solidify the connection.
With the hotspot network chosen and the connection process initiated, you are now poised to proceed with the subsequent steps, leading you closer to successfully connecting your Fire Tablet to the hotspot and unlocking the benefits of internet access on the go.
Step 4: Entering the Hotspot Password
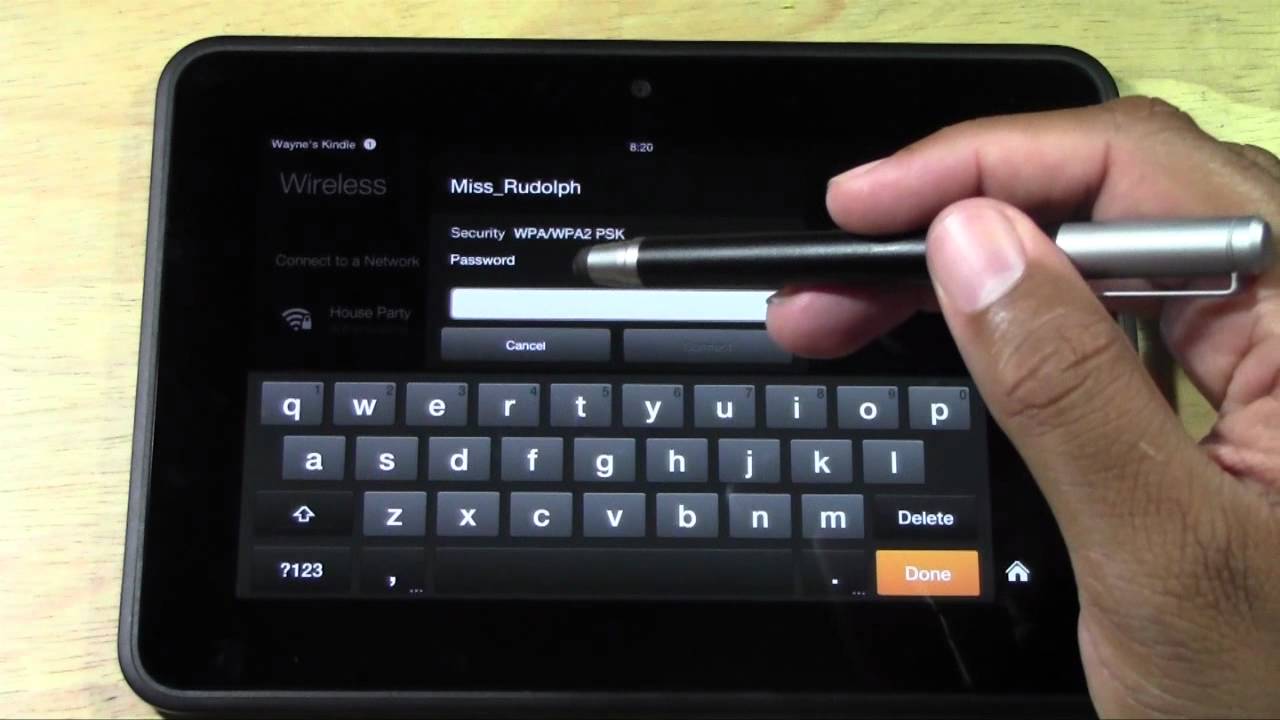
As you embark on the journey to connect your Fire Tablet to a hotspot, the pivotal step of entering the hotspot password stands as a crucial gateway to establishing a secure and reliable connection. Upon choosing the specific hotspot network from the list of available options, the subsequent action involves entering the requisite password to authenticate and solidify the connection.
When prompted to enter the hotspot password, it is essential to exercise diligence and accuracy in inputting the characters to ensure a successful connection. The hotspot password, also known as the network security key or passphrase, serves as a safeguard to protect the network from unauthorized access, thereby preserving the integrity and privacy of the connection.
As you navigate to the password entry screen, take a moment to verify the accuracy of the characters you input. Pay close attention to uppercase and lowercase letters, special symbols, and numerical digits, ensuring that each character is entered correctly. Additionally, be mindful of any spaces or hyphens within the password and input them as specified to avoid authentication errors.
In scenarios where the hotspot password is not readily available or has been recently updated, it is advisable to seek assistance from the hotspot provider or the individual responsible for managing the network. By obtaining the correct password from a reliable source, you can mitigate potential issues related to incorrect password entry and expedite the process of connecting your Fire Tablet to the hotspot.
Upon successfully entering the hotspot password, your Fire Tablet will proceed to authenticate the connection with the chosen hotspot network. This authentication process validates the provided password and establishes a secure link between your device and the hotspot, enabling seamless access to the internet and associated services.
By meticulously entering the hotspot password with precision and attention to detail, you are poised to overcome this critical juncture in the connection process, setting the stage for the final stride toward establishing a secure and reliable link between your Fire Tablet and the chosen hotspot network.
With the hotspot password accurately entered and the authentication process initiated, you are now primed to proceed with the final step, culminating in the successful connection of your Fire Tablet to the hotspot and unlocking the potential for uninterrupted internet access on the go.
Step 5: Connecting to the Hotspot
After successfully navigating through the preceding steps of accessing the Settings menu, selecting the Wi-Fi option, choosing the hotspot network, and entering the hotspot password, you have reached the pivotal juncture of connecting your Fire Tablet to the hotspot. This final step solidifies the culmination of your efforts, paving the way for seamless and uninterrupted access to the internet on your device.
Upon entering the correct hotspot password, your Fire Tablet will initiate the connection process, establishing a secure link with the chosen hotspot network. During this phase, your device communicates with the hotspot, exchanging authentication data and establishing a secure channel for data transmission.
As the connection process unfolds, your Fire Tablet will display visual indicators to signify the progress and status of the connection attempt. This may include animated icons, progress bars, or textual prompts indicating the stages of connection establishment. Additionally, signal strength indicators and connection status messages provide valuable insights into the strength and stability of the established link.
Once the connection is successfully established, your Fire Tablet will display confirmation of the secured connection to the hotspot network. This confirmation serves as a testament to the successful completion of the connection process, signifying your device's readiness to leverage the hotspot for internet access.
With the connection to the hotspot secured, your Fire Tablet is now equipped to harness the benefits of internet access on the go. Whether for browsing the web, streaming media content, or staying connected with online services, the established connection empowers you to make the most of your Fire Tablet's capabilities in diverse environments.
As you embark on your internet-enabled endeavors, it is essential to monitor the stability and strength of the connection, ensuring a seamless and uninterrupted browsing experience. Keeping an eye on the Wi-Fi signal strength indicator and network status within the device settings allows you to gauge the quality of the connection and make informed decisions to optimize your internet experience.
By successfully completing the process of connecting your Fire Tablet to the hotspot, you have unlocked a world of possibilities for staying connected and accessing online content while on the move. Embracing the flexibility and convenience of a secure hotspot connection enriches your digital lifestyle, enabling you to remain connected and engaged with the online world wherever your adventures take you.
With the connection to the hotspot established, you are now poised to embark on a seamless and enriching internet experience, leveraging the power of connectivity to enhance your digital endeavors and stay connected with the world around you.
Conclusion
In conclusion, the process of connecting your Fire Tablet to a hotspot encompasses a series of essential steps that culminate in the establishment of a seamless and secure internet connection. By navigating through the intricacies of accessing the Settings menu, selecting the Wi-Fi option, choosing the hotspot network, entering the hotspot password, and ultimately connecting to the hotspot, you have unlocked a myriad of possibilities for staying connected and accessing online content while on the move.
As you reflect on the journey from accessing the Settings menu to the triumphant connection to the hotspot, it becomes evident that the seamless integration of technology has empowered you to transcend geographical constraints and embrace a digital lifestyle characterized by flexibility and connectivity. The ability to effortlessly link your Fire Tablet to a hotspot amplifies the device's utility, enabling you to browse the web, stream media content, and engage with online services irrespective of your location.
Furthermore, the meticulous attention to detail and precision in entering the hotspot password underscores the importance of safeguarding network security and privacy. By exercising diligence in authenticating the connection, you have demonstrated a commitment to ensuring the integrity and reliability of the established link, thereby fortifying your digital experiences with a layer of security and trust.
As you embark on your internet-enabled endeavors, it is imperative to leverage the established hotspot connection to its fullest potential, embracing the freedom to explore, learn, and connect with the online world. Whether you find yourself in a bustling café, a tranquil park, or a vibrant urban setting, the ability to stay connected and engaged with the digital landscape amplifies the versatility and impact of your Fire Tablet, enriching your experiences and broadening your horizons.
In essence, the journey of connecting your Fire Tablet to a hotspot transcends the mere establishment of a network link; it embodies the convergence of technology, connectivity, and human experiences. As you navigate through the digital realm with your Fire Tablet as a trusted companion, the seamless connection to a hotspot serves as a conduit for exploration, creativity, and connection, fostering a dynamic and enriching digital lifestyle.
With the connection to the hotspot solidified, you are poised to embark on a seamless and enriching internet experience, leveraging the power of connectivity to enhance your digital endeavors and stay connected with the world around you. Embrace the possibilities, seize the opportunities, and revel in the freedom to explore the boundless expanse of the digital world with your Fire Tablet as your steadfast ally.