Introduction
Having a slow download speed on your PC can be frustrating, especially when you’re trying to download large files or stream media content. Fortunately, there are several steps you can take to improve your download speed and optimize your PC’s performance. In this article, we will discuss ten effective methods to get better download speed on your PC.
A fast and reliable internet connection is essential for smooth browsing and downloading. Slow speeds can be caused by various factors such as network congestion, improper browser settings, outdated drivers, or software conflicts. By following the tips outlined in this article, you can address these issues and optimize your system for faster downloads.
Before we dive into the specific methods, it’s important to mention that the effectiveness of these steps may vary depending on your system specifications and internet service plan. However, implementing these practices can generally lead to improved download speeds for most users.
Whether you’re a gamer looking to download large game files, a multimedia enthusiast wanting to stream high-definition movies, or simply someone who values a fast browsing experience, these tips will help you get the most out of your internet connection.
From optimizing your PC settings to managing your bandwidth usage and ensuring a stable connection, each method addresses a different aspect that can contribute to slow download speeds. By combining these strategies, you can create an optimized environment for faster downloads and a smoother browsing experience overall.
Now, let’s explore each method in detail and get started on improving the download speed of your PC.
Check your Internet connection
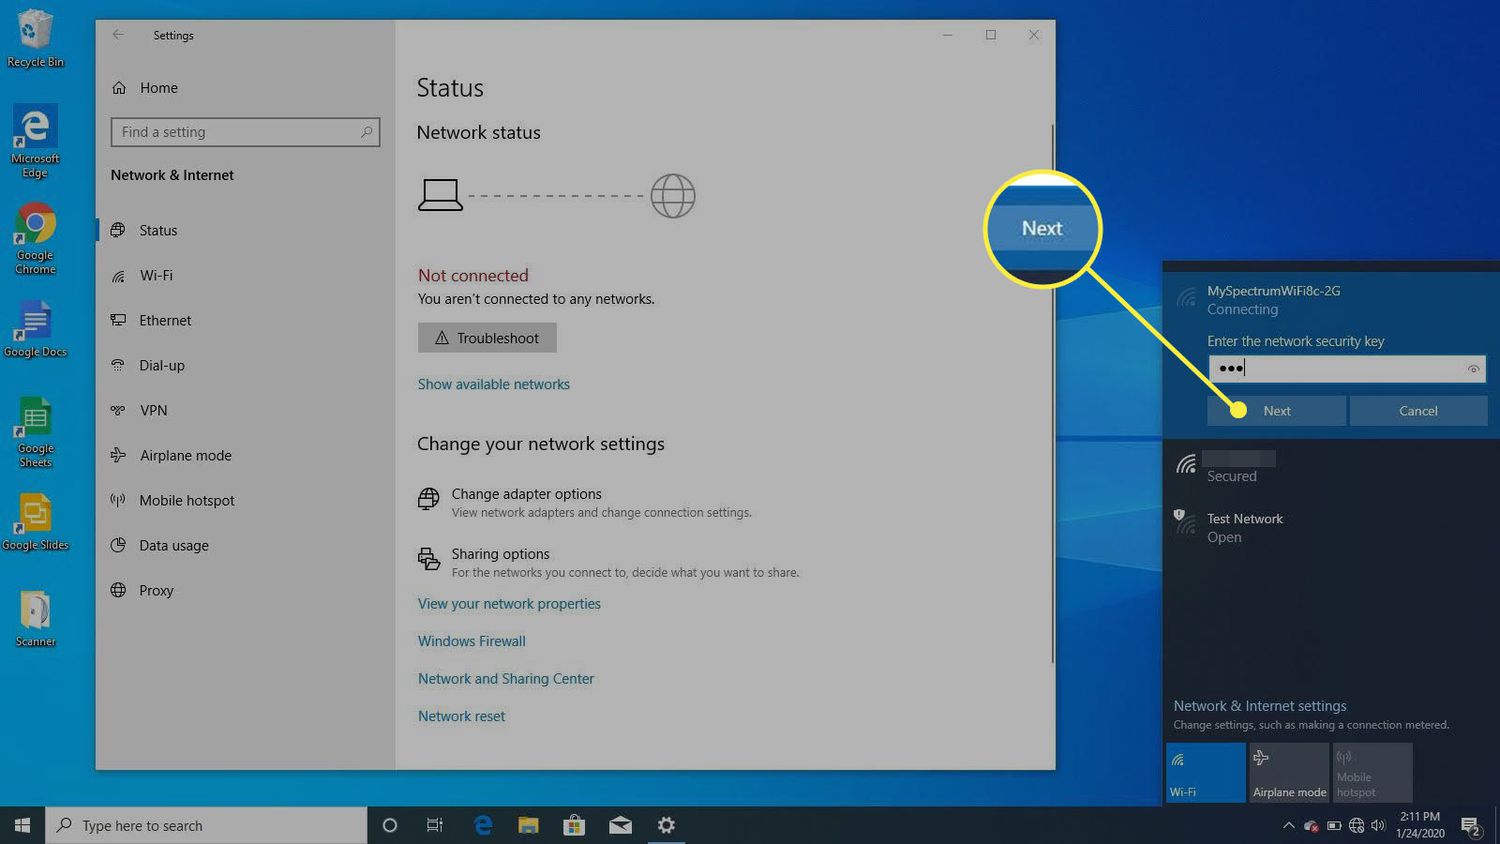
The first step in improving your download speed is to ensure that your internet connection is stable and functioning properly. A weak or unstable connection can significantly impact your download speeds. Here are a few things you can do to check and optimize your internet connection:
- Restart your modem and router: Sometimes, a simple restart can resolve connectivity issues. Power off your modem and router, wait for a few minutes, and then turn them back on.
- Check your signal strength: If you’re using a Wi-Fi connection, check the signal strength on your device. Poor signal can result in slower speeds. Consider moving closer to your router or using a Wi-Fi extender to boost the signal.
- Run a speed test: Use online speed testing tools to measure your internet connection speed. This will give you an idea of your current download and upload speeds. If the results are significantly lower than expected, contact your internet service provider (ISP) to address any network issues.
- Scan for malware: Malware or viruses on your computer can interfere with your internet connection and slow down your browsing speed. Use a reputable antivirus program to scan your system and remove any detected threats.
By thoroughly checking your internet connection and addressing any issues, you can eliminate potential factors that may be causing slow download speeds. Remember that a stable and fast connection is crucial for optimal download performance.
Clear your browser cache
The browser cache stores temporary files and data from websites you visit, which helps in speeding up future visits to those sites. However, an overflowing or corrupted cache can actually slow down your browser and hinder download speeds. Clearing your browser cache can help improve your download speed. Here’s how to do it:
-
For Google Chrome users:
- Click on the three-dot menu in the top-right corner and select “More tools” and then “Clear browsing data”.
- In the popup window, select the time range for which you want to clear the cache. It is recommended to choose “All time” to clear everything.
- Check the box next to “Cached images and files”.
- Click on the “Clear data” button to remove the cached files from your browser.
-
For Mozilla Firefox users:
- Click on the three-line menu in the top-right corner and select “Options”.
- In the left sidebar, click on “Privacy & Security”.
- Scroll down to the “Cookies and Site Data” section and click on the “Clear Data” button.
- Check the box next to “Cached Web Content”.
- Click on “Clear” to delete the cached files.
-
For Microsoft Edge users:
- Click on the three-dot menu in the top-right corner and select “Settings”.
- Under the “Clear browsing data” section, click on the “Choose what to clear” button.
- Check the box next to “Cached data and files”.
- Click on the “Clear” button to remove the cached files from your browser.
After clearing the browser cache, restart your browser and try downloading again. This will ensure that your browser is not bogged down by unnecessary files and improve its overall performance, resulting in faster download speeds.
Disable unnecessary background processes and applications
Running multiple background processes and applications can consume valuable system resources, leading to a sluggish performance and slower download speeds. By disabling unnecessary processes and applications, you can free up system resources and allocate them to tasks that require higher priority, such as downloading files. Here’s how you can do it:
-
Disable startup programs:
- Press Ctrl + Shift + Esc to open the Task Manager.
- Click on the “Startup” tab.
- Select the programs that you don’t need to run on startup and click on the “Disable” button.
-
Close unnecessary applications:
- Press Ctrl + Alt + Delete to open the Task Manager.
- Click on the “Processes” or “Applications” tab.
- Identify the applications that are consuming high CPU or memory usage but are not essential for your current tasks.
- Right-click on the application and select “End Task” or “Close”.
-
Limit background processes:
- Press Ctrl + Shift + Esc to open the Task Manager.
- Click on the “Processes” or “Details” tab.
- Right-click on a process that you don’t need and select “Set Priority” and choose a lower priority level.
By disabling unnecessary background processes and applications, you can ensure that your system resources are focused on downloading files, resulting in improved download speeds. However, be cautious and only disable processes and applications that you are familiar with and know to be non-essential.
Update your network drivers
Outdated or corrupted network drivers can cause connectivity issues and restrict your download speeds. Updating your network drivers to the latest versions can improve the compatibility and performance of your network hardware, resulting in faster and more stable connections. Here’s how you can update your network drivers:
- Identify your network adapter:
- Press Windows + X and select “Device Manager” from the menu.
- In the Device Manager window, expand the “Network adapters” category.
- Take note of the name and model of your network adapter.
- Download the latest drivers:
- Visit the website of your network adapter manufacturer (e.g., Intel, Realtek, Broadcom).
- Locate the support or driver download section on the website.
- Search for the drivers specific to your network adapter model and operating system.
- Download the latest drivers to your computer.
- Install the drivers:
- Open the downloaded driver package.
- Follow the on-screen instructions to install the drivers. This typically involves running an executable file and accepting the license agreement.
- Restart your computer to complete the installation process.
Updating your network drivers can fix compatibility issues, improve performance, and optimize your network connection. This, in turn, can enhance your download speed and provide a smoother browsing experience. It is recommended to regularly check for driver updates, as manufacturers often release new versions to address bugs or improve performance.
Use a download manager
Using a dedicated download manager can greatly enhance your download speed and provide additional features to manage your downloads effectively. Unlike built-in browser download managers, specialized software can utilize multiple connections for a single file, resulting in faster download speeds. Here are some key benefits of using a download manager:
- Parallel downloading: Download managers can split a file into multiple parts and download them simultaneously. This allows for faster downloads, especially for larger files.
- Resumable downloads: If your download gets interrupted or your connection drops, download managers can resume the download from where it left off, saving you time and bandwidth.
- Bandwidth allocation: Download managers let you allocate bandwidth to specific downloads, giving priority to more important files while still allowing others to progress in the background.
- Scheduling downloads: You can schedule downloads to occur during off-peak hours or when your internet usage is low, optimizing your download speed and reducing potential congestion.
There are several download managers available, both free and paid. Some popular options include Internet Download Manager (IDM), Free Download Manager, and JDownloader. These tools integrate with your browser and offer a seamless download experience, while also providing advanced features to boost your download speeds and manage your files.
To use a download manager, simply install the software and follow the instructions provided. Once installed, it should automatically capture and handle download links for you. You can customize settings, such as the number of connections, download location, and download priority, to optimize your download speeds and manage your files according to your preferences.
Using a specialized download manager can significantly improve your download speed, especially for larger files. Consider trying out different options to find the one that best suits your needs and enhances your download experience.
Optimize your PC settings
Optimizing your PC settings can help improve download speeds by maximizing the resources available for downloading files. By making a few adjustments and tweaks, you can optimize your system’s performance and ensure better download speeds. Here are some key settings to consider:
- Adjust power settings:
- Open the Control Panel and navigate to the “Power Options” section.
- Select a power plan that is optimized for high performance or adjust the settings of your current power plan to allow maximum performance.
- Manage virtual memory:
- Open the Control Panel and go to the “System” or “System and Security” section.
- Click on “Advanced system settings”.
- In the “Performance” section, click on the “Settings” button.
- Go to the “Advanced” tab and click on the “Change” button in the “Virtual memory” section.
- Make sure the “Automatically manage paging file size for all drives” option is unchecked.
- Select the “Custom size” option and set both the initial and maximum size to the recommended value (or a higher value if you have ample disk space).
- Click “OK” to apply the changes.
- Disable unnecessary visual effects:
- Open the Control Panel and go to the “System” or “System and Security” section.
- Click on “Advanced system settings”.
- In the “Performance” section, click on the “Settings” button.
- On the “Visual Effects” tab, select the option to “Adjust for best performance” or manually uncheck the unnecessary visual effects.
- Click “OK” to save the changes.
Optimizing your PC settings can help prioritize resources for download tasks and minimize unnecessary background processes. This allows your system to allocate more power to downloading files, resulting in improved download speeds.
Additionally, regularly performing system maintenance tasks such as disk cleaning, defragmentation, and updating software can also contribute to optimized performance and better download speeds. Keeping your PC in good health ensures that it operates efficiently and maximizes its capabilities for downloading files.
Limit bandwidth usage for other devices
If you have multiple devices connected to your home network, they can compete for bandwidth and slow down your download speeds. By limiting the bandwidth usage of other devices, you can allocate more bandwidth to your PC and enhance your download speed. Here are a few methods to achieve this:
- Set up Quality of Service (QoS):
- Access your router’s admin panel by entering its IP address in a web browser.
- Look for the QoS settings or bandwidth control options in the router settings.
- Enable QoS and prioritize bandwidth for your PC or specific programs that require high-speed internet, such as your download manager.
- Save the settings and restart your router for the changes to take effect.
- Limit bandwidth on individual devices:
- Some routers allow you to individually limit the bandwidth for each connected device. Access your router’s admin panel and look for the “bandwidth control” or “traffic controls” section.
- Select the device you want to limit and set the maximum upload and download speeds for that device.
- Apply the changes and save the settings.
- Use a bandwidth management software:
- There are various software programs available that allow you to monitor and manage bandwidth usage on your network. These programs enable you to set bandwidth limits, prioritize certain devices or applications, and monitor real-time traffic.
- Research and select a reliable bandwidth management software that suits your needs and follow the provided instructions for installation and configuration.
By limiting the bandwidth usage of other devices, you can ensure that your PC receives the necessary resources for faster and uninterrupted downloads. This technique is particularly useful when you have multiple devices actively using the internet simultaneously.
Remember to consider the needs of other users on your network before limiting their bandwidth, as it may affect their online activities. It is always a good practice to communicate and coordinate with other users to ensure a fair distribution of available bandwidth.
Use a wired connection instead of Wi-Fi
While Wi-Fi offers convenience and flexibility, it may not always provide the most stable or fastest connection for downloading files. If you’re experiencing slow download speeds, consider utilizing a wired connection instead. Here’s why a wired connection can improve your download speed:
- Stability: Wired connections are typically more stable than Wi-Fi, as they are less prone to interference from other devices and obstacles such as walls or distance.
- Consistency: Wi-Fi signals can fluctuate due to network congestion or signal interference. In contrast, a wired connection provides a more reliable and consistent data transfer rate.
- Speed: In general, wired connections have the potential for faster download speeds compared to Wi-Fi, mainly due to reduced signal loss and higher bandwidth capabilities.
To switch from Wi-Fi to a wired connection, follow these steps:
- Locate the Ethernet port on your computer or laptop.
- Connect one end of the Ethernet cable to the Ethernet port on your computer.
- Insert the other end of the cable into an available Ethernet port on your router or modem.
- Ensure that the connection is secure and the cable is correctly plugged in.
- Disable the Wi-Fi connection on your computer to ensure that it utilizes the wired connection.
Once you’ve established a wired connection, you should experience improved download speeds and a more stable internet connection overall. However, if a wired connection is not feasible, consider optimizing your Wi-Fi setup by placing the router in a central location, minimizing interference from other devices, and using appropriate security settings to ensure a strong signal and reliable connection.
Disable Windows auto-updates
Windows auto-updates are designed to keep your operating system up to date with the latest security patches and feature enhancements. However, these updates can sometimes consume significant bandwidth and slow down your download speeds, especially when they are downloaded and installed in the background. By temporarily disabling Windows auto-updates, you can allocate more bandwidth to your downloads. Here’s how you can do it:
- Open the Windows Settings by pressing Windows + I keys together.
- Click on “Update & Security” to access the Windows Update settings.
- In the “Windows Update” tab, click on “Change active hours”.
- Set your active hours to a time when you are less likely to use your computer, such as during the night or when you’re away from your PC.
- Return to the “Windows Update” tab and click on “Advanced options”.
- Under the “Pause updates” section, toggle on the “Pause until” option and select a date far in the future to disable automatic updates temporarily.
- Close the settings window and continue with your downloads.
Keep in mind that disabling automatic updates means you won’t receive important security updates and new features. It is crucial to periodically check for updates manually and re-enable automatic updates to ensure your system remains secure and up to date.
If you have a limited data plan or frequently encounter slow download speeds due to Windows updates, consider using the Windows Update Delivery Optimization feature. It allows you to limit the bandwidth used by Windows updates, providing you with more control over download speeds while still keeping your system secure.
Remember to regularly check for updates and install them when you have sufficient bandwidth and time available. Delaying updates indefinitely can leave your system vulnerable to security risks.
Contact your Internet Service Provider (ISP)
If you have tried the previous methods and are still experiencing slow download speeds, it may be worth reaching out to your Internet Service Provider (ISP) for assistance. Your ISP can troubleshoot network-related issues and provide guidance on improving your download speeds. Here are a few steps you can take when contacting your ISP:
- Identify the issue: Before contacting your ISP, gather information about the slow download speeds you are experiencing. Note the specific times, file sizes, and any error messages you encounter. This information will help your ISP diagnose the problem more effectively.
- Call customer support: Dial the customer support hotline of your ISP or use their online chat support to initiate a conversation. Explain the issue you are facing and provide the details you gathered in the previous step.
- Follow instructions: Your ISP may guide you through a series of troubleshooting steps, such as resetting your modem or performing speed tests. Cooperate and follow their instructions to the best of your ability.
- Request a technician visit: If the issue persists and your ISP determines that the problem lies within their network infrastructure, request a technician visit to investigate and resolve the issue.
- Document interactions: Keep a record of your interactions with the ISP, including dates, times, and the names of the customer support representatives you spoke to. This documentation may come in handy if you need to escalate the issue or file a complaint.
By contacting your ISP, you allow them to address any network-related issues that may be impacting your download speeds. Their expertise and resources can help identify and resolve the underlying problem, ensuring that you receive the optimal download speeds you’re paying for.
Remember to be patient and cooperative during the troubleshooting process, as resolving network-related issues may take some time. If the issue persists even after contacting your ISP, consider exploring alternative internet service providers in your area or seeking expert advice from a tech specialist.


![How To Increase Your Internet Speed Right Now [GUIDE]](https://robots.net/wp-content/uploads/2022/04/how-to-increase-your-internet-speed-featured-300x175.jpg)