Introduction
Are you in need of downloading pictures from Google to your Mac? Whether you’re looking for images to use in a presentation, for personal use or for any other purpose, saving images from Google is a straightforward process. In this guide, we will walk you through the steps to download pictures from Google onto your Mac.
With the vast collection of images available on Google, you can find pictures for almost any topic you can imagine. Whether it’s breathtaking landscapes, adorable animal photos, or high-quality artwork, Google Images is a treasure trove of visual content.
By following the steps outlined in this article, you will be able to save any image you find on Google directly onto your Mac, providing you with a convenient way to access and use them when needed.
Note that it is essential to respect copyright laws and usage rights when using images downloaded from Google. Make sure to only download images that are labeled for reuse or have the appropriate licenses for your intended purpose.
So, without further ado, let’s dive into the step-by-step process of downloading pictures from Google onto your Mac.
Step 1: Go to Google Images
The first step in downloading pictures from Google to your Mac is to navigate to the Google Images website. Open your preferred web browser, such as Safari or Chrome, and enter “Google Images” into the search bar.
Click on the link that says “Google Images – Search by Image” or similar. This will take you to the Google Images homepage, where you can begin your search for the desired image.
Google Images is a powerful search engine that allows you to find images based on keywords or by uploading an image. You can search for specific images, browse through various categories, or even use advanced search filters to refine your results.
Once you have accessed Google Images, you will see a search bar with a camera icon on the right-hand side. This camera icon allows you to search by image. You can either paste the URL of an image you want to find or upload an image from your Mac.
If you prefer to search by keyword, simply enter the description or keywords related to the image you are looking for into the search bar and hit “Enter” or click on the magnifying glass icon.
Google will display a grid of images that match your search query. You can scroll through the page to explore the results.
If you haven’t found the desired image yet, you can try refining your search by using additional keywords or adjusting the search filters available on the left-hand side of the screen.
Once you have located the image you want to download, click on it to view it in full size, which will take you to the image details page. This is where you can proceed with the next steps to save the picture to your Mac.
Step 2: Search for the desired image
Now that you’re on the Google Images homepage, it’s time to search for the specific image you want to download to your Mac. Follow these steps to find the desired image:
- Enter keywords into the search bar: In the search bar at the top of the Google Images page, type in specific keywords related to the image you’re looking for. Be as descriptive as possible to narrow down your results. For example, if you’re searching for a picture of a sunset, you could enter “sunset on the beach.”
- Utilize additional search filters: To refine your search further, you can use the various search filters available on the left-hand side of the page. These filters include size, color, type, and even usage rights. If you need an image for commercial purposes, make sure to select the appropriate filter to find images that are labeled for commercial use.
- Browse through the search results: Google will display a grid of images that match your search query. Scroll through the page to see the different options available. If you don’t find what you’re looking for on the first page, you can navigate through multiple pages by clicking on the page numbers or the “Next” button at the bottom of the page.
- Click on a specific image: When you come across an image that catches your eye and fits your needs, click on it. This will take you to a larger view of the image along with additional details.
Remember to choose an image that is relevant to your purpose and complies with any copyright or usage restrictions. Be cautious of using copyrighted images without permission or appropriate licensing.
Once you have selected the image you want to download, you can proceed to the next step of saving it to your Mac.
Step 3: Click the image to view it in full size
After performing a search and finding the image you want to download from Google, the next step is to click on the image to view it in full size. Here’s how to do it:
- Browse the search results: Scan through the search results until you find the image that interests you. Look for an image that best matches your desired size, resolution, and content.
- Select the image: Click on the image you want to view in more detail. This will open a larger version of the image and display it on the screen.
- Use the “View Image” button (optional): In some cases, you may notice that the “View Image” button is available next to the image. If you see this button, you can simply click on it to directly view the image in its original size, without any surrounding webpage elements. However, note that this feature may not always be available, as Google has made changes to its interface and functionality in recent years.
- Inspect the details: Take a moment to examine the image closely. This will allow you to confirm if it is indeed the image you want to download and ensure its quality meets your requirements.
- Take note of the image source (optional): If you’re using the image for a project or need to provide attribution, it’s beneficial to note down the information about the image source at this stage. This information typically includes the website or photographer’s name, the date of publication, or any other relevant details.
By clicking on the image and viewing it in full size, you can assess its suitability and determine if it meets your expectations. Once you’re satisfied with the image, you can proceed to the next step to save it onto your Mac.
Step 4: Right-click on the image
After you have clicked on the image to view it in full size, the next step is to right-click on the image to access the context menu. This menu will provide you with options to save the image to your Mac. Here’s how to do it:
- Position your cursor: Move your cursor over the image you want to download, making sure it is within the boundaries of the image.
- Right-click on the image: Once your cursor is in the correct position, right-click on the image. This will bring up a context menu with various options.
The options in the context menu may vary depending on your web browser and operating system. However, there are a few common options you might see:
- Save Image As: This option allows you to save the image to your Mac. By selecting this option, a file explorer window will open, prompting you to choose the destination folder where you want the image to be saved.
- Copy Image: This option copies the image to your clipboard, allowing you to paste it into a document or image editing software.
- Open Image in New Tab: This option opens the image in a new browser tab or window, allowing you to view it without any additional webpage elements.
- Save Image to Downloads (or a similar option): Some browsers may provide a direct option to save the image to your “Downloads” folder without opening a file explorer window.
Select the appropriate option based on your preferences and the purpose for which you’re downloading the image. If you want to save the image to your Mac, proceed to the next step to choose a destination folder.
Step 5: Select “Save Image As”
Once you have right-clicked on the image, a context menu will appear with various options. In this step, we will focus on selecting the “Save Image As” option to save the image to your Mac. Follow these steps:
- Right-click on the image: Make sure your cursor is positioned over the image, then right-click to bring up the context menu.
- Locate and select “Save Image As”: Scroll through the options in the context menu until you find “Save Image As” or a similar option. Click on it to initiate the saving process.
By selecting the “Save Image As” option, you are instructing your web browser to prompt you to choose a location on your Mac where you want to save the image.
Note that the exact wording of the option may vary depending on your web browser and operating system. However, the concept remains the same, as the objective is to save the image to your Mac.
After selecting the “Save Image As” option, a file explorer window will appear, allowing you to choose the destination folder on your Mac where you want the image to be saved.
It’s a good practice to choose a folder where you can easily find the image later, such as your “Downloads” folder or a specific folder dedicated to images. You can navigate through your folders and select the desired location.
Once you have selected the destination folder for the image, you can proceed to the next step, where you have the option to rename the image if desired.
Step 6: Choose a destination folder on your Mac
After selecting the “Save Image As” option, a file explorer window will appear, prompting you to choose a destination folder on your Mac where you want the image to be saved. Follow these steps to select the appropriate folder:
- Review the file explorer window: Take a moment to familiarize yourself with the contents of the file explorer window. You will see a list of folders and directories on your Mac.
- Navigate to the desired folder: If you have a specific folder in mind, navigate through the directory structure by clicking on the folders one by one until you reach the desired location. This could be your “Downloads” folder, a designated folder for images, or any other location that suits your organizational preferences.
- Select the destination folder: Once you have located the desired folder, click on it to select it as the destination for saving the image.
- Confirm the selection: In some cases, you may see a confirmation button such as “Choose” or “Save”, depending on your operating system. Click on this button to confirm the selection of the destination folder and close the file explorer window.
Choosing a suitable destination folder is essential for easy access to your downloaded image in the future. Consider your organizational structure and preferences when selecting the folder.
If you cannot find the desired folder, or if you want to create a new folder specifically for these images, most file explorers allow you to create a new folder within the file explorer window. Look for options such as “New Folder” or a folder icon with a “+” sign to create a new folder.
Once you have selected the destination folder, you can proceed to the next step, where you have the option to rename the image if desired.
Step 7: Rename the image (optional)
After choosing the destination folder for your downloaded image, you have the option to rename the image before saving it to your Mac. Renaming the image can help you keep your files organized and make it easier to identify the image in the future. Here’s how you can rename the image:
- Review the file name: In the file explorer window, you will typically see the current file name of the image you’re downloading.
- Right-click on the image file name: Right-click on the file name to access the contextual menu.
- Select “Rename” (or similar option): From the contextual menu, choose the “Rename” option. This action will allow you to edit the file name.
- Edit the file name: Click on the file name, and it will become editable. Type in the desired name for the image.
- Avoid illegal characters and keep it descriptive: Make sure to avoid using any illegal characters in the file name, such as symbols or punctuation that are not allowed in file names. Additionally, use a descriptive name that accurately reflects the content of the image.
- Press Enter to save the new file name: Once you have entered the new name, press Enter (or Return) on your keyboard to save the changes.
Renaming the image is an optional step, but it can be helpful for better file organization and easier retrieval in the future. It’s particularly useful if you plan to download multiple images or if you want to keep track of the specific subject or purpose of each image.
If you prefer to keep the original file name, you can skip this step and proceed to the next step, where you will save the image with the chosen name in the previously selected destination folder.
Step 8: Click “Save”
After selecting the destination folder and, if desired, renaming the image, it’s time to save the image to your Mac. Follow these steps to complete the process:
- Review the file details: Take a moment to double-check the destination folder and the chosen file name to ensure everything is correct.
- Click on the “Save” button: In the file explorer window, locate the “Save” button and click on it to initiate the saving process. The button may have different labels depending on your operating system and file explorer.
Clicking the “Save” button will prompt your web browser to save the image file to the specified destination folder on your Mac. Depending on the file size and your internet connection speed, the saving process may take a few seconds or longer.
During the saving process, you may see a progress bar or a status indicator that shows the progress of the download. Once the download is complete, you will receive a confirmation message indicating that the image has been successfully saved.
It’s important to be patient and avoid closing the file explorer window or navigating away from the page until the saving process is complete. Doing so may interrupt the download and cause the image file to be incomplete or corrupted.
Once you have received the confirmation message, you can close the file explorer window and proceed to the final step to locate the downloaded image on your Mac.
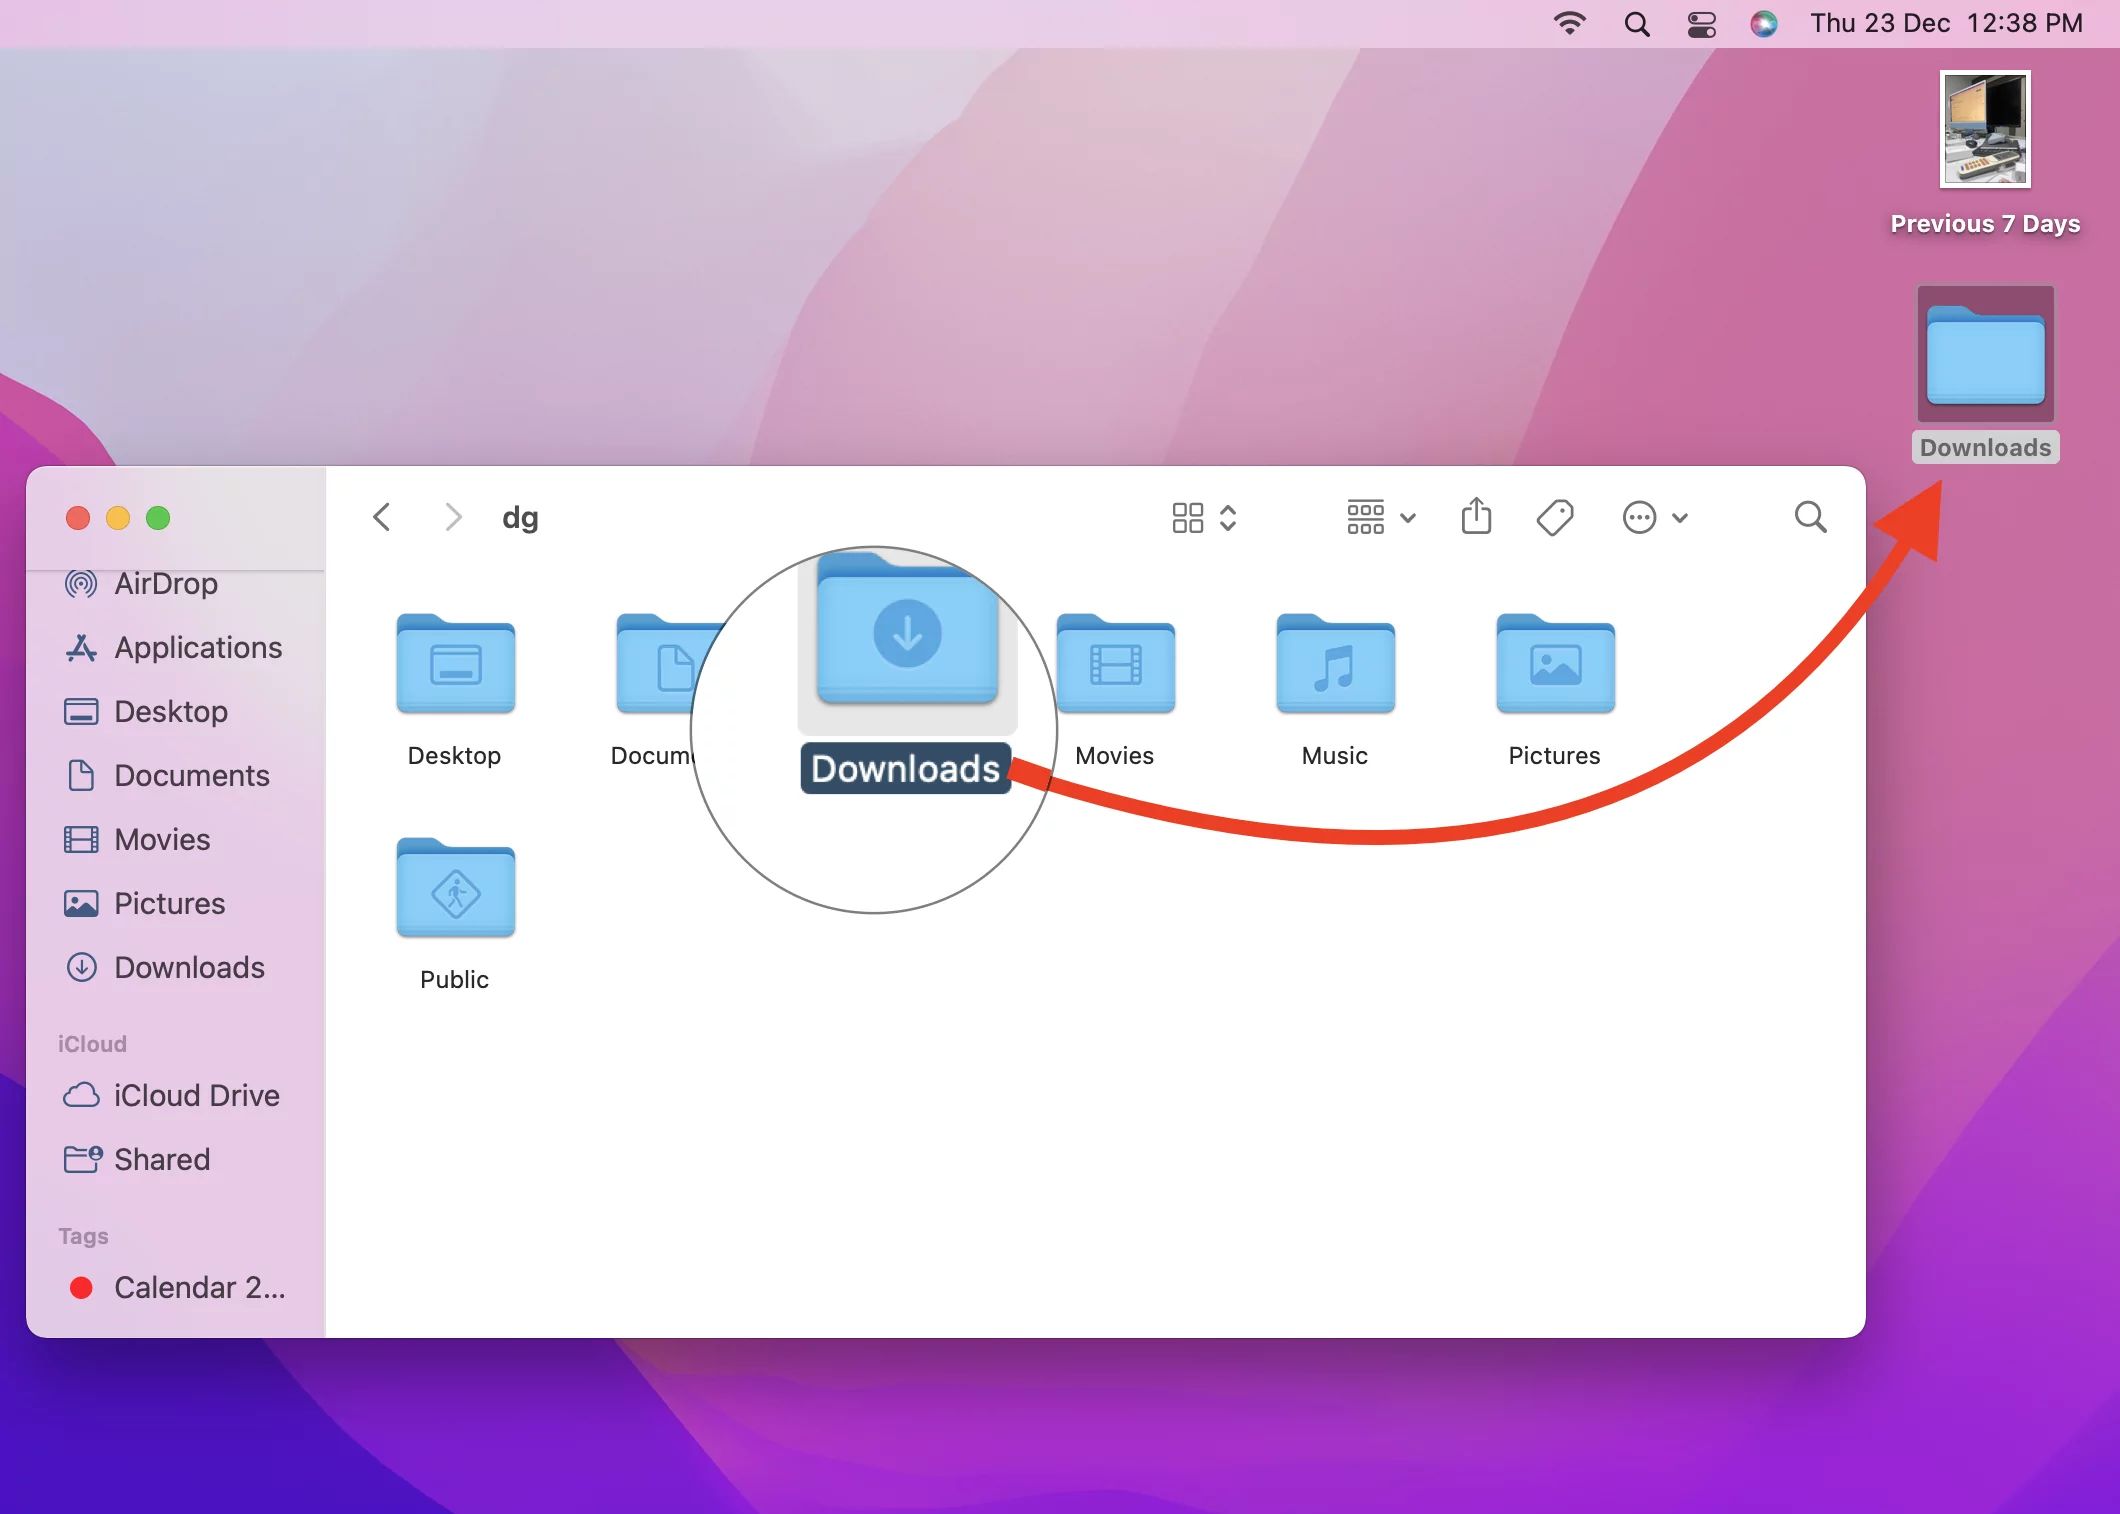
Step 9: Find the downloaded image on your Mac
After successfully saving the image to your Mac, you may want to locate the downloaded image so that you can access and use it as needed. Here’s how to find the downloaded image:
- Open the Finder: Click on the Finder icon, usually located in the dock at the bottom of your Mac screen, to open the Finder application.
- Navigate to the destination folder: In the left sidebar of the Finder window, you will see a list of common locations. Click on the folder where you saved the image, such as “Downloads” or any other specified folder.
- Search for the image file: Once you have opened the destination folder, you will see a list of files. Look for the image file you downloaded by scanning through the list. If necessary, you can use the search bar at the top-right of the Finder window and enter the file name or extension to quickly locate the image.
- Double-click to open the image: Once you have located the image file, double-click on it to open and view it using the default image viewer on your Mac. Alternatively, you can right-click on the image file and choose a specific application or software to open it, depending on your needs.
By following these steps, you will be able to find the downloaded image on your Mac and open it in the appropriate application for viewing, editing, or sharing.
If you are unable to locate the downloaded image in the expected folder, consider checking your other folders or performing a search on your Mac using the search bar in the Finder window. Additionally, ensure that you have saved the image and the chosen file destination was correct during the saving process.
Now that you have successfully found the downloaded image on your Mac, you can utilize it for your desired purposes, whether for personal use or in professional projects.
Conclusion
Downloading pictures from Google to your Mac is a simple and convenient process that allows you to access a wide variety of visual content. By following the step-by-step guide outlined in this article, you can easily save images from Google Images to your computer for personal or professional use.
Starting with navigating to Google Images and searching for the desired image, you can explore the vast collection of pictures available. Clicking on an image allows you to view it in full size, and then right-clicking on the image presents you with the option to save it. By selecting “Save Image As” and choosing the destination folder on your Mac, you can save the image to your computer. Renaming the image is an optional step, but it can help with organization and easier identification.
Once the image is saved, you can find it on your Mac by opening the Finder and navigating to the destination folder. From there, you can open the image in an appropriate application for viewing, editing, or sharing.
Remember to carefully consider the copyright and usage rights of the images you download from Google, ensuring that you are using them within the boundaries of the law and any applicable licensing agreements.
Now that you have mastered the process of downloading pictures from Google on your Mac, you have the ability to enhance your presentations, create captivating designs, or simply enjoy and share visual content to suit your needs.