Introduction
Welcome to our guide on how to download music to your Kindle Fire! The Kindle Fire is a versatile device that allows you to not only read books and browse the internet but also enjoy your favorite music on the go. Whether you’re a music enthusiast or simply want to have some tunes to listen to while you relax, we’ve got you covered.
Downloading music to your Kindle Fire is a straightforward process, but it does require a few steps to get started. In this guide, we will walk you through each step, ensuring that you can follow along easily and get your favorite music onto your device in no time.
Before we dive into the process, it’s essential to note that not all models of the Kindle Fire support direct music downloads. Older models may have limitations or require additional apps to be installed. We will address these differences in the following steps to ensure that you have the right setup for your Kindle Fire.
To download music to your Kindle Fire, you first need to set up an account with a music streaming service. Several options are available, such as Amazon Music, Spotify, or Pandora. These services allow you to access a vast library of music and download it directly to your device for offline listening.
If you’re ready to get started, grab your Kindle Fire and let’s explore the steps necessary to download music and create your personalized playlist that will keep you entertained all day long.
Step 1: Check if your Kindle Fire supports music downloads
Before diving into the process of downloading music onto your Kindle Fire, it’s important to determine if your device supports this feature. While newer models typically have built-in support for music downloads, some older models may require additional steps or apps to enable this functionality.
To check if your Kindle Fire supports music downloads, follow these steps:
- Power on your Kindle Fire and unlock the device.
- Tap on the “Apps” tab on the home screen to access your apps.
- Look for the Amazon Music app or any other music streaming app you have installed. If you can’t find any music-related apps, it may indicate that your device does not support direct music downloads.
- If you have the Amazon Music app or a similar app installed, tap on it to open it and see if you can access the music library. If you are able to browse and listen to music within the app, this indicates that your Kindle Fire supports music downloads.
- If you don’t have any music streaming apps installed, you may need to download one from the Amazon Appstore or another trusted source. Look for apps like Amazon Music, Spotify, or Pandora, which are popular choices for streaming and downloading music.
If you discover that your Kindle Fire does not have built-in support for music downloads, don’t worry! There are still options available to enjoy music on your device. You can consider using music streaming services that do not require downloading, such as Spotify or Pandora. These services allow you to stream music directly from the internet, eliminating the need for local storage on your device.
Additionally, you can explore third-party apps that specialize in downloading and managing music on your Kindle Fire. These apps may provide a workaround for older models or offer additional features and customization options for music playback.
Once you’ve confirmed that your Kindle Fire supports music downloads or have found an alternative method to enjoy music on your device, you’re ready to move on to the next steps. In the following sections, we will guide you through the process of setting up a music streaming service account, downloading the necessary apps, and accessing your favorite tunes on your Kindle Fire.
Step 2: Set up an Amazon Music or other music streaming service account
To download and enjoy music on your Kindle Fire, you need to have an account with a music streaming service. One popular option is Amazon Music, which offers a vast library of songs and albums for you to explore. Alternatively, you can choose other music streaming services like Spotify or Pandora.
Here’s how to set up an Amazon Music or other music streaming service account:
- Open the web browser on your Kindle Fire and navigate to the Amazon Music website or the website of your chosen music streaming service.
- Look for the option to create an account or sign up for a free trial. Depending on the service, you may need to provide your email address, create a password, and agree to the terms and conditions.
- Follow the prompts to complete the registration process. Some services may ask for additional information, such as your name and payment details if you opt for a premium subscription.
- Once you have successfully signed up, check your email for any verification messages or instructions that may be required to activate your account.
With your Amazon Music or other music streaming service account set up, you’re now ready to proceed to the next step of the process. Make sure to have your login credentials handy, as you’ll need them to sign in to the music streaming app on your Kindle Fire.
If you choose a free account option, keep in mind that it may come with limitations, such as ads or limited access to certain features or songs. If you want an ad-free experience or access to premium content, you can consider upgrading to a paid subscription, which typically offers additional benefits like offline downloads and higher audio quality.
Setting up an account with a music streaming service provides you with access to a vast collection of music, allowing you to explore and discover new songs and artists. Whether you prefer the personalized recommendations of Amazon Music or the user-generated playlists on Spotify, having a streaming service account will enhance your music experience on your Kindle Fire.
In the next step, we will guide you through the process of downloading the music streaming app on your Kindle Fire, so you can start filling your device with your favorite tunes.
Step 3: Download the music streaming app on your Kindle Fire
Now that you have set up your Amazon Music or other music streaming service account, it’s time to download the corresponding app on your Kindle Fire. The app will serve as your gateway to access the music library and enjoy your favorite songs.
Here’s how to download the music streaming app on your Kindle Fire:
- Go to the home screen of your Kindle Fire and tap on the “Apps” tab.
- Open the Amazon Appstore or the app store associated with your device.
- Search for the music streaming app you want to download. For example, if you are using Amazon Music, search for “Amazon Music” in the search bar.
- Tap on the app when you find it in the search results. This will take you to the app’s download page.
- Click on the “Download” or “Get” button to initiate the download and installation process.
- Wait for the app to download and install on your Kindle Fire. The time may vary depending on your internet connection speed.
Once the app is successfully installed, you will find its icon on your home screen or in the Apps tab. Tap on the app’s icon to launch it.
If you are using Amazon Music, you may already have the app pre-installed on your Kindle Fire. In that case, you can skip the download process and directly access the app from your home screen or the Apps tab.
Remember to ensure that the app you download is compatible with your specific model of Kindle Fire. Some older models may require specific versions or alternative apps to provide music streaming and downloading capabilities.
Downloading the music streaming app on your Kindle Fire is a crucial step as it grants you access to a vast collection of songs, albums, and playlists. It transforms your device into a portable music player, ready to entertain you wherever you go.
In the next step, we will guide you through signing in to your music streaming service account on the app, allowing you to personalize your music experience on your Kindle Fire.
Step 4: Sign in to your music streaming service account on the app
With the music streaming app successfully downloaded on your Kindle Fire, it’s time to sign in to your music streaming service account. By logging in, you can access your personalized music library, playlists, and settings, ensuring a tailored music experience on your device.
Follow these steps to sign in to your music streaming service account on the app:
- Locate the music streaming app on your Kindle Fire’s home screen or in the Apps tab and tap on its icon to open the app.
- On the app’s login screen, you will typically find options to sign in or register for a new account. Select the “Sign In” option.
- Enter your login credentials, which usually consist of your email address or username and password associated with your music streaming service account. These are the same credentials you used when setting up your account.
- If you have trouble remembering your login details, look for the “Forgot password” or “Forgot username” options on the login screen. These options will guide you through the process of recovering your account information.
- After entering your login credentials, tap on the “Sign In” or “Login” button.
- Wait for the app to authenticate your account. This process may take a few seconds, depending on your internet connection speed.
Once the app successfully verifies your account, you will be logged in and granted access to the music streaming service’s features and content. Take a moment to explore the app’s interface, which may include sections like Recommended or Popular selections, playlists, curated radio stations, and search functionality.
Signing in to your music streaming service account on the app allows you to customize your music listening experience on your Kindle Fire. You can access your favorite songs, create personalized playlists, discover new music based on your preferences, and enjoy a range of additional features offered by the service.
Now that you are logged in to the app, we will move on to the next step, where we will guide you through the process of searching for and selecting the music you want to download on your Kindle Fire.
Step 5: Search for and select the music you want to download
Now that you’re logged in to your music streaming app on your Kindle Fire, you’re ready to search for and select the music you want to download. Whether it’s a specific song, an album, or a curated playlist, the app’s search functionality will help you find exactly what you’re looking for.
Follow these steps to search for and select the music you want to download:
- Open the music streaming app on your Kindle Fire by tapping on its icon on the home screen or in the Apps tab.
- Look for the search bar within the app’s interface. It’s usually located at the top or in a prominent position on the screen.
- Tap on the search bar to activate it and bring up the on-screen keyboard.
- Enter the name of the song, artist, album, or playlist you want to find. As you type, the app may suggest relevant search results to help you refine your search.
- Once you have entered your search query, tap on the search or enter button on the keyboard to initiate the search.
- Review the search results page that appears. The app will display a list of songs, albums, playlists, or artists matching your search criteria.
- Browse through the search results and tap on the specific item you want to download. This will bring up more details about the selection.
- Within the selection’s detail page, you may find options like “Add to Library,” “Add to Playlist,” or “Download” depending on the app. Tap on the appropriate option to download the music to your Kindle Fire.
- Repeat the above steps to search for and select additional music that you want to download to your device.
Remember that the available options and user interface may vary depending on the music streaming app you are using. However, most apps provide intuitive search functionality and clear instructions on how to download music.
Searching for and selecting the music you want to download allows you to create your personalized collection on your Kindle Fire. You have the freedom to explore different genres, discover new artists, and compile a library of your favorite tracks.
In the next step, we will guide you through the process of downloading the selected music to your Kindle Fire, so you can enjoy it offline and on the go.
Step 6: Download the selected music to your Kindle Fire
Now that you’ve searched for and selected the music you want to download on your music streaming app, it’s time to download the chosen tracks, albums, or playlists to your Kindle Fire. By downloading the music, you can enjoy it offline, even when you don’t have an internet connection.
Follow these steps to download the selected music to your Kindle Fire:
- Ensure that you have a stable internet connection, as downloading music requires a reliable and consistent internet connection.
- Open the music streaming app on your Kindle Fire and make sure you are on the page displaying the selection you want to download. This could be a specific song, album, or playlist.
- Look for the download button or option associated with the selected item. It is usually represented by an arrow pointing downwards or a cloud icon with an arrow.
- Tap on the download button or option to initiate the download process. The app will start downloading the selected music files to your Kindle Fire.
- Depending on the size and quantity of the music you are downloading, the process may take some time. You can monitor the progress of the download, usually indicated by a progress bar or a percentage completion.
- Once the download is complete, the music is stored locally on your Kindle Fire, allowing you to access and enjoy it offline at any time.
- Repeat these steps for any additional music items you want to download to your device.
It’s important to note that the amount of music you can download may be subject to certain limitations, such as the available storage space on your Kindle Fire or any limitations set by your music streaming service account. Be mindful of these restrictions to ensure a smooth and hassle-free downloading experience.
By downloading your selected music to your Kindle Fire, you remove the need for an active internet connection to enjoy your favorite tunes. Whether you’re traveling, in a low-signal area, or simply want to conserve data, having your music downloaded gives you the flexibility to listen to your curated collection wherever and whenever you want.
In the next step, we will guide you through accessing your downloaded music on your Kindle Fire, so you can start enjoying your offline music library.
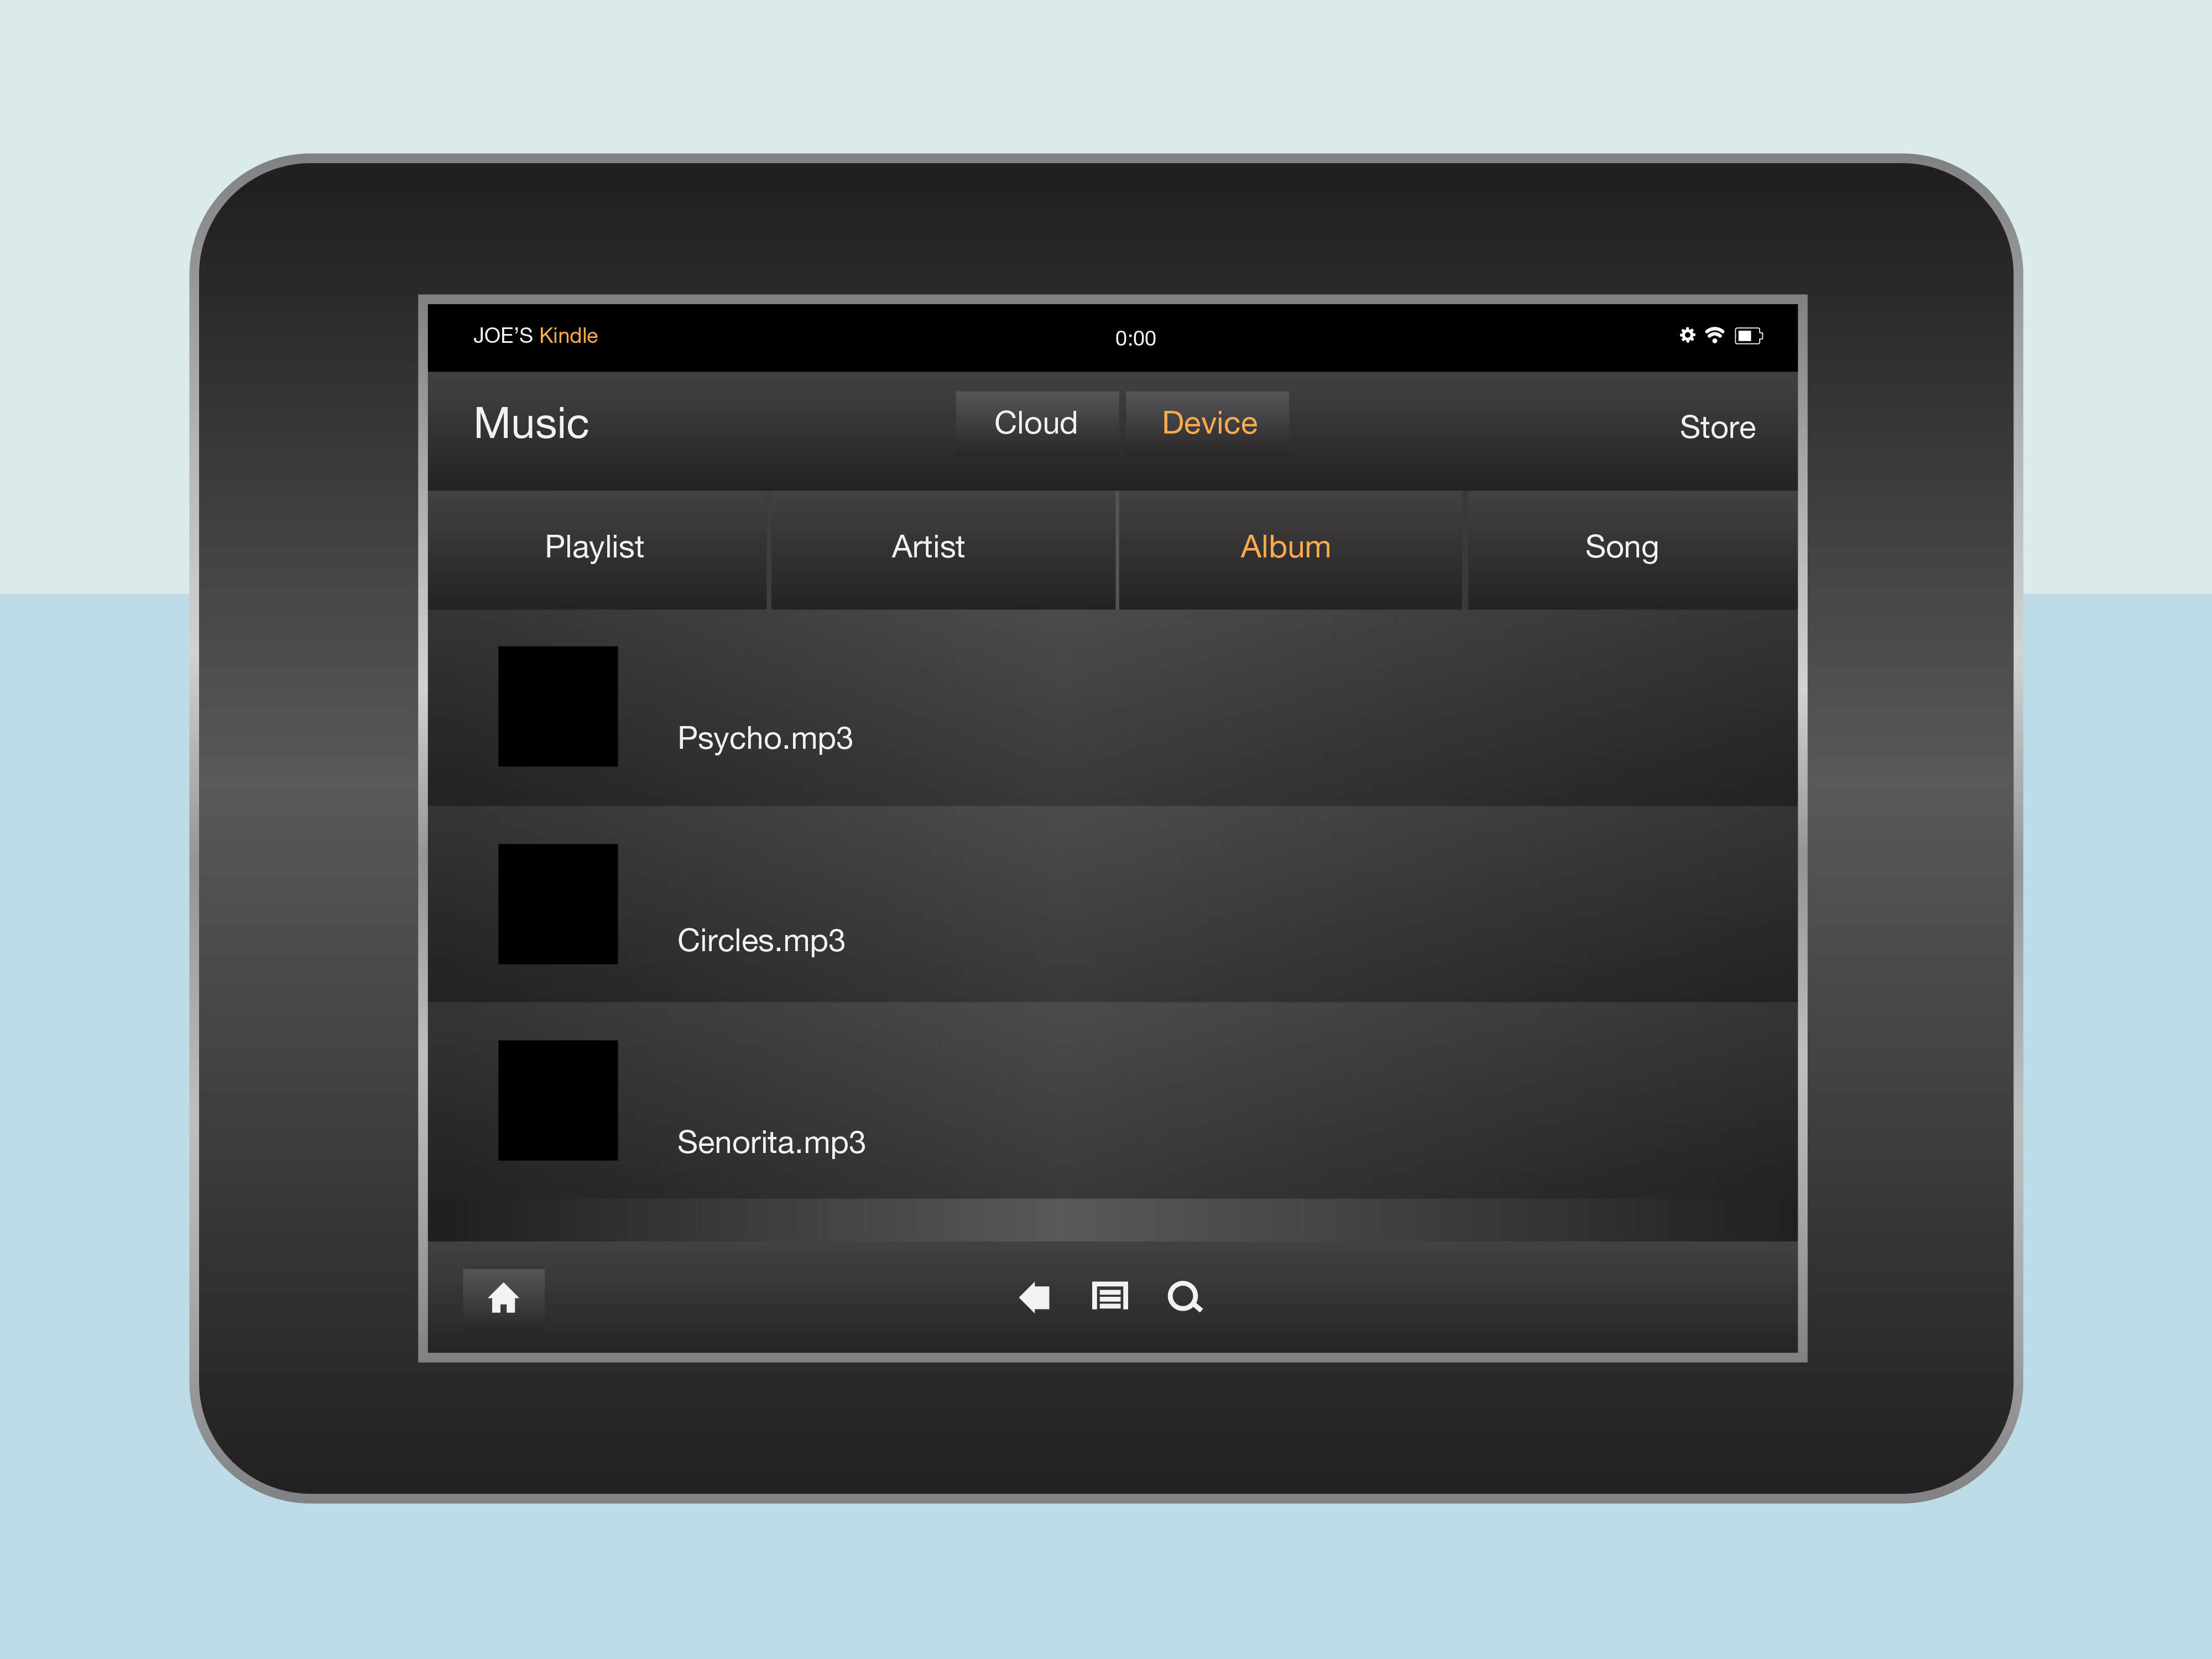
Step 7: Access your downloaded music on the Kindle Fire
Now that you have successfully downloaded your favorite music to your Kindle Fire, it’s time to access and enjoy your offline collection. Whether you’re in the mood for a specific song, album, or playlist, accessing your downloaded music is a breeze.
Follow these steps to access your downloaded music on the Kindle Fire:
- On your Kindle Fire’s home screen, locate the music streaming app you used to download the music. Tap on its icon to open the app.
- Once the app is open, you will usually find a navigation menu or tabs at the bottom or top of the screen. Tap on the option that lets you access your music library or downloads.
- In the library or downloads section, you should see a list of the music you have downloaded. This may be organized by categories such as songs, albums, or playlists.
- Browse through the list and tap on the specific item you want to play. This will open the player screen, where you can control playback, adjust volume, and see the artwork and song details.
- You can also create playlists, rearrange the order of songs, or access additional settings within the music streaming app to customize your listening experience.
- Enjoy listening to your downloaded music without the need for an internet connection. Explore different playlists, artists, or genres to find the perfect soundtrack for your day.
By accessing your downloaded music on the Kindle Fire, you have the freedom to enjoy your favorite songs and playlists wherever you go, even when you’re offline. Whether you’re on a long journey, relaxing at home, or working out at the gym, your personal music collection is always at your fingertips.
Remember to periodically sync your music streaming app to update your downloaded library. Some apps allow you to set automatic syncing preferences, ensuring that you always have your most recent additions available for offline enjoyment.
Congratulations! You have completed all the steps necessary to download and access your music on your Kindle Fire. Now you can immerse yourself in your favorite tunes whenever and wherever you like.
Conclusion
Congratulations on successfully downloading and accessing music on your Kindle Fire! You have learned how to set up a music streaming service account, download the necessary app, and select and download your favorite songs, albums, and playlists. Now, you can enjoy your personalized music collection on your device, even when you’re offline.
Remember, before starting the process, it’s important to check if your Kindle Fire supports music downloads. Older models may require additional apps or have limitations, so be sure to verify compatibility.
Setting up an account with a music streaming service like Amazon Music, Spotify, or Pandora opens up a world of endless musical possibilities. These services offer vast libraries of songs and albums, ensuring that you always have something to match your mood.
By downloading the music streaming app on your Kindle Fire, you have transformed your device into a portable music player. It allows you to access and enjoy your favorite tunes wherever and whenever you want.
Searching for and selecting the music you want to download gives you the freedom to create a personalized collection. Whether it’s a beloved artist, a catchy new song, or a specially curated playlist, you can tailor your music library to suit your preferences.
Once downloaded, your music is stored locally on your Kindle Fire, eliminating the need for an internet connection. You can access your offline library at any time, whether you’re on a long trip, in a low-signal area, or simply want to save on data usage.
With easy access to your downloaded music on your Kindle Fire, you can enjoy a seamless and engaging music experience. Relish in the melodies, sing along to your favorite lyrics, and let the music uplift your spirits.
Thank you for following our guide on how to download music to your Kindle Fire. We hope this information has been helpful and that you now feel confident in navigating the process. Enjoy your music-filled adventures on your Kindle Fire!