Introduction
Welcome to the exciting world of GTA mods! Grand Theft Auto (GTA) is a popular action-adventure game that allows players to roam free in a vast, open-world environment. While the base game provides countless hours of entertainment, mods take the experience to a whole new level. Mods, short for modifications, are user-created enhancements that can add new features, improve graphics, introduce new gameplay mechanics, and much more.
In this guide, we will walk you through the process of downloading and installing GTA mods. Whether you’re a seasoned GTA player looking to spice up your gaming experience or a newcomer eager to explore the limitless possibilities, this guide has got you covered.
Before we dive into the modding scene, it’s essential to understand that modding can be a complex process, and it’s crucial to follow the necessary steps to ensure a smooth experience. Additionally, it’s essential to note that modding is typically done on the PC version of the game, as console versions may have limited modding capabilities.
In the following sections, we will guide you through the process of selecting the right modding platform, researching and choosing mods, understanding mod requirements, downloading and installing script hooks, finding and downloading mods, installing mods, managing mods with mod managers, updating mods, and troubleshooting common issues.
So, are you ready to take your GTA experience to the next level? Let’s begin our journey into the world of GTA mods!
Selecting the Right Modding Platform
When it comes to modding GTA, choosing the right modding platform is crucial. Different platforms offer unique features and support different types of mods, so it’s essential to consider your specific needs and preferences. Here are a few popular modding platforms to consider:
- OpenIV: OpenIV is a widely used modding platform for GTA. It provides a comprehensive set of tools and features, allowing you to create and manage mods with ease. With OpenIV, you can easily browse game files, import and export textures, and install mods seamlessly. It’s a great choice for both beginners and experienced modders.
- FiveM: If you’re interested in multiplayer modding, FiveM is an excellent option. FiveM is a modding framework that allows you to create custom multiplayer servers with unique gameplay mechanics. It’s perfect for those who want to enjoy GTA with friends or join existing modded servers. Keep in mind that FiveM is primarily focused on multiplayer modifications.
- Script Hook V: Script Hook V is not a standalone modding platform, but rather a crucial tool for modding GTA. It acts as a bridge between the game’s scripts and the mods you install. Before installing mods, you’ll need to download and install Script Hook V to ensure compatibility. It’s important to note that Script Hook V is only compatible with specific game versions, so make sure to check for compatibility before downloading.
- Modding Communities: Apart from specific platforms, there are numerous modding communities where modders share their creations and provide support. Websites like GTA5-Mods.com and GTAforums.com are excellent resources for finding and discussing mods. These communities offer a wealth of information, tutorials, and downloads to help you get started.
When selecting a modding platform, consider your modding goals and the level of experience you have. If you’re new to modding, platforms like OpenIV and FiveM may provide a more user-friendly experience. On the other hand, if you’re an experienced modder looking for specific capabilities, exploring modding communities and their forums may be the best option.
Remember, choosing the right modding platform is the foundation for a successful modding experience. Take the time to explore different platforms, read user reviews, and consider the compatibility of the platform with your specific GTA version.
Now that you understand the importance of selecting the right modding platform, let’s move on to the next step: researching and choosing mods.
Researching and Choosing Mods
Once you’ve selected the right modding platform for your GTA game, it’s time to dive into the exciting world of mods. With countless mods available, it’s important to research and choose mods that align with your interests and preferences. Here are some essential steps to help you in the process:
- Define Your Objectives: Before starting your search for mods, take a moment to define what you want to achieve with modding. Do you want to enhance the game’s graphics, add new vehicles, or introduce gameplay changes? Having a clear objective will help you narrow down your mod choices.
- Read User Reviews and Ratings: Modding communities often include user reviews and ratings for mods. Take the time to read through these reviews to get a sense of user experiences and any potential issues with the mod. This will help you make informed decisions and avoid mods that may not deliver as expected.
- Check Mod Compatibility: Ensure that the mods you choose are compatible with your specific GTA game version and modding platform. Mods designed for a different game version or incompatible platforms may cause errors or glitches. Always double-check the mod’s compatibility information provided by the mod author.
- Consider Mod Size and Performance Impact: Some mods can be quite large in size and may impact game performance. If you have limited bandwidth or a lower-end system, it’s important to consider the size and performance impact of the mods you intend to install. Opt for mods that fit within your system’s capabilities.
- Explore Mod Categories: Mods are typically categorized based on their functionality, such as graphics enhancements, gameplay changes, vehicle mods, and more. Browse through different mod categories to discover the various options available. You might stumble upon mods that you didn’t initially consider but align perfectly with your interests.
- Watch Mod Demos and Tutorials: Many mod authors provide demos and tutorials showcasing their mods in action. Watching these videos can give you a better understanding of how the mod works and its potential impact on your gameplay. It can also help you determine if the mod aligns with your vision for modding GTA.
Remember, each mod comes with its own set of features and potential limitations. It’s important to invest time in researching and understanding what each mod has to offer before making a final decision. By following these steps, you’ll be able to narrow down your choices and select mods that will enhance your GTA experience.
Now that you know how to research and choose mods effectively, let’s move on to the next step: understanding mod requirements.
Understanding Mod Requirements
Before you can start downloading and installing mods for your GTA game, it’s crucial to have a clear understanding of the mod’s requirements. Mod requirements include the necessary software, game version, and any additional dependencies needed to ensure the mod works correctly. Here are some key aspects to consider when understanding mod requirements:
- Game Version Compatibility: Mods are typically designed for specific game versions. Ensure that the mod you intend to install is compatible with your GTA game version. Installing mods that are not compatible can lead to crashes and other glitches.
- System Requirements: Some mods may have specific system requirements, such as minimum RAM, graphics card capabilities, or CPU specifications. It’s essential to check whether your system meets the mod’s requirements to ensure smooth performance.
- Script Hook Requirement: Many mods require Script Hook, a tool used to connect mods to the game’s scripting engine. Make sure to install Script Hook and any necessary updates that are compatible with your game version. Failing to install Script Hook or using an incompatible version can prevent mods from working.
- Additional Dependencies: Some mods may have additional dependencies, such as specific libraries or plugins, to function properly. These dependencies may need to be installed alongside the mod to ensure its functionality. Always check the mod’s documentation or readme file for any additional requirements.
- Mod Load Order: In some cases, if you have multiple mods installed, it’s important to consider the mod load order. Certain mods may require specific positions in the load order to function correctly. Mod load order can typically be managed through mod managers or specific instructions provided by the mod author.
- Modding Platform Specifics: Depending on the modding platform you’re using, there may be additional requirements or specific instructions to follow. Familiarize yourself with the guidelines provided by the modding platform to ensure a smooth installation process.
Understanding these requirements before installing mods will help you avoid compatibility issues and ensure a stable and enjoyable modding experience. Take the time to carefully read through the mod requirements and double-check if your system and game meet the necessary criteria.
Now that you understand the importance of mod requirements, let’s move on to the next step: downloading and installing Script Hook.
Downloading and Installing Script Hook
In order to successfully install and run mods in your GTA game, you’ll need to download and install Script Hook. Script Hook is a crucial tool that acts as a bridge between the game’s scripts and the mods you install. Here’s a step-by-step guide to downloading and installing Script Hook:
- Research Script Hook Compatibility: Before downloading Script Hook, verify that it is compatible with your specific GTA game version. Script Hook versions are typically released to match specific game updates, so using an incompatible version can cause errors or crashes.
- Find Reliable Script Hook Sources: Script Hook can be downloaded from various sources. It’s important to ensure that you download it from a reliable and trustworthy source to avoid any potential malware or fake versions. Websites like the official Script Hook website or popular modding communities are reliable sources for downloading Script Hook.
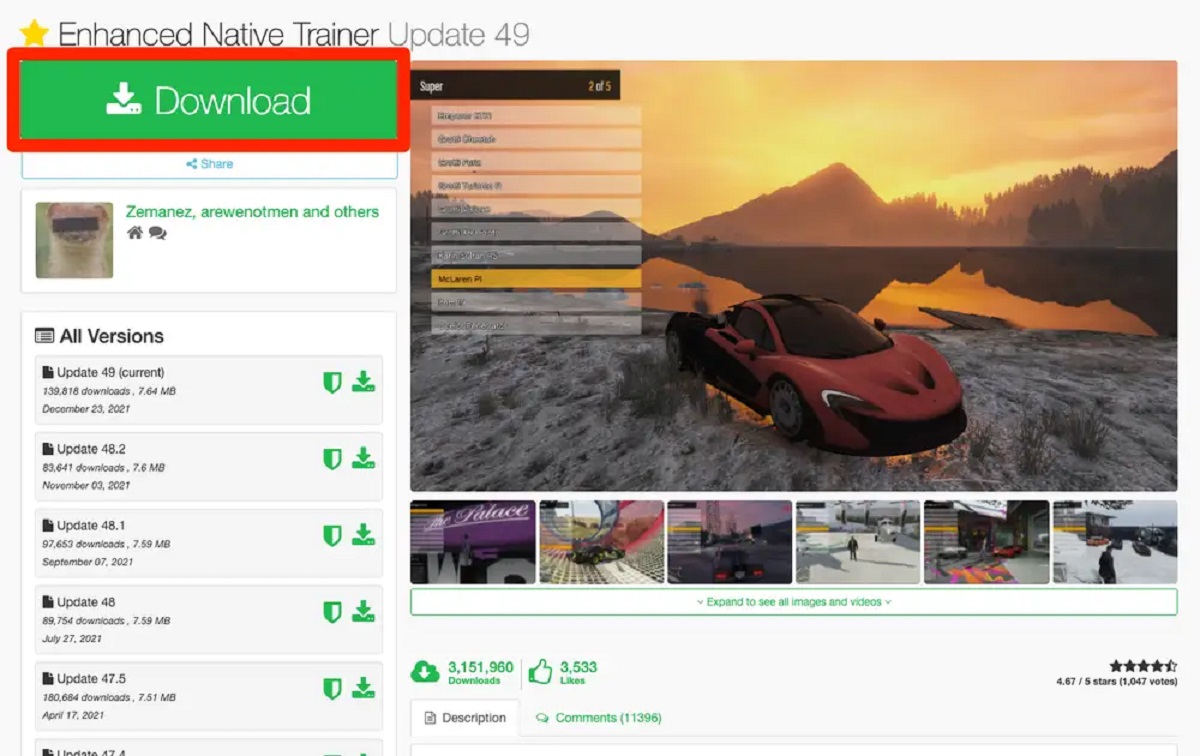
- Download Script Hook: Once you’ve identified a reliable source, navigate to the download section and locate the appropriate Script Hook version for your game. Download the Script Hook archive, which is typically a .zip or .rar file.
- Extract the Script Hook Files: After downloading the Script Hook archive, extract the contents to a convenient location on your computer. Most archive tools allow you to right-click on the archive and select “Extract” or use the software’s extraction feature.
- Copy Script Hook Files to Game Directory: Open the extracted folder and locate the Script Hook files, usually named “dinput8.dll” and “ScriptHookV.dll.” Copy these files and navigate to your GTA game directory, which is typically located in the Steam or Rockstar Games folder on your computer. Paste the Script Hook files directly into the main game directory.
- Confirm Successful Installation: To confirm that Script Hook is installed correctly, launch your GTA game. If Script Hook has been installed properly, you should see a small notification message indicating that Script Hook has been loaded.
By successfully installing Script Hook, you’ve laid the groundwork for installing and running mods in your GTA game. Script Hook acts as a framework that allows mods to interact with the game’s scripts and enhances the modding experience.
Now that you have Script Hook installed, it’s time to move on to the next step: finding and downloading mods for your GTA game.
Finding and Downloading Mods
Now that you have Script Hook installed, it’s time to find and download the mods that will enhance your GTA game. There are several resources available where you can discover a wide variety of mods created by the GTA modding community. Here’s a step-by-step process to help you find and download mods:
- Visit Modding Communities: Modding communities such as GTA5-Mods.com and GTAforums.com are excellent platforms to find a vast collection of mods. These websites provide detailed mod listings, including descriptions, screenshots, and user reviews.
- Browse Mod Categories: Explore different mod categories to find mods that align with your interests and preferences. Categories can range from graphics enhancements and gameplay changes to vehicle mods and character customizations. Narrow down your search by selecting specific categories that appeal to you.
- Read Mod Descriptions and User Reviews: Take the time to read the mod descriptions provided by the mod authors. These descriptions offer insights into what the mod does, its features, and any additional requirements. Additionally, check user reviews and ratings to get a better understanding of the mod’s overall quality and user satisfaction.
- Download Mods: Once you’ve found a mod you’re interested in, click on the download button or link provided on the mod’s page. In most cases, mods are downloaded as compressed files, such as .zip or .rar archives.
- Extract Mod Files: After downloading the mod, extract the contents of the compressed file to a temporary location on your computer. Most archive tools allow you to right-click on the file and select “Extract” or use the software’s extraction feature.
- Follow Mod Installation Instructions: Each mod may have specific installation instructions provided by the mod author. Take the time to read through these instructions carefully. They may include copying files to specific directories, modifying game files, or using mod managers to install the mod.
- Check for Mod Dependencies: Some mods may require additional files or libraries to function correctly. Make sure to check the mod’s description or readme file for any specific dependencies and install them accordingly.
- Verify Successful Installation: Once you have installed the mod, launch your GTA game to verify that it is working correctly. Some mods may have in-game settings or configuration files that you can adjust to customize your mod experience.
Remember to exercise caution when downloading and installing mods. Stick to reliable sources and reputable modding communities to ensure that you are getting legitimate and safe mods for your GTA game.
Now that you know how to find and download mods successfully, it’s time to move on to the next step: installing mods into your GTA game.
Installing Mods
Now that you have downloaded the mods for your GTA game, it’s time to install them and bring new features and enhancements to your gameplay. The installation process may vary depending on the modding platform and the specific mod you are installing. Here are some general steps to help you install mods:
- Backup Game Files: Before you proceed with installing mods, it’s always a good idea to create a backup of your game files. This will ensure that you can revert to the original game state if any issues arise during the installation process.
- Identify Mod Files: After downloading the mod, locate the mod files that you extracted from the compressed archive. These files may include script files (ending in .dll or .asi), texture files (ending in .ytd or .png), or other relevant mod content.
- Copy Mod Files: Copy the mod files you identified in the previous step to the appropriate directory in your GTA game folder. The mod installation instructions or the mod’s documentation will specify the exact location where the files should be placed.
- Manage Mod Load Order: If you have multiple mods installed, it’s essential to consider the mod load order. Some mods may require a specific load order to function correctly. Mod load order management can typically be done through mod managers or by following specific instructions provided by the mod author.
- Enable Mods: If you are using a modding platform like OpenIV, you may need to enable the mods in the platform’s settings. This step ensures that the mods you installed are active and ready to enhance your gameplay.
- Test Mods: Launch your GTA game to test the installed mods. Ensure that the mods are functioning as intended and that they do not cause any compatibility issues or errors. Pay attention to any in-game settings or configurations that may be available for the installed mods.
- Update Mods: It’s important to keep your mods up to date. Mod authors frequently release updates to improve compatibility, fix issues, or add new features. Regularly check for updates and install them to ensure that you have the latest version of each mod.
By following these steps, you’ll be able to install mods and enhance your GTA game with exciting new features and enhancements. Remember to follow the specific installation instructions provided by each mod and exercise caution when modifying game files.
Now that you have successfully installed mods, let’s explore how you can manage mods using mod managers in the next section.
Managing Mods with Mod Managers
Mod managers are tools that simplify the process of installing, organizing, and managing mods for your GTA game. They provide an efficient way to enable or disable mods, handle conflicts between different mods, and keep your mod library organized. Here’s a step-by-step guide on how to manage mods using mod managers:
- Choose a Mod Manager: There are several mod managers available for GTA mods, such as OpenIV Package Installer and Mod Organizer 2. Research different mod managers and select one that suits your preferences and is compatible with your modding platform.
- Install the Mod Manager: Download the mod manager from a reputable source and follow the installation instructions provided by the developer. Typically, the installation involves running the installer and specifying the installation directory.
- Add Mods to the Mod Manager: Once the mod manager is installed, you’ll need to add the mods you want to manage. This is usually done by browsing for the mod files or specifying the mod folder location. The mod manager will then import the mods into its library.
- Enable or Disable Mods: With the mods added to the mod manager, you can enable or disable them as needed. This feature allows you to selectively activate or deactivate mods without having to manually move or delete mod files in your game directory.
- Handle Mod Conflicts: Mod managers often provide functionality to handle conflicts between different mods. If two or more mods modify the same game files, conflicts may arise. The mod manager will help you identify and resolve these conflicts to ensure the smooth functioning of your mods.
- Organize Mods: Mod managers offer features to organize your mods efficiently. You can create mod categories, group mods by type or functionality, and assign tags or labels to quickly locate and manage your installed mods.
- Update Mods: Many mod managers provide an update function to check for updates to your installed mods. This feature ensures that you have the latest version of each mod. Regularly check for updates and install them to keep your mods up to date.
- Launch the Game: Once you’ve managed your mods using the mod manager, launch your GTA game through the mod manager. It will automatically detect and enable the mods you have selected, allowing you to enjoy their enhanced features and functionality.
Using a mod manager simplifies the process of managing multiple mods, reduces the chances of conflicts, and provides a streamlined approach to enable or disable mods as desired. Make sure to familiarize yourself with the features and capabilities of the specific mod manager you choose to optimize your modding experience.
Now that you know how to effectively manage mods using mod managers, let’s move on to the next step: updating your installed mods.
Updating Mods
As the GTA modding community continues to evolve, mod authors often release updates to improve compatibility, fix bugs, and introduce new features. Keeping your mods up to date ensures that you have the latest enhancements and resolves any known issues. Here’s a step-by-step guide on how to update your installed mods:
- Check for Mod Updates: Regularly check the modding community websites or forums from where you obtained your mods. Most mod authors provide information on updates or new releases in dedicated mod pages or discussion threads.
- Download the Updated Mod: Once you find an updated version of a mod you have installed, download the updated files. Make sure you are downloading the specific mod version that is compatible with your GTA game version and modding platform.
- Backup Game Files and Old Mod Version: Before updating any mod, it’s wise to back up your game files and the old version of the mod you currently have installed. This allows you to revert to the previous version in case any issues arise with the updated mod.
- Replace Mod Files: After downloading the updated mod files, locate the files you need to replace in your mod folder or game directory. Typically, you will need to overwrite the existing mod files with the updated ones.
- Confirm Successful Update: Launch your GTA game to confirm that the updated mod is working correctly and that any previous issues or bugs have been resolved. If necessary, adjust any in-game settings or configurations related to the updated mod.
- Delete Old Mod Version: Once you have confirmed that the updated mod is functioning correctly, it’s safe to delete the old version of the mod from your mod folder or game directory. This helps to keep your mod library organized and prevents conflicts between different versions.
Updating your mods is essential to ensure compatibility with game updates, enhance your modding experience, and take advantage of any improvements or additions made by mod authors. Regularly checking for updates and keeping your mods up to date will help you stay up to speed with the ever-evolving world of GTA modding.
Now that you know how to update your installed mods, let’s move on to the next step: troubleshooting common issues that may arise during the modding process.
Troubleshooting Common Issues
While modding can greatly enhance your GTA gameplay experience, it’s important to be aware that issues can arise. Luckily, many common issues encountered during the modding process can be resolved with some troubleshooting steps. Here are some common issues and potential solutions:
- Game Crashes: If your game is crashing after installing a particular mod, it may indicate an incompatibility issue. Check that the mod is compatible with your game version and modding platform. Additionally, ensure that you have installed any necessary dependencies or prerequisites required by the mod.
- Missing Textures or Models: If you are experiencing missing textures or models in your game after installing a mod, it may be due to mod conflicts or incorrect installation. Verify that the mod is compatible with your other installed mods and that you have followed the installation instructions correctly. If the issue persists, consider removing or disabling conflicting mods.
- Script Errors or Incompatibilities: Some mods require specific script versions or may not be compatible with other script mods. Make sure that you have the correct versions of required scripts and that there are no conflicts between different script mods. Updating Script Hook and other script dependencies can often resolve these issues.
- Performance Issues: Certain mods may impact game performance, resulting in lower frame rates or lag. If you experience performance issues, consider adjusting the graphics settings in your game or disabling resource-intensive mods. You can also update your graphics drivers or modify the mod’s settings to optimize performance.
- Mod Not Working as Intended: If a mod does not provide the expected features or functionality, ensure that you have installed the mod correctly and followed any specific instructions provided by the mod author. Check for mod updates that may address known issues or conflicts. If the problem persists, consult the modding community forums or seek assistance from the mod author.
- File or Antivirus False Positives: Some antivirus software and file scanning utilities may flag mod files as potential threats or false positives. If you trust the source of the mod and have verified its legitimacy, you can add mod files to your antivirus software’s whitelist or temporarily disable the scanning feature when installing or running mods.
When troubleshooting issues, it’s important to follow modding best practices, such as backing up game files, keeping your mods and game updated, and ensuring compatibility between mods. Exploring modding community forums and seeking assistance from experienced modders can also provide valuable insights and solutions to specific issues.
With patience and persistence, most modding issues can be resolved, allowing you to fully enjoy the enhanced gameplay and features that mods offer.
Now that you know how to troubleshoot common modding issues, you’re well-equipped to overcome any challenges that may arise during the process.
Conclusion
Congratulations! You’ve reached the end of this guide on how to download and install mods for GTA. Modding opens up a world of possibilities, allowing you to customize and enhance your GTA gameplay experience. By following the steps outlined in this guide, you’ve learned how to select the right modding platform, research and choose mods, understand mod requirements, download and install Script Hook, find and download mods, install mods, manage mods with mod managers, update mods, and troubleshoot common issues.
Remember, modding can be an intricate process, and it’s essential to follow the instructions provided by mod authors and exercise caution when modifying game files. Regularly check for updates, back up your game files, and explore modding community resources to stay up to date with the latest mods and trends.
Whether you’re looking to improve graphics, add new gameplay mechanics, or explore unique creations made by the modding community, the world of GTA mods offers a wealth of options. Immerse yourself in the diverse modding community, discover new possibilities, and tailor your GTA experience to your preferences.
Now that you have the knowledge and expertise to embark on your modding journey, it’s time to unleash your creativity and make your mark on the streets of Los Santos. Get out there, find the mods that resonate with you, and enjoy the enhanced world of Grand Theft Auto!