Introduction
Welcome to our guide on how to download apps from Family Sharing! If you’re not familiar with Family Sharing, it’s a convenient feature offered by Apple that allows family members to share their app purchases, subscriptions, and even media content with each other. Gone are the days of having to buy apps multiple times for different family members. With Family Sharing, you can save money and simplify app management within your household.
In this article, we’ll walk you through the process of setting up Family Sharing and downloading apps from the shared library. Whether you’re a parent looking to provide your child with access to educational apps, or a couple wanting to share your favorite productivity tools, Family Sharing is the solution you’ve been looking for.
By following the steps outlined in this guide, you’ll be able to seamlessly download apps from the shared library without any hassle. We’ll also provide tips on how to manage app downloads and personalize your Family Sharing experience.
So, if you’re excited to start sharing and downloading apps with your family members, let’s get started with the guide. You’ll be up and running in no time!
What is Family Sharing?
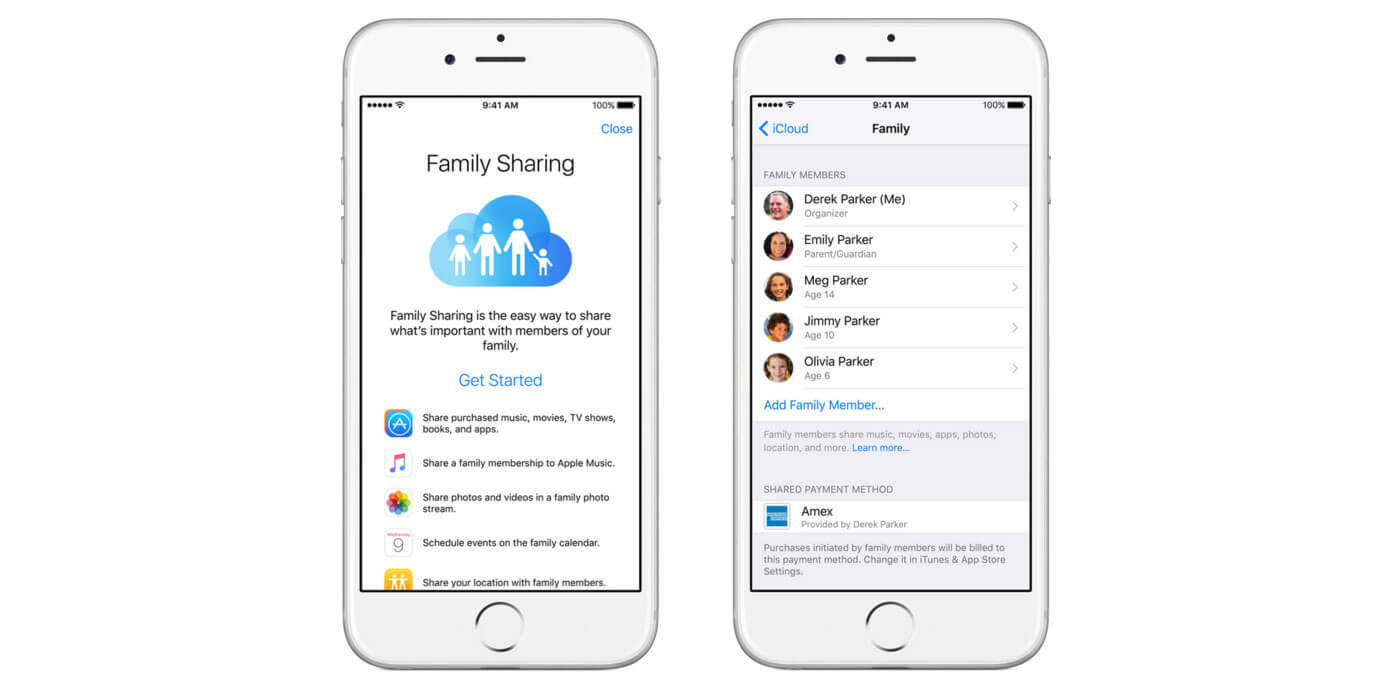
Family Sharing is a feature introduced by Apple that allows you to share purchases and subscriptions with up to six family members using their own Apple IDs. This feature is available on iOS devices, Mac computers, and even Apple TV, ensuring that everyone in your family can enjoy the apps, music, movies, books, and more, that have been purchased within your family group.
By enabling Family Sharing, you can create a shared library of apps, music, books, and other media content that can be accessed by all family members. This means that you no longer have to repurchase apps or media individually for each family member. Instead, one family member can purchase a particular app, and everyone in the family can freely download and use it.
Besides app and media sharing, Family Sharing also offers additional benefits. For example, you can set up a family calendar to keep everyone up to date with important events and appointments. You can even share your location with family members for easier coordination and peace of mind.
Additionally, Family Sharing allows parents to set up Apple IDs for their children without the need for a credit card. This enables parents to have control over their child’s purchases and downloads, ensuring a safe and appropriate digital experience.
It’s important to note that while Family Sharing is a powerful feature, it does come with some limitations. Some app subscriptions or in-app purchases may not be eligible for sharing, and certain media content may have geographic restrictions. However, the majority of apps, music, and other media can be shared among family members, making Family Sharing a valuable tool for saving money and simplifying app management within your household.
Now that you have a better understanding of what Family Sharing is and its benefits, let’s move on to the steps required to set it up and start downloading apps from the shared library.
Step 1: Set up Family Sharing
Before you can start downloading apps from Family Sharing, you’ll need to set it up on your Apple device. Family Sharing can be set up on an iPhone, iPad, iPod touch, Mac computer, or Apple TV running the latest software version. Follow these simple steps to set up Family Sharing:
- Open the “Settings” app on your device.
- Tap on your name at the top of the screen, which will bring you to your Apple ID settings.
- Select “Set Up Family Sharing” or “Set Up Family” depending on your device.
- Tap on “Get Started” and choose to share your purchases with your family or not. You can change this setting later if needed.
- Next, you’ll be prompted to invite family members to join your Family Sharing group. You can invite them via iMessage or by entering their email addresses. They will receive an invitation to accept and join your Family Sharing group.
- Once they accept the invitation, you’ll be able to manage their access to shared apps, media, and other features.
Congratulations! You have successfully set up Family Sharing on your device. Now, let’s move on to the next step to enable app downloads from Family Sharing.
Step 2: Enable App Downloads from Family Sharing
Now that you have Family Sharing set up, it’s time to enable app downloads from the shared library. This will allow you and your family members to download and access apps that have been purchased by other members of your Family Sharing group. Follow these steps to enable app downloads:
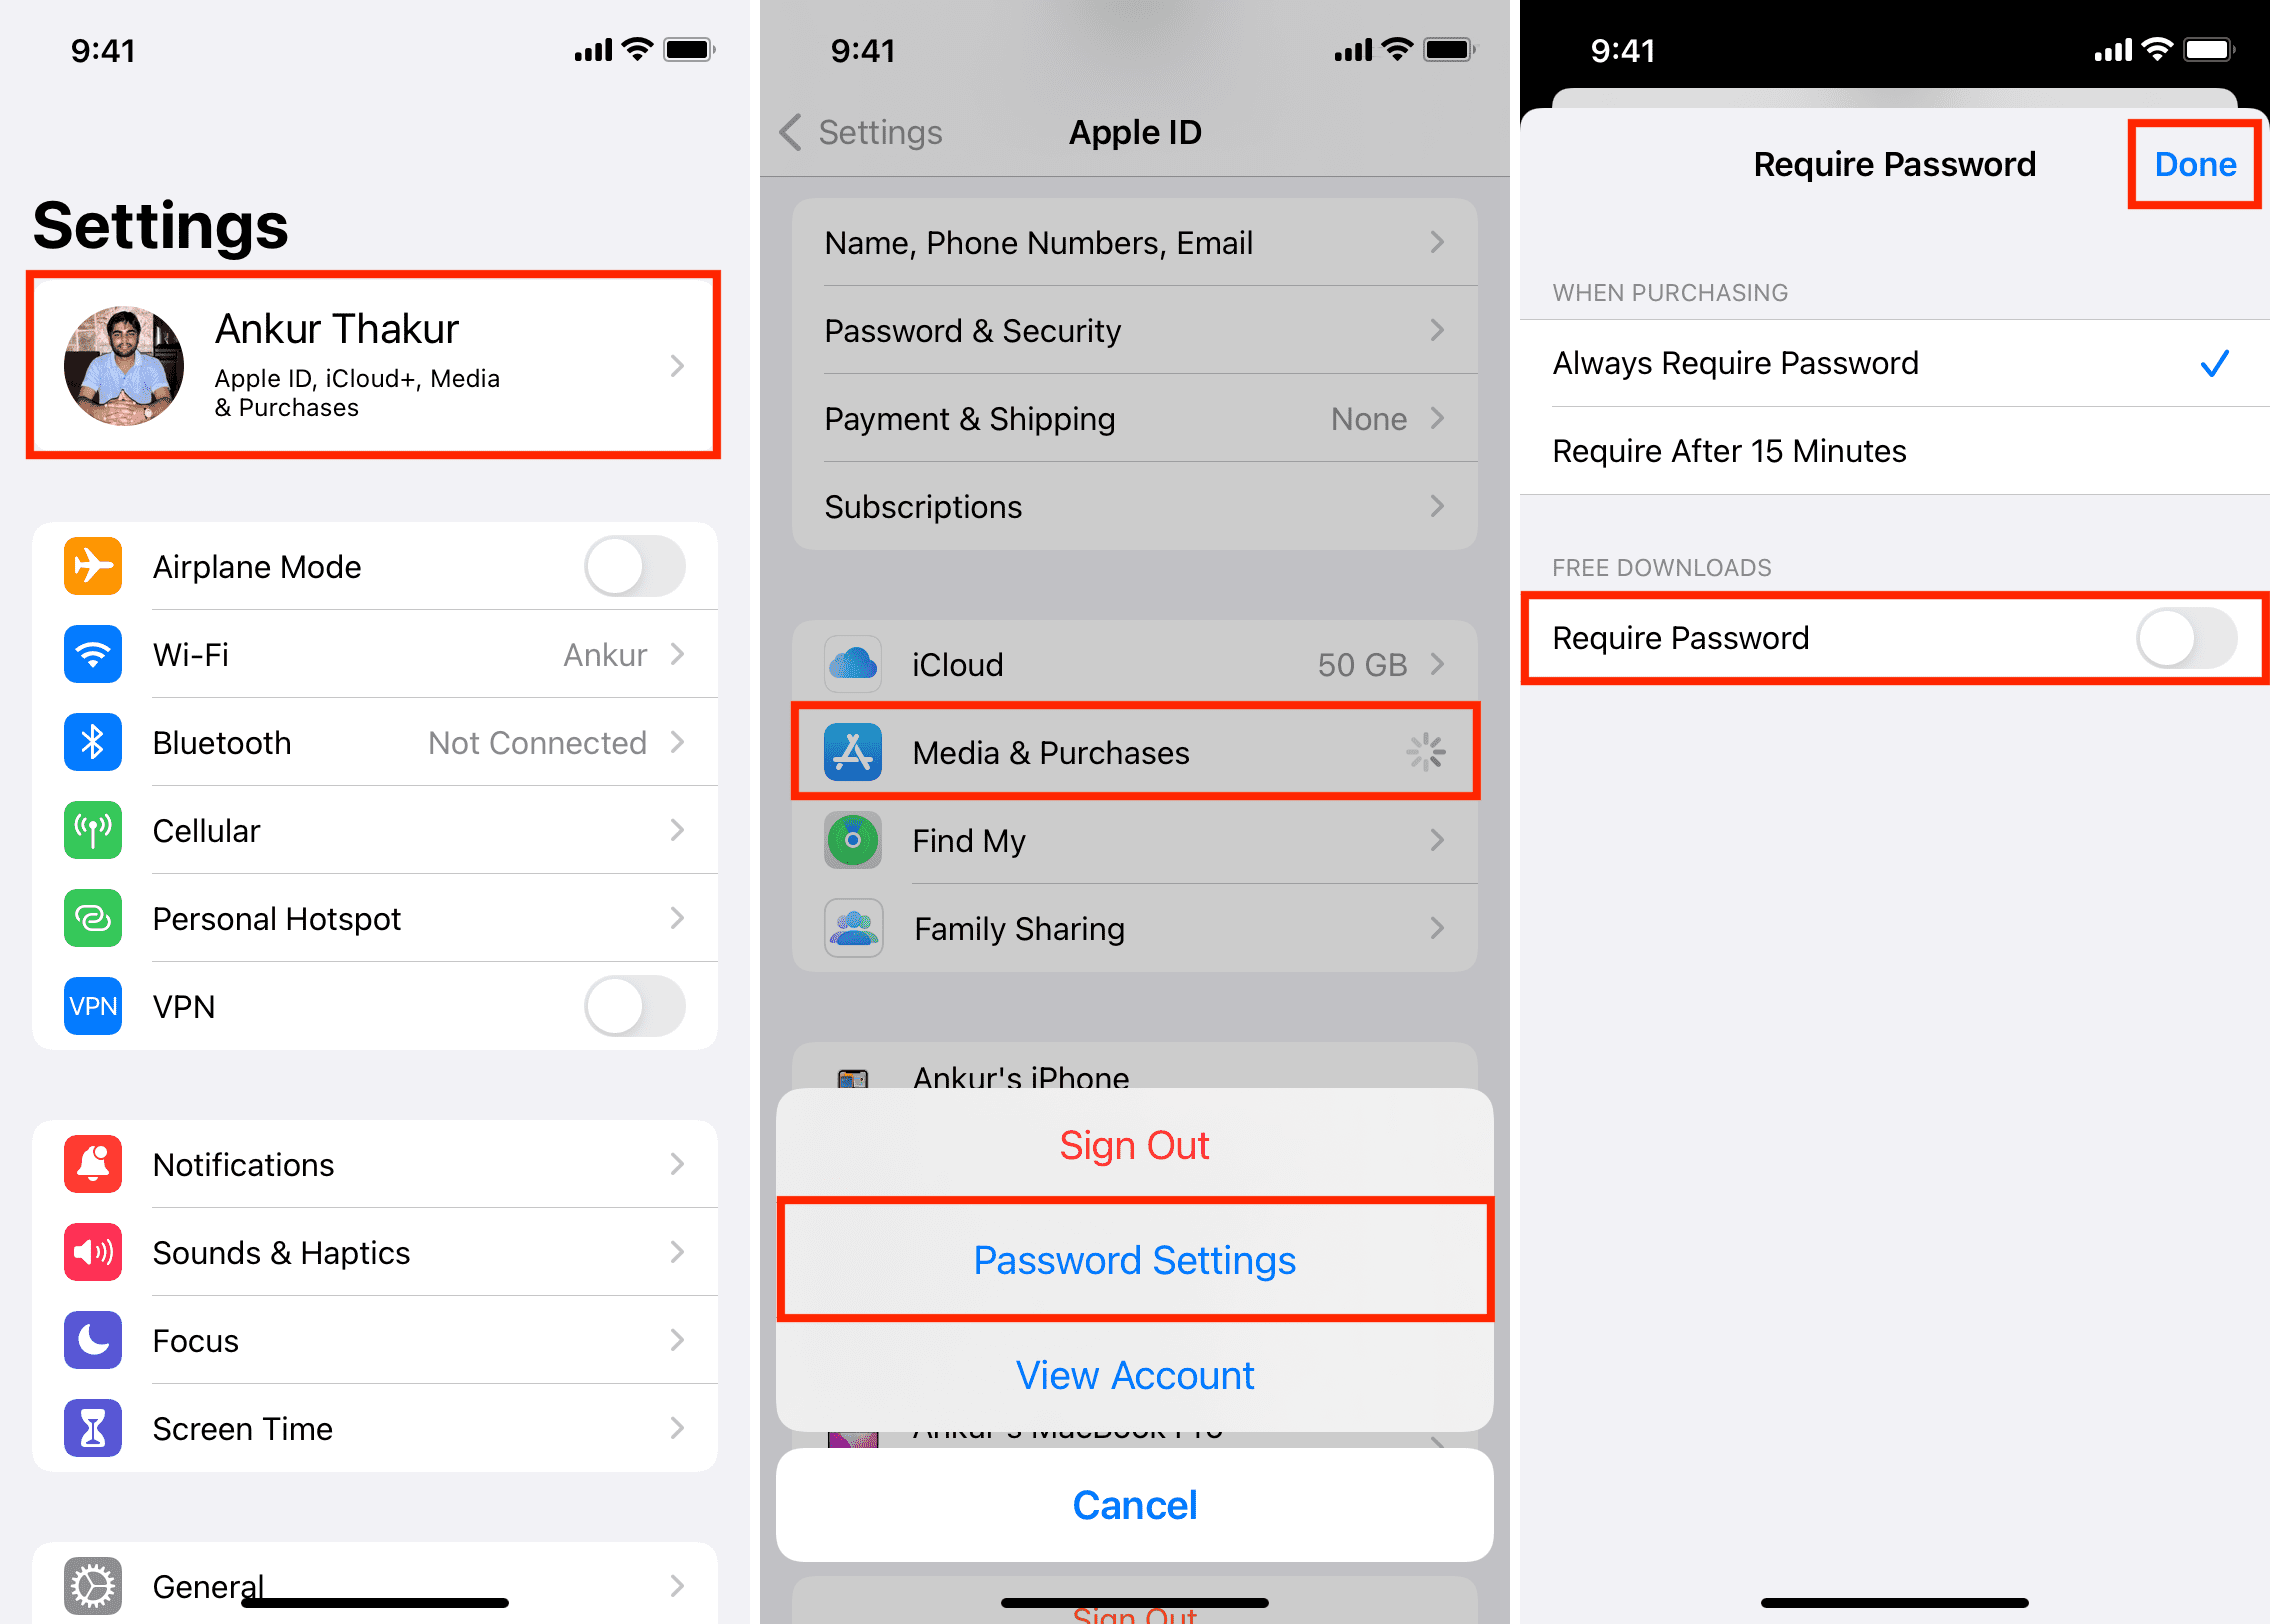
- Open the “Settings” app on your device.
- Tap on your name at the top of the screen to access your Apple ID settings.
- Scroll down and select “Family Sharing”.
- Tap on “Purchase Sharing”.
- Toggle on the “Share My Purchases” option. This will allow your family members to access and download the apps you have purchased.
- Under the “Ask To Buy” section, you can choose to enable or disable this feature for family members under 18 years old. When enabled, you will receive a notification and have the ability to approve or decline their app purchases.
- Once you have made your desired selections, exit the settings and your app purchases will now be shared with your family members.
That’s it! You have successfully enabled app downloads from Family Sharing. Now, let’s move on to the next step where we’ll guide you on how to download an app from the shared library.
Step 3: Download an App from Family Sharing
Now that app downloads are enabled from Family Sharing, it’s time to start enjoying the shared apps. Whether you want to download an app that you purchased or one that another family member purchased, the process is straightforward. Follow these steps to download an app from the shared library:
- Open the App Store on your device.
- Tap on the “Today” tab at the bottom of the screen.
- Tap on your profile picture at the top right corner of the screen. This will take you to your account settings.
- Under the “Purchased” section, you will see options like “My Purchases” and “Family Purchases”.
- Tap on “Family Purchases” to access the shared app library.
- Browse through the list of available apps and tap on the one you want to download.
- On the app’s page, tap on the “Get” or “Download” button.
- If prompted, authenticate with your Apple ID or use Face ID/Touch ID.
- Wait for the app to download and install on your device.
- Once the download is complete, you can find the app on your home screen and start using it.
That’s it! You have successfully downloaded an app from Family Sharing. Repeat these steps to download any other shared apps that you or your family members desire.
Step 4: Manage App Downloads from Family Sharing
Managing app downloads from Family Sharing allows you to control which apps are accessible to each family member, view their download history, and remove apps if needed. Follow these steps to effectively manage app downloads from Family Sharing:
- Open the “Settings” app on your device.
- Tap on your name at the top of the screen to access your Apple ID settings.
- Scroll down and select “Family Sharing”.
- Tap on the name of the family member whose app downloads you want to manage.
- Under the “Shared Purchases” section, you will see a list of downloaded apps.
- To remove an app, simply swipe left on the app and tap on “Remove”. This will remove the app from that particular family member’s device.
- If you want to hide certain apps from family members, you can toggle off the switch next to the app name. This will prevent them from accessing and downloading the app.
- If you want to view the download history of the family member, tap on “Downloaded” to see a list of recently downloaded apps.
- To quickly download an app that another family member has downloaded, you can tap on the cloud icon next to the app’s name. This will initiate the download on your device.
- Exit the settings and continue managing app downloads for other family members if desired.
By following these steps, you can effectively manage app downloads from Family Sharing and ensure a personalized experience for each family member.
Conclusion
Congratulations! You’ve now learned how to set up and download apps from Family Sharing. This powerful feature from Apple allows you and your family members to share app purchases, subscriptions, and media content, saving you money and simplifying app management.
We started by explaining what Family Sharing is and its benefits. It’s a convenient way to share apps and media within your family, set up parental controls, and even coordinate events with a shared family calendar. Family Sharing truly enhances the overall digital experience within your household.
We then walked you through the step-by-step process of setting up Family Sharing on your device, enabling app downloads from the shared library, and downloading apps from Family Sharing. With just a few simple taps, you can access a wide range of apps that have been purchased by other family members and enjoy them on your own device.
Finally, we showed you how to manage app downloads from Family Sharing. You learned how to remove apps, hide certain apps from family members, view the download history, and even quickly download apps that have been recently downloaded by other family members.
With Family Sharing, you can foster a sense of collaboration and enjoyment among your family members. Whether it’s educational apps for your kids, productivity tools for work, or entertainment apps for everyone to enjoy, Family Sharing makes it easy to access and share these resources.
So, what are you waiting for? Start setting up Family Sharing and make the most out of your app purchases within your family. Share, download, and enjoy the apps together!