Introduction
Downloading a Word document on a Mac is a simple and straightforward process. Whether you need to access a document offline, share it with others, or make edits using a different software, it’s essential to know how to download the file onto your Mac’s hard drive. In this guide, we will walk you through the step-by-step process of downloading a Word document on a Mac.
Microsoft Word is a widely used word processing software that allows users to create, edit, and save documents. By default, Word documents are saved in the .docx format, but they can also be saved in the older .doc format for compatibility with previous versions of Word.
Whether you are working on a personal project, collaborating with colleagues, or studying for an important assignment, being able to download Word documents on your Mac will provide you with offline access to your files, enabling you to work seamlessly even when an internet connection is not available.
In the following sections, we will guide you through the step-by-step process of downloading a Word document on a Mac, ensuring that you have all the necessary tools and knowledge to conveniently save your files for offline use.
Step 1: Open the Word Document
The first step in downloading a Word document on your Mac is to open the document that you want to download. Whether it’s a document you have created yourself or received from someone else, you’ll need to have the document open in Microsoft Word before you can proceed with the download process.
To open an existing Word document, you can follow these simple steps:
- Locate the Word document on your Mac’s hard drive or in your preferred file storage location.
- Double-click on the document to open it. This should launch Microsoft Word and load the document in a new window.
- If you have Microsoft Word set as your default program for opening Word documents, you can also right-click on the document and select “Open With” followed by “Microsoft Word” to open the document.
Once the document is open in Microsoft Word, you are ready to proceed to the next step in the process of downloading the Word document on your Mac. Make sure to save any changes you have made to the document before proceeding to ensure that you have the most up-to-date version saved on your Mac.
Step 2: Click on “File” in the Menu Bar
After opening the Word document you want to download, the next step is to access the File menu in Microsoft Word. The File menu contains various options and commands related to managing and manipulating your documents. By clicking on “File,” you can access the necessary options to download the document onto your Mac.
To click on “File” in the menu bar, follow these steps:
- Look at the menu bar at the top of the Microsoft Word window. It contains various options such as File, Edit, View, Insert, Format, and more.
- Locate and click on the “File” option. This will open a dropdown menu with several options.
By clicking on “File,” you will be presented with a range of options related to managing your Word document, including saving, printing, sharing, and downloading options. In the next step, we will explore how to access the specific option required to download your Word document on a Mac.
It’s important to note that the exact appearance and arrangement of options in the File menu may differ depending on the version of Microsoft Word you are using. However, the basic steps and functions remain consistent across different versions.
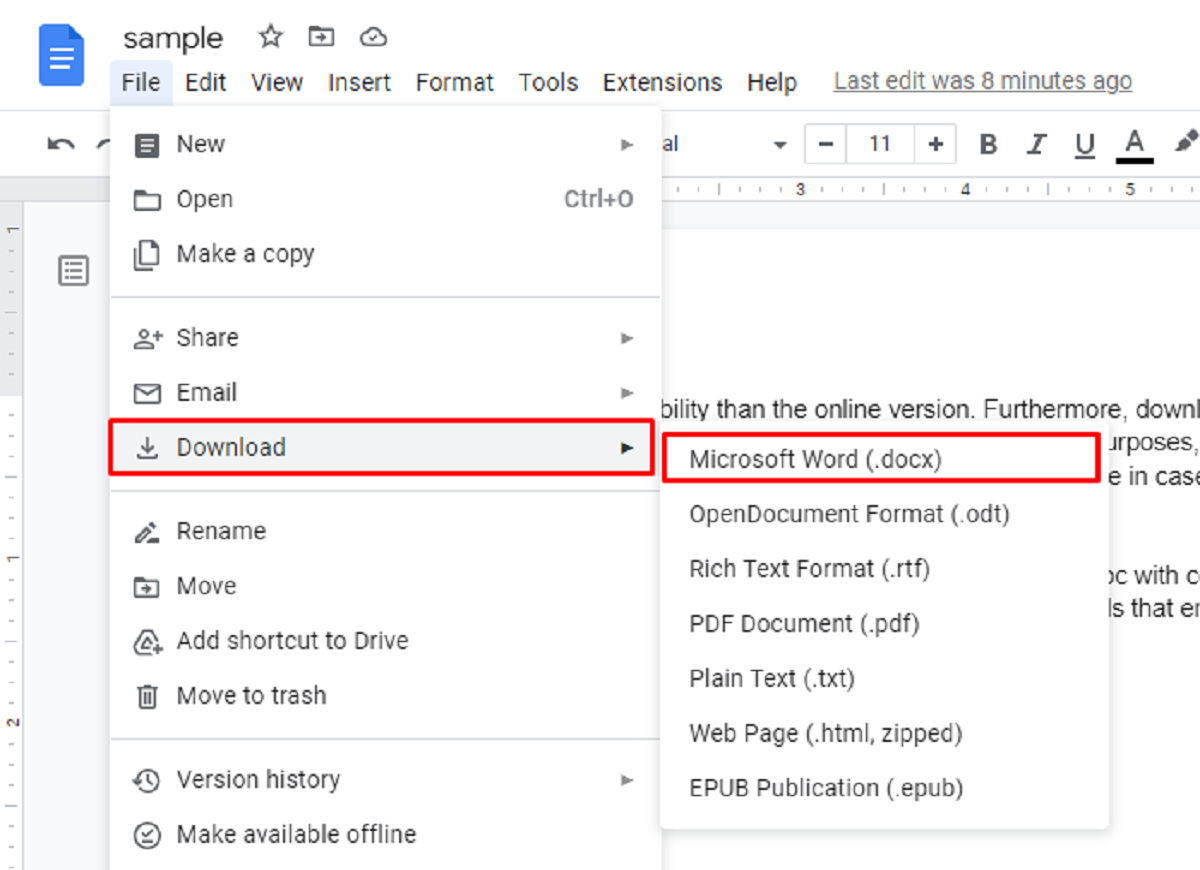
Step 3: Select “Download As”
Once you have clicked on “File” in the menu bar, the next step is to select the “Download As” option. This option allows you to choose how you want to download and save the Word document on your Mac. By selecting the appropriate format, you can ensure compatibility with different software or devices.
To select “Download As” in Microsoft Word, follow these steps:
- After clicking on “File,” a dropdown menu will appear with various options.
- Scroll down the menu and locate the “Download As” option. It may be listed under different names, such as “Export” or “Save As.”
- Click on “Download As.” This will open a submenu with different file format options.
The submenu will show a variety of file formats that you can choose from, depending on your specific needs. The available options may include formats like Microsoft Word (.docx or .doc), PDF, plain text, and more.
Take a moment to consider the purpose of downloading the Word document and the software or devices you plan to use it with. For instance, if you need to share the document with someone who doesn’t have Microsoft Word, selecting the PDF option may be more suitable.
In the next step, we will explain how to choose the appropriate file format for downloading your Word document on a Mac.
Step 4: Choose “Microsoft Word (.docx)” or “Word 97-2004 (.doc)”
After selecting “Download As,” you will be presented with a submenu containing different file format options for saving your Word document on your Mac. The two most common options for saving a Word document are “Microsoft Word (.docx)” and “Word 97-2004 (.doc).” In this step, we will guide you through the process of choosing the appropriate file format for your needs.
To choose between “Microsoft Word (.docx)” and “Word 97-2004 (.doc),” follow these steps:
- In the “Download As” submenu, review the available file format options.
- If you want to save the document in the newer version of Microsoft Word, click on “Microsoft Word (.docx).” This format is compatible with the latest versions of Microsoft Word and provides richer features and formatting options.
- If you need to ensure compatibility with older versions of Microsoft Word or other software, click on “Word 97-2004 (.doc).” This format is compatible with older versions of Microsoft Word and ensures that your document can be accessed and opened by a wider range of software and devices.
Consider your specific requirements and the intended recipients or users of the Word document. If you are unsure which format to choose, it’s generally recommended to save your document in the more recent .docx format, as it offers better compatibility and advanced features.
Once you have made your selection, the Word document will be saved in the chosen format on your Mac. In the next step, we will explain how to save and specify the location for downloading the Word document.
Step 5: Save the Document to Your Desired Location
After choosing the appropriate file format for your Word document, the final step is to save the document to your desired location on your Mac. By specifying the location, you can ensure that the document is easily accessible and organized within your file system.
To save the Word document to your desired location, follow these steps:
- After selecting the file format, a dialog box will appear, prompting you to choose the destination folder or location for saving the document.
- Navigate to the desired location on your Mac by using the folder hierarchy displayed in the dialog box.
- Once you have reached the desired location, click on the “Save” or “Save As” button to save the Word document.
You can also specify a custom name for the document in the dialog box if you wish to change the default name. This allows you to easily identify and locate the document in the future.
Consider selecting a location that is easily accessible and well-organized based on your filing system. This will help you locate and retrieve the document when needed.
Once you have completed these steps, the Word document will be downloaded and saved to your specified location on your Mac. You can now access and manage the document offline, share it with others, or make any necessary edits using compatible software.
By following these five simple steps, you can successfully download a Word document on your Mac and have it readily available for your personal and professional needs.
Conclusion
Downloading a Word document on a Mac is a convenient and essential skill for effectively managing and accessing your files. In this guide, we have walked you through the step-by-step process of downloading a Word document on your Mac, ensuring that you can easily save your files for offline use, share them with others, or make edits using different software.
Remember, the process involves opening the Word document, clicking on “File” in the menu bar, selecting “Download As,” choosing the appropriate file format (such as “Microsoft Word (.docx)” or “Word 97-2004 (.doc)”), and saving the document to your desired location on your Mac. By following these steps, you can customize the downloading process to meet your specific needs and ensure file compatibility.
Having the ability to download Word documents on your Mac provides you with offline accessibility and flexibility, allowing you to work on your documents anytime, anywhere, without the need for a stable internet connection. Whether you are working on personal projects, collaborating with colleagues, or studying for important assignments, being able to download and save your Word documents is crucial.
Incorporating this skill into your workflow will enhance your productivity and efficiency, as you can access and work on your documents offline, make quick updates, and share them with others seamlessly. Additionally, by saving documents in different file formats, you can ensure compatibility with various software and devices.
By following the steps outlined in this guide, you have gained the knowledge and confidence to successfully download Word documents on your Mac. Incorporate these steps into your workflow to streamline your document management and enhance your productivity.
So the next time you need to download a Word document on your Mac, you’ll have the necessary tools and know-how to do it swiftly and effortlessly.