Introduction
Using a VPN (Virtual Private Network) on a school computer can be an effective way to enhance your online security and access blocked websites or content. Schools often have strict internet restrictions in place, preventing students from accessing certain websites or services. However, with a VPN, you can bypass these restrictions and enjoy a more open and secure browsing experience.
A VPN works by creating a secure connection between your device and the internet. When you connect to a VPN server, your internet traffic is encrypted and routed through the server, masking your IP address and encrypting your data. This not only protects your privacy but also allows you to access websites and online services that may be blocked on the school’s network.
In this guide, we will walk you through the process of downloading a VPN on a school computer. By following these steps, you can unlock the full potential of the internet and enjoy a safer and more unrestricted browsing experience. Before we dive into the details, let’s take a look at some of the benefits of using a VPN on a school computer.
Step 1: Understanding the Benefits of Using a VPN on a School Computer
Before diving into the process of downloading a VPN on a school computer, it’s important to understand the numerous benefits that come with using a VPN in an educational setting. Here are some key advantages to keep in mind:
Bypassing Internet Restrictions: One of the major benefits of using a VPN on a school computer is the ability to bypass internet restrictions set by the school’s network. Many educational institutions enforce strict filtering measures that block access to certain websites, social media platforms, or streaming services. With a VPN, you can bypass these restrictions and access the content you need and want.
Enhanced Online Security: Privacy and security are of utmost importance, especially when using shared networks. When connected to a VPN, all your internet traffic is encrypted, protecting your personal information from potential hackers or malicious third parties. This added layer of security ensures that your online activities remain private and secure while using a school computer.
Access to Restricted Content: In some cases, valuable educational resources may be blocked on the school network. With a VPN, you can gain access to websites, research papers, and other materials that are otherwise unavailable. This enables you to broaden your educational horizons and improve your learning experience.
Anonymous Browsing: By using a VPN, you can browse the internet anonymously. Your IP address is masked, making it difficult for anyone to track your online activities. This is particularly helpful when conducting research or accessing sensitive information on a school computer.
Secure Remote Access: VPNs can also provide secure remote access to school resources. This is especially beneficial for students who need to work on group projects or access school files from off-campus locations. With a VPN, you can securely connect to your school’s network and access the resources you need, regardless of your physical location.
Understanding these benefits will motivate you to proceed with downloading a VPN on your school computer. Next, we will discuss how to research compatible VPNs for school computers.
Step 2: Researching Compatible VPNs for School Computers
Before downloading a VPN on your school computer, it’s crucial to research and find a VPN provider that is compatible with the school’s network and meets your specific needs. Here are some steps to help you in your research:
1. Check the school’s VPN policy: Start by checking if your school has any specific guidelines or restrictions on using VPNs. Some schools may have their own recommended VPN providers, while others may explicitly prohibit the use of VPNs. Understanding the school’s policy will ensure that you comply with any rules or regulations.
2. Read reviews and comparisons: Look for trustworthy review websites and online forums that discuss VPN providers. Read reviews and comparisons to understand the features, performance, and reliability of different VPNs. Pay attention to factors such as connection speed, server locations, and customer support.
3. Consider your needs: Think about why you want to use a VPN on your school computer. Are you mainly looking to bypass internet restrictions, enhance security, or access content from specific regions? Make a list of your requirements to narrow down the options and find a VPN provider that best caters to your needs.
4. Check for compatibility: Ensure that the VPN you choose is compatible with the operating system of your school computer. Check if the VPN provider offers client software or apps for your specific operating system. It’s also essential to confirm that the VPN works smoothly on your school’s network.
5. Consider pricing and plans: Evaluate the pricing and plans offered by different VPN providers. Look for any discounts or special offers for students. However, keep in mind that the cheapest option may not always be the best choice. Consider the overall value and quality of the VPN service.
6. Check customer support: It’s important to choose a VPN provider that offers reliable and responsive customer support. Check if they provide 24/7 live chat support, email support, or phone support. Quick and helpful customer support can make a significant difference if you encounter any issues during the installation or use of the VPN.
By following these steps and conducting thorough research, you can find a VPN provider that is compatible with your school computer and suits your requirements. In the next step, we will discuss the system requirements for downloading and using a VPN on a school computer.
Step 3: Meeting System Requirements
Before downloading a VPN on your school computer, it’s essential to ensure that your computer meets the system requirements for the VPN software. Here are the key elements to consider:
Operating System: Check the VPN provider’s website to ensure that their software supports the operating system installed on your school computer. Common operating systems include Windows, macOS, and Linux. Some VPN providers may also offer mobile apps for iOS and Android devices.
Processor and Memory: Verify that your school computer meets the minimum processor and memory requirements specified by the VPN provider. Most modern computers should have no issue meeting these requirements, but it’s always a good idea to double-check to ensure optimal performance.
Available Storage Space: Check the amount of available storage space on your school computer. Make sure you have enough space to download and install the VPN software. Typically, VPN software takes up a relatively small amount of storage space, but it’s still important to ensure you have sufficient room.
Internet Connection: Ensure that your school computer has a stable internet connection. While using a VPN, a reliable internet connection is crucial for maintaining a consistent VPN connection. If the internet connection is weak or unstable, it may affect the performance of the VPN software.
Administrative Access: In some cases, downloading and installing software on a school computer may require administrative access. Check with your school’s IT department or system administrators to determine if you have the necessary permissions to install a VPN on your computer. If not, you may need to seek their assistance or consider alternative options.
By ensuring that your school computer meets the necessary system requirements, you can proceed with confidence to download and install the VPN software. In the next step, we will guide you through the process of downloading the VPN software onto your school computer.
Step 4: Downloading the VPN Software
Once you have chosen a compatible VPN and confirmed that your school computer meets the necessary system requirements, it’s time to download the VPN software. Follow these steps to get started:
1. Visit the VPN provider’s website: Open your preferred web browser and navigate to the official website of the VPN provider you have chosen.
2. Locate the download section: Look for the download section on the website. It is usually found on the homepage or in the navigation menu. Click on the download button or link to proceed.
3. Select the appropriate operating system: On the download page, select the version of the VPN software that matches the operating system of your school computer. If you are given multiple options, choose the one that is specifically designed for your operating system.
4. Initiate the download: Click on the download button or link to start downloading the VPN software to your school computer. The file will typically be in the form of an installer or an executable file.
5. Save the downloaded file: Once the download is complete, choose a location on your school computer to save the downloaded VPN software file. It is recommended to save it in a location that is easy to access, such as the desktop or the downloads folder.
6. Scan the downloaded file for malware: Before proceeding with the installation, it’s a good practice to scan the downloaded file for malware or viruses. Use an antivirus program to ensure the file is clean and safe to install on your school computer.
With the VPN software successfully downloaded, you are now ready to move on to the next step: installing the VPN software on your school computer. Keep in mind that the installation process may slightly vary depending on the VPN provider and the operating system you are using.
Step 5: Installing the VPN Software on a School Computer
Now that you have downloaded the VPN software onto your school computer, it’s time to proceed with the installation process. Follow these steps to install the VPN software:
1. Locate the downloaded VPN software: Open the folder or location where you saved the downloaded VPN software file. It is typically in the downloads folder or on your desktop.
2. Run the VPN installer: Double-click on the VPN software file to start the installation process. This will launch the installer and display the installation wizard.
3. Follow the on-screen prompts: Read and follow the on-screen prompts to proceed with the installation. You may need to select the installation language, accept the terms and conditions, and choose the installation location. Ensure that you carefully read through each step before proceeding.
4. Customize the installation settings: Some VPN software installations allow you to customize additional settings during the installation process. Depending on your preferences, you may be given options to choose the installation type (express or custom), create shortcuts, or enable additional features. Customize these settings according to your requirements and preferences.
5. Wait for the installation to complete: Once you have confirmed your settings, click on the “Install” or “Finish” button to begin the installation process. The progress bar will indicate the installation status, and you may need to wait for a few moments for the installation to complete.
6. Launch the VPN software: After the installation is complete, the VPN software may automatically launch. If not, locate the newly installed VPN software in your applications or programs menu and open it.
7. Sign in or create an account: Upon launching the VPN software, you will usually be prompted to sign in with your VPN account credentials. If you don’t have an account, you may be guided through the process of creating one. Follow the on-screen instructions and provide the necessary information to complete the sign-in or account creation process.
Congratulations! You have successfully installed the VPN software on your school computer. In the next step, we will guide you on configuring the VPN settings to ensure optimal performance and security.
Step 6: Configuring the VPN Settings
After installing the VPN software on your school computer, it’s important to configure the VPN settings to ensure optimal performance and security. Follow these steps to configure the VPN settings:
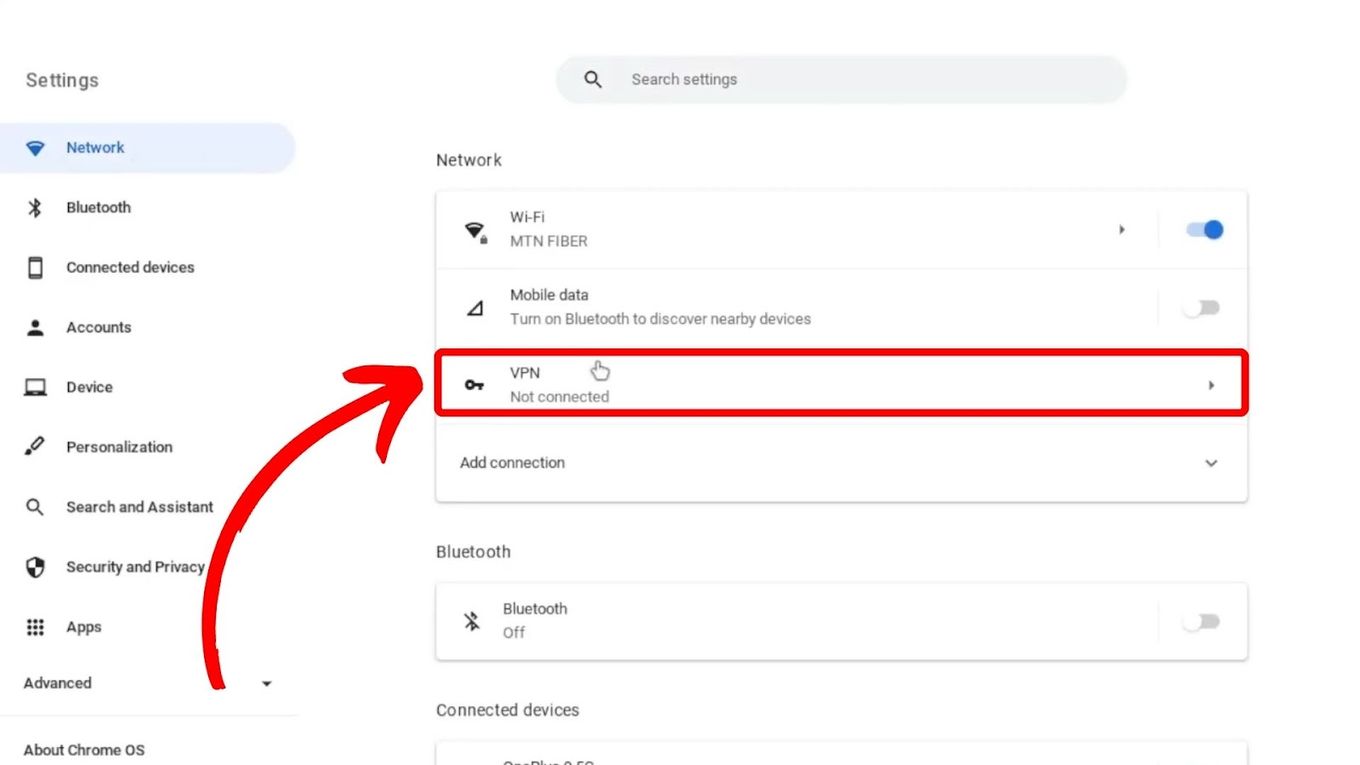
1. Open the VPN software: Launch the VPN software on your school computer. You can usually find the VPN software icon either on your desktop, taskbar, or in the programs menu.
2. Sign in to your VPN account: Enter your VPN account credentials to sign in to the VPN software. If you don’t have an account, follow the instructions provided to create one.
3. Choose a server location: Most VPN software allows you to select a server location from a list of available options. Choose a server location that best suits your needs. If you’re looking to access region-restricted content, select a server located in that specific region.
4. Configure protocol settings: Some VPN software allows you to choose from different protocols for your connection. If you’re not familiar with protocols, it’s recommended to stick with the default or recommended settings. However, if you have specific requirements, you can explore and choose the appropriate protocol.
5. Enable additional features: VPN software may offer additional features, such as kill switch, split tunneling, or DNS leak protection. Explore the settings and enable any features that align with your preferences or offer enhanced security and functionality.
6. Test the connection: Before connecting to the VPN network, it’s advisable to test the connection by accessing a website or service. Ensure that the VPN connection is established, and your IP address is masked. This will confirm that the VPN is working correctly.
7. Adjust automatic connection options: Some VPN software allows you to set automatic connection preferences. For example, you can choose to automatically connect to the VPN when your school computer starts or when you access specific networks. Adjust these settings according to your preferences and needs.
8. Save and apply the settings: Once you have configured the VPN settings to your satisfaction, save the settings and ensure they are applied. This will ensure that the VPN operates with your desired preferences whenever you use it on your school computer.
By configuring the VPN settings appropriately, you can tailor the VPN connection to your specific requirements while maintaining an optimal level of security and performance. In the next step, we will guide you on connecting to the VPN network on your school computer.
Step 7: Connecting to the VPN Network
Once you have configured the VPN settings on your school computer, it’s time to connect to the VPN network. Follow these steps to establish a secure connection:
1. Open the VPN software: Launch the VPN software on your school computer if it’s not already open. You can typically find the VPN software icon on your desktop, taskbar, or in the programs menu.
2. Sign in to your VPN account: Enter your VPN account credentials to sign in to the VPN software. If you haven’t created an account, follow the instructions provided to create one.
3. Choose a server location: Select a server location from the available options. The server location you choose will determine the IP address and the region you will be connecting from. If you have specific requirements, choose a server location accordingly.
4. Connect to the VPN network: Click on the “Connect” button or a similar option in the VPN software to establish a secure connection to the VPN network. The VPN software will establish a secure tunnel between your school computer and the VPN server.
5. Wait for connection confirmation: Once you click on the “Connect” button, the VPN software will attempt to establish a connection. Wait for a few moments until you receive a confirmation message indicating that you are connected to the VPN network.
6. Test the connection: After establishing a connection, test the VPN connection by accessing a website or service. Ensure that the VPN is functioning correctly, and your IP address is masked. This will confirm that your school computer is now securely connected to the VPN network.
7. Disconnect from the VPN network: When you no longer need to use the VPN on your school computer, you can disconnect from the VPN network. Open the VPN software and click on the “Disconnect” button or a similar option.
Note: If you experience any issues while connecting to the VPN network, ensure that your internet connection is stable and that you have entered the correct VPN account credentials. You can also try selecting a different server location or contacting the VPN provider’s customer support for assistance.
By following these steps, you can easily connect your school computer to the VPN network, providing increased security and privacy for your online activities. In the final step, we will explore how to make the most of using the VPN on a school computer.
Step 8: Using the VPN on a School Computer
Now that you have successfully connected to the VPN network on your school computer, it’s time to make the most of your VPN usage. Here are some tips to help you maximize the benefits of using the VPN:
1. Access blocked content: Take advantage of the VPN to access blocked websites, social media platforms, or streaming services that are typically restricted on the school’s network. With the VPN, you can bypass these restrictions and enjoy a more open and unrestricted browsing experience.
2. Protect your online privacy: Keep your online activities private and secure by using the VPN. The VPN creates an encrypted connection that protects your data and masks your IP address, making it difficult for others to track your online activities.
3. Enjoy anonymous browsing: Browse the internet anonymously by using the VPN. Your IP address is masked, ensuring that your location and identity remain hidden from websites, advertisers, and other online entities.
4. Secure public Wi-Fi connections: When connecting to public Wi-Fi networks, use the VPN to encrypt your internet traffic and protect your sensitive information from potential hackers or eavesdroppers. This is particularly crucial when using public Wi-Fi networks at school or other public places.
5. Improve online security: The VPN adds an additional layer of security to your school computer, especially when accessing websites or online services that may be vulnerable to cyber threats. This helps safeguard your personal information and prevents unauthorized access to your data.
6. Collaborate securely: If you need to collaborate with fellow students or access school resources from off-campus locations, the VPN can provide a secure and reliable connection. Connect to the VPN before accessing shared drives or working on group projects to ensure your data is protected.
7. Benefit from different server locations: Depending on the VPN provider you have chosen, you may have access to servers in various locations around the world. Experiment with different server locations to access region-specific content or improve connection speeds for certain websites or services.
Remember to disconnect from the VPN when you no longer need to use it, as keeping the VPN connected unnecessarily may slow down your internet connection. Additionally, comply with your school’s policies regarding VPN usage and respect any applicable laws or regulations.
By following these tips, you can take full advantage of using a VPN on your school computer, ensuring a safer, more secure, and more versatile online experience. Happy browsing!
Conclusion
In conclusion, using a VPN on a school computer can offer numerous benefits, ranging from bypassing internet restrictions to enhancing online security and privacy. By following the steps outlined in this guide, you can successfully download, install, and configure a VPN on your school computer, allowing you to enjoy a more open and secure browsing experience.
Understanding the benefits of using a VPN on a school computer sets the foundation for your VPN journey. Thoroughly researching compatible VPNs ensures that you choose a provider that meets your specific needs and works seamlessly with your school’s network. Ensuring your school computer meets the necessary system requirements is essential for a smooth installation process.
Downloading and installing the VPN software are crucial steps. With the software installed, it’s important to configure the VPN settings to optimize performance and security. Connecting to the VPN network and utilizing its features enable you to access blocked content, protect your online privacy, and securely browse public Wi-Fi networks.
By using a VPN on your school computer, you can overcome internet restrictions, enhance your online security, and access content that may otherwise be blocked. It provides you with the freedom to browse the internet without limitations, protect your sensitive data, and collaborate securely with others.
However, it is important to always comply with your school’s VPN policy and any applicable laws or regulations. Respect the rights and privacy of others when using the VPN, and disconnect from the VPN when not needed to optimize your internet connection speed.
By following the steps outlined in this guide, you can confidently download, install, and utilize a VPN on your school computer, expanding your online horizons while keeping your digital activities secure and private. Enjoy the benefits of a safer, more open, and more versatile browsing experience on your school computer today!