Introduction
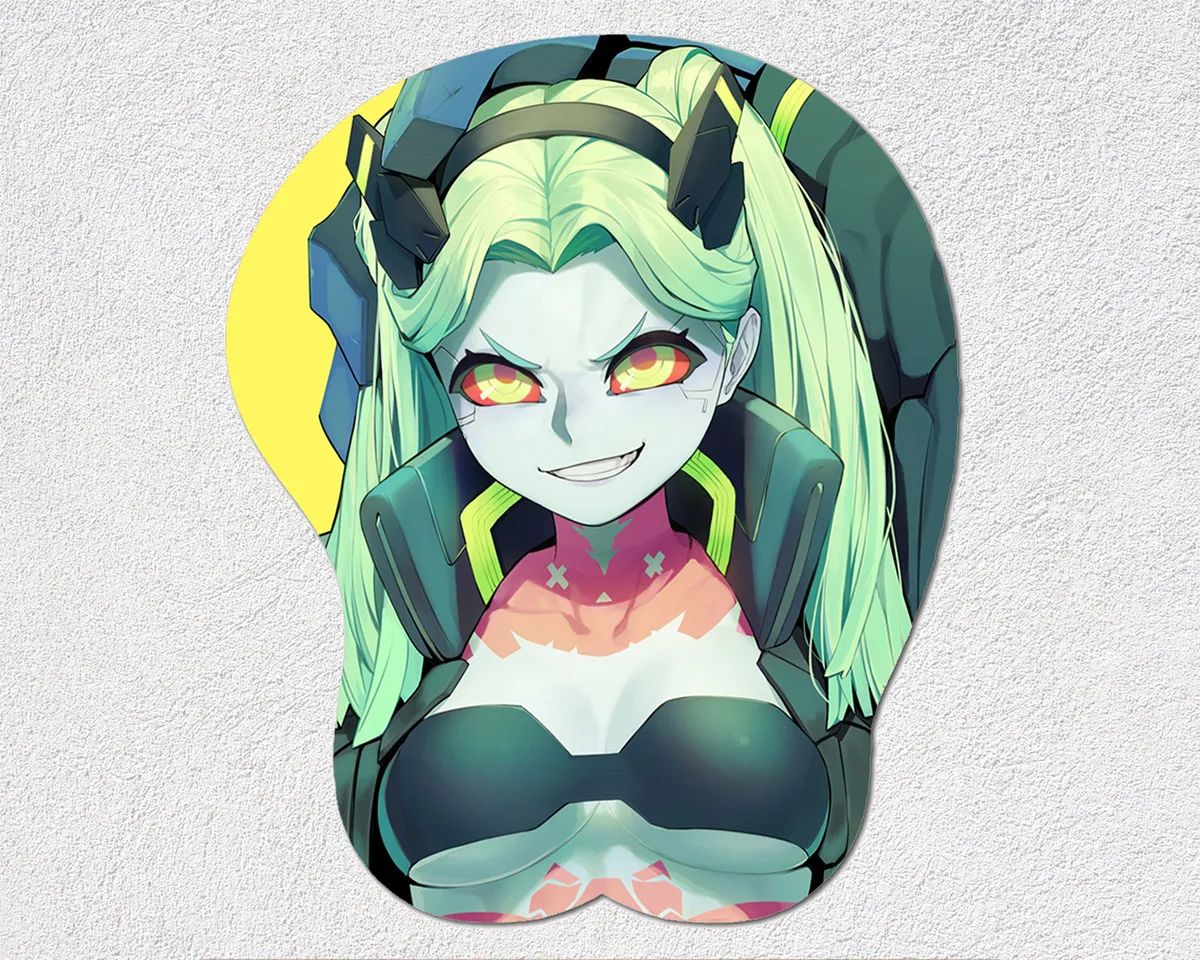
Creating your own oppai mouse pad can be a fun and rewarding DIY project. Whether you're a fan of anime, manga, or just enjoy a touch of humor in your workspace, a custom oppai mouse pad can add a personal touch to your desk setup. The term "oppai" originates from Japanese anime and manga and refers to a character's large, often exaggerated, breasts. These mouse pads are designed to provide a comfortable resting place for your wrist while using the computer, making them both practical and amusing.
In this guide, we'll walk you through the process of making your very own oppai mouse pad from start to finish. You'll learn about the materials needed, the design process, printing options, and how to assemble the mouse pad. Whether you're creating a gift for a fellow anime enthusiast or simply want to inject some personality into your workspace, this step-by-step guide will help you bring your custom oppai mouse pad to life. So, let's dive in and get started on this quirky and enjoyable DIY project.
Materials Needed
Before embarking on the creation of your custom oppai mouse pad, it’s essential to gather the necessary materials. Here’s a list of items you’ll need to bring your project to fruition:
- Mouse pad base: Select a mouse pad with a smooth fabric surface and a non-slip rubber backing. The size and shape can vary based on your personal preferences.
- Foam padding: Obtain foam padding to provide wrist support. This can be cut to the desired shape and size to fit the design of your mouse pad.
- Fabric: Choose a soft, stretchy fabric to cover the mouse pad and foam padding. The fabric should be large enough to cover the entire mouse pad with some extra for wrapping around the edges.
- Design template: Create or obtain a design template for the oppai mouse pad. This can be a humorous anime character, a custom illustration, or any other image that suits your taste.
- Fabric markers or ink: Acquire fabric markers or ink in various colors to bring your design to life on the fabric.
- Scissors: Have a pair of sharp scissors on hand for cutting the fabric and foam padding to the required dimensions.
- Glue: Use fabric glue or a suitable adhesive to secure the fabric and foam padding to the mouse pad base.
- Clear sealant (optional): If you want to protect the design from wear and tear, consider using a clear sealant to coat the finished mouse pad.
By ensuring you have all these materials at your disposal, you’ll be well-prepared to proceed with the subsequent steps of designing and assembling your custom oppai mouse pad.
Designing the Oppai Mouse Pad
Once you have gathered the necessary materials, the next step in creating your custom oppai mouse pad is to focus on the design. This is where your creativity can truly shine, allowing you to personalize the mouse pad according to your unique preferences. Here’s a step-by-step guide to help you through the design process:
- Choose Your Character: If you’re an anime enthusiast, you may already have a favorite character in mind. Select an anime character or create a custom illustration that embodies the playful and lighthearted spirit of the oppai mouse pad. Consider the character’s pose, facial expression, and overall aesthetic to ensure it aligns with your vision.
- Sketch the Design: Before transferring the design onto the fabric, sketch it out on paper to fine-tune the details. This initial sketching phase allows you to make any necessary adjustments to the character’s proportions and pose, ensuring that the final design meets your expectations.
- Transfer the Design: Using the fabric markers or ink, carefully transfer the sketched design onto the fabric. Take your time to capture the nuances of the character’s features, clothing, and, of course, the "oppai" in a way that reflects your artistic style.
- Add Personal Touches: Feel free to incorporate additional elements, such as accessories or background details, to enhance the overall appeal of the design. These personal touches can make the mouse pad even more unique and tailored to your specific interests.
- Review and Refine: Once the design is transferred, take a moment to review the overall composition. Make any necessary refinements to ensure that the character’s features are well-defined and that the design captures the desired essence of humor and charm.
By following these steps, you can bring your chosen character to life on the fabric, setting the stage for the next phase of the project: printing the design onto the mouse pad surface.
Printing the Design
Once you have finalized the design on the fabric, the next crucial step in creating your oppai mouse pad is to transfer the design onto the mouse pad surface. This process involves precision and attention to detail to ensure that the printed design aligns seamlessly with your original vision. Here’s how to proceed with printing the design:
- Prepare the Printing Area: Find a clean and well-lit area where you can lay out the mouse pad and fabric without any obstructions. It’s essential to have a flat surface to facilitate the transfer of the design.
- Position the Fabric: Carefully place the fabric with the completed design onto the mouse pad, ensuring that it is centered and aligned according to your preferences. Smooth out any wrinkles or creases to create a uniform surface for the printing process.
- Apply Even Pressure: With the fabric in place, use a heat press or iron set to the appropriate temperature to apply even pressure over the entire design area. This step is crucial for transferring the design from the fabric to the mouse pad surface effectively.
- Monitor the Transfer: As you apply heat and pressure, monitor the transfer process to ensure that the design adheres to the mouse pad surface uniformly. Take your time to guarantee that the printed design retains its clarity and vividness.
- Allow for Cooling: Once the printing process is complete, allow the mouse pad to cool down before carefully removing the fabric. This cooling period helps set the design onto the surface, ensuring its longevity and resistance to wear.
By following these steps, you can successfully transfer the meticulously crafted design from the fabric onto the mouse pad, bringing your custom oppai mouse pad one step closer to completion. With the design now prominently displayed on the mouse pad surface, the final assembly phase awaits.
Assembling the Mouse Pad
With the design successfully printed onto the mouse pad surface, the final phase of assembling your custom oppai mouse pad involves bringing together all the components to create a functional and visually appealing accessory for your workspace. Follow these steps to complete the assembly process:
- Trim the Fabric: Carefully trim any excess fabric around the edges of the mouse pad to achieve a clean and uniform appearance. Take your time to ensure that the edges are neatly trimmed without compromising the integrity of the design.
- Secure the Foam Padding: Place the foam padding over the non-slip rubber backing of the mouse pad, aligning it with the printed design. Ensure that the foam padding provides adequate wrist support and comfort, especially in the area surrounding the character’s "oppai."
- Attach the Fabric: Using fabric glue or a suitable adhesive, secure the fabric with the printed design over the foam padding and mouse pad base. Smooth out any wrinkles or air bubbles to achieve a seamless and professional finish.
- Allow for Drying: After attaching the fabric, allow sufficient time for the adhesive to dry completely. This step is crucial for ensuring that the fabric remains firmly affixed to the mouse pad, preventing any shifting or detachment over time.
- Optional Sealant Application: If you wish to enhance the durability of the design, consider applying a clear sealant over the fabric to provide protection against spills and wear. This optional step can prolong the vibrancy and integrity of the printed design.
- Personalize and Enjoy: Once the assembly is complete, take a moment to personalize your custom oppai mouse pad further. Consider adding any additional embellishments or details to make it uniquely yours. Finally, place the mouse pad on your desk and enjoy the personalized touch it brings to your workspace.
By following these assembly steps, you can transform the printed design into a functional and eye-catching oppai mouse pad that reflects your creativity and personality. With the assembly process completed, you now have a unique accessory that adds a touch of humor and individuality to your desk setup.
Conclusion
Embarking on the journey of creating your own oppai mouse pad is not only a delightful DIY project but also an opportunity to infuse your workspace with a personalized touch. From selecting the materials to assembling the final product, each step allows you to exercise your creativity and bring forth a unique accessory that reflects your interests and sense of humor.
By following the detailed process outlined in this guide, you have learned how to design, print, and assemble a custom oppai mouse pad from start to finish. With the right materials and a dash of artistic flair, you can transform a simple mouse pad into a conversation piece that adds character to your desk environment.
As you admire your completed oppai mouse pad, take pride in the craftsmanship and creativity that went into its making. Whether it serves as a lighthearted conversation starter or simply brings a smile to your face during long hours at the computer, your custom creation is a testament to your ingenuity and individuality.
So, go ahead and proudly display your custom oppai mouse pad, knowing that it embodies your unique style and adds a playful element to your workspace. Embrace the fun and satisfaction that come with crafting a one-of-a-kind accessory that reflects your personality and interests.
Now, as you enjoy the comfort and amusement your new mouse pad provides, perhaps you’ll be inspired to embark on more creative DIY projects in the future. Let this endeavor serve as a reminder that with a bit of imagination and effort, you can transform everyday items into personalized works of art that brighten your surroundings and bring joy to your daily routine.