Introduction
If you're an avid typist or a passionate gamer, the sensation of pressing down on a mechanical keyboard is likely a familiar and satisfying feeling. The distinct "click" or "clack" of the keys can evoke a sense of nostalgia for some, while others simply appreciate the tactile feedback and responsiveness that mechanical keyboards offer. However, for those seeking a personalized touch or improved functionality, swapping out keycaps can be an enticing endeavor.
In this guide, we'll delve into the intricacies of upgrading your mechanical keyboard by replacing its keycaps. Whether you're aiming to enhance the aesthetic appeal or seeking a specific keycap material to optimize your typing experience, this step-by-step tutorial will equip you with the knowledge and confidence to embark on this engaging customization journey.
From understanding the fundamentals of mechanical keyboards to selecting the ideal keycap and executing the replacement process, we'll cover each stage comprehensively. By the end of this tutorial, you'll not only have a newfound appreciation for the intricate components of your mechanical keyboard but also the practical skills to elevate its performance and aesthetics through personalized keycap modifications. So, let's dive into the world of mechanical keyboards and unlock the secrets to upgrading your typing or gaming experience through the art of keycap customization.
Understanding Mechanical Keyboards
Before delving into the realm of keycap customization, it’s essential to grasp the foundational aspects of mechanical keyboards. Unlike their membrane counterparts, which utilize rubber domes to register key presses, mechanical keyboards employ individual switches for each key. These switches are available in various types, each offering distinct tactile feedback, actuation force, and acoustics.
One of the most popular switch types is the Cherry MX series, renowned for its durability and versatility. The Cherry MX Blue switches, for instance, are cherished for their audible click and tactile bump, providing typists with a responsive and audible keystroke feedback. Conversely, the Cherry MX Red switches offer a linear and quieter typing experience, making them a preferred choice among gamers seeking rapid key actuation without audible feedback.
Furthermore, mechanical keyboards are revered for their longevity, with many switches rated for tens of millions of keystrokes. This durability, coupled with the customizable nature of mechanical keyboards, makes them an appealing canvas for personalization. Whether you’re aiming to enhance the aesthetics with vibrant keycap designs or seeking a specific keycap material to suit your typing style, the versatility of mechanical keyboards allows for a myriad of customization options.
Understanding the intricacies of mechanical keyboards, including the anatomy of switches and their unique characteristics, is pivotal in the realm of keycap customization. By familiarizing yourself with the diverse switch options and their respective attributes, you can make informed decisions when selecting keycaps that align with your preferences and usage requirements.
Now that we’ve laid the groundwork for comprehending the essence of mechanical keyboards, let’s venture into the realm of keycap selection and customization to further enhance your typing or gaming experience.
Choosing the Right Keycap
When embarking on the journey of keycap customization, the initial step is selecting the ideal keycap that aligns with your aesthetic preferences and functional requirements. Keycaps are available in an array of materials, including ABS (Acrylonitrile Butadiene Styrene), PBT (Polybutylene Terephthalate), and even more exotic options such as double-shot or artisan keycaps, each offering unique characteristics and visual appeal.
ABS keycaps, recognized for their smooth texture and ability to retain vibrant colors, are a popular choice among enthusiasts seeking a wide spectrum of design possibilities. However, they are prone to wear and develop a shiny appearance over time due to the oils and moisture from fingertips. On the other hand, PBT keycaps, known for their durability and resistance to shine, are favored for their longevity and textured feel, making them an ideal choice for heavy typists or gamers.
For those seeking an elevated level of customization, double-shot keycaps are an intriguing option. These keycaps feature a dual-layer construction, allowing for legends (the characters on the keycaps) to be a different color from the keycap itself, resulting in a visually striking and long-lasting design. Additionally, artisan keycaps, often handcrafted by artisans in the keyboard community, offer an unparalleled level of uniqueness and artistry, making them coveted collector’s items among keyboard enthusiasts.
Moreover, the keycap profile, which defines the shape and height of the keycaps, plays a significant role in both aesthetics and ergonomics. Common profiles include OEM, Cherry, DSA, and SA, each presenting distinct visual and tactile characteristics. By carefully considering the material, profile, and design options, you can tailor your keycap selection to suit your personal style and functional preferences, ultimately enhancing the overall typing or gaming experience.
With a myriad of keycap options at your disposal, the process of choosing the right keycap presents an exciting opportunity to infuse your mechanical keyboard with a touch of individuality and functionality. By understanding the diverse materials, profiles, and design possibilities, you can embark on this keycap customization journey with confidence and creativity, paving the way for a truly personalized typing or gaming experience.
Removing the Old Keycap
Before embarking on the process of replacing a keycap, it’s essential to familiarize yourself with the method of safely removing the existing keycap from your mechanical keyboard. This procedure requires a delicate touch to avoid damaging the keycap, switch, or keyboard housing.
The most common tool used for keycap removal is a keycap puller, available in various designs such as wire pullers or ring pullers. These tools are specifically crafted to grasp the sides of the keycap securely without exerting excessive force on the switch underneath. Alternatively, plastic keycap pullers, resembling miniature tongs, are also widely utilized for their gentle yet effective approach to keycap removal.
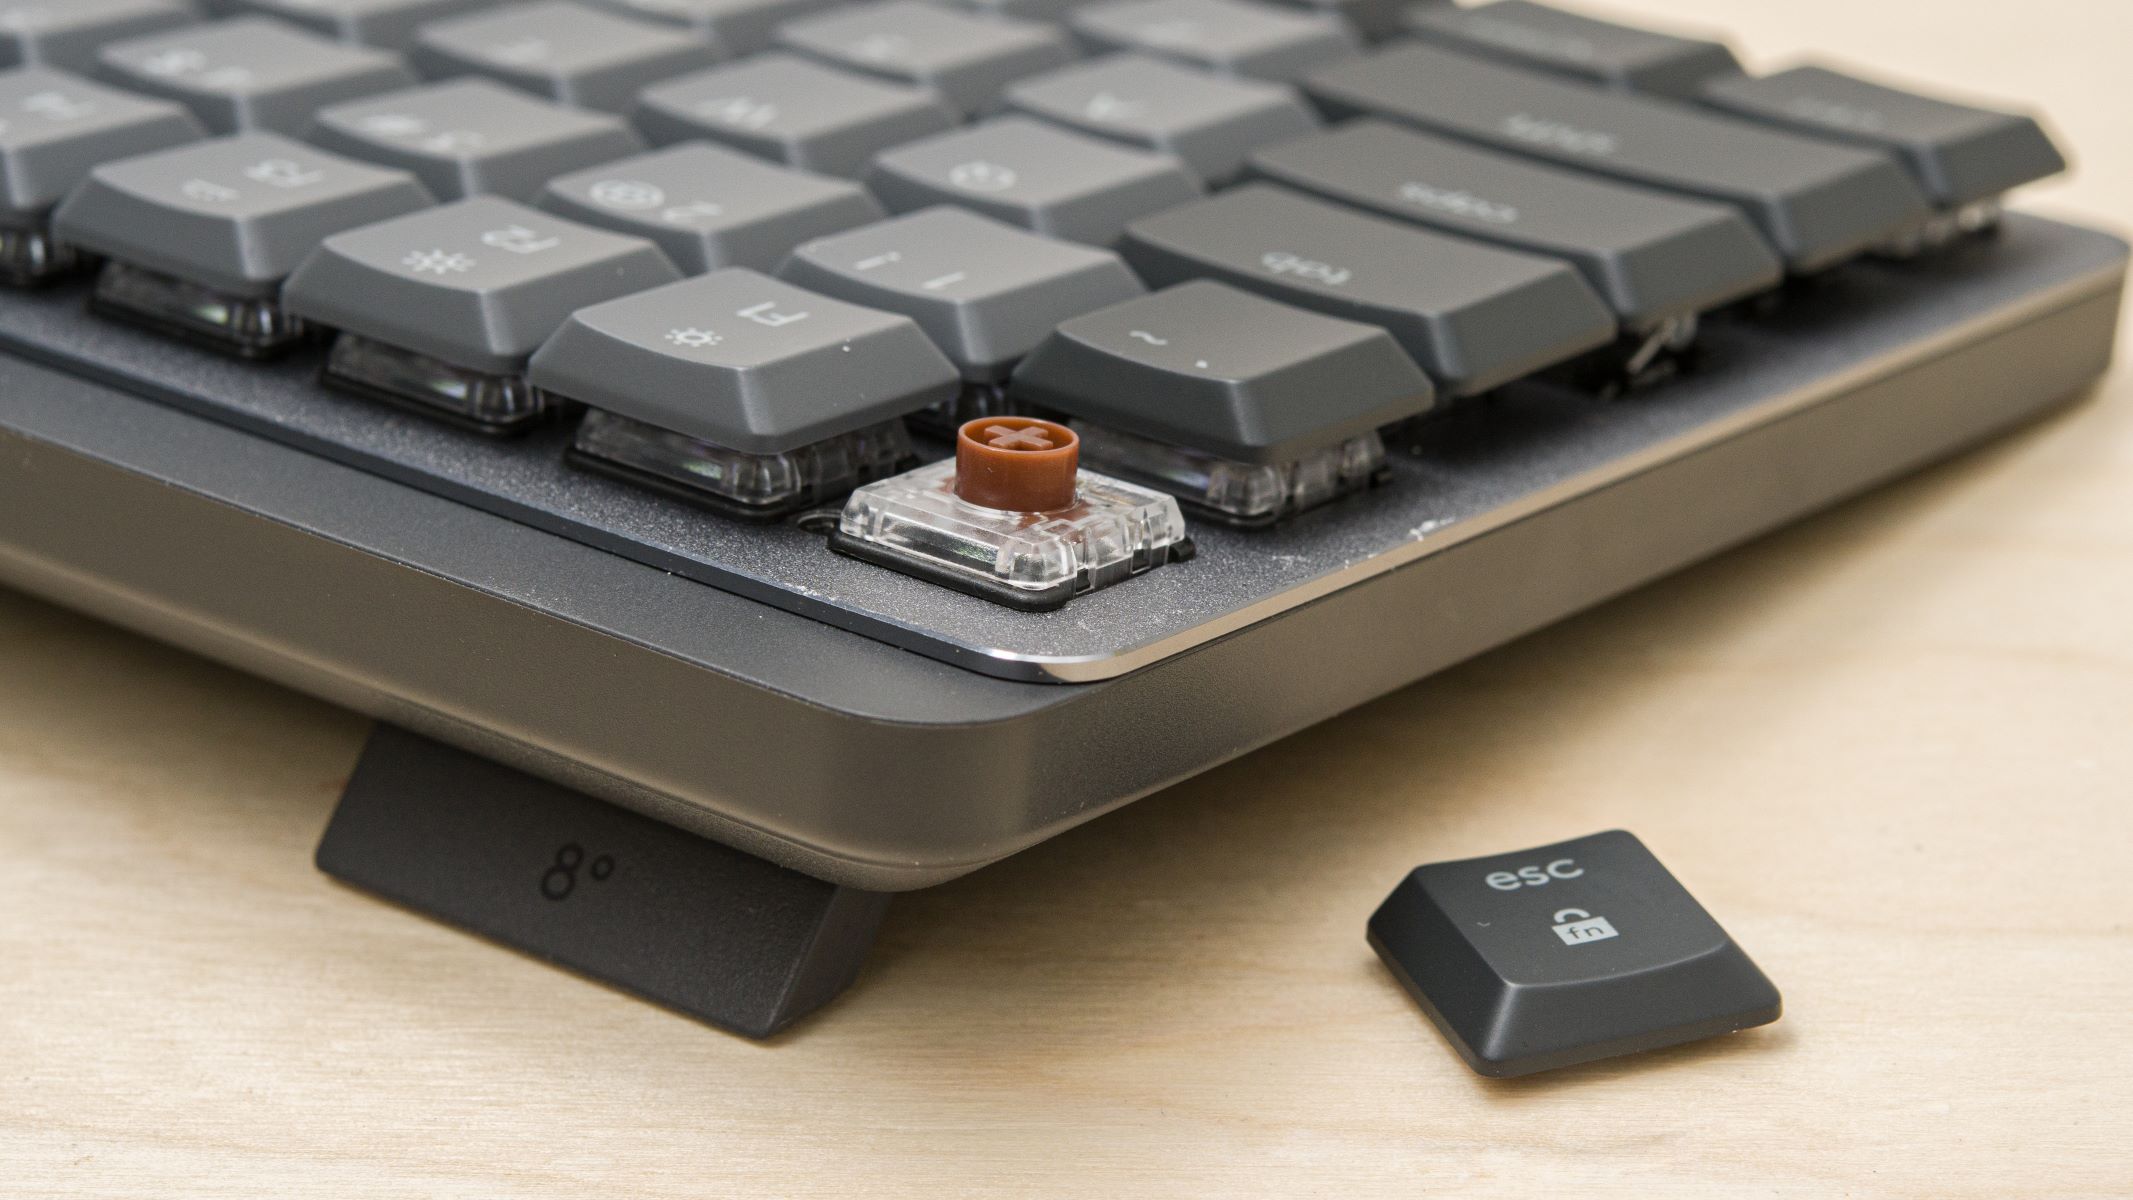
To begin, position the keycap puller over the keycap you intend to remove, ensuring that the puller’s prongs are aligned with the sides of the keycap. Gently but firmly squeeze the keycap puller, securing its grip on the keycap, and then apply upward pressure while wiggling the keycap from side to side. It’s crucial to maintain a steady and even force to prevent the keycap from being pulled askew, potentially damaging the switch or stabilizers.
In some instances, particularly with older or heavily used keyboards, the keycap may exhibit resistance when being removed. In such cases, a gentle rocking motion combined with slight side-to-side movements can aid in loosening the keycap from the switch stem. It’s imperative to exercise patience and avoid abrupt or forceful actions, as excessive pressure can lead to breakage or damage to the delicate components.
Upon successfully dislodging the keycap from the switch, inspect the switch stem and housing for any residual debris or foreign particles that may have accumulated over time. A can of compressed air or a soft-bristled brush can be used to gently clean the exposed switch, ensuring that it remains free of obstructions and debris.
By delicately and methodically removing the old keycap, you pave the way for a seamless transition to the installation of a new keycap. With the existing keycap safely removed and the switch area meticulously cleaned, you’re now primed to embark on the next phase of this keycap customization journey: placing the new keycap onto the switch and reveling in the personalized touch it brings to your mechanical keyboard.
Placing the New Keycap
As you embark on the exhilarating journey of keycap customization, the process of placing a new keycap onto your mechanical keyboard is a pivotal step that demands precision and finesse. Whether you’re aiming to infuse your keyboard with a vibrant pop of color, a textured feel, or a personalized touch, the act of installing a new keycap is a gratifying endeavor that elevates both the aesthetics and functionality of your keyboard.
Before proceeding, it’s crucial to identify the specific switch type and keycap mount of your mechanical keyboard, as these factors dictate the compatibility of keycaps. The most prevalent keycap mounts include Cherry MX, Alps, and Topre, each requiring corresponding keycaps that align with their unique specifications. Additionally, being mindful of the keycap profile, whether it’s OEM, Cherry, DSA, or SA, is essential in ensuring a seamless and ergonomic fit.
To begin, align the stem of the new keycap with the switch housing, ensuring that the keycap is oriented in the correct position and that the stem aligns with the cross-shaped or “+”-shaped switch stem. Apply gentle and even pressure directly over the center of the keycap, exerting downward force until you feel or hear a satisfying snap, indicating that the keycap is securely seated onto the switch stem.
It’s imperative to exercise caution and avoid applying excessive force when seating the keycap, as this can potentially damage the delicate switch or keycap. A steady and controlled approach is paramount, ensuring that the keycap is seated evenly and securely without causing undue stress on the switch or stabilizers.
For keycaps featuring stabilizers, such as the larger keys like the spacebar or the Enter key, it’s essential to position the stabilizer wires or inserts into their designated slots within the keycap. This ensures proper stability and uniform key movement, preventing any wobbling or uneven actuation of the key. Carefully align the stabilizer components with the corresponding slots on the keycap and gently press down to secure them in place.
With the new keycap seamlessly installed onto the switch, take a moment to appreciate the enhanced visual appeal and tactile satisfaction it brings to your mechanical keyboard. Whether it’s a striking artisan keycap, a textured PBT keycap, or a vibrant double-shot keycap, the act of placing a new keycap is a rewarding step that infuses your keyboard with a touch of individuality and functionality.
Testing the Keycap
After successfully placing the new keycap onto your mechanical keyboard, it’s essential to conduct a thorough testing phase to ensure that the keycap is functioning optimally and that it seamlessly integrates with the overall typing or gaming experience. This crucial step allows you to verify the keycap’s stability, actuation, and overall compatibility with the switch, providing confidence in the successful customization of your keyboard.
Begin by methodically pressing the key multiple times, observing its responsiveness and the tactile feedback it imparts. Whether it’s a clicky Cherry MX Blue switch or a linear Cherry MX Red switch, each keystroke should feel consistent and reliable, reflecting the intrinsic characteristics of the switch and keycap combination.
During this testing phase, pay close attention to the stability and alignment of the keycap, ensuring that it remains securely seated on the switch stem without any wobbling or lateral movement. This is particularly pertinent for larger keys equipped with stabilizers, such as the spacebar, Enter key, or Shift key, as they necessitate proper stabilization to facilitate smooth and uniform actuation.
Furthermore, evaluate the acoustics of the keycap, noting any discernible changes in sound compared to the original keycap. Whether the new keycap introduces a more pronounced click, a subdued thock, or a muted clack, the auditory feedback should align with your preferences and the inherent characteristics of the switch.
For gamers, testing the keycap’s responsiveness and actuation during intense gaming sessions is paramount. Whether executing rapid keystrokes in a high-action game or engaging in precise inputs in a strategy game, the new keycap should seamlessly complement your gaming style and contribute to an enhanced gaming experience.
Typists, on the other hand, can evaluate the keycap’s ergonomics and comfort during extended typing sessions. The texture, profile, and overall feel of the keycap should harmonize with your typing style, fostering a comfortable and efficient typing experience that minimizes fatigue and maximizes productivity.
By subjecting the new keycap to rigorous testing across various usage scenarios, you can ascertain its compatibility, stability, and overall impact on your typing or gaming experience. This meticulous evaluation ensures that the keycap seamlessly integrates with your mechanical keyboard, enhancing both its visual allure and functional performance.
Conclusion
Embarking on the journey of keycap customization for your mechanical keyboard is a gratifying endeavor that allows you to infuse your keyboard with a touch of individuality, functionality, and visual appeal. From understanding the intricate components of mechanical keyboards to selecting the ideal keycap material and executing the replacement process, this comprehensive guide has equipped you with the knowledge and confidence to elevate your typing or gaming experience through personalized keycap modifications.
By comprehending the foundational aspects of mechanical keyboards, including the diverse switch types, durability, and customization potential, you’ve gained a deeper appreciation for the intricacies of these beloved input devices. The ability to tailor your keyboard to suit your preferences, whether through vibrant ABS keycaps, durable PBT keycaps, or distinctive artisan keycaps, empowers you to curate a keyboard that reflects your personality and enhances your functionality.
The meticulous process of removing the old keycap and delicately placing the new keycap onto the switch has not only enhanced the visual allure of your keyboard but also contributed to its ergonomic and functional prowess. The testing phase, which scrutinized the keycap’s stability, actuation, and compatibility, ensured that the customized keycap seamlessly integrates with your typing or gaming experience, fostering a heightened sense of satisfaction and engagement.
As you revel in the tactile feedback, visual allure, and personalized touch that the new keycap brings to your mechanical keyboard, you’ve unlocked the potential to continually evolve and refine your keyboard to suit your evolving preferences and usage requirements. Whether it’s delving into the realm of artisan keycaps, exploring novel keycap profiles, or experimenting with diverse materials, the world of keycap customization offers an ever-expanding canvas for personal expression and functional optimization.
So, as you embark on this captivating journey of keycap customization, remember that each new keycap is not merely an accessory but a testament to your individuality, creativity, and pursuit of an enhanced typing or gaming experience. With each keystroke, the personalized keycap resonates with your unique style, breathing new life into your mechanical keyboard and elevating it from a mere tool to a personalized work of art that reflects your passion and personality.