Introduction
When it comes to supporting creative projects or innovative ideas, Indiegogo has become one of the most popular crowdfunding platforms. With a diverse range of campaigns to choose from, it’s an excellent platform for both creators and backers. If you’re eager to contribute to a project on Indiegogo and prefer to use PayPal as your payment method, you’ve come to the right place. In this article, we’ll guide you through the step-by-step process of paying on Indiegogo with PayPal.
Indiegogo allows users to fund projects that interest them, ranging from technology and film to fashion and art. If you’re new to the platform, don’t worry – we’ll walk you through the entire process, making it easy for you to support the projects you’re passionate about.
Paying with PayPal on Indiegogo offers several advantages. It’s a secure and convenient payment method that gives you the flexibility to pay with your PayPal balance or connect your PayPal account to your credit/debit card or bank account. Plus, with PayPal’s robust buyer protection policies, you can feel confident that your transaction will be safe and protected.
Throughout this guide, we’ll explain each step in detail, providing clear instructions and helpful tips to ensure a smooth and seamless payment experience. Whether you’re a first-time backer or a seasoned Indiegogo supporter, this guide will show you how to navigate the process and complete your payment using PayPal.
Now, without further ado, let’s dive into the step-by-step instructions for paying on Indiegogo with PayPal.
Step 1: Creating an Indiegogo Account
The first step in paying on Indiegogo with PayPal is to create an Indiegogo account if you haven’t done so already. It’s a quick and simple process that will enable you to explore campaigns, back projects, and manage your contributions.
To get started, visit the Indiegogo website (www.indiegogo.com) and click on the “Sign Up” button located in the top-right corner of the homepage. You have the option to sign up using your Facebook or Google account, or you can provide your email address and create a password.
Once you’ve entered your information and clicked on the “Sign Up” button, you’ll receive a confirmation email. Open your email inbox, find the email from Indiegogo, and click on the verification link to activate your account.
After confirming your account, you’ll be directed back to Indiegogo’s website. At this point, you can personalize your account settings by adding a profile picture, updating your bio, and selecting your interests. These steps are optional but can enhance your Indiegogo experience.
Now that your account is set up, you’re ready to explore the vast array of projects available and start supporting campaigns that align with your interests. In the following steps, we’ll guide you through the process of finding a project to support and paying for your chosen perk using PayPal.
Step 2: Finding a Project to Support
Now that you have an Indiegogo account, it’s time to find a project that you’re passionate about supporting. Indiegogo offers a wide range of campaigns across various categories, including technology, art, film, fashion, and more. Here’s how you can discover exciting projects:
1. Explore the Indiegogo Homepage: Start by visiting the Indiegogo homepage. You’ll find featured projects, popular campaigns, and trending categories that can help you discover new and noteworthy projects. Take your time to browse through the listings and click on the projects that catch your interest.
2. Utilize Filters: Indiegogo provides various filters to narrow down your search and find the right project. You can filter campaigns by category, location, popularity, and funding status. This allows you to focus on projects that align with your preferences and goals.
3. Browse Categories: If you have a specific interest or category in mind, you can navigate directly to that category page on Indiegogo. This will show you a curated list of campaigns within that particular category, making it easier to find projects that resonate with you.
4. Check Recommendations: Indiegogo offers personalized project recommendations based on your previous interactions and interests. These recommendations can be found on your account dashboard or in the “Discover” section of the website. Take a look at these suggestions to explore campaigns tailored to your preferences.
As you explore different campaigns, pay attention to their project descriptions, funding goals, and available perks. This information will help you make an informed decision about which project to support and which perk to choose. Once you’ve found the perfect project, it’s time to move on to the next step: selecting the perk you want.
Step 3: Selecting the Perk You Want
After finding a project that resonates with you on Indiegogo, it’s time to select the perk you want to support. Perks are rewards offered by campaign creators to backers who contribute a certain amount of money. These perks can range from early access to the product, exclusive merchandise, or special experiences.
To select a perk:
1. Visit the project page: Click on the project you’re interested in to navigate to its dedicated page. Here, you’ll find more details about the project, updates from the creator, and a list of available perks.
2. Explore the perks: Scroll through the list of perks offered by the campaign creator. Each perk will have a specific contribution amount associated with it, along with a description of what you’ll receive in return.
3. Consider your budget and interests: Take your budget into account and consider which perks align with your interests and preferences. Think about what you would personally enjoy or find value in. It’s also a good idea to read any limitations or delivery dates associated with each perk.
4. Make your selection: Once you’ve identified the perk you want to support, click on the corresponding “Select” or “Contribute” button. This will add the perk to your cart and allow you to proceed to the checkout process.
Keep in mind that some projects may offer limited quantities of certain perks, so if there’s a perk that you’re particularly interested in, it’s best to contribute as soon as possible to secure your spot.
Now that you’ve chosen your desired perk, it’s time to move on to the next step: adding the perk to your Indiegogo shopping cart.
Step 4: Adding the Perk to Your Cart
Once you have selected the desired perk on Indiegogo, the next step is to add it to your shopping cart. By adding the perk to your cart, you ensure that it is reserved for you and ready for checkout when you’re ready to proceed with your payment.
To add the perk to your cart:
1. Click on the “Add to Cart” or “Contribute” button: On the project page, locate the specific perk you have selected. Next to the description of the perk, there will be a button labeled “Add to Cart” or “Contribute.” Click on this button to add the perk to your cart.
2. Review your cart: Once you’ve clicked the “Add to Cart” button, a confirmation message will appear, letting you know that the perk has been added. You can then click on the “Go to Cart” or “View Cart” button to review the items in your cart.
3. Edit or remove perks (if necessary): In your shopping cart, you have the option to review and edit the perks you have added. If you want to make changes, such as adjusting the quantity or removing a perk altogether, you can do so by using the available options in your cart.
4. Continue shopping (optional): If you’re interested in supporting multiple projects or adding more perks to your cart, you can use the “Continue Shopping” button to browse and select additional perks. This allows you to combine multiple perks into a single checkout transaction.
Once you are satisfied with the perks in your cart, you’re one step closer to completing your payment. The next step is to proceed to the checkout process, where you will choose your payment method and provide the necessary information to finalize your contribution.
Step 5: Proceeding to Checkout
Once you have added the desired perk to your cart on Indiegogo, it’s time to proceed to the checkout process. This step involves confirming your contribution, providing shipping information (if applicable), and selecting your preferred payment method, which in this case is PayPal.
Follow these steps to proceed to checkout:
1. Access your cart: At the top or bottom of the page, you will find a button labeled “Checkout” or “Proceed to Checkout.” Click on this button to access the checkout page.
2. Review your contribution details: On the checkout page, you will see a summary of your contribution, including the chosen perk, the contribution amount, and any shipping fees (if applicable). Take a moment to review everything and ensure it is accurate.
3. Provide shipping information: If the perk you selected requires shipping, you will need to provide your shipping address during the checkout process. Fill in the required fields with your accurate shipping information to ensure timely and accurate delivery of your perk.
4. Select PayPal as your payment method: On the checkout page, you will see a list of available payment methods. Look for the option to pay with PayPal and select it as your preferred method of payment.
5. Continue to PayPal: After selecting PayPal as your payment method, click on the “Continue to PayPal” or similar button to proceed. You will be redirected to PayPal’s secure website to complete the payment process.
By following these steps, you have successfully navigated to the checkout process and are ready to finalize your payment using PayPal. The next steps will guide you through logging into your PayPal account, confirming the payment, and completing the checkout process.
Step 6: Choosing PayPal as Your Payment Method
Once you’ve reached the PayPal payment page during the checkout process on Indiegogo, it’s time to choose PayPal as your preferred method of payment. PayPal offers a secure, convenient, and widely accepted payment option, allowing you to complete your transaction with ease.
Here’s how you can choose PayPal as your payment method:
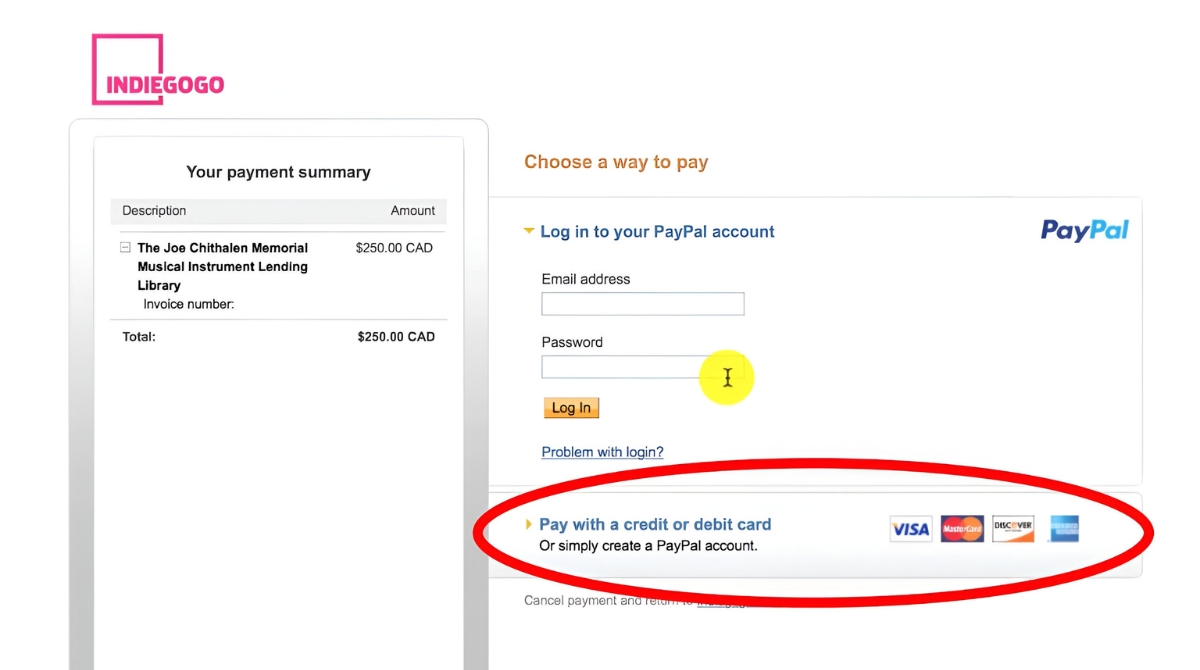
1. Log in to your PayPal account: On the PayPal payment page, you will see a section where you can log in to your PayPal account. Enter your registered email address and password to access your account. If you don’t have a PayPal account yet, you can sign up for one by clicking on the “Sign Up” or “Create Account” button.
2. Link your PayPal account (if necessary): If you haven’t linked your PayPal account to your Indiegogo profile yet, you will be prompted to do so during this step. Follow the instructions provided to connect your PayPal account to Indiegogo. This step may require you to authorize Indiegogo to access your PayPal account information.
3. Confirm your payment details: Once you’ve successfully logged in to your PayPal account and linked it to Indiegogo, review your payment details. Ensure that the contribution amount and any applicable fees are accurate before proceeding. If necessary, you can make any final adjustments at this stage.
4. Proceed with the payment: After verifying your payment details, click on the “Pay Now,” “Continue,” or similar button to proceed with the payment. PayPal will process the transaction and redirect you back to the Indiegogo website once the payment is complete.
By choosing PayPal as your payment method, you can enjoy the convenience of using your PayPal balance, linking your credit/debit card or bank account, and taking advantage of PayPal’s buyer protection policies.
Now that you’ve successfully selected PayPal as your payment method and confirmed your payment details, it’s time to proceed to the next step – logging in to your PayPal account.
Step 7: Logging in to Your PayPal Account
After selecting PayPal as your payment method on Indiegogo, the next step is to log in to your PayPal account. Logging in ensures the security of your payment information and allows you to complete the transaction seamlessly.
Follow these steps to log in to your PayPal account:
1. On the PayPal payment page, you will see a section labeled “Log In” or “Log Into Your Account.” Enter the email address associated with your PayPal account in the designated field.
2. Enter your password: Once you’ve entered your email address, you’ll be prompted to enter your PayPal account password. Carefully enter your password, ensuring that uppercase and lowercase letters are correct. If you are uncertain about your password, you can select the “Forgot password?” option to reset it.
3. Verify your account: If you have enabled Two-Factor Authentication (2FA) on your PayPal account, you may be required to provide an additional verification code. This code is typically sent to your mobile device or email address associated with your PayPal account. Enter the verification code when prompted.
4. Click on the “Log In” or “Sign In” button to proceed.
By logging in to your PayPal account, you ensure the security and privacy of your payment information during the transaction. PayPal utilizes advanced encryption technologies to safeguard your personal and financial data, providing you with a safe and secure payment experience.
Once you’ve successfully logged in to your PayPal account, you will be able to proceed with confirming the payment and completing the checkout process on Indiegogo. The next step will guide you through confirming the payment on the PayPal website.
Step 8: Confirming the Payment
After logging in to your PayPal account during the checkout process on Indiegogo, the next step is to confirm the payment. Confirming the payment ensures that your contribution is processed successfully and that the funds are transferred to the project creator.
Follow these steps to confirm the payment on the PayPal website:
1. Review the payment details: On the PayPal website, you will see a summary of the payment details, including the amount you’re contributing, the project name or campaign title, and any additional fees associated with the transaction. Take a moment to review these details and ensure they are accurate.
2. Confirm the payment: If everything looks correct, click on the “Confirm” or “Pay Now” button to proceed with the payment. By confirming the payment, you authorize PayPal to transfer the specified amount from your PayPal account or your linked payment method to the project creator’s account on Indiegogo.
3. Wait for the confirmation screen: Once you’ve confirmed the payment, PayPal will process the transaction. You will be redirected to a confirmation screen that indicates a successful payment. This screen may include a transaction ID for reference.
4. Return to Indiegogo: After the payment has been confirmed on PayPal, you will be automatically redirected back to Indiegogo’s website. Here, you should receive a confirmation of your contribution, along with any additional perks or benefits associated with the perk you selected.
By confirming the payment on the PayPal website, you finalize the transaction and ensure that your contribution reaches the project you’re supporting on Indiegogo. This step completes the payment process and brings you one step closer to supporting the campaign and receiving your chosen perks.
Now that you’ve successfully confirmed the payment, the final step is to complete the checkout process on Indiegogo and finalize your contribution. The following step will guide you through completing the checkout process.
Step 9: Completing the Checkout Process
After confirming the payment on PayPal, the final step in paying on Indiegogo with PayPal is completing the checkout process on the Indiegogo website. Completing this step finalizes your contribution and ensures that your support is processed successfully.
Follow these steps to complete the checkout process:
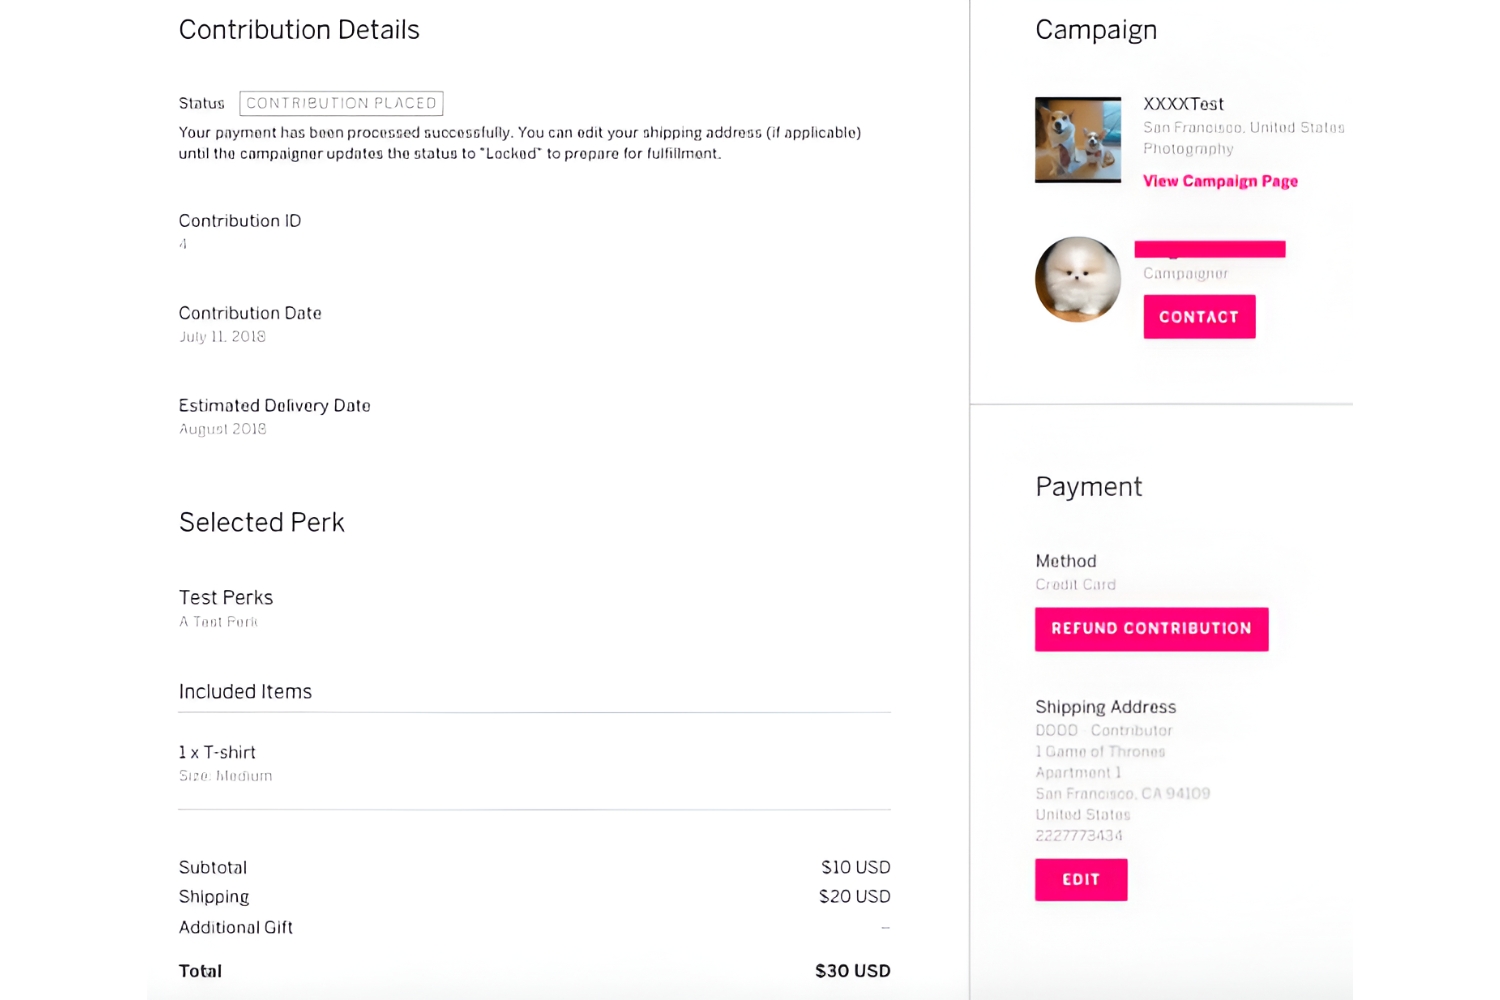
1. Return to the Indiegogo website: Once you’ve been redirected back to the Indiegogo website after confirming the payment on PayPal, you will find yourself on the order confirmation page. This page will display a summary of your contribution and any perks associated with it.
2. Review your order: Take a moment to review your order and ensure that all the details are accurate. Check the contribution amount, selected perks, and any applicable shipping information. If there are any changes you need to make, use the provided options to edit your order.
3. Fill out any required information: If there are additional details that need to be provided, such as your shipping address or any special instructions, fill them out on the checkout page. Make sure to double-check the accuracy of the information you enter.
4. Submit your order: Once you’ve reviewed all the details and filled out any necessary information, click on the “Submit Order” or similar button to complete the checkout process. This action finalizes your contribution and completes the transaction.
5. Receive confirmation: After submitting your order, you will receive a confirmation message indicating that your contribution has been successfully processed. This confirmation may also include additional information, such as estimated delivery times for physical perks, if applicable.
By completing the checkout process on Indiegogo, you finalize your contribution and ensure that your support is acknowledged by the project creator. It’s an exciting moment as you’ve successfully completed your payment and taken an active role in supporting the project or campaign that you’re passionate about.
Congratulations! You’ve now completed the entire process of paying on Indiegogo with PayPal. Your contribution will go towards supporting the project and helping it come to life. Thank you for your support and for being a part of the Indiegogo community!
Conclusion
Paying on Indiegogo with PayPal is a straightforward and convenient process that allows you to support the creative projects and campaigns that inspire you. By following the step-by-step guide provided in this article, you can navigate through creating an Indiegogo account, finding a project to support, selecting your desired perk, adding it to your cart, and proceeding to checkout.
When it comes time to choose your payment method, PayPal offers a secure and widely accepted option. By logging in to your PayPal account, confirming the payment, and completing the checkout process on Indiegogo, you ensure that your contribution reaches the project creator and that your perks are reserved for delivery.
Remember, as you navigate the Indiegogo platform, take your time to explore different campaigns, read project descriptions, and consider your budget and interests before selecting a perk. Your support can make a significant difference in helping creators bring their ideas to life.
Whether you’re a first-time backer or a seasoned supporter, Indiegogo provides a platform where you can connect with innovative ideas and contribute to projects that align with your passions. With PayPal as your chosen payment method, you can contribute with confidence, knowing that your transaction is secure and protected.
Thank you for choosing Indiegogo as your crowdfunding platform and PayPal as your payment method. Your support plays a vital role in fueling innovation and creativity around the world. Happy supporting!