Introduction
Welcome to the world of digital payments and convenience! In this modern era, where technology is constantly evolving, one of the most convenient ways to make payments is through an e-wallet. E-wallets have gained popularity for their ease of use, secure transactions, and the ability to store multiple cards in one place. If you are a TNG cardholder and want to enjoy the benefits of an e-wallet, you’ve come to the right place.
In this article, we will guide you through the step-by-step process of linking your TNG card to an e-wallet. By doing so, you can make seamless transactions, track your spending, and enjoy the perks offered by the e-wallet provider. Whether you’re a regular TNG card user or new to the concept of e-wallets, we’ll ensure that you have all the information you need to get started.
From downloading the e-wallet app to topping up your account and making transactions, we’ll cover each step in detail. By the end of this guide, you’ll be ready to experience the convenience and efficiency of using an e-wallet linked to your TNG card.
So, let’s dive in and explore the world of digital payments, as we show you how to link your TNG card to an e-wallet. Get ready to simplify your payment experience and embrace the future of transactions.
Step 1: Download the E-wallet App
The first step in linking your TNG card to an e-wallet is to download the e-wallet app onto your mobile device. This app is typically available for both iOS and Android platforms and can be found in the respective app stores. Simply open the app store on your device and search for the e-wallet app.
Once you’ve found the app, tap on the “Download” or “Get” button to initiate the installation process. The app will then be downloaded and installed on your device. Depending on your internet connection speed, this may take a few moments.
It’s important to ensure that you are downloading the official app from the authorized developer. Look for the app that has the developer’s name and logo, and check the ratings and reviews to verify its authenticity.
After the installation is complete, you can open the app by tapping on the respective icon on your home screen or app drawer. The app may require certain permissions, such as access to your location or contacts, for optimal functionality. Grant the necessary permissions to proceed.
Now that you have successfully downloaded the e-wallet app, you are ready to move on to the next step: creating an account.
Step 2: Create an Account
After downloading the e-wallet app, the next step is to create an account. Launch the app and look for the option to sign up or create a new account. Tap on it to begin the registration process.
You will be prompted to provide some personal information, such as your name, email address, and phone number. Make sure to enter accurate and valid information, as it will be used to verify your account and for future communications.
Once you have filled in the required fields, tap on the “Next” or “Continue” button to proceed. In some cases, you may also be asked to create a password or PIN to secure your account. Choose a strong and unique password or PIN to protect your e-wallet.
After completing the registration process, you will usually receive a verification email or SMS to confirm your account. Follow the instructions provided in the email or SMS to verify your account. This step is essential to ensure the security and integrity of your e-wallet.
Once your account is verified, you can log in to the e-wallet app using the credentials you provided during registration. Congratulations! You now have a registered account with the e-wallet.
Creating an account is a crucial step in the process of linking your TNG card to the e-wallet. It allows you to securely access and manage your e-wallet, track your transactions, and enjoy the benefits of cashless payments.
In the next step, we will guide you through the process of linking your TNG card to the e-wallet so that you can start making seamless transactions.
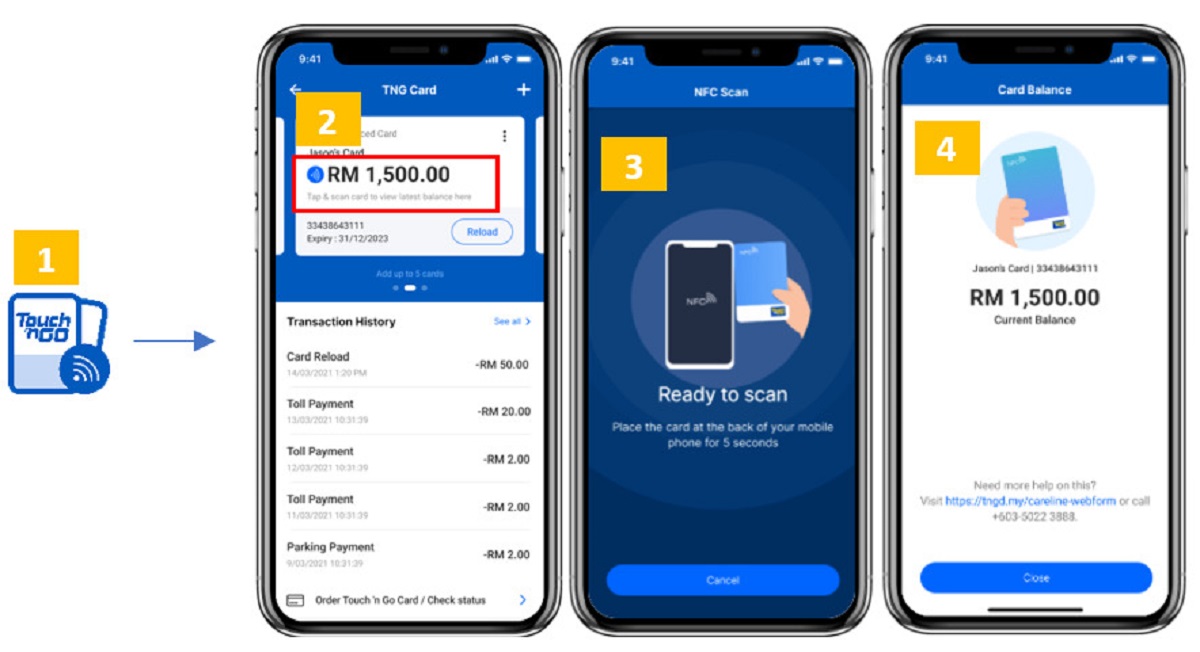
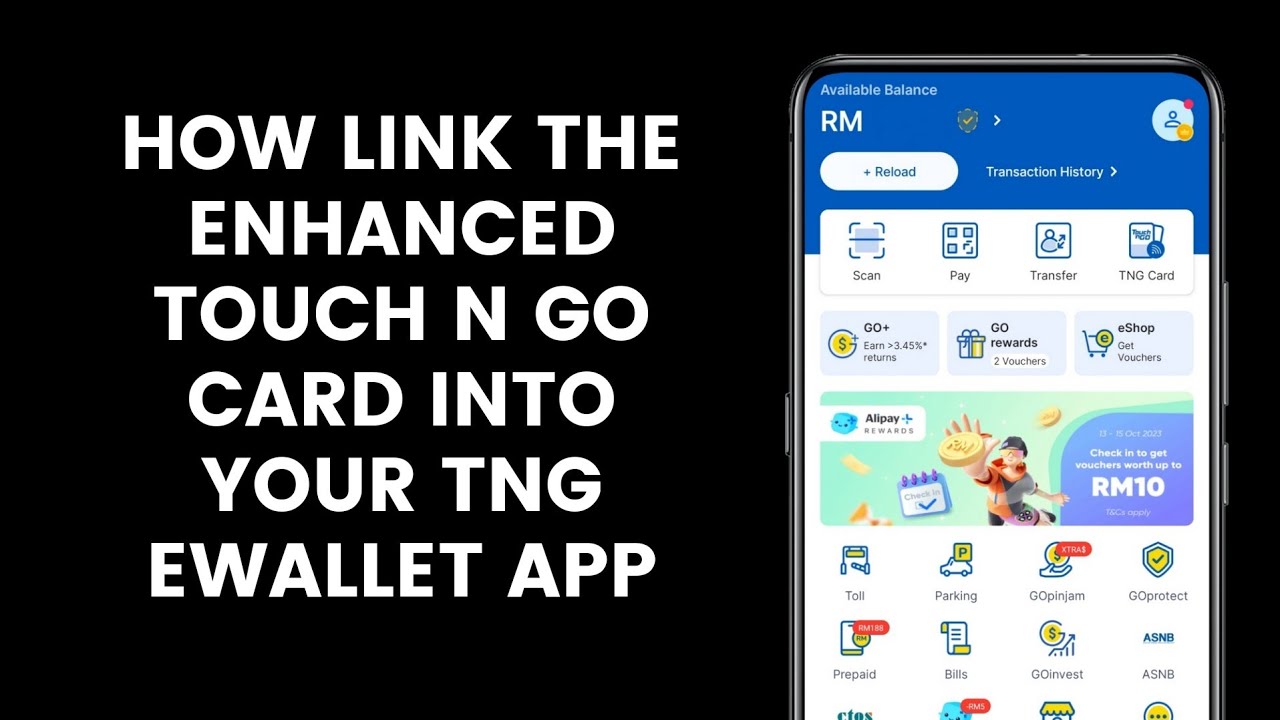
Step 3: Link TNG Card to E-wallet
Now that you have successfully created an account, the next step is to link your TNG card to the e-wallet. This process may vary depending on the e-wallet provider, but the general steps are as follows:
- Open the e-wallet app on your mobile device and log in to your account using your credentials.
- Look for the “Add Card” or “Link Card” option within the app. This option is usually found in the settings or account settings section.
- Select “TNG Card” as the type of card you want to link.
- You will be prompted to enter the TNG card details, such as the card number, expiry date, and CVV or security code. Make sure to enter the information correctly.
- After providing the necessary card details, tap on the “Link” or “Add Card” button to initiate the linking process.
- The e-wallet app will communicate with the TNG card system to verify and link the card to your e-wallet account. This process may take a few moments, so be patient.
- Once the linking process is complete, you will receive a confirmation message or notification indicating that your TNG card has been successfully linked to the e-wallet.
It’s important to note that the TNG card should be in your possession during the linking process. Some e-wallet providers may require additional steps, such as a one-time password (OTP) sent to your registered mobile number or email for added security.
By linking your TNG card to the e-wallet, you can now enjoy the convenience of using your e-wallet for transactions at supported merchants and platforms. Your TNG card will be seamlessly integrated into the e-wallet, allowing you to make cashless payments with ease.
In the next step, we will guide you through the process of verifying your TNG card to ensure its authenticity and security.
Step 4: Verify Your TNG Card
After linking your TNG card to the e-wallet, it is important to verify the card to ensure its authenticity and security. Verification is a standard procedure implemented by e-wallet providers to protect users from potential fraud and unauthorized usage. Follow these steps to verify your TNG card:
- Open the e-wallet app on your mobile device and log in to your account.
- Navigate to the card management or verification section within the app. This section is typically found in the settings or account settings menu.
- Select the linked TNG card that requires verification.
- Depending on the e-wallet provider, you may be asked to provide additional information or perform certain actions to complete the verification process. This can include verifying your identity through biometric authentication, such as fingerprint or facial recognition.
- Follow the on-screen instructions to complete the verification process. This may involve scanning the TNG card barcode or entering a verification code provided by the e-wallet app.
- Once the verification process is successfully completed, you will receive a confirmation message or notification stating that your TNG card has been verified.
Verification is an important step in ensuring the security and integrity of your TNG card when using it with the e-wallet. By verifying your card, you can have peace of mind knowing that your transactions are protected and authorized.
It is worth noting that some e-wallet providers may require periodic re-verification of the TNG card to maintain its validity. This helps to further enhance the security of your e-wallet and prevent unauthorized usage.
Once your TNG card is successfully verified, you’re ready to move on to the next step – selecting your preferred payment method within the e-wallet.
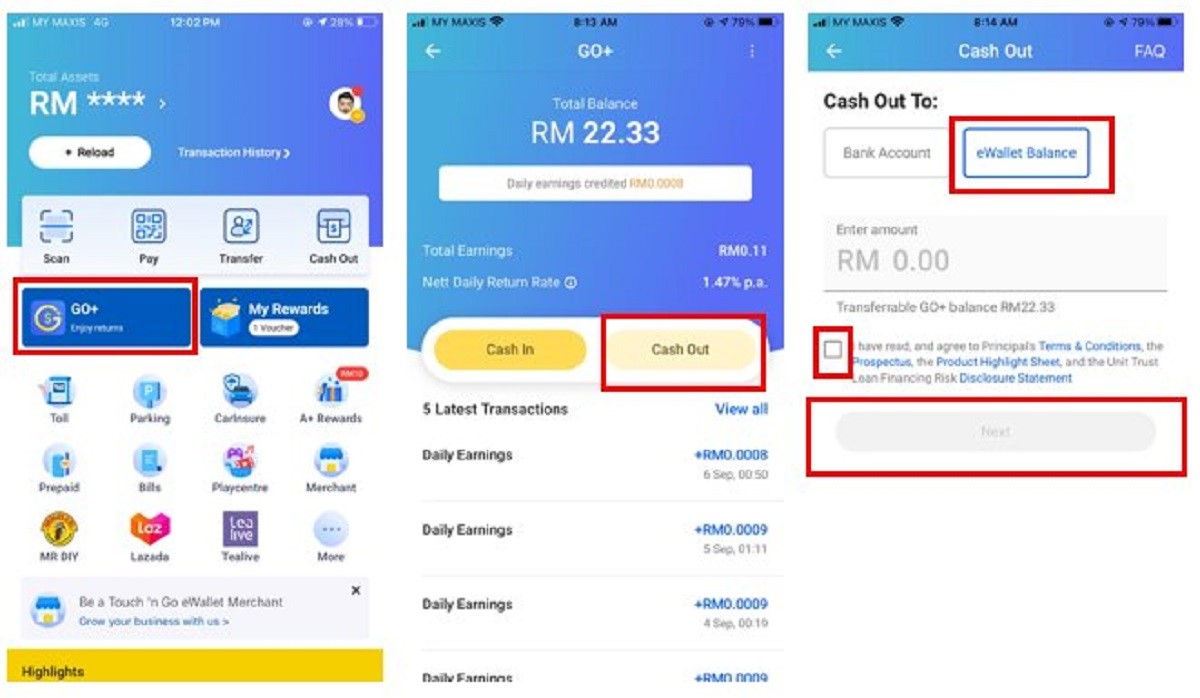
Step 5: Select Payment Method
After verifying your TNG card, the next step is to select your preferred payment method within the e-wallet. E-wallets typically offer multiple payment options to cater to different user preferences. Here’s how you can select your payment method:
- Open the e-wallet app and log in to your account.
- Navigate to the payment settings or payment methods section within the app. This can usually be found in the settings or account settings menu.
- Here, you will see a list of available payment methods. Look for the TNG card option and select it as your preferred payment method.
- Some e-wallet providers may allow you to set a default payment method for convenience. If this option is available, you can choose to set your TNG card as the default payment method.
- Ensure that the TNG card is set as the active payment method in your e-wallet. This will ensure that when you make a payment, the transaction will be deducted from your TNG card balance.
Once you have selected your payment method, you are ready to start using your e-wallet linked to your TNG card for seamless transactions. The e-wallet will automatically deduct the payment amount from your TNG card balance whenever you make a purchase or payment using the e-wallet.
It’s important to regularly check your TNG card balance and keep it topped up to ensure a smooth payment experience. Some e-wallet apps offer features to conveniently top up your e-wallet balance using your linked TNG card, which we will discuss in the next step.
Now that you have chosen your payment method within the e-wallet, you can enjoy the convenience and ease of making cashless transactions without the need for physical cash or cards.
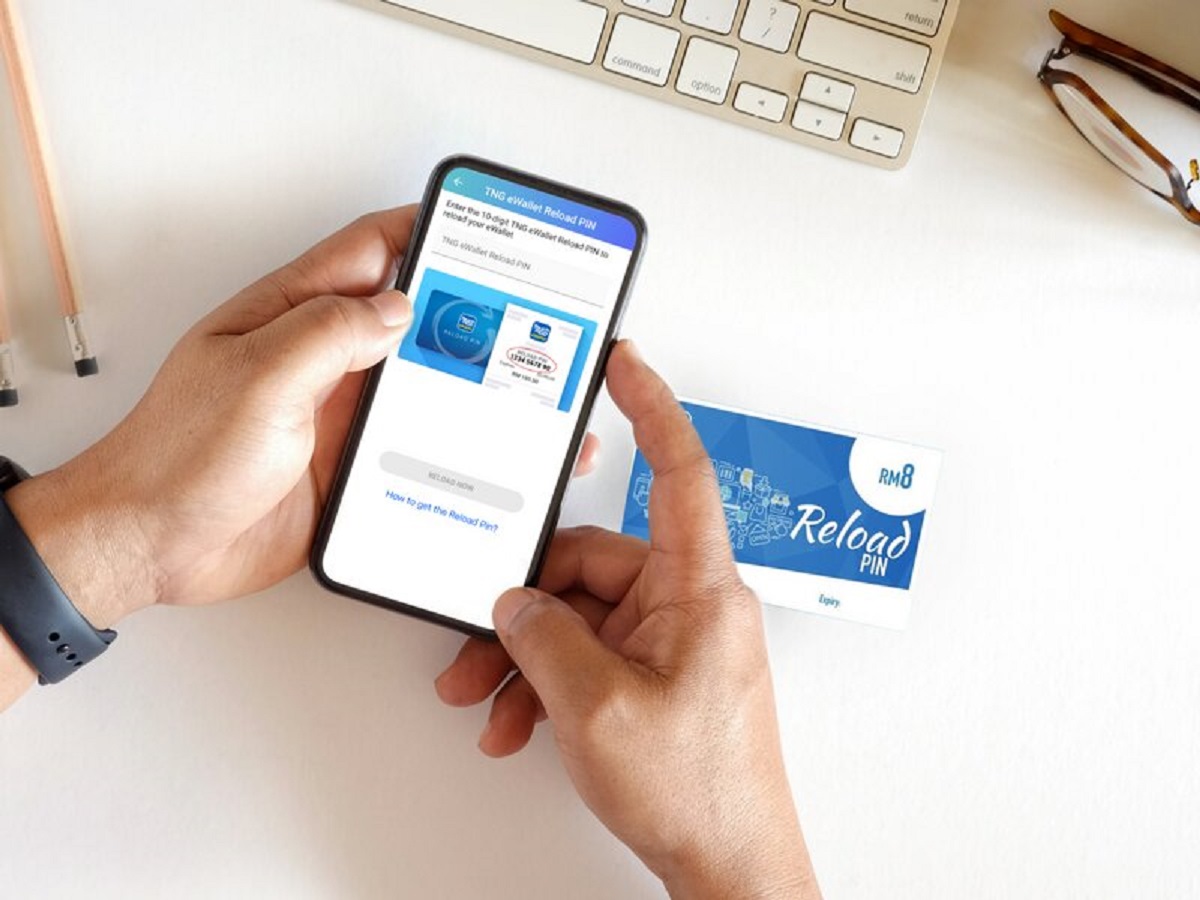
Step 6: Top Up Your E-wallet with TNG Card
To ensure a seamless payment experience with your e-wallet, it is important to keep your e-wallet balance topped up. Topping up your e-wallet with your linked TNG card is a straightforward process. Follow these steps to top up your e-wallet:
- Launch the e-wallet app on your mobile device and log in to your account.
- Look for the “Top Up” or “Add Funds” option within the app. This option is usually available in the main menu or wallet settings.
- Select the TNG card as your preferred payment method for topping up.
- Enter the desired amount you wish to top up your e-wallet with. Some e-wallets may have minimum or maximum top-up limits, so make sure to check the specific requirements.
- Confirm the top-up transaction and proceed to the payment step.
- You will be prompted to enter your TNG card details, such as the card number, expiry date, and CVV or security code.
- Review the payment details and confirm the transaction to complete the top-up process.
- Once the transaction is successful, the top-up amount will be reflected in your e-wallet balance, and you can start using it for your transactions.
It’s important to keep track of your e-wallet balance and top it up when necessary to avoid any inconvenience during payments. Some e-wallet apps offer the option to set automatic top-ups or enable notifications when your e-wallet balance is low, ensuring a seamless payment experience.
With your e-wallet topped up, you can now enjoy the convenience of making transactions without worrying about carrying physical cash or fumbling with cards. Your TNG card will automatically be debited for each transaction, providing a hassle-free payment experience.
In the final step, we will summarize the process and conclude our guide on how to link your TNG card to an e-wallet.
Step 7: Enjoy Convenient Transactions
Congratulations! By now, you have successfully linked your TNG card to your e-wallet and completed all the necessary steps. You are now ready to enjoy the convenience of making seamless and cashless transactions.
With your e-wallet linked to your TNG card, you can now use it to make payments at supported merchants, online platforms, and even peer-to-peer transfers. Say goodbye to the hassle of carrying physical cash or searching for your wallet. With just your mobile device, you can easily pay for your purchases.
When making a transaction, simply launch your e-wallet app, select the TNG card as your payment method, and authorize the transaction. The amount will be deducted from your TNG card balance automatically, providing a quick and seamless payment experience.
One of the key advantages of using an e-wallet linked to your TNG card is the ability to track your spending and manage your finances more effectively. Most e-wallet apps provide transaction history and spending analysis features, allowing you to review and monitor your expenses conveniently.
Furthermore, e-wallets often offer additional features and benefits such as cashback rewards, loyalty programs, and exclusive promotions. Take advantage of these perks to enhance your payment experience and save money on your transactions.
Always ensure that you keep your TNG card linked to your e-wallet secure by setting strong authentication methods and regularly updating your app to the latest version. This will help safeguard your account and protect your financial information.
Embrace the future of transactions and enjoy the convenience and efficiency that comes with using an e-wallet linked to your TNG card. Simplify your payment experience, track your expenses, and enjoy the perks offered by the e-wallet provider.
Now that you have completed all the steps, you are ready to embark on a journey of digital payments and experience a new level of convenience and ease with your TNG card and e-wallet. Happy transacting!
Conclusion
Congratulations on successfully linking your TNG card to an e-wallet! You have now unlocked a world of convenience and efficiency in your day-to-day transactions. By following the step-by-step process outlined in this guide, you have ensured a seamless and secure experience when making payments.
With your TNG card linked to the e-wallet, you can enjoy the benefits of cashless transactions, track your spending, and take advantage of additional features and perks offered by the e-wallet provider. Say goodbye to the hassle of carrying physical cash and searching for your wallet. With just a few taps on your mobile device, you can make payments effortlessly.
Remember to keep your TNG card and e-wallet secure by setting strong authentication methods and regularly updating your e-wallet app. This will help protect your financial information and ensure the integrity of your transactions.
Whether you’re shopping at your favorite stores, ordering food online, or splitting bills with friends, your linked TNG card and e-wallet provide a convenient and efficient way to make transactions. Enjoy the benefits of tracking your expenses, receiving cashback rewards, and taking advantage of exclusive promotions.
Now that you have completed all the necessary steps to link your TNG card to an e-wallet, you are ready to embrace the future of payments and experience the ease and simplicity it brings. Embrace the digital transformation and enjoy the convenience of a cashless lifestyle.
Thank you for choosing to explore the world of e-wallet payments with your TNG card. We hope this guide has provided you with the information and guidance you needed. Happy transacting!