Introduction
Welcome to the world of digital currencies! If you’re eager to get in on the action and start investing in cryptocurrencies, one popular option is XRP. In this guide, we’ll walk you through the process of buying XRP on Bitstamp, one of the leading cryptocurrency exchanges.
XRP is the native cryptocurrency of the Ripple network, designed to facilitate fast and low-cost international money transfers. As the third-largest cryptocurrency by market capitalization, XRP has garnered significant attention from both individual investors and financial institutions. Whether you want to invest in XRP for long-term gains or for shorter-term trading opportunities, Bitstamp provides a reliable platform to buy and sell this digital asset.
Before we dive into the details, it’s worth noting that investing in cryptocurrencies carries risks. The cryptocurrency market is highly volatile, and prices can fluctuate dramatically. It’s essential to do your own research, understand the risks involved, and only invest what you can afford to lose.
In this guide, we’ll cover everything you need to know to get started with buying XRP on Bitstamp. We’ll walk you through setting up a Bitstamp account, verifying your identity, funding your account, placing an order for XRP, executing the trade, and even withdrawing your XRP from Bitstamp to your personal wallet.
At the end of this guide, you’ll have a clear understanding of how to navigate the Bitstamp platform and confidently make your first XRP purchase. So, let’s jump right in and get started!
Setting Up a Bitstamp Account
Before you can start buying XRP on Bitstamp, you’ll need to create an account. Don’t worry; the process is straightforward.
1. Visit the Bitstamp website (www.bitstamp.net) and click on the “Register” button to begin.
2. Fill in the required information, including your email address and password. Make sure to choose a strong password that you’ll remember but is also secure.
3. Read and accept the Terms of Use and Privacy Policy by checking the boxes.
4. Complete the CAPTCHA to prove that you’re not a robot.
5. Click on the “Register” button to create your account.
After completing these steps, you’ll receive a confirmation email from Bitstamp. Click on the link in the email to verify your email address and activate your account.
Once your account is activated, you can log in to Bitstamp using your email address and password.
For added security, we recommend enabling two-factor authentication (2FA) on your Bitstamp account. This extra layer of security helps protect your account from unauthorized access. You can enable 2FA by linking your account to the Google Authenticator app or using a hardware security key.
Now that you have a Bitstamp account, it’s time to verify your identity to comply with Bitstamp’s security measures and regulations. We’ll cover the verification process in the next section.
Verifying Your Account
In order to comply with financial regulations and enhance the security of their platform, Bitstamp requires users to go through a verification process. This process includes providing identification documents to confirm your identity. Here’s how you can verify your Bitstamp account:
1. Log in to your Bitstamp account.
2. Click on your account name in the top right corner of the screen and select “Verification” from the dropdown menu.
3. You will be prompted to choose the type of account you want to verify: Individual or Corporate. Select the appropriate option for your situation.
4. Follow the on-screen instructions to complete the verification. This typically involves providing personal information, such as your full name, date of birth, and address.
5. You will also need to upload identification documents. Bitstamp accepts valid passports, national IDs, and driver’s licenses as proof of identity. Make sure the documents you provide are clear and legible.
6. In some cases, Bitstamp may require additional documents to verify your address or source of funds. These may include utility bills, bank statements, or proof of income. Follow the instructions provided by Bitstamp to submit any additional documentation required.
7. After submitting your documents, Bitstamp’s verification team will review your information. This process may take some time, so be patient. You will receive an email notification once your verification is either approved or if any additional information is required.
Once your account is verified, you will have access to higher funding limits and additional features on the Bitstamp platform. Verification is an important step to ensure the security and legitimacy of the Bitstamp exchange.
It’s worth noting that different account types may have different verification requirements and limits. Make sure to review the specific requirements for your account type on the Bitstamp website.
Now that your account is verified, it’s time to fund it and start buying XRP. We’ll cover the process of funding your Bitstamp account in the next section.
Funding Your Bitstamp Account
Before you can start buying XRP on Bitstamp, you’ll need to deposit funds into your account. Bitstamp provides several options for funding your account:
1. Bank Transfer: You can deposit funds into your Bitstamp account using a traditional bank transfer. Bitstamp supports both SEPA (Single Euro Payments Area) transfers for users in Europe and international wire transfers for users outside of Europe. Simply initiate the transfer from your bank account using the provided details on the Bitstamp deposit page. Keep in mind that bank transfers may take a few business days to complete.
2. Cryptocurrency Deposits: If you already hold cryptocurrencies like Bitcoin or Ethereum, you can transfer them to your Bitstamp account and use them to purchase XRP. Bitstamp supports a variety of cryptocurrencies, so check the deposit page for the full list and corresponding wallet addresses.
3. Credit and Debit Cards: Bitstamp also allows users to fund their accounts using credit or debit cards. This option offers a convenient and relatively fast way to deposit funds. However, keep in mind that there may be additional fees associated with using cards for deposits.
After selecting your preferred funding method, follow the instructions provided by Bitstamp to complete the deposit process. Make sure to double-check your account details and any specific instructions, such as including a unique reference code or using a specific wallet address for cryptocurrency deposits.
Once your funds are deposited and confirmed in your Bitstamp account, you are ready to place an order for XRP. We’ll guide you through the process in the next section.
Placing an Order for XRP
Now that your Bitstamp account is funded, it’s time to place an order for XRP. Bitstamp provides different order types to accommodate different trading strategies. Here’s how you can place an order for XRP:
1. Log in to your Bitstamp account.
2. On the trading interface, choose the XRP trading pair you want to trade. This could be XRP/USD, XRP/EUR, or XRP/BTC, depending on your preferred base currency.
3. Select the type of order you want to place. Bitstamp offers three order types:
- Market Order: A market order allows you to buy XRP at the current market price. Simply enter the amount of XRP you want to buy and click on the “Buy” button. The order will be executed immediately at the best available market price.
- Limit Order: A limit order allows you to specify the price at which you want to buy XRP. Set the desired price per XRP and the amount you want to buy, then click on the “Buy” button. The order will be placed on the order book and will be executed when the market reaches your specified price.
- Stop Order: A stop order allows you to buy XRP when the market price reaches or surpasses a specific trigger price. Set the trigger price and the amount you want to buy, then click on the “Buy” button. The order will be placed on the order book and will be executed when the market reaches the trigger price.
4. Review your order details, including the quantity, price, and total cost. Double-check for any errors or discrepancies.
5. Confirm your order by clicking on the “Buy” button.
Once your order is placed, Bitstamp will execute the trade based on the order type and market conditions. You can monitor the status of your order on the trading interface. If your order is executed successfully, you will see the XRP available in your Bitstamp account balance.
It’s important to note that the actual execution speed of your order depends on market liquidity and trading volume. During periods of high demand or volatility, orders may take longer to be fulfilled.
Now that you’ve successfully purchased XRP on Bitstamp, let’s move on to the next section to understand trade execution and confirmation.
Trade Execution and Confirmation
After placing an order for XRP on Bitstamp, you may wonder how and when the trade will be executed. Understanding the process of trade execution and confirmation can help you track and manage your transactions effectively.
1. Order Matching: Bitstamp operates as an order book exchange, matching buy and sell orders from users. When you place a market order, it will be executed immediately at the best available price from the existing sell orders. If you place a limit order, it will be added to the order book, and execution will occur once a matching sell order is found at or below your specified price.
2. Trade Confirmation: Once your order is executed, a trade confirmation will be displayed on the trading interface. This confirmation provides details about the trade, including the quantity of XRP purchased, the execution price, any fees incurred, and the total cost of the transaction. It’s important to review this information to ensure accuracy.
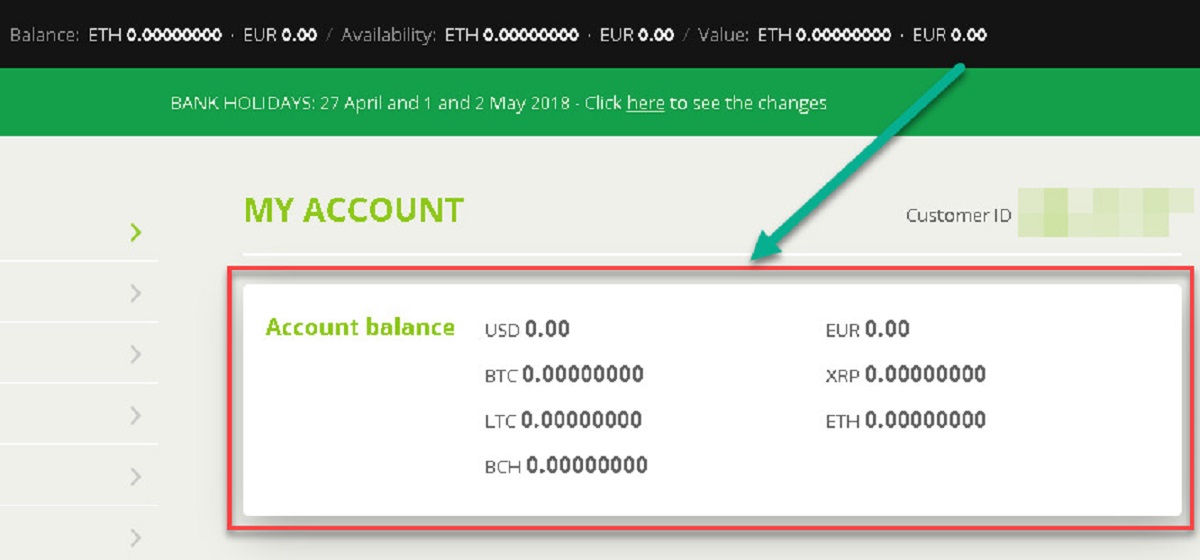
3. Account Balance Update: After the trade confirmation, your Bitstamp account balance will reflect the updated amount of XRP you now own. You can view your XRP balance by navigating to the “Wallets” section on the Bitstamp platform.
4. Transaction History: Bitstamp keeps a record of all your trades and transactions. You can access your transaction history by visiting the “Account” or “Transactions” section on the website. This is useful for tracking your trading activity, calculating profitability, and maintaining accurate records for tax purposes.
It’s important to note that trade execution and confirmation timing can vary depending on market conditions, trading volume, and the order type you chose. During periods of high market activity, it may take longer for orders to be executed and confirmed.
Additionally, always double-check the trade confirmation details to ensure the accuracy of the executed trade. If you notice any discrepancies or issues, reach out to Bitstamp’s customer support for assistance.
Now that you have a clear understanding of trade execution and confirmation, let’s move on to the final section, which covers withdrawing XRP from your Bitstamp account.
Withdrawing XRP from Bitstamp
If you’ve purchased XRP on Bitstamp and want to move it to your personal wallet or another exchange, you’ll need to initiate a withdrawal. Bitstamp provides a simple process for withdrawing XRP from your account:
1. Log in to your Bitstamp account.
2. Navigate to the “Withdrawal” section, usually found under “Wallets” or “Funds.”
3. Select XRP as the cryptocurrency you want to withdraw.
4. Enter the destination address of your personal wallet or the address of the exchange where you want to transfer your XRP. Make sure to double-check the address for accuracy, as cryptocurrency transactions are irreversible.
5. Specify the amount of XRP you want to withdraw. Ensure that you have enough funds available in your account to cover any associated withdrawal fees.
6. Review the withdrawal details, including the XRP amount, destination address, and any applicable fees.
7. Confirm the withdrawal by clicking on the “Withdraw” button or similar action.
Once you’ve confirmed the withdrawal, Bitstamp will process the transaction. The time it takes for the XRP to arrive at the destination address will depend on network congestion and the confirmation speed of the XRP blockchain. Typically, XRP transactions are completed quickly, often within a few minutes.
It’s important to note that Bitstamp may charge a fee for XRP withdrawals. The exact fee amount can vary, so make sure to check the fee schedule on the Bitstamp website before initiating the withdrawal.
After the withdrawal is successfully processed, you can track the transaction using the XRP blockchain explorer. Simply input the transaction ID (TXID) provided by Bitstamp to view the status and progress of the withdrawal.
Remember to always keep your wallet address and private keys secure. Losing access to your wallet can result in permanent loss of your XRP funds.
Congratulations! You have successfully learned how to withdraw XRP from Bitstamp. Now you can securely manage your XRP holdings in your personal wallet or use them on other platforms as desired.
Conclusion
Congratulations! You’ve reached the end of our guide on how to buy XRP on Bitstamp. We’ve covered all the essential steps, from setting up your account to placing an order for XRP and withdrawing it to your personal wallet. With this knowledge, you’re well-equipped to start your XRP investment journey.
Remember, investing in cryptocurrencies comes with risks. The market can be highly volatile, and prices can fluctuate significantly. It’s crucial to do your own research, understand the risks involved, and make informed investment decisions.
Bitstamp provides a user-friendly platform that allows you to buy, sell, and trade XRP with ease. The process starts with creating an account, verifying your identity, and funding your account using bank transfers, cryptocurrencies, or credit/debit cards. Once your account is funded, you can place orders for XRP using market, limit, or stop orders.
It’s important to keep track of your trades and transactions using Bitstamp’s transaction history. This allows for accurate record-keeping and helps with tax reporting if required.
When you’re ready to move your XRP off the Bitstamp platform, you can initiate a withdrawal to your personal wallet or another exchange. Ensure you provide the correct destination address and account for any associated withdrawal fees.
Always keep your personal wallet address and private keys secure to protect your XRP funds. Losing access to your wallet can result in permanent loss of your digital assets.
Now that you have a solid understanding of buying XRP on Bitstamp, it’s time to take the next step and dive into the exciting world of digital currencies. Stay informed, stay vigilant, and happy trading!