Introduction
Welcome to the world of cryptocurrency! If you’re in Canada and want to buy XRP, you’ve come to the right place. XRP, which stands for Ripple, is one of the most popular cryptocurrencies globally. It offers fast and low-cost transactions, making it an attractive choice for both individual investors and businesses.
However, navigating the process of buying XRP in Canada may seem daunting, especially if you’re new to the cryptocurrency market. But fear not, as this guide will walk you through the steps to buy XRP and help you get started on your crypto journey.
Before we dive into the specific steps, it’s important to understand the basics. XRP is a digital asset that serves as a bridge currency for cross-border transactions on the Ripple network. Unlike Bitcoin, which operates on a decentralized platform, XRP has a centralized authority managing its blockchain. This distinction doesn’t diminish its value or potential, though, as XRP has gained significant attention and adoption in recent years.
Now that you have a brief understanding of XRP let’s discuss the steps you need to follow to buy XRP in Canada. You’ll need to carry out some research, choose a reliable cryptocurrency exchange, create an account, verify your identity, deposit funds, find the XRP trading pair, place an order, and finally, secure your XRP in a wallet. We’ll go through each step in detail to ensure you have a smooth and successful buying experience.
Step 1: Research and Choose a Cryptocurrency Exchange
The first step in buying XRP in Canada is to research and choose a reliable cryptocurrency exchange. There are numerous exchanges available, each with its own set of features, fees, security measures, and supported cryptocurrencies. It’s important to select an exchange that offers XRP trading pairs and has a good reputation in the industry.
When researching exchanges, consider the following factors:
- Security: Look for exchanges that prioritize the security of user funds through features like two-factor authentication (2FA) and cold storage.
- Fees: Pay attention to trading fees, deposit and withdrawal fees, as these can significantly impact your overall costs.
- Liquidity: Choose an exchange with sufficient liquidity to ensure smooth trading and avoid slippage.
- User Interface: Opt for an exchange with an intuitive and user-friendly interface to enhance your trading experience.
- Customer Support: Check if the exchange offers responsive customer support to address any issues or concerns.
Popular cryptocurrency exchanges that support XRP trading in Canada include Binance, Bitbuy, Coinberry, and Coinsquare. Take the time to explore the features and offerings of different exchanges before making a decision.
Reading user reviews and conducting thorough research can also provide valuable insights into the overall reputation and performance of an exchange. Look for exchanges that have a good track record and positive user feedback.
Once you have identified a few potential exchanges, compare their features and fees to narrow down your options. Remember, the goal is to find a platform that offers a seamless and secure trading experience for buying XRP.
After finalizing your choice, proceed to the next step of creating an account on the chosen cryptocurrency exchange.
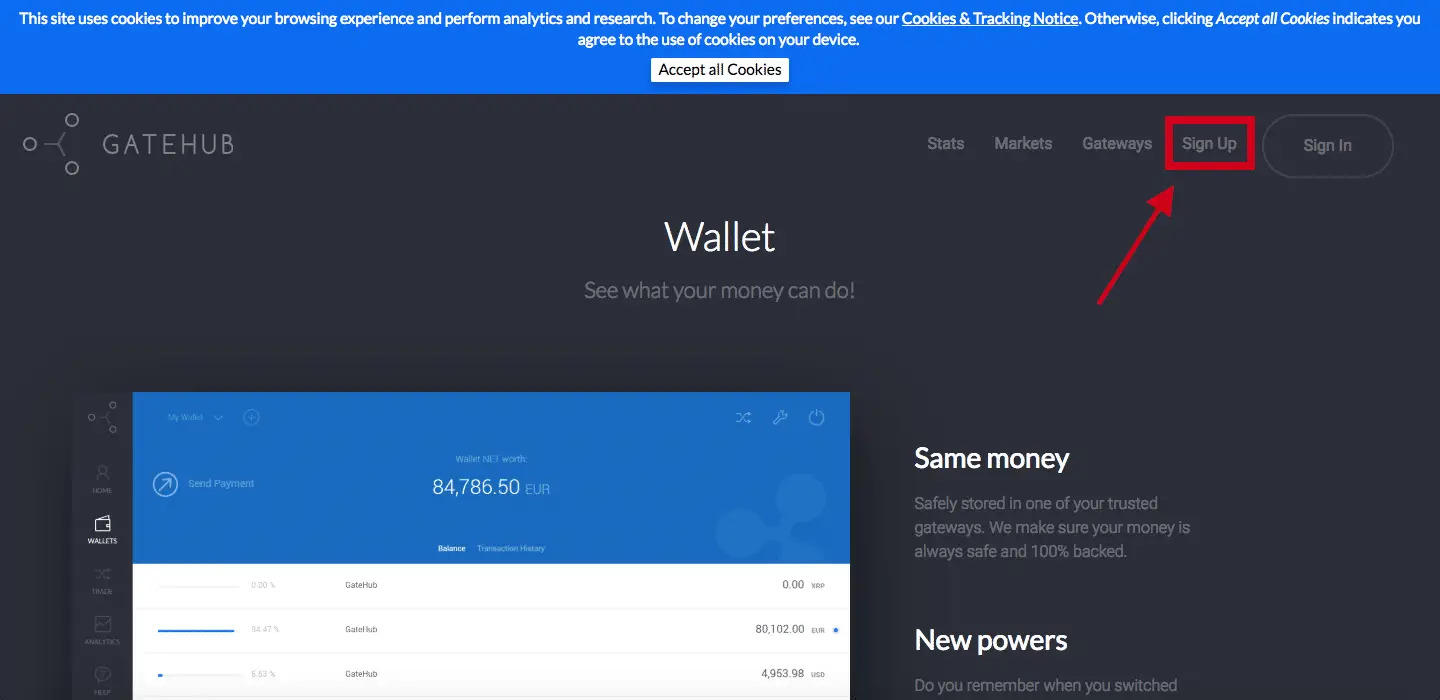
Step 2: Create an Account on the Chosen Exchange
Now that you’ve done your research and chosen a cryptocurrency exchange to buy XRP, it’s time to create an account. The process may vary slightly between exchanges, but the general steps remain similar.
Follow these steps to create an account on your chosen exchange:
- Visit the official website of the exchange you selected.
- Look for the “Sign Up” or “Register” button and click on it.
- Provide the required information, including your name, email address, and a secure password. Make sure to use a strong password that includes a combination of upper and lower case letters, numbers, and special characters.
- Agree to the terms and conditions laid out by the exchange.
- Complete any additional verification steps, such as captcha or email verification, as required by the exchange.
Some exchanges may also require additional information for account creation, such as proof of identity and proof of address. This is part of their Know Your Customer (KYC) process, which ensures compliance with anti-money laundering regulations. You may need to provide scanned copies of your identification documents, such as a passport or driver’s license, as well as utility bills or bank statements to verify your address.
Once you have submitted all the necessary information, your account will be created, and you can proceed to the next steps in the XRP buying process.
Remember to enable two-factor authentication (2FA) on your account to add an extra layer of security. This can typically be done through the account settings or security section of the exchange platform. With 2FA enabled, you will need to provide a unique code generated by a mobile app or received via SMS in addition to your password every time you log in.
Creating an account on a trusted and secure exchange is a crucial step in ensuring the safety of your funds and personal information. Take the time to carefully follow the registration process and provide accurate information.
With your account successfully created, you are now ready to move on to the next step, which involves verifying your account and completing the KYC process.
Step 3: Verify Your Account and Complete the KYC Process
After creating your account on the chosen cryptocurrency exchange, the next step is to verify your account and complete the Know Your Customer (KYC) process. KYC requirements vary between exchanges, but most reputable platforms enforce these measures to comply with regulatory standards and enhance security.
Follow these steps to verify your account and complete the KYC process:
- Log in to your newly created account on the cryptocurrency exchange.
- Navigate to the account verification section, which is usually found in the settings or profile tab.
- Provide the requested personal information, such as your full name, date of birth, and address.
- Upload the necessary identification documents, which may include a scanned copy of your passport, driver’s license, or government-issued ID card.
- In some cases, you may be asked to take a selfie or provide additional proof of address.
- Submit the required documents and wait for the exchange to review and confirm your verification.
The verification process may take some time, ranging from a few minutes to several days, depending on the exchange’s workload. It’s essential to be patient during this stage and refrain from attempting to make any transactions until your account is fully verified.
Verifying your account and completing the KYC process not only ensures compliance with regulatory guidelines but also provides an added layer of security for you and the exchange. By confirming your identity, the exchange can mitigate risks associated with fraud and money laundering.
Once your account is verified, you can move on to the next step and deposit funds into your exchange account. Having your account fully verified also expands your trading options and allows you to access advanced features provided by the exchange.
Remember to check your email regularly during the account verification process, as the exchange may request additional information or documentation to complete the KYC process. It’s important to follow the exchange’s instructions carefully to avoid any delays or complications.
With your account successfully verified, you’re now ready to proceed to the next step and deposit funds into your exchange account.
Step 4: Deposit Funds into Your Exchange Account
Now that your account is fully verified, it’s time to deposit funds into your exchange account. The process may vary slightly between exchanges, but the general steps remain similar.
Follow these steps to deposit funds into your exchange account:
- Login to your account on the cryptocurrency exchange.
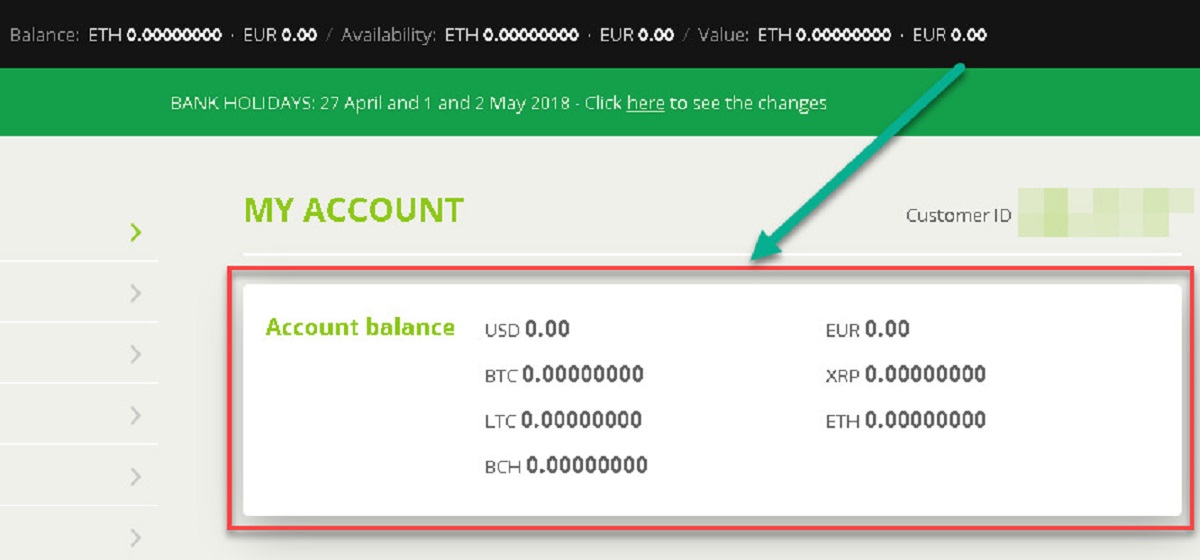
- Navigate to the “Wallet” or “Balances” section of the exchange platform.
- Select the currency or cryptocurrency you wish to deposit into your account. In this case, you’ll want to choose Canadian dollars (CAD) or the cryptocurrency you intend to exchange for XRP.
- Once you’ve chosen the currency, you’ll be provided with the deposit address or bank account details to which you can send your funds. Note down this information, as you’ll need it for the next step.
- If depositing Canadian dollars (CAD), you may need to use Interac e-Transfer, a wire transfer, or another method as specified by the exchange. Follow the instructions given by the platform to complete the deposit.
- For cryptocurrency deposits, open your own digital wallet (if you don’t have one already) and send the specified amount to the provided cryptocurrency address.
- Wait for the funds to be credited to your exchange account. The timing may vary depending on the deposit method used and network congestion on the blockchain for cryptocurrency deposits.
It’s important to double-check the deposit address and account details before initiating the transaction. Errors in inputting the address can result in the loss of funds or make it challenging to recover them.
When depositing funds, it’s crucial to consider the exchange’s fees for deposits, as they may differ depending on the method or currency used. Take note of any fees involved to ensure you’re aware of the total cost of your deposit.
Once the funds are successfully deposited into your exchange account, you’re ready to move on to the next step and find the Ripple (XRP) or XRP trading pair to initiate the purchase.
Congratulations! You’re making progress towards buying XRP in Canada. Now that your exchange account is funded, let’s move on to the next step and find the Ripple (XRP) trading pair on the exchange.
Step 5: Find Ripple (XRP) or XRP Trading Pair
With funds successfully deposited into your exchange account, the next step is to find the Ripple (XRP) or XRP trading pair. This step is crucial as it allows you to locate the specific market where XRP is traded against another currency or cryptocurrency.
Follow these steps to find the Ripple (XRP) trading pair:
- Login to your account on the cryptocurrency exchange.
- Navigate to the exchange’s trading section or market platform.
- Look for the search bar or market selection options.
- Enter “Ripple” or “XRP” into the search bar to filter the available trading pairs.
- Select the XRP trading pair you wish to use. Common options include XRP/CAD (if you deposited Canadian dollars), XRP/USD, or XRP/BTC.
Choosing the right trading pair is essential, as it determines the currency or cryptocurrency you’ll be using to purchase XRP. If you deposited Canadian dollars, you’ll want to select the XRP/CAD trading pair. If you deposited another cryptocurrency like Bitcoin, you’ll need to find the XRP/BTC trading pair.
Take note of the current XRP price and any market data provided, such as the trading volume and order book. This information can help you make informed decisions when placing your XRP buy order.
Once you’ve selected the desired trading pair, you’re now ready to move on to the next step and place an order to buy XRP.
Exciting times! You’re getting closer to acquiring XRP. Finding the Ripple (XRP) trading pair was the key step to identify the specific market where XRP is traded against the chosen currency or cryptocurrency. Now, let’s move on to the next step and place your order to buy XRP.
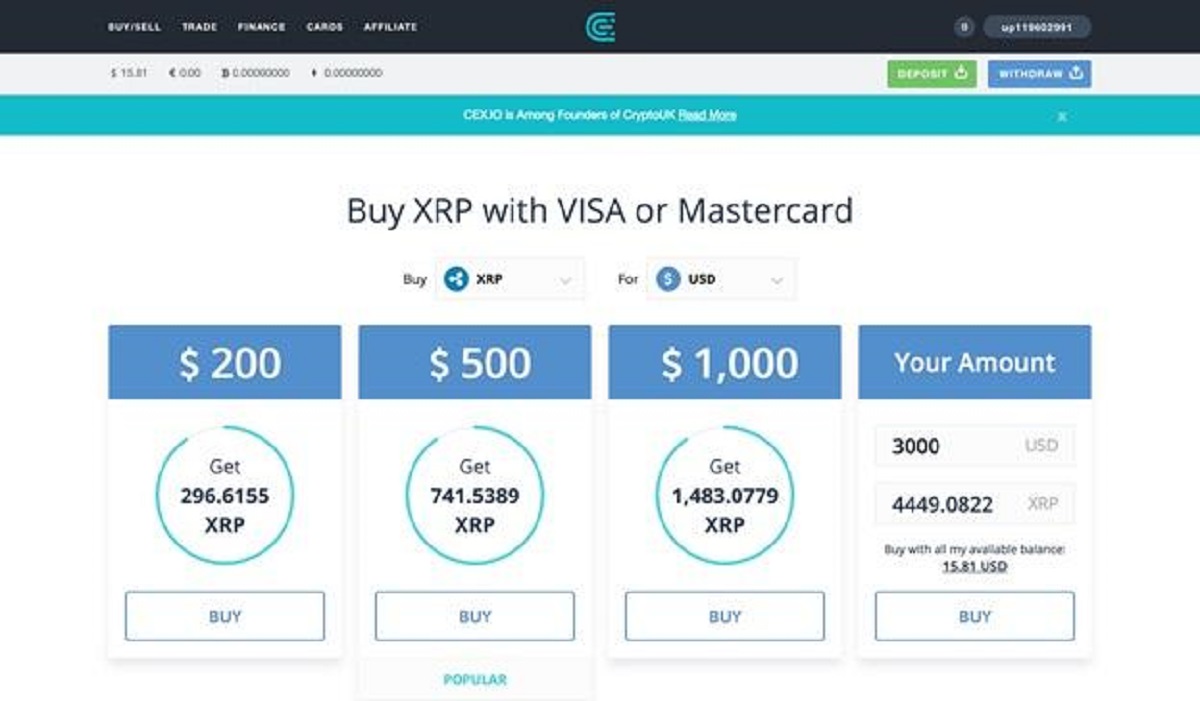
Step 6: Place an Order to Buy XRP
You’ve reached an exciting stage in your journey to buy XRP in Canada – placing an order to purchase XRP. This step involves specifying the amount of XRP you want to buy and executing the trade on the cryptocurrency exchange.
Follow these steps to place an order to buy XRP:
- Login to your account on the cryptocurrency exchange.
- Navigate to the trading section or market platform.
- Ensure you have selected the Ripple (XRP) trading pair that corresponds to the currency or cryptocurrency you wish to use for the purchase.
- Select the type of order you want to place. There are typically two types: market orders and limit orders.
-
- Market Order: A market order executes the trade immediately at the current market price. You simply specify the amount of XRP you want to buy, and the order will be filled as long as there is sufficient liquidity.
- Limit Order: A limit order allows you to set a specific price at which you want to buy XRP. If the market reaches your specified price, the order will be executed. If not, the order will remain open until your desired price is met or the order is canceled.
- Enter the amount of XRP you want to buy, either in XRP units or the equivalent amount in the base currency (e.g., CAD).
- If placing a limit order, specify the price at which you want to buy XRP. Ensure the price is within the current market range to increase the likelihood of the order being filled.
- Review the details of your order, including the amount of XRP and the total cost.
- Once you’re satisfied with the order details, click on the “Buy” or “Place Order” button to submit your buy order.
- Wait for the order to be processed and executed. Once filled, the XRP you purchased will be credited to your exchange account.
It’s important to note that the execution of your buy order may take some time, depending on market conditions and liquidity. Be patient and avoid making any hasty decisions. You can monitor the status of your order in the trading section of the exchange platform.
Congratulations! Your order to buy XRP has been placed. With the successful execution of the order, you’re now the proud owner of XRP. However, it’s crucial to ensure the security of your XRP holdings by transferring them to a secure wallet.
Let’s move on to the final step and learn how to store your XRP in a wallet.
Step 7: Store Your XRP in a Wallet
Once you’ve bought XRP, it’s essential to store it in a secure wallet to protect your investment. While keeping your XRP on an exchange is convenient for trading, storing crypto assets in a personal wallet provides an added layer of security and control.
Follow these steps to store your XRP in a wallet:
- Research and choose a reliable XRP wallet that meets your needs. There are several options available, including hardware wallets, software wallets, and online wallets.
- Set up your chosen wallet by following the instructions provided by the wallet provider.
- Generate a new XRP address within the wallet. This address will serve as your unique identifier on the blockchain, allowing you to receive XRP.
- On the cryptocurrency exchange, initiate a withdrawal request to send your XRP to your newly generated wallet address.
- Enter the XRP wallet address provided by your personal wallet into the withdrawal form on the exchange, along with the amount of XRP you wish to transfer.
- Review the withdrawal details to ensure accuracy, including the recipient address and the amount of XRP being transferred.
- Confirm the withdrawal request. The exchange will process the transaction and send your XRP to your personal wallet.
- Check your personal wallet to ensure that the XRP has been successfully received. This may take some time, depending on network congestion.
By transferring your XRP to a personal wallet, you have full control over your funds, and you reduce the risk of potential hacks or security breaches that can occur on exchanges. Keep in mind that storing your XRP in a wallet also means that you are responsible for safeguarding your wallet credentials and ensuring the security of your device.
It’s worth mentioning that different wallet options offer varying features and levels of security. Hardware wallets are often considered the most secure option as they store your XRP offline, away from potential online threats. Software wallets provide convenient access but are connected to the internet, so they carry a higher risk of being compromised. Online wallets, while accessible from anywhere, rely on the security practices of the wallet provider.
Before choosing a wallet, consider your security preferences, convenience, and the specific features each type of wallet offers. Take the time to research and select a wallet that best fits your needs.
Congratulations! You have successfully stored your XRP in a personal wallet, ensuring the security and ownership of your crypto assets. Now you can sit back, relax, and keep an eye on the XRP market, ready to make informed decisions about your investment.
Remember to keep your wallet credentials secure and regularly back up your wallet to protect against any potential loss of funds. Enjoy your XRP journey!
Conclusion
Congratulations on completing the journey to buying XRP in Canada! By following the steps outlined in this guide, you have gained the knowledge and confidence to navigate the process successfully.
We started by emphasizing the importance of researching and choosing a reliable cryptocurrency exchange that supports XRP trading. Through thorough research and consideration of factors like security, fees, liquidity, user interface, and customer support, you made an informed decision on the exchange that best suits your needs.
Next, you created an account on the chosen exchange, providing accurate information and following the necessary verification steps to ensure compliance with regulatory requirements. By completing the Know Your Customer (KYC) process, you enhanced the security of your account and the exchange.
Afterward, you deposited funds into your exchange account, being mindful of any fees and double-checking the deposit address or account details. With funds in your account, you were able to find the Ripple (XRP) trading pair, ensuring you selected the appropriate currency or cryptocurrency to purchase XRP.
Placing the buy order was an exciting step, where you chose between a market order, executed instantly at the current market price, or a limit order, allowing you to set a specific price at which to buy XRP. With your order successfully executed, you became the proud owner of XRP.
To ensure the security and control of your investment, you secured your XRP in a personal wallet. Researching and selecting a reliable wallet option, you transferred your XRP from the exchange to your wallet, taking responsibility for safeguarding your wallet credentials and device security.
Buying XRP is just the beginning of your journey into the world of cryptocurrencies. It’s important to stay informed about market trends, price movements, and any updates or developments related to XRP. Regularly monitor your investment and consider diversifying your portfolio to manage risk effectively.
Remember, the cryptocurrency market can be volatile, and it’s crucial to make investment decisions based on thorough research, analysis, and your personal risk tolerance.
Now that you’ve successfully completed the steps to buy XRP, enjoy your journey in the exciting world of cryptocurrencies. Stay curious, continue learning, and make informed decisions as you explore the potential opportunities and possibilities that XRP and the broader crypto market offer.
Happy investing!