Introduction
Welcome to the world of online banking and convenient money transfers! With the rapid advancement of technology, financial transactions have become easier than ever. One such platform that has revolutionized the way we send and receive money is Zelle.
Zelle is a popular digital payment service that allows users to quickly and securely send money to friends, family, and businesses directly from their bank accounts. Whether you’re splitting the bill with friends, paying rent, or buying goods, Zelle offers a convenient and hassle-free way to transfer funds.
However, keeping track of your financial transactions is essential for managing your finances effectively. Fortunately, Zelle provides users with the ability to access their transaction history, giving you full visibility into your payment activity.
In this article, we will explore the various methods of checking your Zelle history, so you can stay on top of your finances and ensure accuracy in your transactions. Whether you prefer using the Zelle app, online banking, or reaching out to customer service, we’ve got you covered!
Now, let’s dive into the different options available to access your Zelle history.
What is Zelle?
Zelle is a popular digital payment service that allows users to send and receive money directly from their bank accounts. It offers a fast, secure, and convenient way to transfer funds to friends, family, or even businesses.
Launched in 2017, Zelle quickly gained popularity among consumers as a reliable and user-friendly platform for money transfer. It is supported by a vast network of banks and financial institutions, making it accessible to a wide range of users.
One of the key advantages of Zelle is its real-time money transfer feature. Unlike traditional transfer methods that may take days to process, Zelle enables instantaneous transactions. This means that recipients can receive the funds in their bank accounts almost immediately, eliminating the need for waiting periods.
Another standout feature of Zelle is its integration with existing banking apps. Many major banks have their own Zelle integration, allowing customers to easily access and use the service without the need for additional apps or logins. This seamless integration makes Zelle a convenient option for users who already have online banking set up with their respective financial institutions.
Zelle also prioritizes security, utilizing industry-leading measures to safeguard user information and transactions. The platform utilizes encryption and multifactor authentication to ensure that your money and personal details are protected.
To use Zelle, you typically need to have a bank account in the United States, as the service is primarily available to U.S. residents. However, some banks may extend Zelle services to international customers, so it’s worth checking with your financial institution to see if you can take advantage of this convenient payment option.
Overall, Zelle offers a simple, convenient, and secure way to send and receive money. Whether you’re splitting bills, paying someone back, or conducting business transactions, Zelle provides a reliable solution that has become increasingly popular in the world of online banking.
How to Access Zelle History
Keeping track of your financial transactions is essential for maintaining a clear understanding of your finances. When it comes to Zelle, accessing your transaction history is a straightforward process. Let’s explore the different options available:
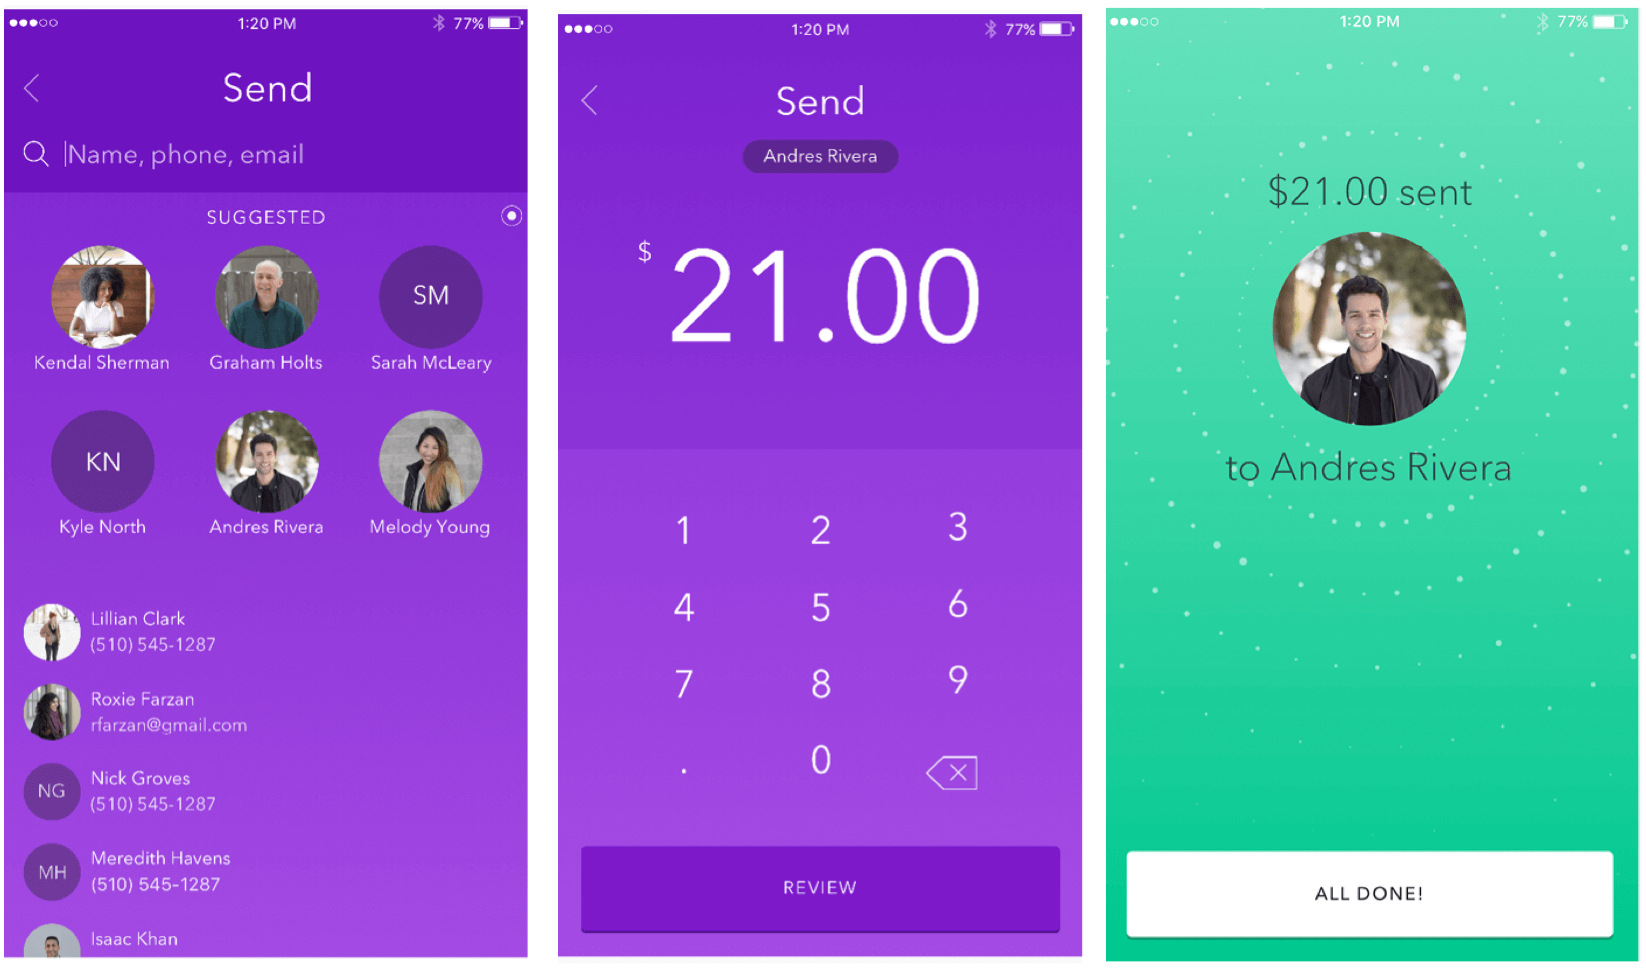
Option 1: Using the Zelle App
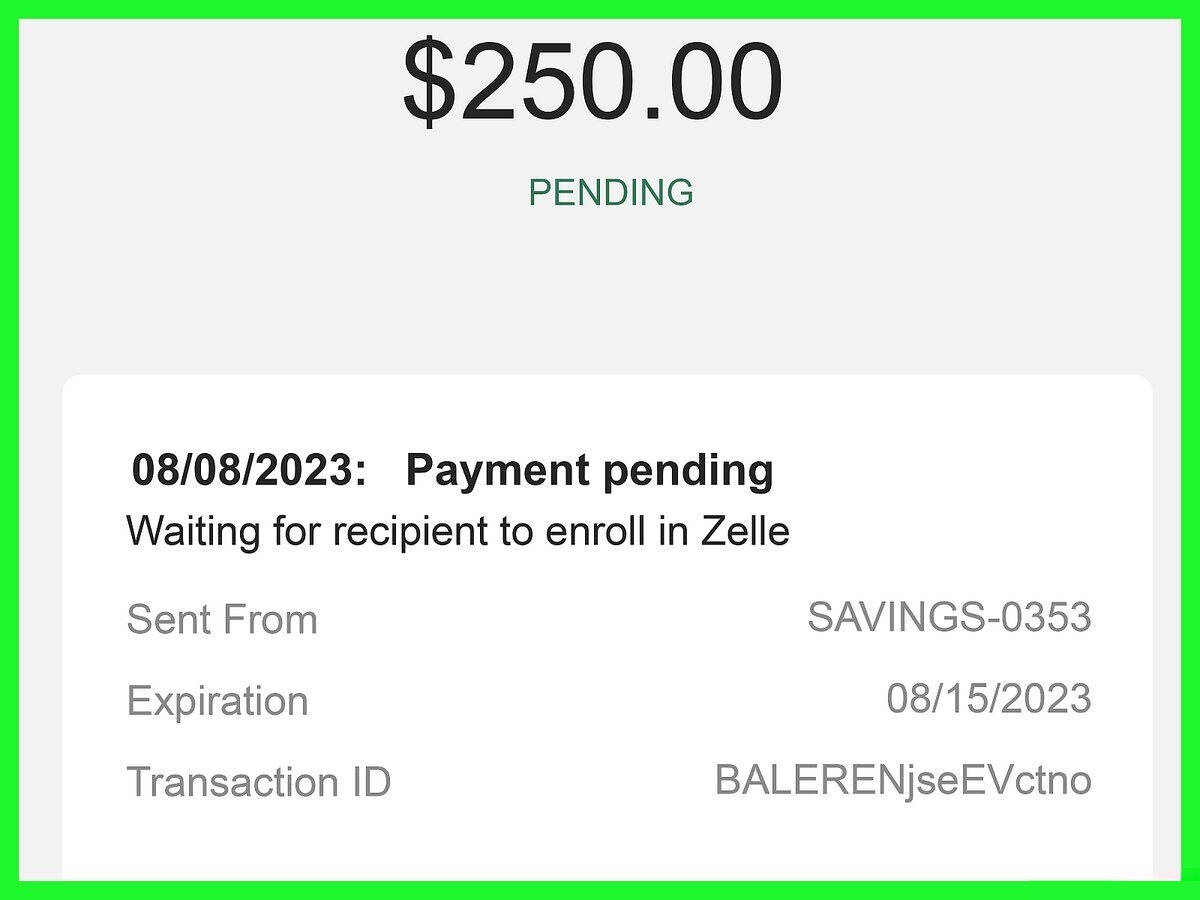
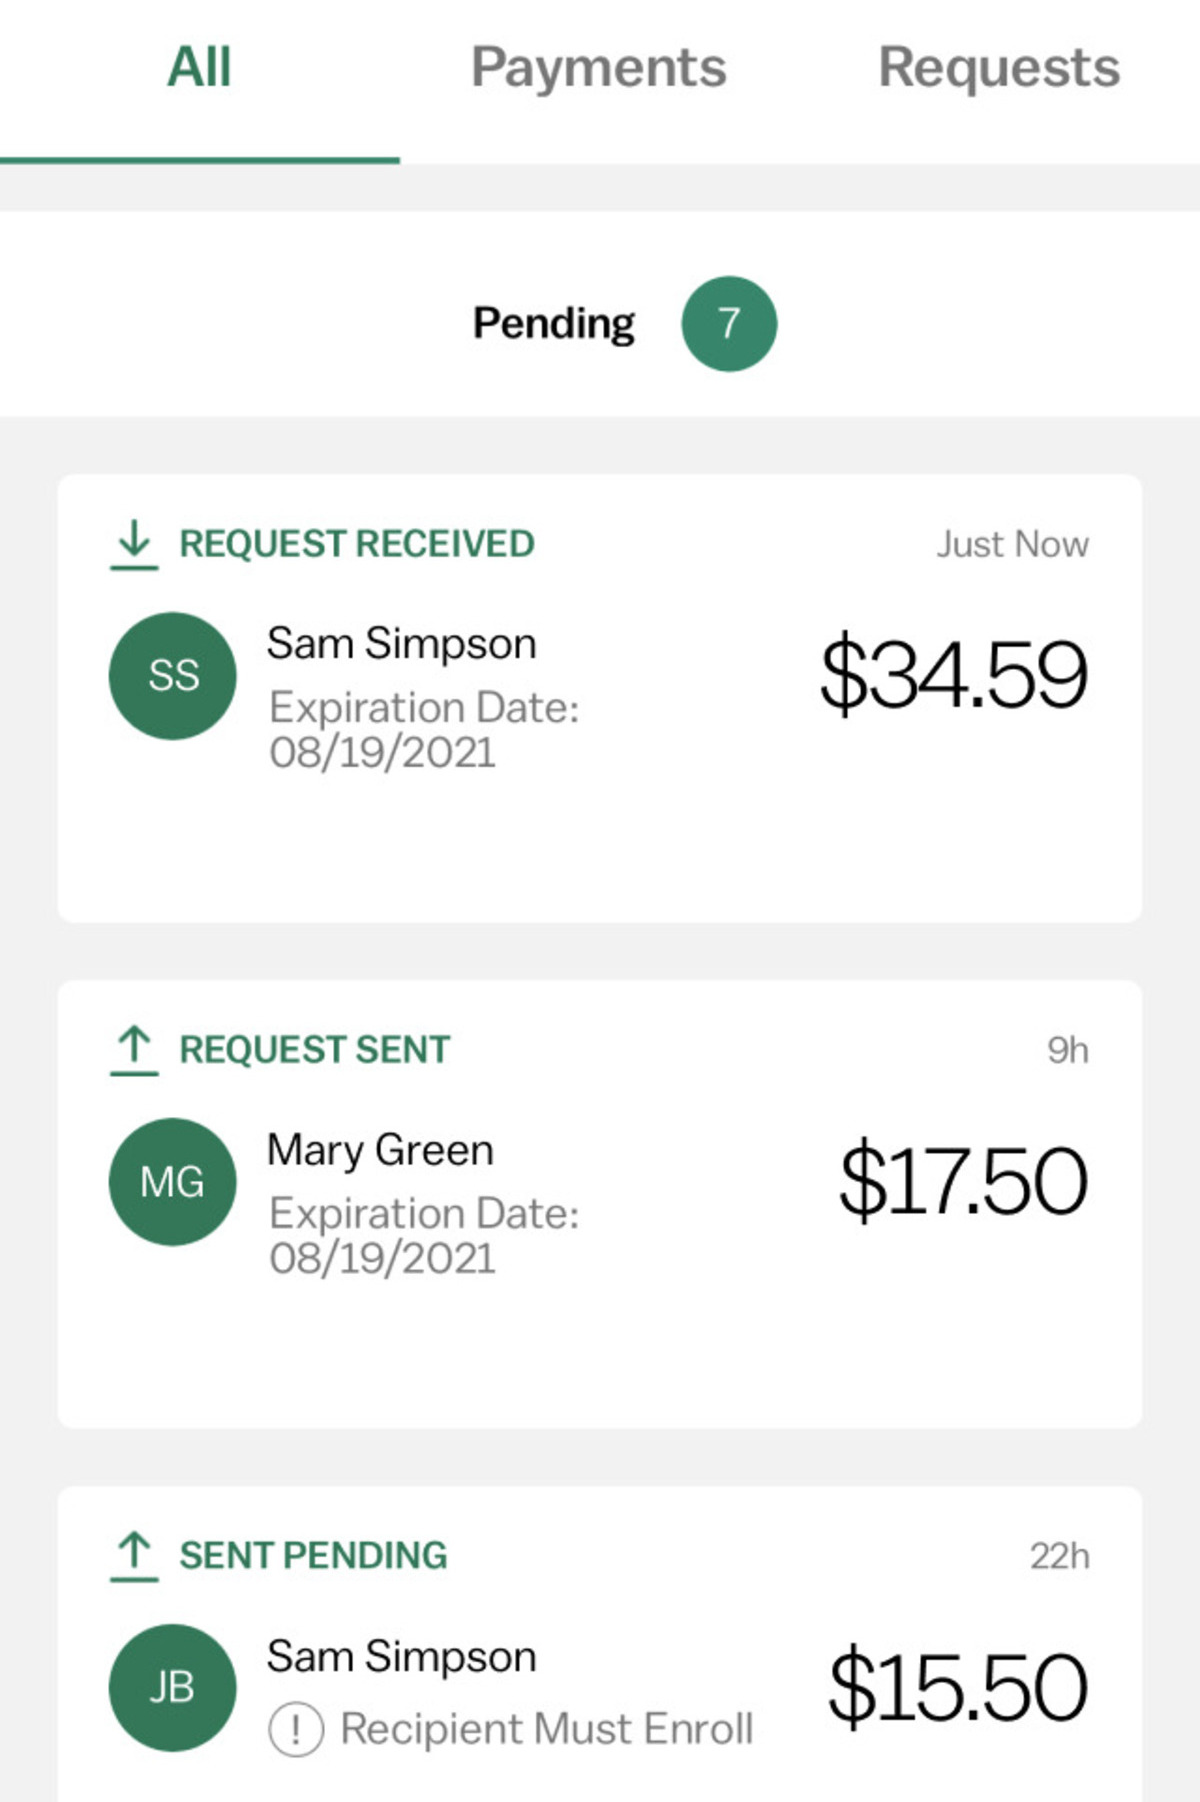
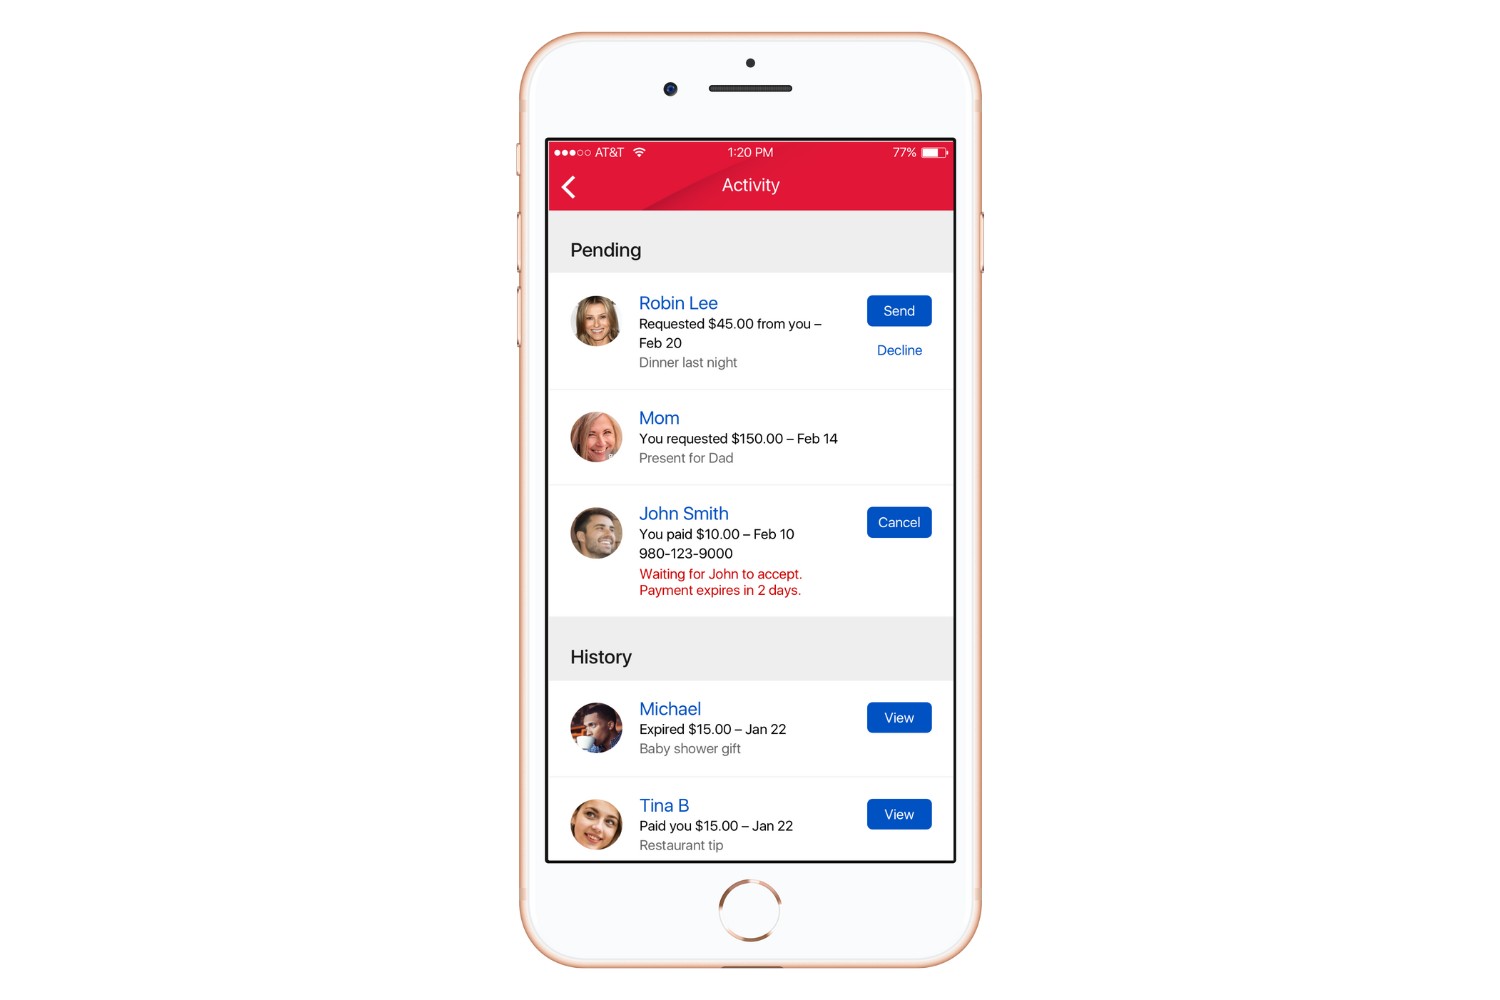
If you have the Zelle app installed on your mobile device, accessing your transaction history is a breeze. Simply open the app and navigate to the “Activity” or “History” section, where you will find a detailed overview of all your past transactions. From there, you can view specific details such as the recipient’s name, date and time of the transaction, and the amount sent or received.
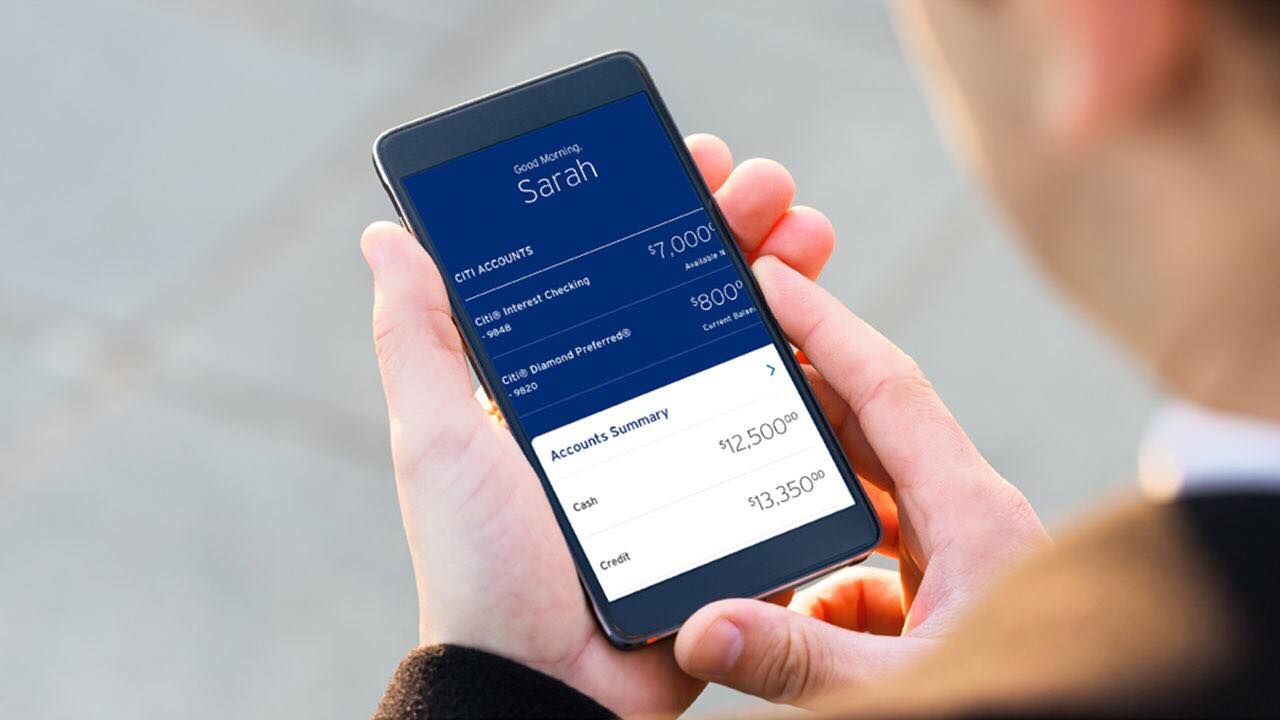
Option 2: Using Online Banking
If your bank has integrated Zelle into its online banking platform, you can access your Zelle history directly through your bank’s website or mobile app. Log in to your online banking account, navigate to the “Transfers” or “Payments” section, and look for the option to view your Zelle transaction history. Here, you’ll be able to see a detailed list of all the payments made or received through Zelle.
Option 3: Contacting Customer Service
In some instances, you may encounter difficulties accessing your Zelle transaction history through the app or online banking. If this happens, don’t worry! You can always reach out to Zelle’s customer service for assistance. They will be able to provide you with the necessary guidance and help troubleshoot any issues you may be experiencing. Contact information for customer service can usually be found on the Zelle website or within the app.
By utilizing one of these options, you can easily access your Zelle transaction history and keep an accurate record of your financial activity. Whether you prefer using the app, online banking, or reaching out to customer service, it’s important to find the method that works best for you.
Now that we’ve covered the different ways to access your Zelle history, let’s explore some tips to make the most out of this functionality.
Option 1: Using the Zelle App
If you have the Zelle app installed on your mobile device, accessing your transaction history is quick and convenient. Here’s how you can do it:
- Open the Zelle app on your smartphone or tablet.
- Log in to your Zelle account using your registered credentials.
- Once you’re logged in, navigate to the “Activity” or “History” section within the app. The specific location may vary depending on the app version.
- In the activity/history section, you will find a comprehensive list of all your past Zelle transactions. The list will generally display the recipient’s name, the date and time of the transaction, as well as the corresponding amount sent or received.
- Scroll through the list to view the details of each transaction. If you need more information about a specific transaction, you can click or tap on it to expand and see additional details.
Using the Zelle app gives you full access to your transaction history at your fingertips. You can review your past payments, track your expenses, and even monitor any pending transactions. This option is ideal for users who frequently utilize the Zelle app for transfers and want a seamless experience.
Furthermore, the Zelle app may offer additional features to enhance your financial management. It may allow you to categorize transactions, add notes or memos, and even set reminders for future payments. Exploring these features within the app can help you stay organized and better track your spending.
Remember to keep your Zelle app updated to access the latest features and ensure a smooth user experience. If you encounter any difficulties or have questions about using the Zelle app to access your transaction history, don’t hesitate to reach out to Zelle’s customer service for assistance.
Now that we’ve covered accessing your Zelle history using the app, let’s explore another option: using online banking.
Option 2: Using Online Banking
If your bank has integrated Zelle into its online banking platform, accessing your Zelle transaction history becomes even more convenient. Here’s how you can view your Zelle history through online banking:
- Log in to your online banking account using your credentials. Make sure you have enrolled in automatic online banking with your bank.
- Once logged in, navigate to the section related to transfers, payments, or transactions. The exact location may vary depending on your bank’s online banking interface.
- Look for the option that specifically mentions Zelle or peer-to-peer payments. This could be labeled as “Zelle History,” “Send Money with Zelle,” or something similar.
- Click or tap on the Zelle-related option, and you should be redirected to a page that displays your Zelle transaction history.
- You’ll typically see a list of all your Zelle transactions, including the recipient’s name, transaction dates, and amounts sent or received. Some banks may also provide additional details like transaction IDs or reference numbers.
- Scroll through the list to review your past Zelle transactions. If you need more information about a particular transaction, there may be an option to click or tap on it for further details.
Using online banking to access your Zelle transaction history offers the advantage of a unified platform for managing your finances. You can easily track your Zelle payments alongside your other banking activities, providing a comprehensive view of your financial transactions.
With online banking, you may also have the ability to filter or sort your Zelle history based on specific criteria, such as date range or transaction type. This can be especially useful if you’re looking for a particular payment or need to reconcile your Zelle activity with other financial records.
If you encounter any issues or have questions while accessing your Zelle history through online banking, reach out to your bank’s customer service for assistance. They will be able to guide you through the process and address any concerns you may have.
Now that we’ve explored accessing your Zelle history via online banking, let’s move on to another option: contacting customer service.
Option 3: Contacting Customer Service
If you’re facing difficulties accessing your Zelle transaction history through the app or online banking, don’t worry – you can always reach out to Zelle’s customer service for assistance. Here’s how you can contact them:
- Locate the customer service contact information for Zelle. This can usually be found on the Zelle website or within the Zelle app.
- Use the provided contact information, which may include a phone number or email address, to get in touch with Zelle’s customer service team.
- Explain the issue you’re facing regarding accessing your Zelle transaction history. Be sure to provide any relevant details or error messages you may have encountered.
- Follow the instructions or guidance given by the customer service representative to troubleshoot the issue together. They may ask you to provide account information for verification purposes.
- If necessary, the customer service representative will assist you in accessing your Zelle transaction history or address any other concerns you may have.
Contacting customer service can be a great option if you’ve tried accessing your Zelle history through the app or online banking but have encountered technical difficulties. The Zelle customer service team is there to provide support and ensure that you can access and review your transaction history with ease.
When reaching out to customer service, it’s a good idea to have some patience and prepare relevant information or screenshots that may help them understand and resolve the issue more efficiently. Providing clear and concise details about the problem can expedite the troubleshooting process.
Customer service can also assist you with any other Zelle-related questions or concerns you may have. They can provide guidance on using the Zelle app, troubleshoot payment issues, and address any potential security concerns you may encounter.
Remember, customer service is there to assist you, so don’t hesitate to reach out if you need help accessing your Zelle transaction history or have any other inquiries related to the service.
Now that we’ve explored the different options for accessing your Zelle transaction history, let’s move on to some tips to help you make the most out of this functionality.
Tips for Checking Zelle History
Checking your Zelle transaction history is essential for effectively managing your finances and keeping track of your payments. Here are some tips to help you make the most out of this functionality:
- Review your transaction history regularly: Make it a habit to check your Zelle history periodically. By reviewing your transactions, you can ensure accuracy, identify any unauthorized activity, and stay on top of your financial records.
- Keep track of important details: Take note of important details such as transaction IDs, reference numbers, or any additional notes you may have entered for each transaction. These details can be helpful for reference or reconciliation purposes in the future.
- Export or save records: If you need to keep a record of your Zelle transactions for accounting or documentation purposes, consider exporting or saving your transaction history. Most banking apps and online platforms provide options to export your transaction history as a CSV or PDF file.
- Double-check transaction details: Before confirming a transaction, ensure that you have entered the correct recipient’s information, including the email address or mobile number associated with their Zelle account. Verifying these details will help prevent any unintended transfers.
- Set up transaction alerts: If your bank offers the option, consider enabling transaction alerts for Zelle payments. This way, you will receive instant notifications whenever a transaction takes place, providing an extra layer of security and ensuring you’re aware of any activity.
- Reach out for assistance if needed: If you encounter any issues or have questions while accessing your Zelle history, don’t hesitate to contact customer service. They can provide guidance, troubleshoot any problems, or answer any queries you may have.
By following these tips, you can effectively utilize and leverage your Zelle transaction history. Not only will it help you maintain accurate financial records, but it will also contribute to a better understanding of your spending patterns and overall financial health.
Now that we’ve learned about checking your Zelle history and some helpful tips, let’s wrap up with a quick summary.
Conclusion
Checking your Zelle transaction history is a crucial aspect of managing your finances effectively. By reviewing your past payments, tracking your expenses, and ensuring accuracy in your transactions, you can stay on top of your financial records and maintain control of your money.
In this article, we explored three different options for accessing your Zelle history: using the Zelle app, utilizing online banking, and contacting customer service if needed. Each option provides a convenient and reliable way to view your transaction history, allowing you to choose the method that works best for you.
Whether you prefer the user-friendly interface of the Zelle app, the seamless integration with online banking, or the guidance of customer service, you have the tools at your disposal to monitor and track your Zelle payments with ease.
Additionally, we discussed some valuable tips for optimizing your Zelle history checking experience, such as regularly reviewing your transaction history, double-checking important details, and setting up transaction alerts. These tips will help you make the most out of the functionality and ensure a smooth and secure financial experience.
Remember, Zelle is a powerful platform that simplifies personal and business transactions, providing you with a convenient and efficient way to send and receive money. By staying informed and proactive in accessing and reviewing your Zelle history, you can stay in control of your finances and make informed decisions regarding your money.
So, take advantage of the options available to you, keep exploring the features of the Zelle app and online banking, and don’t hesitate to reach out to customer service if you need assistance. Checking your Zelle history is the key to managing your financial life successfully!