Introduction
Welcome to the world of cryptocurrencies, where digital currencies like Ethereum and Bitcoin are revolutionizing the way we transact and store value. If you have Ethereum and wish to convert it to Bitcoin, you’ve come to the right place. In this guide, we will walk you through the step-by-step process of exchanging Ethereum for Bitcoin.
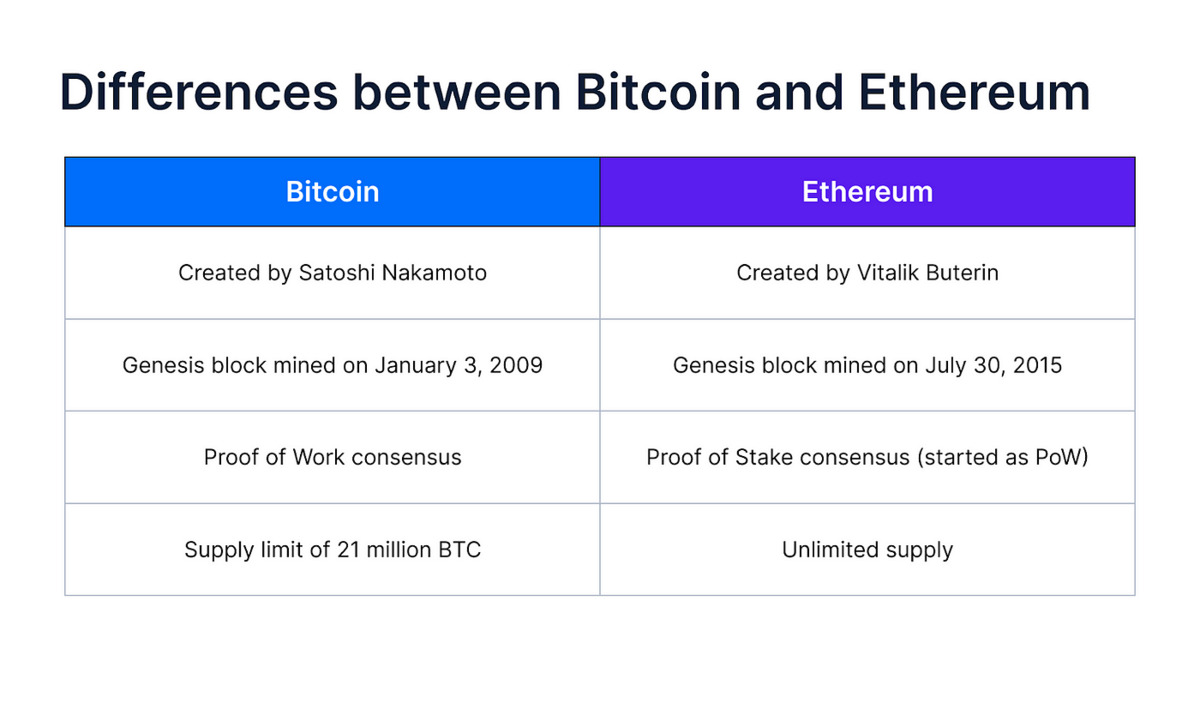
But why would someone want to convert Ethereum to Bitcoin? Well, both Ethereum and Bitcoin are popular cryptocurrencies with their unique features and use cases. Bitcoin, often referred to as digital gold, is seen as a store of value and a long-term investment. On the other hand, Ethereum is a blockchain platform that enables the creation of decentralized applications and smart contracts.
Whether you’re diversifying your cryptocurrency portfolio, taking advantage of trading opportunities, or simply looking to exchange Ethereum for Bitcoin for any other reason, this guide will help simplify the process for you.
Before we dive into the steps, it’s important to note that you will need an account on a cryptocurrency exchange platform. There are numerous reputable exchanges to choose from, such as Binance, Coinbase, or Kraken, to name a few. These platforms provide a secure environment where you can buy, sell, and trade cryptocurrencies. Make sure to do your research and select an exchange that best suits your needs in terms of security, fees, and user experience.
Now that we’ve covered the basics, let’s move on to the next step: setting up a cryptocurrency exchange account.
Step 1: Set up a cryptocurrency exchange account
The first step in exchanging Ethereum for Bitcoin is to set up an account on a reputable cryptocurrency exchange platform. As mentioned earlier, there are several popular exchanges to choose from, such as Binance, Coinbase, or Kraken.
To get started, visit the website of the exchange you’ve selected and look for the “Sign Up” or “Register” button. Click on it and you will be directed to the account registration page. Here, you will need to provide some personal information, including your name, email address, and a secure password. Make sure to choose a strong password that is unique and not used for any other accounts.
Once you’ve filled in the required information, you may be asked to verify your email address. Simply follow the instructions provided in the verification email to complete the process. Some exchanges may also require additional identity verification, such as providing a photo ID or proof of address. This is to comply with regulatory requirements and ensure the security of the platform.
After your account is set up and verified, you will have access to your exchange dashboard. Take some time to familiarize yourself with the different features and tools available on the platform. This will help you navigate through the exchange and make the most of your trading experience.
Remember, it’s crucial to prioritize security when setting up your exchange account. Enable two-factor authentication (2FA) if it’s available and consider using a hardware wallet or a separate cold wallet to store your cryptocurrencies. These additional security measures will help protect your funds from potential hacks or unauthorized access.
Now that you have your exchange account ready, it’s time to move on to the next step: depositing Ethereum into your account.
Step 2: Deposit Ethereum into your exchange account
Now that you have set up your cryptocurrency exchange account, the next step is to deposit your Ethereum into the account. This will allow you to have funds available for trading and exchanging for Bitcoin.
To deposit Ethereum, you will need to generate a unique wallet address provided by the exchange. This address acts as a destination for your Ethereum and ensures that it is correctly associated with your account on the exchange platform.
Once you are logged into your exchange account, navigate to the “Deposit” or “Funds” section. Look for Ethereum (ETH) in the list of available cryptocurrencies and click on it. This will display your unique Ethereum wallet address.
Now, copy the generated wallet address or scan the QR code if available. It’s important to double-check that you are copying the correct address, as sending Ethereum to the wrong address can result in permanent loss of funds.
Next, open your personal Ethereum wallet, whether it’s a software wallet, mobile wallet, or hardware wallet. Locate the option to send or transfer Ethereum and paste the exchange wallet address that you copied earlier.
Specify the amount of Ethereum you want to deposit into your exchange account. Take note of any network fees or transaction fees that may be involved in the transfer. These fees can vary depending on the network congestion and the exchange platform’s fee structure.
Once you have completed the necessary fields, review the transaction details and confirm the Ethereum transfer. The transaction will be broadcasted to the Ethereum network, and you will be able to monitor its progress using a blockchain explorer.
It’s important to note that Ethereum transactions may take some time to be confirmed on the blockchain, especially during periods of high network congestion. Be patient and allow for sufficient confirmations before proceeding to the next step.
Once the Ethereum deposit is successfully confirmed and credited to your exchange account, you’re now ready for the next step: finding the trading pair ETH/BTC.
Step 3: Find the trading pair ETH/BTC
With your Ethereum successfully deposited into your exchange account, it’s time to find the trading pair ETH/BTC. This trading pair represents the exchange rate between Ethereum and Bitcoin, allowing you to trade one cryptocurrency for the other.
Navigate to the exchange’s trading section or marketplace, where you will find a list of available trading pairs. Look for ETH/BTC, as this is the pair you are interested in for converting Ethereum to Bitcoin.
Once you have located the ETH/BTC trading pair, you will see a price chart displaying the recent price movements and trading volume. This chart can help you analyze the price trends and make informed trading decisions.
Below the price chart, you will find the order book, which shows the current buy and sell orders for ETH/BTC. The order book provides information about the demand and supply for both Ethereum and Bitcoin at different price levels.
It’s important to carefully analyze the order book to determine the optimal price at which you would like to sell your Ethereum and buy Bitcoin. You can also place limit orders, which allow you to set a specific price at which you’re willing to sell or buy, and wait for the market to reach that price.
If you prefer a quick transaction, you can choose to place a market order. This type of order is executed immediately at the current market price. Keep in mind that market orders may be subject to slippage, which means the actual execution price may differ slightly from the expected price.
Before proceeding with the trade, double-check the trading fees associated with the exchange. Exchanges usually charge a small percentage fee for each trade you make. These fees can vary depending on the exchange platform, the trading volume, and your account tier.
Once you are satisfied with your analysis and ready to proceed, it’s time to place a sell order for your Ethereum in exchange for Bitcoin. In the next step, we will guide you on how to do that successfully.
Step 4: Place a sell order for Ethereum
Now that you have found the ETH/BTC trading pair and have a clear understanding of the market conditions, it’s time to place a sell order for your Ethereum.
To begin, navigate to the trading interface or order placement section of your chosen exchange. Look for the option to place a sell order for Ethereum.
Specify the amount of Ethereum you wish to sell. You can either enter the quantity manually or use the available options to input a specific percentage or fraction of your total Ethereum balance.
Next, choose the order type. There are typically two types of orders: market order and limit order.
– Market Order: A market order is executed immediately at the available market price. This is the quickest way to sell your Ethereum, but keep in mind that the execution price may differ slightly from the expected price due to market fluctuations.
– Limit Order: With a limit order, you can set a specific price at which you want to sell your Ethereum. This allows you to have more control over the execution price, but there is a chance that your order may not be filled if the market price does not reach your specified price.
Once you have selected the order type and specified the amount of Ethereum to sell, review the order details and ensure they are accurate. Take note of any fees or commissions that may be associated with the trade.
If you are satisfied with the order details, click on the “Sell” or “Place Order” button to submit your sell order.
At this point, your sell order will be placed in the order book, and it will be matched with a corresponding buy order from another trader. The execution of the trade depends on the availability of buyers who are willing to purchase your Ethereum at the specified price.
It’s important to note that the execution time of your sell order can vary depending on the liquidity of the market and the demand for Ethereum. In some cases, the trade may be executed almost instantly, while in others, it may take some time for the order to be filled.
Once your sell order is successfully executed, the Ethereum will be converted into Bitcoin at the agreed-upon exchange rate. In the next step, we will discuss how to confirm the transaction and ensure that the Bitcoin is credited to your exchange account.
Step 5: Confirm the transaction
After placing your sell order for Ethereum and waiting for it to be executed, it’s important to confirm the transaction to ensure that the Bitcoin is properly credited to your exchange account.
Once your sell order is matched with a corresponding buy order from another trader, the transaction will be recorded on the blockchain. This process may take a few minutes to confirm, depending on the blockchain network’s congestion and the number of confirmations required by the exchange.
To confirm the transaction, go to your exchange account’s transaction history or order history section. Look for the completed sell order, which should indicate that the Ethereum has been successfully traded for Bitcoin.
Verify that the details of the transaction, such as the amount of Ethereum sold, the exchange rate, and any fees involved, match your expectations. Make sure to double-check that the Bitcoin balance in your exchange account reflects the amount you should have received based on the exchange rate at the time of the transaction.
Exchanges typically provide a transaction ID or hash that you can use to track the transaction on the blockchain. You can copy this ID and use a blockchain explorer to view the transaction details and confirm its validity.
It’s essential to ensure that the transaction has been confirmed on the blockchain and that the Bitcoin has been credited to your account before proceeding. If the transaction appears to be stuck or is not reflecting the correct amount, you may need to contact customer support for assistance.
Remember to exercise caution when dealing with your private keys or access to your exchange account. Keep your account credentials secure and be mindful of phishing attempts or fraudulent activities.
Once you have confirmed the transaction and verified the Bitcoin deposit in your exchange account, you’re one step closer to completing the process of exchanging Ethereum for Bitcoin. In the next step, we will guide you on how to withdraw the Bitcoin to your personal wallet.
Step 6: Verify Bitcoin deposit in your exchange account
After successfully exchanging your Ethereum for Bitcoin, it’s crucial to verify that the Bitcoin has been properly deposited into your exchange account before proceeding with any further steps.
To verify the Bitcoin deposit, navigate to your exchange account’s balance or wallet section. Look for the Bitcoin (BTC) balance and ensure that it reflects the correct amount that you should have received based on the exchange rate at the time of the transaction.
Double-check the transaction history or deposit history section to confirm that the Bitcoin deposit has been recorded. The transaction details should include the amount of Bitcoin received, the time of the deposit, and any associated fees.
Exchanges typically provide a transaction ID or hash for each deposit. You can use this information to track the transaction on the blockchain using a blockchain explorer. This will allow you to verify that the transaction has been successfully confirmed on the Bitcoin network.
Keep in mind that Bitcoin transactions may require multiple confirmations on the blockchain before they are considered final and irreversible. The number of confirmations required can vary depending on the exchange’s policy and the network congestion.
If you notice any discrepancies or issues with the Bitcoin deposit, it’s crucial to contact the exchange’s customer support for assistance. They will be able to investigate the matter and provide guidance on any necessary actions to resolve the situation.
Remember to exercise caution when dealing with your Bitcoin or any other cryptocurrencies. It is always recommended to store your crypto assets in a personal wallet that you control, rather than keeping them on an exchange for an extended period. This will provide you with full control and security over your funds.
Once you have verified the Bitcoin deposit in your exchange account, you’re ready to proceed to the final step: withdrawing the Bitcoin to your personal wallet.
Step 7: Withdraw Bitcoin to your wallet
Now that you have successfully verified the Bitcoin deposit in your exchange account, it’s time to withdraw the Bitcoin and transfer it to your personal wallet for secure storage.
To initiate the withdrawal, navigate to the withdrawal or funds transfer section of your exchange account. Look for the option to withdraw Bitcoin (BTC).
When making a withdrawal, you will need to provide the destination wallet address. This is the address of your personal wallet where you want the Bitcoin to be sent. It’s crucial to copy the wallet address accurately to ensure that the Bitcoin is sent to the intended destination.
If you don’t have a personal wallet yet, it’s recommended to set one up before proceeding with the withdrawal. There are various types of wallets, including software wallets, hardware wallets, and mobile wallets, each offering different levels of security and ease of use.
Once you have entered the destination wallet address, specify the amount of Bitcoin you want to withdraw. Take note of any withdrawal fees charged by the exchange, as these will be deducted from the total amount being transferred.
Review the withdrawal details to ensure accuracy and then submit the withdrawal request. Depending on the exchange, you may need to provide additional verification or confirm the withdrawal via email or an authentication method such as two-factor authentication (2FA).
Once your withdrawal request is processed by the exchange, the Bitcoin will be sent to the specified wallet address. The time it takes for the Bitcoin to reach your personal wallet can vary depending on network congestion and the speed of the blockchain network.
After receiving the Bitcoin in your personal wallet, it’s important to ensure that you have securely stored the wallet’s private keys or recovery seed phrase. These are essential in accessing and recovering your Bitcoin in case of any loss or hardware failure.
Congratulations! You have successfully exchanged Ethereum for Bitcoin and securely transferred the Bitcoin to your personal wallet. By owning your private keys, you have full control and ownership of your Bitcoin, providing you with peace of mind.
Remember to keep your personal wallet safe and consider additional security measures such as enabling two-factor authentication, regularly updating your wallet software, and keeping backups of your private keys or recovery phrases in offline and secure locations.
Now that you have completed the process, you can track the value of your Bitcoin investment and continue to explore the exciting world of cryptocurrencies. Happy hodling!
Conclusion
Congratulations! You have successfully navigated the process of exchanging Ethereum for Bitcoin. By following the step-by-step guide outlined in this article, you have gained valuable insight into setting up a cryptocurrency exchange account, depositing Ethereum, finding the ETH/BTC trading pair, placing a sell order, confirming the transaction, verifying the Bitcoin deposit, and finally, withdrawing the Bitcoin to your personal wallet.
Exchanging Ethereum for Bitcoin opens up a world of opportunities in the cryptocurrency market. Bitcoin, known as the pioneer of cryptocurrencies, represents a store of value and a long-term investment, while Ethereum offers a powerful blockchain platform for decentralized applications and smart contracts. By diversifying your cryptocurrency portfolio, you can benefit from the unique features and potential growth of both digital assets.
Throughout the process, it is essential to prioritize security. Choose a reputable and secure cryptocurrency exchange platform, enable two-factor authentication, and consider storing your cryptocurrencies in a personal wallet that you control. By taking these steps, you can protect your funds from potential hacks and have full control over your assets.
Remember to stay informed about the latest developments in the cryptocurrency market. Keep track of price movements, market trends, and regulatory changes that may impact the value of your investments. The cryptocurrency market is highly volatile, and it is important to conduct thorough research and make informed decisions.
Now that you have completed the process of exchanging Ethereum for Bitcoin, you have taken a significant step in your cryptocurrency journey. Whether you are entering the market for investment purposes, diversifying your portfolio, or exploring the possibilities of blockchain technology, cryptocurrencies offer a new and exciting frontier. Continue to learn, adapt, and explore the vast opportunities that lie ahead in the world of cryptocurrencies.