Introduction
Welcome to the world of action-packed adventures captured in stunning 4K Ultra HD! Whether you're a thrill-seeking athlete, an avid traveler, or simply a lover of high-quality videos, owning a 4K Ultra HD action camera opens up a realm of possibilities for creating breathtaking footage. One of the key features that sets these cameras apart is the ability to adjust the frame size, allowing you to customize the visual output to suit your specific needs.
Understanding how to change the frame size on a 4K Ultra HD action camera empowers you to optimize your recordings for different scenarios, ensuring that every moment is captured with the utmost clarity and precision. In this comprehensive guide, we will delve into the intricacies of frame size adjustment, equipping you with the knowledge and confidence to make the most of your cutting-edge device.
As we embark on this journey, we'll explore the significance of frame size, unravel the steps to modify it on your 4K Ultra HD action camera, and provide valuable tips for selecting the right frame size based on your filming requirements. By the end of this guide, you'll be well-versed in harnessing the full potential of your camera, elevating your videography skills to new heights.
So, grab your 4K Ultra HD action camera, buckle up, and get ready to unlock the secrets of frame size customization. Let's dive into the captivating world of high-definition recording and unleash the power of visual storytelling!
Understanding Frame Size
Frame size refers to the dimensions of the video frame, determining the width and height of the visual content captured by your 4K Ultra HD action camera. This parameter plays a pivotal role in shaping the visual composition of your recordings, influencing the level of detail, field of view, and overall quality of the footage.
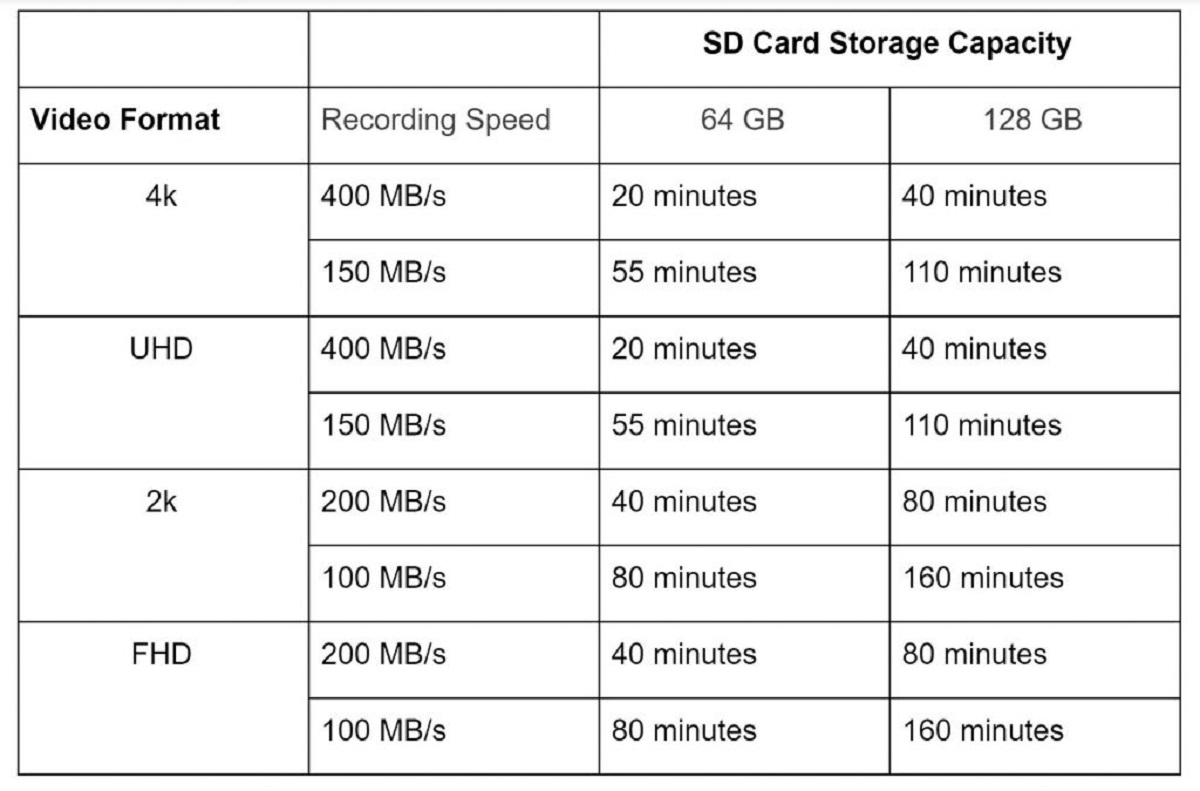
When it comes to 4K Ultra HD action cameras, the frame size options typically encompass a range of resolutions, such as 3840×2160 (4K), 2704×1520 (2.7K), and 1920×1080 (1080p), each offering distinct visual characteristics. The higher the resolution, the more pixels are packed into the frame, resulting in sharper, more lifelike images that excel in capturing intricate details and vibrant colors.
Furthermore, the frame size directly impacts the field of view, influencing how much of the surrounding environment is encompassed within the frame. A wider frame size, often associated with lower resolutions, provides a broader perspective, ideal for capturing expansive landscapes and immersive action scenes. On the other hand, a narrower frame size, typically associated with higher resolutions, delivers a more focused and detailed view, perfect for highlighting specific subjects with precision.
Understanding the nuances of frame size empowers you to tailor your recordings to suit diverse settings and storytelling objectives. By selecting the appropriate frame size, you can adapt to varying lighting conditions, capture dynamic motion with clarity, and convey the intended narrative with visual finesse.
As we delve deeper into the realm of frame size customization, you'll gain a comprehensive grasp of how this fundamental parameter shapes the visual language of your recordings, paving the way for boundless creative expression and immersive storytelling.
Steps to Change Frame Size on a 4K Ultra HD Action Camera
Embarking on the journey of adjusting the frame size on your 4K Ultra HD action camera is a straightforward yet impactful process that empowers you to harness the full potential of your device. Here are the essential steps to modify the frame size and unleash a world of visual possibilities:
- Access the Settings: Begin by navigating to the settings menu on your 4K Ultra HD action camera. This can typically be done through the camera’s interface or touchscreen display, allowing you to access a range of customizable parameters.
- Select Resolution: Within the settings menu, locate the option to adjust the resolution or frame size. Depending on the camera model, this may be listed as “Resolution,” “Frame Size,” or a similar descriptor. Once selected, you’ll be presented with a list of available resolutions to choose from.
- Choose the Desired Frame Size: Browse through the available frame size options and select the resolution that best aligns with your filming requirements. Consider the visual aesthetics you aim to achieve, the level of detail needed, and the field of view that suits your storytelling vision.
- Confirm the Selection: After choosing the desired frame size, confirm your selection within the settings menu. This typically involves pressing a dedicated button or tapping an on-screen prompt to apply the changes.
- Verify the Changes: Once the new frame size is selected, it’s advisable to verify the changes by previewing the live feed or capturing a test footage. This allows you to ensure that the adjusted frame size aligns with your expectations and enhances the visual impact of your recordings.
By following these straightforward steps, you can seamlessly tailor the frame size of your 4K Ultra HD action camera to suit the unique demands of each filming scenario. Whether you’re aiming to capture sweeping vistas in stunning detail or focus on intricate subjects with precision, the ability to modify the frame size empowers you to elevate the visual narrative of your recordings with unparalleled clarity and impact.
Tips for Choosing the Right Frame Size
When it comes to selecting the optimal frame size for your 4K Ultra HD action camera, several factors come into play, each influencing the visual outcome of your recordings. Here are valuable tips to guide you in choosing the right frame size based on your filming requirements:
- Consider the Storytelling Context: Evaluate the narrative and visual aesthetics of your intended footage. For expansive landscapes and action-packed sequences, a wider frame size (lower resolution) can capture the immersive grandeur of the scene. Conversely, intimate details and focused compositions benefit from a narrower frame size (higher resolution).
- Assess Lighting Conditions: Take into account the lighting environment where you’ll be filming. In well-lit settings with ample natural or artificial light, higher resolutions can showcase vibrant colors and intricate details. In low-light or high-contrast scenarios, a lower resolution may offer smoother tonal transitions and enhanced visibility.
- Understand Storage and Editing Considerations: Higher resolutions result in larger file sizes, impacting storage capacity and post-production workflows. Consider the storage limitations of your camera and the editing capabilities of your equipment when choosing the frame size. Balancing visual quality with practical considerations is key.
- Explore Frame Rate Compatibility: Some frame sizes may be associated with specific frame rates, influencing the smoothness of motion in your recordings. Ensure that the chosen frame size aligns with your desired frame rate, especially when capturing fast-paced action or creating slow-motion effects.
- Experiment and Adapt: Embrace experimentation and adaptability when exploring frame size options. Capture test footage using different frame sizes in varied settings to gauge their visual impact. Over time, you’ll develop an intuitive sense of which frame size best complements different filming scenarios.
By integrating these tips into your decision-making process, you can navigate the diverse array of frame size options with confidence, ensuring that each recording is tailored to convey your unique artistic vision with precision and impact. The ability to choose the right frame size empowers you to craft visually compelling narratives that resonate with your audience and stand out with unparalleled clarity and depth.
Conclusion
Congratulations! You’ve embarked on a captivating journey through the intricacies of frame size customization on your 4K Ultra HD action camera. By gaining a deeper understanding of frame size and its pivotal role in shaping the visual language of your recordings, you’ve unlocked a world of creative possibilities that elevate your videography to new heights.
As you navigate the process of adjusting the frame size, remember that each selection holds the power to transform the visual narrative, capturing moments with unparalleled clarity, depth, and impact. Whether you’re immersing your audience in sweeping landscapes, highlighting intricate details, or capturing dynamic action sequences, the ability to tailor the frame size empowers you to curate a visual experience that resonates with authenticity and artistry.
Armed with the essential steps to modify the frame size and valuable tips for choosing the right dimensions, you’re equipped to embark on a seamless and informed frame size customization journey. Embrace the art of storytelling through visual composition, harness the nuances of frame size to convey your narrative with precision, and let your creativity flourish as you craft compelling, high-definition recordings.
So, venture forth with your 4K Ultra HD action camera as your trusted companion, and let the world become your canvas. With each frame, each resolution, and each carefully selected dimension, you’re poised to capture the essence of every moment in breathtaking detail, ensuring that your visual storytelling leaves an indelible mark on the hearts and minds of your audience.
May your cinematic adventures be defined by boundless creativity, technical finesse, and an unwavering passion for visual storytelling. Embrace the power of frame size customization, and let your recordings speak volumes with the clarity and impact they deserve.