Introduction
Welcome to the world of acoustic guitar! Whether you are an aspiring guitarist or simply curious about how this versatile instrument works, understanding the notes on the acoustic guitar is essential. The guitar is a fascinating instrument with its six strings and various frets allowing for a wide range of musical possibilities. But where do you start? In this article, we will explore the notes on the acoustic guitar, from the open string notes to the intricacies of the fretboard.
Learning the notes on the acoustic guitar is like unlocking a musical code. It is the foundation on which you can build melodies, chords, and harmonies. Without a solid understanding of the notes, playing the guitar can feel like blindly navigating through a maze. But fear not! With some guidance, practice, and patience, you’ll soon find yourself confidently strumming away and creating beautiful music.
Whether you’re a beginner or an intermediate player looking to expand your knowledge, knowing the notes on the guitar is crucial. It allows you to communicate with other musicians, read sheet music and tabs, and improvise with confidence. So, let’s dive into the fascinating world of the notes on the acoustic guitar and discover the secrets of this incredible instrument.
What Are the Notes on the Acoustic Guitar?
Before we delve into the specifics, it’s important to understand the basic concept of notes on the acoustic guitar. Notes are the building blocks of music. They represent individual pitches that form melodies, chords, and harmonies. On the acoustic guitar, notes are produced by plucking or strumming the strings, which vibrate and generate sound.
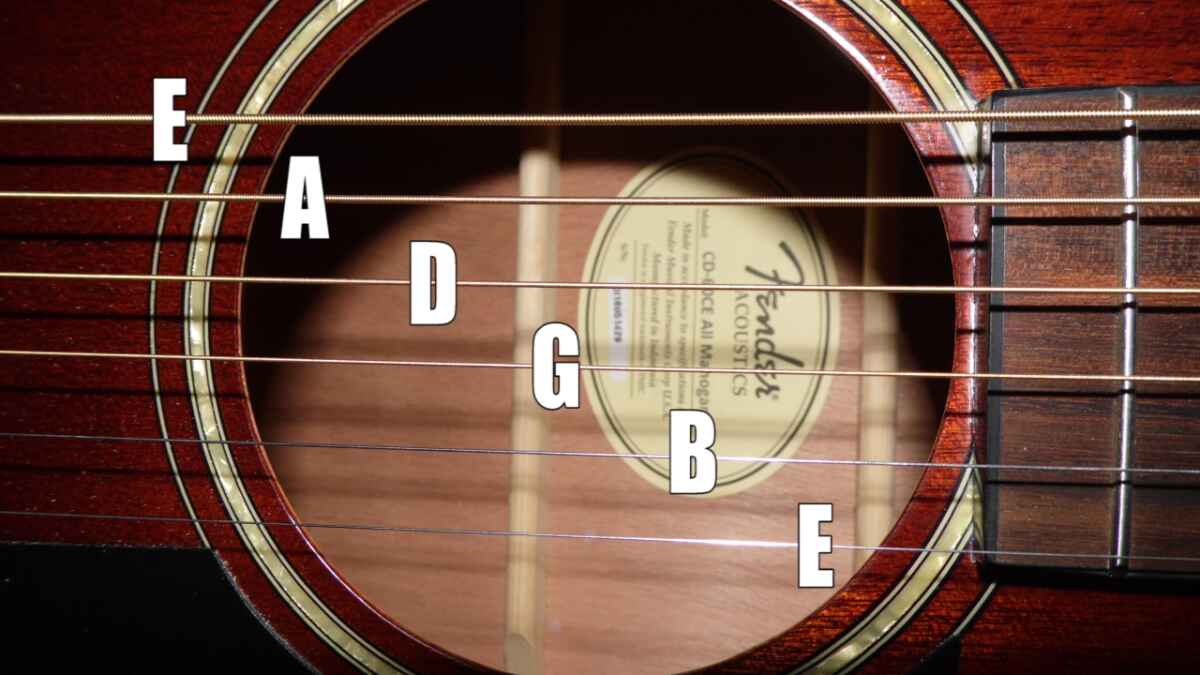
The acoustic guitar is typically tuned to the standard tuning, which is EADGBE from the lowest to the highest-pitched string. Each string on the guitar can produce specific notes when played open (without fretting). The open string notes, from the thickest to the thinnest string, are as follows:
- E string: the open note is E
- A string: the open note is A
- D string: the open note is D
- G string: the open note is G
- B string: the open note is B
- E string: the open note is E
These open string notes provide a starting point for understanding the guitar’s fretboard. By fretting the strings at different positions, you can create different pitches and play different notes. As you move up the fretboard, the pitch of the notes increases, allowing for a wider tonal range.
It’s important to note that the acoustic guitar is a transposing instrument, which means the written pitch of the music is different from the sounding pitch. When you play a written C on the guitar, it actually sounds like a concert pitch B-flat. This transposition is due to the way the guitar is tuned and its unique characteristics.
Understanding the notes on the acoustic guitar is a fundamental step in your musical journey. It will enable you to read sheet music, play melodies and chords, and communicate effectively with other musicians. So, let’s continue exploring the fascinating world of guitar notes and expand our knowledge of this incredible instrument.
Open String Notes
The open string notes on the acoustic guitar are the pitches produced when you play the guitar strings without pressing down any frets. These notes provide a starting point and a reference for understanding the fretboard and playing different melodies and chords.
On a standard-tuned acoustic guitar, the open string notes, from the thickest to the thinnest string, are as follows:
- The thickest string, also known as the 6th string or Low E string, produces the note E when played open.
- The 5th string, known as the A string, produces the note A when played open.
- The 4th string, known as the D string, produces the note D when played open.
- The 3rd string, known as the G string, produces the note G when played open.
- The 2nd string, known as the B string, produces the note B when played open.
- The thinnest string, also known as the 1st string or High E string, produces the note E when played open.
These open string notes serve as the foundation for understanding the relationships between the different pitches and intervals on the guitar. By understanding and memorizing these notes, you can easily navigate the fretboard and identify the positions of other notes. This knowledge is essential for playing melodies, creating chord shapes, and improvising on the acoustic guitar.
It’s important to note that the open string notes are just the starting point. By fretting the strings at various positions, you can create different pitches and play a wide range of notes. The open string notes provide a reference point, but the true versatility of the guitar lies in the ability to produce different pitches by manipulating the strings with your fingers.
Now that we’ve established the open string notes on the acoustic guitar, let’s continue our exploration of the fretboard and dive deeper into the world of notes on this incredible instrument.
Learning the Notes on the Fretboard
Learning the notes on the fretboard is a crucial step in becoming a proficient guitarist. It allows you to navigate the guitar neck with confidence, effortlessly play melodies, and construct chords. While it may seem daunting at first, with consistent practice and a systematic approach, you can master the notes on the fretboard.
The fretboard is divided into multiple frets, each representing a different pitch. The notes on the fretboard are organized in a repeating pattern, meaning that the same pattern is repeated across all strings. This pattern consists of natural notes (A, B, C, D, E, F, G) and sharps/flats (notes between the natural notes).
One of the most effective methods to learn the notes on the fretboard is to start with the natural notes. Begin by memorizing the notes on the open strings (E, A, D, G, B, E) as a reference point. Then, focus on learning the natural notes on one string at a time. Start with the low E string and work your way up to the high E string.
As you familiarize yourself with the natural notes, you can then move on to learning the sharps and flats. These notes are represented by symbols such as “#” (sharp) and “b” (flat). Sharps and flats are the notes that fall between the natural notes. For example, between the notes C and D, you have C#, and between the notes D and E, you have Eb.
There are numerous exercises and mnemonic devices you can use to enhance your learning process. One popular method is to use visual markers on the fretboard, such as small stickers or tape, to indicate the positions of specific notes. Start by marking the natural notes and gradually remove the markers as you gain more confidence.
Another effective exercise is to practice playing scales in different positions on the fretboard. Scales help you understand the relationship between different notes and build muscle memory in your fingers. By consistently practicing scales, you’ll gradually become more comfortable with the notes on the fretboard.
Remember, learning the notes on the fretboard is not a one-time task. It requires ongoing practice and repetition. With dedication and patience, you’ll gradually internalize the locations of the notes and be able to play with ease.
Now that you have an understanding of the approach to learning the notes on the fretboard, let’s explore the concept of natural notes and sharps/flats in more detail.
Natural Notes and Sharps/Flats
When learning the notes on the acoustic guitar, it’s essential to understand the concept of natural notes and sharps/flats. These terms refer to the basic building blocks of musical pitch and form the foundation of the notes found on the guitar fretboard.
The natural notes are the fundamental pitches in music and are represented by the letters A, B, C, D, E, F, and G. These notes form the major scale and serve as references for creating melodies, chords, and harmonies. On the guitar, the natural notes are found on each string and repeat in a pattern as you move along the fretboard.
However, between some natural notes, there are additional pitches known as sharps (#) and flats (b). Sharps and flats represent the notes that fall between the natural notes. For example, between the notes C and D, there is a note called C#, and between the notes D and E, there is a note called Eb.
Sharps (#) indicate a note that is one half-step or semitone higher than the natural note, while flats (b) indicate a note that is one half-step or semitone lower. The use of sharps or flats can alter the sound and character of a melody or chord, adding richness and color to the music.
Understanding the relationship between natural notes and sharps/flats is crucial for navigating the guitar fretboard. It allows you to identify and play different pitches, opening up a wide range of musical possibilities. By familiarizing yourself with the natural notes and their sharps/flats, you’ll be able to read and interpret musical notation, play melodies and chords accurately, and explore different musical styles.
Memorizing the natural notes and their sharps/flats can initially feel overwhelming, but with consistent practice and repetition, it becomes second nature. Start by memorizing the natural notes on each string and then gradually introduce the sharps and flats. With time, you’ll develop a strong foundation of knowledge that will greatly enhance your guitar playing skills.
Now that we’ve explored the concept of natural notes and sharps/flats, let’s move on to understanding octaves on the guitar and how they contribute to the overall picture of note arrangement on the fretboard.
Octaves on the Guitar
Octaves play a significant role in understanding the notes on the guitar and their arrangement on the fretboard. An octave is the interval between two notes where the higher-pitched note has a frequency that is exactly double the frequency of the lower-pitched note. This interval creates a harmonious and pleasing sound.
The guitar neck is designed in such a way that notes repeat at different positions. This repetition occurs in the form of octaves. For example, if you play an open E string, then the 12th fret of that same string also produces the note E, but an octave higher.
Understanding octaves is crucial for expanding your musical creativity on the guitar. By recognizing the patterns and relationships between notes, you can play the same melody or chord in different positions on the fretboard, creating unique sounds and adding depth to your playing.
When navigating the fretboard, it’s helpful to visualize the octave patterns. By knowing the location of one note, you can easily find its octave. For example, if you know the open E string produces the note E, you can find its octave by locating the 12th fret on that same string.
Playing in octaves also allows you to create fuller and richer sounding chords. By incorporating different octaves of the same note within a chord shape, you can add depth and complexity to your chord progressions.
Moreover, understanding octaves can assist you in transposing music to different positions on the guitar. By knowing the interval between the notes, you can easily adapt a melody or chord progression to a different key or position on the fretboard.
Practicing octave exercises can greatly improve your understanding and familiarity with the notes on the guitar. Start by playing simple melodies or scales in different octaves, gradually moving up and down the guitar neck. This exercise will help you internalize the concept of octaves and expand your overall playing ability.
Now that you have a grasp of octaves on the guitar, let’s explore effective techniques for memorizing the notes on the guitar neck.
Memorizing the Notes on the Guitar Neck
Memorizing the notes on the guitar neck is a crucial skill for any guitarist. It allows you to navigate the fretboard with ease, play melodies and chords in different positions, and communicate effectively with other musicians. While initially daunting, with consistent practice and the right techniques, you can confidently memorize the notes on the guitar neck.
One effective method for memorizing the notes is to break down the fretboard into smaller sections. Start by focusing on one string at a time, gradually moving up and down the neck. Practice playing the notes in sequence, saying the name of each note out loud as you play. This auditory and kinesthetic approach helps reinforce the connection between the finger positions and the corresponding notes.
Another helpful technique is to use reference points or landmarks on the guitar neck. These reference points can be specific frets or fret markers on the guitar, such as dots, lines, or unique shapes. By associating the location of these markers with specific notes, you can quickly identify the positions of other notes relative to these landmarks.
Visualization is another powerful tool for memorizing the notes on the guitar neck. Spend time mentally visualizing the fretboard and the placement of the notes. Imagine the patterns and relationships between the notes, and visualize yourself playing different melodies or chords in specific positions on the neck. This mental rehearsal helps reinforce your knowledge and solidify the understanding of note positions.
Repetition is key when memorizing the notes on the guitar neck. Set aside dedicated practice time each day to review and reinforce your knowledge. Start with simple exercises, such as playing and naming the notes on each string, and gradually progress to more challenging exercises like playing scales or chord progressions in different positions on the neck.
Utilize technology to your advantage. There are various online tools and apps available that can help you practice and quiz yourself on the notes. These resources can provide interactive experiences and gamified learning, making the process of memorization more enjoyable and engaging.
Lastly, be patient and persistent. Memorizing the notes on the guitar neck is a gradual process that takes time and dedication. Celebrate your progress along the way, and don’t get discouraged by occasional setbacks. With consistent effort, you’ll find that the notes on the guitar neck become second nature to you.
Now that you have several techniques for memorizing the notes on the guitar neck, let’s explore some helpful tips and exercises to further reinforce your knowledge.
Helpful Tips and Exercises for Remembering the Notes
Memorizing the notes on the guitar neck can be a challenging but rewarding endeavor. To aid in your learning process, here are some helpful tips and exercises to reinforce your knowledge and improve your ability to remember the notes:
1. Practice with mnemonic devices: Mnemonic devices are memory aids that can help you remember complex information. Create acronyms, phrases, or word associations that represent the sequence of notes on each string. For example, “Eddie Ate Dynamite, Good Bye Eddie” represents the open string notes E, A, D, G, B, and E.
2. Utilize flashcards: Create flashcards with note names and practice flipping through them while naming the corresponding note on the guitar neck. This method strengthens your recognition of note positions and can be an interactive and engaging way to memorize the notes.
3. Play the musical alphabet: Start with an open string and play each note in alphabetical order, moving up each string. For example, on the E string, play E, F, G, A, B, C, D, and E. Repeat this exercise on each string to reinforce the sequence of notes.
4. Interval exercises: Practice finding intervals on the guitar neck. Start with simple intervals, such as thirds or fifths, and gradually move on to more complex intervals. This exercise trains your ears to recognize the distance between different notes and reinforces your understanding of note positions.
5. Use online resources: Explore online resources, such as interactive fretboard trainers or note memorization apps, that provide visual aids, quizzes, and games to help you practice and memorize the notes on the guitar neck. These tools can make the learning process more enjoyable and effective.
6. Song-based learning: Choose songs that you enjoy and try to identify the notes and chords as you play. This practical approach connects theory with application and enhances your ability to recognize and remember the notes in a musical context.
7. Review and repetition: Consistently review and practice the notes on the guitar neck to reinforce your knowledge. Set aside dedicated practice time each day to go through exercises that focus on note memorization. Regular repetition helps solidify your understanding and makes the process of memorizing the notes easier.
Remember, everyone learns differently, so explore different techniques and find what works best for you. Be patient with yourself and enjoy the journey of discovering and mastering the notes on the guitar neck. With time, practice, and dedication, you’ll become more confident and adept at recognizing and playing the notes on the guitar.
Now that you have a toolbox of helpful tips and exercises, you’re well-equipped to continue your journey of mastering the notes on the guitar neck. Let’s wrap up this article with a brief recap of what we’ve covered.
Conclusion
Understanding the notes on the acoustic guitar is an essential skill for any guitarist, whether you’re a beginner or an experienced player. It forms the foundation for playing melodies, constructing chords, and improvising on the instrument. By familiarizing yourself with the open string notes, learning the natural notes and sharps/flats, grasping the concept of octaves, and memorizing the notes on the guitar neck, you can navigate the fretboard with confidence and creativity.
Throughout this article, we’ve explored the different aspects of notes on the acoustic guitar, from the basic open string notes to the intricacies of the fretboard. We’ve discussed techniques and exercises to help you memorize the notes, including mnemonic devices, flashcards, interval exercises, and song-based learning. We’ve also emphasized the importance of repetition and consistent practice in solidifying your knowledge.
Remember, learning the notes on the guitar neck is a gradual process that requires patience and dedication. Don’t get discouraged if you find it challenging at first. With time and perseverance, you’ll find that the fretboard becomes a familiar and comfortable territory.
Now, armed with the knowledge and techniques discussed in this article, continue your guitar journey with confidence. Embrace the joy of exploring melodies, creating chords, and expressing your musicality on the acoustic guitar. Let the notes guide you as you embark on your musical adventures and continue to grow as a guitarist.
So keep strumming, keep practicing, and keep embracing the beauty of the notes on the acoustic guitar!