Introduction
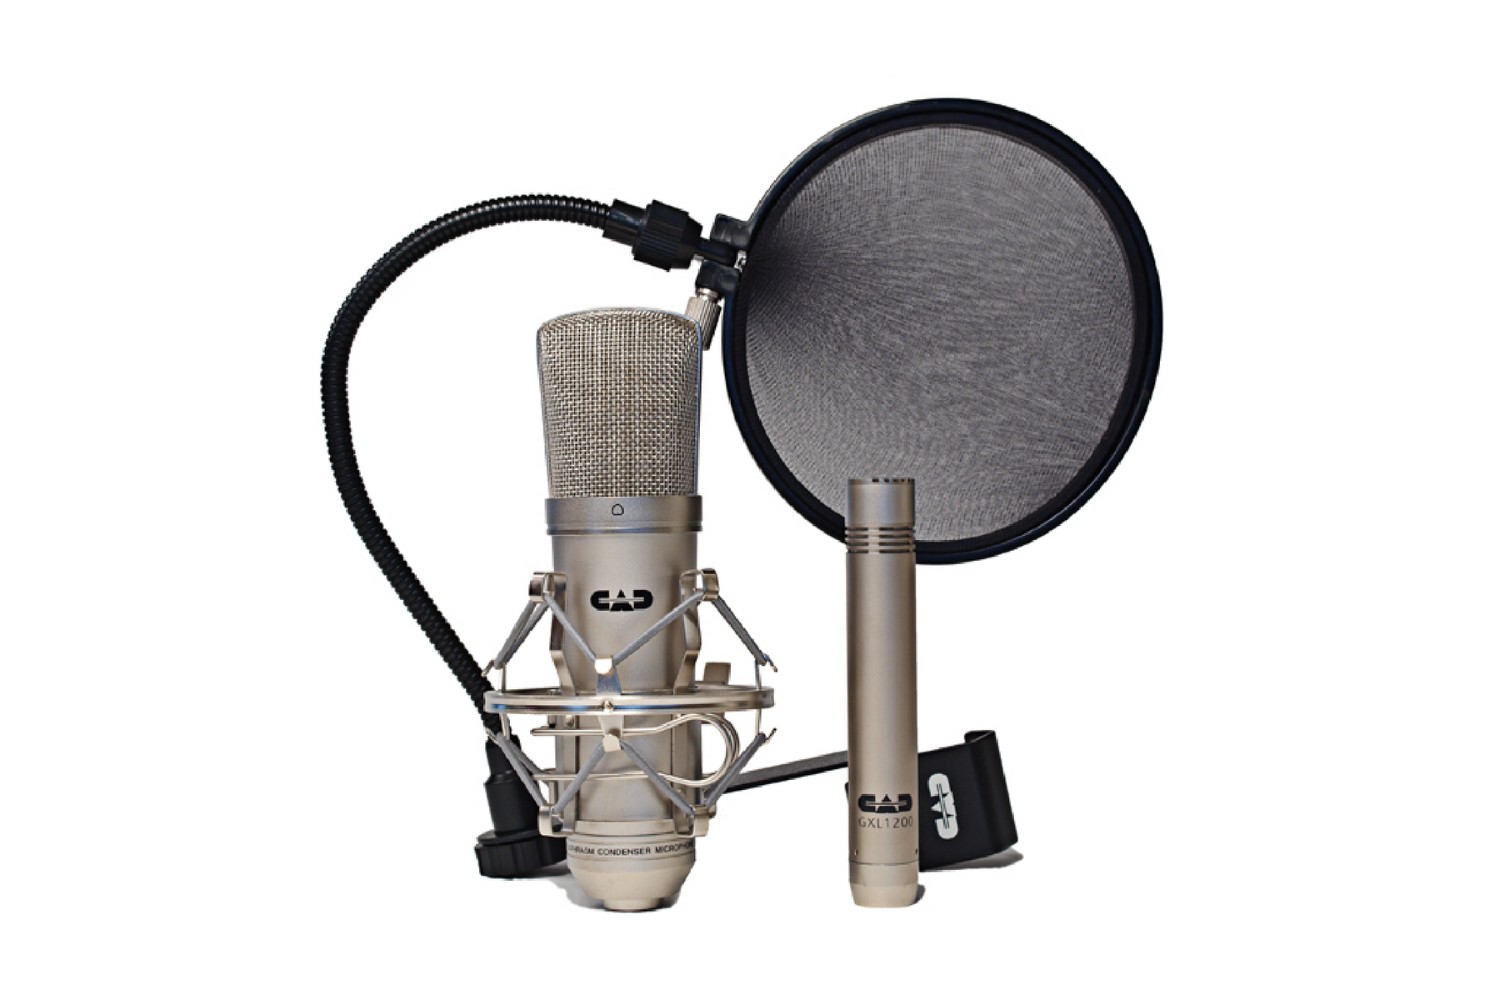
Setting up a professional recording studio at home can be an exciting endeavor, especially when you have the right equipment. The CAD GXL2200 condenser microphone, paired with the On-Stage MS7701B boom mic stand and a reliable 20 XLR cable, provides a solid foundation for capturing high-quality audio. Whether you're a podcaster, musician, or content creator, this setup offers versatility and exceptional sound reproduction.
In this guide, we will walk through the process of unboxing the CAD GXL2200 condenser microphone, assembling the On-Stage MS7701B boom mic stand, connecting the microphone to the stand, setting up the XLR cable, and testing the entire setup. By the end of this tutorial, you'll be ready to unleash the full potential of your CAD GXL2200 condenser microphone and create professional-grade audio recordings from the comfort of your own space.
Let's dive into the world of audio equipment and learn how to set up the CAD GXL2200 condenser microphone with the On-Stage MS7701B boom mic stand and 20 XLR cable. Whether you're a seasoned pro or just starting out, this guide will help you navigate the setup process with ease and confidence. So, grab your gear and let's get started on this exciting audio adventure!
Unboxing the CAD GXL2200 Condenser Microphone
As you embark on the journey of setting up your recording studio, unboxing the CAD GXL2200 condenser microphone is the first step towards unleashing its potential. The packaging is designed to ensure the safety of the microphone during transit, and as you open the box, you’ll find the contents neatly arranged to facilitate a smooth unboxing experience.
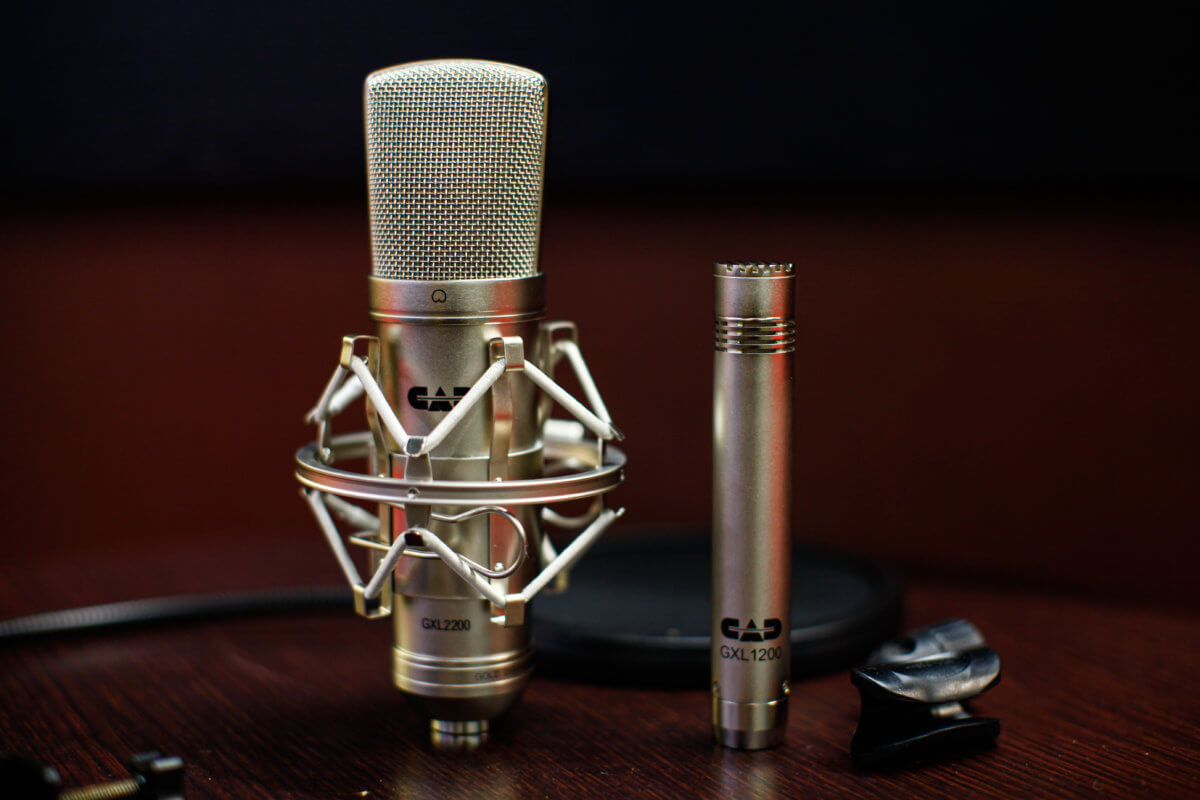
Upon lifting the lid, you’ll be greeted by the sleek and professional design of the CAD GXL2200 condenser microphone. The microphone is securely nestled in a foam insert, providing ample protection against any potential mishandling during shipping. As you carefully lift the microphone out of the box, you’ll notice its solid construction and elegant finish, exuding a sense of quality and craftsmanship.
Alongside the microphone, you’ll find additional components such as the shock mount and microphone pouch. The shock mount plays a crucial role in reducing vibrations and handling noise, ensuring that your recordings remain free from unwanted disturbances. The microphone pouch, designed to snugly accommodate the CAD GXL2200, offers a convenient storage solution, safeguarding the microphone when not in use.
Furthermore, the package includes an instructional manual, providing valuable insights into the features and specifications of the CAD GXL2200 condenser microphone. This resource equips you with the knowledge needed to harness the full capabilities of the microphone, empowering you to optimize its performance for your specific recording needs.
Unboxing the CAD GXL2200 condenser microphone sets the stage for a seamless setup process, offering a glimpse into the quality and attention to detail that defines this professional-grade audio equipment. With the microphone, shock mount, pouch, and instructional manual in hand, you’re now ready to move on to the next step of assembling the On-Stage MS7701B boom mic stand, a pivotal component in creating your home recording studio.
Assembling the On-Stage MS7701B Boom Mic Stand
The On-Stage MS7701B boom mic stand is a versatile and reliable support system for your CAD GXL2200 condenser microphone. As you begin the assembly process, you’ll appreciate the thoughtful design and sturdy construction of this essential component. The stand arrives in several pieces, neatly packaged and ready to be transformed into a stable and adjustable platform for your microphone.
Start by unpacking the base, which serves as the foundation of the mic stand. The weighted base provides stability and prevents the stand from toppling over during use, ensuring the safety of your valuable equipment. Next, locate the main vertical shaft and carefully attach it to the base, securing it in place to create the backbone of the stand.
Once the main shaft is in position, you can then attach the boom arm, which extends horizontally and allows for precise positioning of the microphone. The adjustable boom arm provides flexibility in angling the microphone to capture the perfect sound, making it an indispensable feature for various recording setups. As you secure the boom arm to the main shaft, you’ll notice the smooth and effortless adjustment mechanism, emphasizing the user-friendly design of the On-Stage MS7701B.
After attaching the boom arm, you can then affix the microphone clip or shock mount to the end of the boom arm, ready to receive the CAD GXL2200 condenser microphone. The secure attachment ensures that the microphone remains in place during recording sessions, granting you peace of mind and allowing you to focus on your creative endeavors without any concerns about stability.
Completing the assembly of the On-Stage MS7701B boom mic stand marks a significant milestone in the setup process, bringing you one step closer to creating a professional recording environment in the comfort of your own space. With the stand fully assembled and the CAD GXL2200 condenser microphone at the ready, you’re now prepared to seamlessly integrate these components and embark on the next phase of the setup process: connecting the microphone to the stand and configuring the 20 XLR cable for optimal performance.
Connecting the CAD GXL2200 to the On-Stage MS7701B Boom Mic Stand
With the On-Stage MS7701B boom mic stand fully assembled, it’s time to integrate the CAD GXL2200 condenser microphone into the setup. This pivotal step ensures that the microphone is securely positioned and ready to capture pristine audio, aligning perfectly with your recording needs. The process of connecting the microphone to the stand is straightforward and crucial in establishing a stable and reliable foundation for your recording endeavors.
Begin by carefully attaching the CAD GXL2200 condenser microphone to the microphone clip or shock mount at the end of the boom arm. Ensure that the microphone is firmly secured, minimizing any potential movement or instability during recording sessions. The secure attachment not only safeguards the microphone but also contributes to the overall professional aesthetic of the setup.
As you position the microphone on the stand, take a moment to adjust the boom arm to the desired angle and height, aligning it with your specific recording requirements. The adjustable nature of the boom arm allows for effortless customization, empowering you to create an optimal setup tailored to your unique preferences and the demands of your recording environment.
Once the microphone is in place, take a moment to appreciate the seamless integration of the CAD GXL2200 with the On-Stage MS7701B boom mic stand. This synergy between the microphone and the stand forms the backbone of your recording setup, laying the groundwork for exceptional audio capture and ensuring that you’re equipped with a professional-grade platform for your creative pursuits.
With the CAD GXL2200 securely connected to the On-Stage MS7701B boom mic stand, you’re now ready to delve into the next crucial component of the setup process: configuring the 20 XLR cable. This essential cable serves as the conduit for transmitting the pristine audio captured by the microphone, and its proper setup is vital for achieving optimal recording results. As we move forward, the seamless integration of the microphone and stand sets the stage for a cohesive and reliable recording environment, poised to elevate your audio production endeavors to new heights.
Setting up the 20 XLR Cable
As you progress through the setup of your recording environment, the 20 XLR cable plays a pivotal role in facilitating the seamless transmission of audio signals from the CAD GXL2200 condenser microphone to your recording interface or mixer. This essential cable serves as the conduit for capturing and delivering pristine audio, and its proper setup is crucial for achieving optimal recording results. Let’s delve into the process of setting up the 20 XLR cable, ensuring that it becomes an integral component of your professional-grade recording setup.
Begin by identifying the male and female ends of the 20 XLR cable. The male end, featuring three pins, is designed to connect to the CAD GXL2200 condenser microphone, while the female end, equipped with three corresponding sockets, interfaces with your recording interface or mixer. Familiarize yourself with the distinct features of each end, ensuring that you can effortlessly distinguish between them during the setup process.
Next, carefully connect the male end of the 20 XLR cable to the output port of the CAD GXL2200 condenser microphone. The secure connection ensures that the audio signals captured by the microphone are transmitted without interference, maintaining the integrity and fidelity of the recorded sound. Pay attention to the firmness of the connection, verifying that the male end is snugly and securely attached to the microphone’s output port.
Once the microphone end is connected, proceed to attach the female end of the 20 XLR cable to the input port of your recording interface or mixer. This crucial step establishes a direct link between the microphone and the recording equipment, enabling the transmission of the captured audio signals for further processing and utilization. The secure connection at the input port guarantees a reliable and uninterrupted flow of audio data, setting the stage for pristine recordings and seamless integration with your recording setup.
With the 20 XLR cable successfully set up and serving as the vital link between the CAD GXL2200 condenser microphone and your recording interface or mixer, you’ve laid the groundwork for capturing and transmitting exceptional audio. This seamless integration of the cable into your setup ensures that your recording environment is equipped with the essential components needed to achieve professional-grade results, setting the stage for the next exciting phase: testing the CAD GXL2200 condenser microphone to experience its remarkable capabilities in action.
Testing the CAD GXL2200 Condenser Microphone
With the CAD GXL2200 condenser microphone, On-Stage MS7701B boom mic stand, and 20 XLR cable seamlessly integrated into your recording setup, it’s time to put the capabilities of the microphone to the test. Testing the microphone allows you to experience its exceptional audio capture and reproduction firsthand, providing valuable insights into its performance and versatility across various recording scenarios. Whether you’re a musician, podcaster, or content creator, this testing phase is an exciting opportunity to unleash the full potential of the CAD GXL2200 and witness its remarkable capabilities in action.
Begin by positioning the microphone at the desired angle and height, leveraging the adjustable boom arm of the On-Stage MS7701B stand to achieve the optimal placement for your specific recording needs. Whether you’re capturing vocals, instruments, or spoken word content, the microphone’s versatile positioning ensures that you can tailor its orientation to suit the nuances of your recording environment.
Once the microphone is in position, engage in a series of test recordings to gauge its performance across different audio sources. Experiment with vocal recordings to assess the microphone’s ability to faithfully reproduce the nuances and tonal qualities of the human voice. Explore instrumental recordings to evaluate the microphone’s capacity to capture the richness and depth of various musical instruments. Additionally, consider recording ambient sounds or environmental noise to gauge the microphone’s sensitivity and accuracy in capturing subtle audio details.
As you conduct the test recordings, pay close attention to the clarity, fidelity, and tonal balance of the captured audio. Evaluate the microphone’s ability to minimize background noise and handle high sound pressure levels, ensuring that it delivers pristine and distortion-free recordings even in demanding acoustic environments. Take note of the microphone’s transient response, frequency range, and dynamic range, observing how it faithfully reproduces the subtleties and nuances inherent in the audio sources being recorded.
Furthermore, consider experimenting with the microphone’s polar patterns, if applicable, to explore its directional sensitivity and off-axis rejection. This exploration allows you to harness the microphone’s versatility and adaptability, empowering you to tailor its response to suit the specific requirements of your recording projects.
By thoroughly testing the CAD GXL2200 condenser microphone, you gain valuable insights into its performance characteristics and sonic capabilities, equipping you with the knowledge needed to harness its full potential in your creative endeavors. This testing phase serves as a crucial step in familiarizing yourself with the microphone’s attributes and honing your ability to leverage its capabilities for a diverse range of recording applications.
Conclusion
Embarking on the journey of setting up the CAD GXL2200 condenser microphone with the On-Stage MS7701B boom mic stand and 20 XLR cable has unveiled a world of possibilities for creating professional-grade audio recordings in the comfort of your own space. As you navigated through the unboxing process, assembled the boom mic stand, connected the microphone, configured the XLR cable, and tested the microphone’s capabilities, you’ve gained valuable insights and hands-on experience in harnessing the full potential of this exceptional audio setup.
The unboxing experience provided a glimpse into the quality and craftsmanship of the CAD GXL2200 condenser microphone, setting the stage for a seamless setup process. As you carefully unpacked the microphone, shock mount, and instructional manual, you were greeted by a meticulously designed package that underscored the attention to detail and commitment to delivering professional audio equipment.
Assembling the On-Stage MS7701B boom mic stand proved to be a straightforward and rewarding endeavor, highlighting the stand’s versatility and robust construction. The careful attachment of the boom arm and secure positioning of the microphone on the stand established a stable and adjustable platform, laying the foundation for capturing pristine audio in various recording scenarios.
Connecting the CAD GXL2200 to the On-Stage MS7701B boom mic stand and setting up the 20 XLR cable solidified the integration of these essential components, ensuring a seamless flow of audio signals and a reliable conduit for transmitting high-quality recordings. The meticulous attention to detail in establishing these connections underscored the commitment to creating a professional recording environment tailored to your specific needs.
Testing the CAD GXL2200 condenser microphone provided valuable insights into its performance across diverse recording applications. From vocal and instrumental recordings to capturing ambient sounds, the microphone’s exceptional fidelity, tonal balance, and versatility showcased its ability to faithfully reproduce the nuances and subtleties of various audio sources, empowering you to achieve exceptional results in your creative pursuits.
As you conclude this setup journey, you’re now equipped with a comprehensive understanding of how to set up and leverage the CAD GXL2200 condenser microphone with the On-Stage MS7701B boom mic stand and 20 XLR cable. This knowledge empowers you to embark on a wide range of recording projects with confidence, knowing that you have the tools and expertise to capture professional-grade audio in any creative endeavor.
With the CAD GXL2200 condenser microphone, On-Stage MS7701B boom mic stand, and 20 XLR cable seamlessly integrated into your recording setup, you’re poised to embark on an exciting audio adventure, armed with the capabilities to bring your creative vision to life through the power of pristine, professional-grade audio recordings.