Introduction
Understanding the Basics of Connecting an Electret Condenser Microphone to a Circuit
When it comes to capturing sound in electronic devices, a crucial component is the microphone. An electret condenser microphone is a popular choice due to its compact size and high performance. Connecting this type of microphone to a circuit is a fundamental skill for electronics enthusiasts, hobbyists, and professionals alike. This article will guide you through the process of connecting an electret condenser microphone to a circuit, providing valuable insights and practical tips along the way.
The ability to integrate a microphone into a circuit opens up a myriad of possibilities, from creating innovative audio recording devices to implementing voice-activated controls in electronic projects. Understanding the intricacies of this process is essential for anyone looking to delve into the world of audio electronics. By following the steps outlined in this guide, you will gain a solid foundation in connecting electret condenser microphones to circuits, empowering you to embark on a wide range of exciting projects.
Throughout this article, we will explore the key components required for this task, delve into the technical aspects of electret condenser microphones, and provide a step-by-step guide to effectively connect the microphone to a circuit. By the end of this journey, you will have the knowledge and confidence to seamlessly integrate an electret condenser microphone into your electronic projects, opening up a world of possibilities in audio electronics.
Whether you are a seasoned electronics enthusiast or a newcomer to the field, understanding the process of connecting an electret condenser microphone to a circuit is a valuable skill that can be applied to a diverse array of projects. Let's embark on this enlightening journey and unravel the intricacies of integrating this essential component into electronic circuits.
Understanding Electret Condenser Microphones
Before delving into the process of connecting an electret condenser microphone to a circuit, it is essential to grasp the fundamental principles that underpin the functionality of these remarkable devices. An electret condenser microphone operates on the basis of capacitance, utilizing the variations in capacitance to convert sound waves into electrical signals.
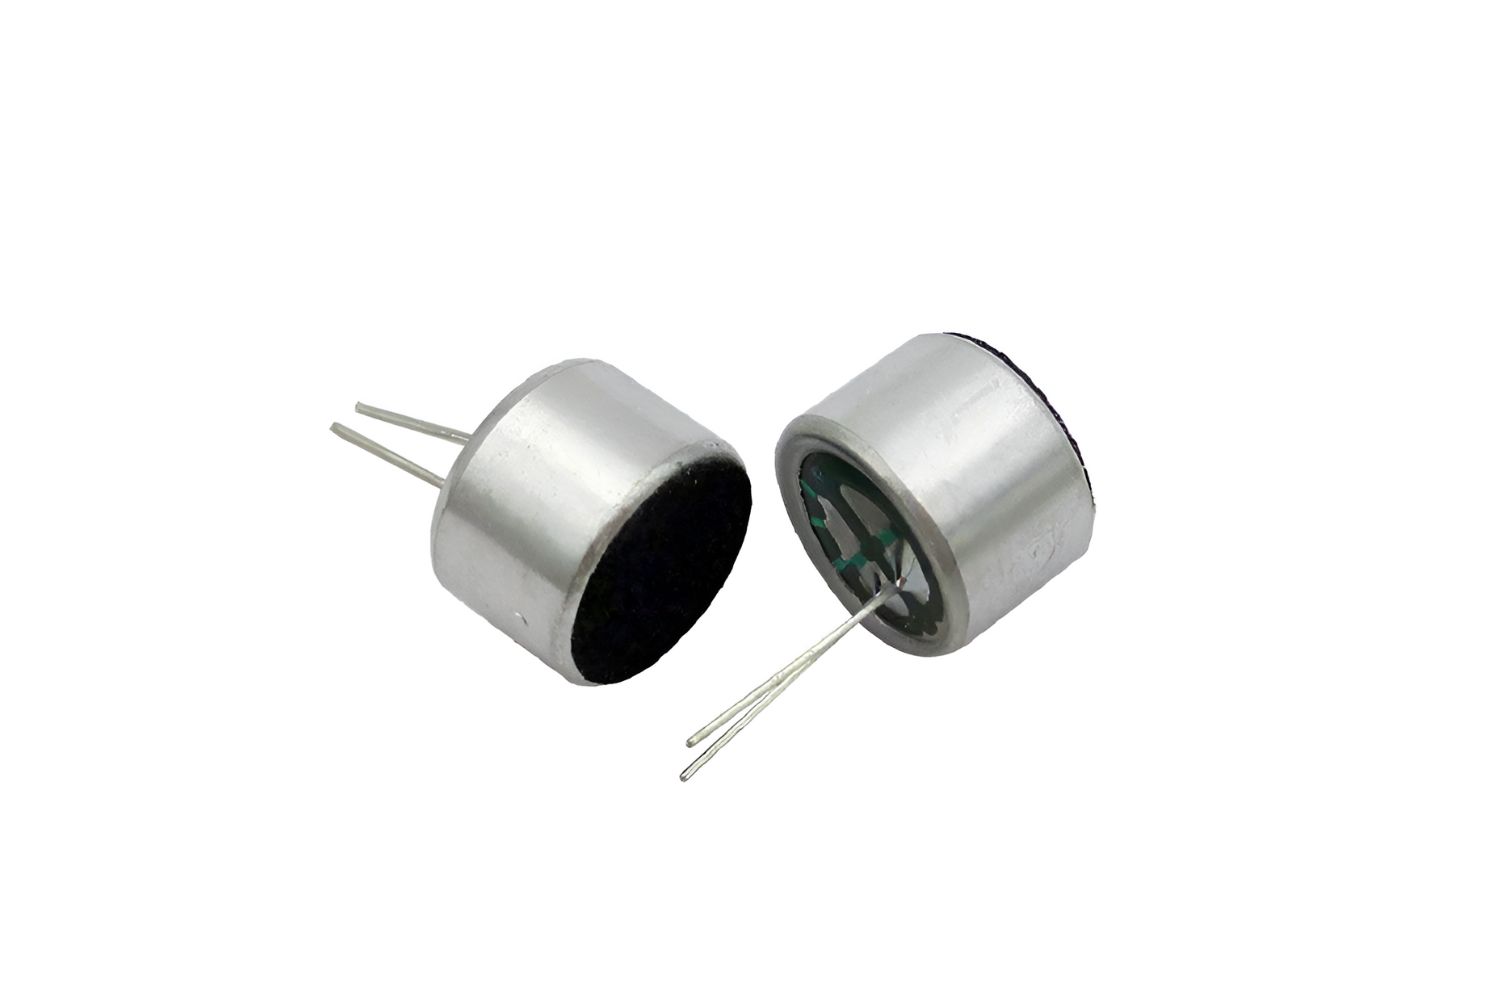
At the heart of an electret condenser microphone is a diaphragm that is positioned in close proximity to a backplate. The diaphragm and backplate form a capacitor, with the air gap between them serving as the dielectric material. This arrangement creates a variable capacitance that changes in response to sound waves. When sound waves interact with the diaphragm, it vibrates, causing the distance between the diaphragm and backplate to fluctuate, thereby altering the capacitance. These variations in capacitance are then converted into electrical signals, effectively capturing the nuances of the sound being recorded.
One of the distinguishing features of electret condenser microphones is the presence of a permanently charged material, known as the electret. This electret is integrated into the microphone during the manufacturing process and plays a crucial role in maintaining a stable electrical charge, enabling the microphone to operate effectively without requiring an external power source. This inherent charge ensures that the microphone is always ready to capture sound, making it a highly practical and versatile component for a wide range of applications.
Understanding the operational principles of electret condenser microphones provides valuable insights into their capabilities and limitations. While these microphones offer exceptional performance and convenience, it is important to consider factors such as frequency response, sensitivity, and signal-to-noise ratio when selecting a microphone for a specific application. By comprehending the inner workings of electret condenser microphones, you can make informed decisions when integrating them into electronic circuits, ensuring optimal performance and functionality.
With a solid grasp of the foundational concepts behind electret condenser microphones, we are well-equipped to explore the components needed to connect these microphones to circuits, setting the stage for an engaging and enlightening journey into the realm of audio electronics.
Components Needed
Before embarking on the process of connecting an electret condenser microphone to a circuit, it is essential to gather the necessary components to ensure a seamless and successful integration. The following components are fundamental to this endeavor:
- Electret Condenser Microphone: The central component of this undertaking is, of course, the electret condenser microphone itself. When selecting a microphone, consider factors such as sensitivity, frequency response, and size to align with the requirements of your project. Additionally, ensure that the microphone is equipped with leads or terminals for easy connection to the circuit.
- Resistors: Depending on the specific requirements of your circuit and the characteristics of the microphone, resistors may be needed to adjust the biasing and impedance matching. It is advisable to have a variety of resistor values on hand to accommodate different circuit configurations.
- Capacitors: Capacitors play a crucial role in filtering and coupling the electrical signals within the circuit. Select capacitors with appropriate voltage ratings and capacitance values to suit the application and ensure optimal signal processing.
- Amplifier (Optional): In some applications, an amplifier may be necessary to boost the signal from the microphone to a level suitable for further processing or recording. The choice of amplifier will depend on the desired signal gain and the specific requirements of the circuit.
- Power Source: While electret condenser microphones do not require an external power source due to the inherent charge provided by the electret material, certain circuit configurations or additional components may necessitate a power source, such as batteries or a DC power supply, to ensure proper functionality.
- Connector and Wiring: To establish the physical connection between the microphone and the circuit, suitable connectors and wiring are essential. Ensure that the connectors are compatible with the microphone’s terminals and that the wiring is of sufficient gauge to carry the electrical signals without significant loss or interference.
By assembling these key components, you will be well-prepared to proceed with the process of connecting the electret condenser microphone to the circuit, laying the groundwork for a successful integration that harnesses the full potential of this essential audio input device.
Connecting the Microphone to a Circuit
With the essential components at hand, the next step is to connect the electret condenser microphone to the circuit in a manner that ensures proper functionality and optimal signal processing. This process involves carefully integrating the microphone into the circuit, considering factors such as biasing, impedance matching, and signal routing to achieve the desired audio input performance.
The specific steps for connecting the microphone to a circuit may vary depending on the circuit configuration and the intended application. However, the following general guidelines provide a solid foundation for this integration:
- Identify the Microphone Terminals: Begin by identifying the terminals or leads of the electret condenser microphone. Typically, these terminals are labeled for easy identification. It is essential to ascertain the polarity and orientation of the microphone to ensure correct connection to the circuit.
- Biasing the Microphone: Electret condenser microphones often require a biasing voltage to operate effectively. This bias voltage ensures that the electret material maintains its charge, enabling the microphone to capture sound accurately. Depending on the microphone’s specifications, a suitable resistor may be used to establish the biasing voltage, ensuring stable and consistent microphone performance.
- Impedance Matching: To optimize signal transfer and minimize signal loss, it is important to consider impedance matching between the microphone and the input stage of the circuit. This may involve the use of resistors and capacitors to align the impedance levels, allowing for efficient signal transfer and proper integration with the circuit.
- Signal Routing and Filtering: Once the microphone is appropriately biased and the impedance is matched, the electrical signals from the microphone need to be routed and processed within the circuit. Capacitors may be employed to filter out unwanted noise and ensure that the audio signals are transmitted effectively to the subsequent stages of the circuit.
- Physical Connection: With the electrical connections established, ensure that the physical connection between the microphone and the circuit is secure and stable. Use appropriate connectors and wiring to prevent signal loss or interference, maintaining a reliable connection for the duration of the microphone’s operation.
By following these guidelines and considering the specific requirements of the circuit and microphone, you can effectively connect the electret condenser microphone to the circuit, setting the stage for capturing high-quality audio input for your electronic projects and applications.
Testing the Circuit
Once the electret condenser microphone has been connected to the circuit, it is essential to perform thorough testing to ensure that the integration is successful and that the microphone is capturing sound accurately. Testing the circuit involves verifying the functionality of the microphone, assessing the signal quality, and confirming that the audio input meets the desired specifications for the intended application.
The following steps outline a comprehensive approach to testing the circuit after integrating the electret condenser microphone:
- Power Up the Circuit: Begin by powering up the circuit, ensuring that all connections are secure and that the power source, if required, is providing the necessary voltage for the microphone and associated components.
- Signal Verification: Use an oscilloscope or a multimeter to verify the presence of electrical signals at the output of the microphone. This step confirms that the microphone is generating signals in response to sound input and that the biasing and impedance matching have been executed effectively.
- Audio Input Test: Generate sound input, such as spoken words or audio tones, and observe the output signals from the microphone. Assess the amplitude, frequency response, and clarity of the captured audio to ensure that the microphone is performing as expected and accurately capturing the sound input.
- Noise and Interference Analysis: Evaluate the circuit’s susceptibility to noise and interference by monitoring the output signals during periods of silence. A well-designed circuit will exhibit minimal noise and interference, maintaining a clean and reliable audio input signal in the absence of sound input.
- Amplification and Processing (If Applicable): If the circuit includes amplification or signal processing stages, assess the performance of these components in enhancing the microphone’s output signals. Verify that the amplification, filtering, and any additional processing are contributing to the overall quality and integrity of the audio input.
By systematically conducting these tests, you can gain valuable insights into the functionality of the integrated circuit and the performance of the electret condenser microphone. Any discrepancies or issues identified during testing can be addressed through adjustments to the circuit configuration, component values, or signal processing parameters, ensuring that the microphone operates optimally within the circuit.
Thorough testing not only validates the successful integration of the microphone but also provides the opportunity to fine-tune the circuit for improved audio performance, setting the stage for leveraging the microphone’s capabilities in a wide range of electronic projects and applications.
Conclusion
Embarking on the journey of connecting an electret condenser microphone to a circuit has provided invaluable insights into the intricate process of integrating this essential audio input device into electronic projects. By understanding the operational principles of electret condenser microphones, gathering the necessary components, and meticulously connecting the microphone to the circuit, we have laid the groundwork for capturing high-quality audio input and unlocking a world of creative possibilities.
The foundational knowledge gained from comprehending the capacitance-based operation of electret condenser microphones has empowered us to appreciate their role in converting sound waves into electrical signals with precision and efficiency. This understanding forms the bedrock upon which successful circuit integration is built, allowing for informed component selection, biasing, impedance matching, and signal routing to optimize the microphone’s performance within the circuit.
Through the meticulous assembly of components, including the electret condenser microphone, resistors, capacitors, and optional amplification components, we have established a robust foundation for seamlessly integrating the microphone into diverse electronic applications. The careful consideration of physical connections, biasing voltages, and impedance matching has culminated in a circuit ready to capture and process audio input with clarity and fidelity.
Thorough testing of the integrated circuit has provided a comprehensive assessment of the microphone’s functionality, signal quality, and resistance to noise and interference. This critical phase ensures that the microphone operates as intended, capturing sound accurately and reliably, while also offering the opportunity to refine and optimize the circuit for enhanced audio performance.
As we conclude this exploration, we have gained the knowledge and practical skills necessary to connect an electret condenser microphone to a circuit, paving the way for a myriad of audio electronics projects and applications. Whether it be designing voice-activated devices, creating innovative audio recording solutions, or implementing sound-sensing applications, the ability to integrate electret condenser microphones into circuits opens doors to endless possibilities in the realm of electronic innovation and creativity.
Armed with this newfound expertise, we are poised to embark on exciting ventures that harness the power of electret condenser microphones, enriching our electronic endeavors with the captivating realm of sound and audio input.