Introduction
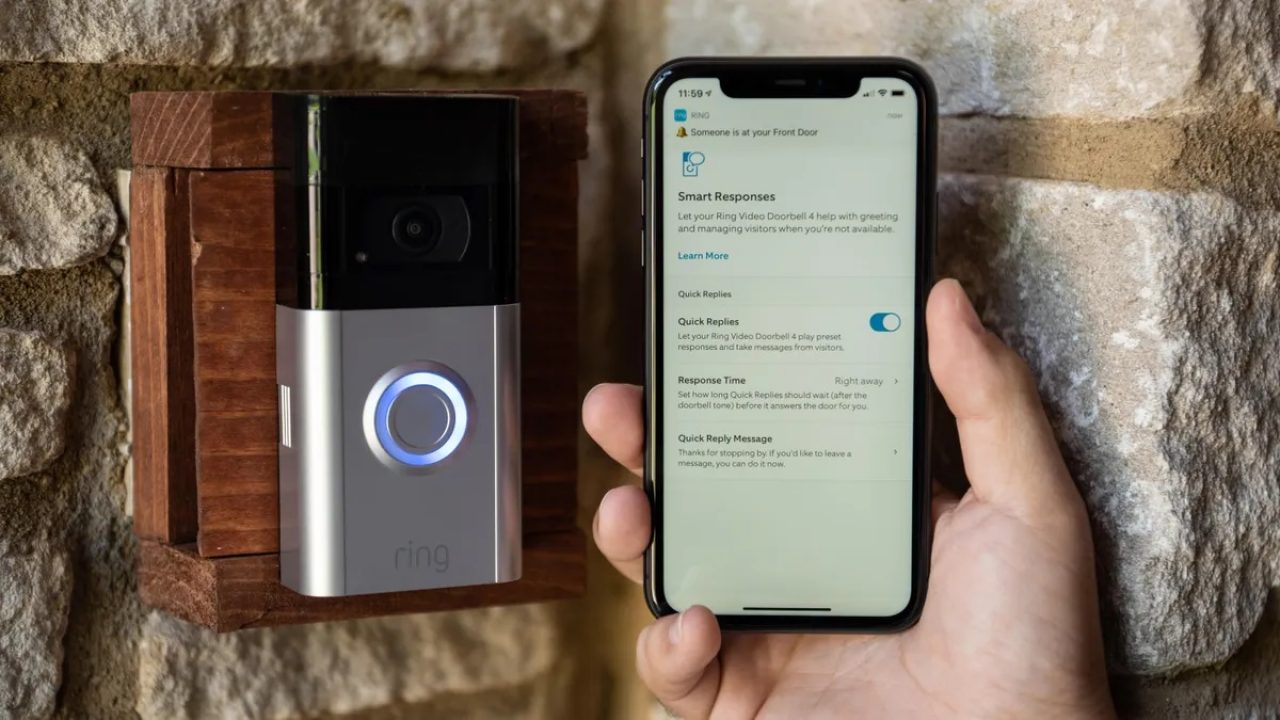
The Ring WiFi-Enabled Video Doorbell is a cutting-edge home security device that allows you to monitor and interact with visitors at your front door from anywhere, using your smartphone or tablet. With its easy installation process and user-friendly app, it has become a popular choice for homeowners looking to enhance their home security system.
In this article, we will guide you through the step-by-step process of installing the Ring WiFi-Enabled Video Doorbell. We will cover everything from gathering the necessary tools and materials to connecting the doorbell to your Wi-Fi network and customizing the settings. Whether you’re a seasoned DIY expert or a newbie with little experience, you’ll find this guide straightforward and easy to follow.
Before diving into the installation process, it’s worth mentioning a few key benefits of this video doorbell. First and foremost, the Ring Doorbell provides you with real-time video and two-way audio communication, enabling you to see and speak to visitors at your doorstep, even when you’re not at home. This is particularly useful for monitoring package deliveries, deterring potential burglars, and ensuring the safety of your loved ones.
Additionally, the Ring Doorbell features motion detection capabilities, which will send you instant alerts on your smartphone whenever someone approaches your door. You can customize the sensitivity of the motion detection to avoid false alarms from passing vehicles or animals, ensuring that you only receive notifications when it truly matters.
Furthermore, the Ring Doorbell offers cloud storage for recorded videos, allowing you to review past events and share important footage with authorities if needed. This provides an additional layer of security and peace of mind, knowing that your video recordings are securely stored and accessible anytime, anywhere.
Now that we’ve outlined the benefits of the Ring WiFi-Enabled Video Doorbell, let’s move on to the installation process. But before we do, make sure you have all the necessary tools and materials on hand.
Step 1: Gather your tools and materials
Before starting the installation process, it’s important to gather all the necessary tools and materials. This will ensure a smooth and efficient installation experience. Here’s a list of items you’ll need:
- Screwdriver (Phillips head)
- Drill and drill bits (if needed)
- Tape measure
- Pencil or marking tool
- Level
- Wire stripper or utility knife
- Small flathead screwdriver
- Charging cable (included with the Ring Doorbell)
- Wi-Fi-enabled smartphone or tablet
Once you have gathered all the necessary tools and materials, you’re ready to proceed to the next step. It’s important to have everything prepared beforehand to avoid any unnecessary delays or interruptions during the installation process. With all the items in hand, you’ll be well-equipped to tackle the installation of your Ring WiFi-Enabled Video Doorbell.
Remember to take all necessary safety precautions when using tools and working with electrical components. If you’re not comfortable working with electricity, it’s always a good idea to consult a professional for assistance. Now that you have your tools and materials ready, let’s move on to the next step: charging the battery of your Ring Doorbell.
Step 2: Charge the battery
Before proceeding with the installation of your Ring WiFi-Enabled Video Doorbell, it’s essential to ensure that the battery is fully charged. The battery provides power to the doorbell, allowing it to function properly. Here’s how you can charge the battery:
- Locate the charging port on the back of the Ring Doorbell. It is usually located at the bottom of the device, near the mounting bracket.
- Using the included charging cable, connect one end to the charging port on the doorbell and the other end to a power source, such as a USB wall adapter or your computer.
- Allow the battery to charge fully. The Ring Doorbell may take a few hours to reach a complete charge, so it’s recommended to leave it connected until the battery icon indicates a full charge.
- Once the battery is fully charged, disconnect the charging cable from the doorbell.
It’s important to note that the Ring Doorbell can also be hardwired to an existing doorbell system, allowing it to draw power directly from your home’s electrical wiring. In this case, the battery charge will act as a backup power source in case of a power outage. If you choose to hardwire the doorbell, you can skip the battery charging step.
Now that the battery is charged, you’re ready to move on to the next step: removing your existing doorbell (if you have one) to make way for the installation of the Ring Doorbell.
Step 3: Remove your existing doorbell
Before installing the Ring WiFi-Enabled Video Doorbell, you’ll need to remove your existing doorbell, if you have one. Removing the old doorbell will create space for the new device and ensure a smooth installation process. Follow these steps to remove your existing doorbell:
- Locate the doorbell chime box, which is usually located inside your home near the front entryway. It may be found in the hallway, closet, or utility room.
- Turn off the power supply to the doorbell system by switching off the circuit breaker or removing the fuse that controls the doorbell circuit. This step is crucial to prevent any electrical accidents during the removal process.
- Once the power is off, double-check that the doorbell is non-functional by pressing the doorbell button. If there is no sound or response, you can proceed with removing the doorbell.
- Use a screwdriver to remove the screws that hold the doorbell cover in place. Carefully remove the cover, exposing the wiring and mounting screws.
- Take note of the wiring configuration, making sure to remember the placement and connections of the wires. It’s helpful to take a picture or label the wires to ensure proper reconnection later.
- Disconnect the wires from the terminals of the doorbell and remove any mounting screws or brackets that secure the doorbell to the wall.
- With the old doorbell fully removed, set it aside or dispose of it properly according to local guidelines.
Once you have successfully removed your existing doorbell, you’re ready to proceed with the installation of the mounting bracket for the Ring Doorbell. Taking the time to remove the old doorbell properly will ensure a seamless installation and allow for easy reconnection of the wiring in the next step.
Step 4: Install the mounting bracket
Now that you have removed your existing doorbell, it’s time to install the mounting bracket for the Ring WiFi-Enabled Video Doorbell. The mounting bracket provides a secure and stable base for the doorbell, ensuring that it stays in place and functions properly. Follow these steps to install the mounting bracket:
- Take the mounting bracket provided with your Ring Doorbell and hold it up against the desired installation location. Make sure the bracket is aligned horizontally and level using a level tool.
- Using a pencil or marking tool, mark the positions of the mounting holes on the wall or door frame. These holes will be used to secure the bracket in place.
- If drilling is necessary, carefully drill pilot holes at the marked positions. Be sure to use an appropriate drill bit size for the type of screws or anchors you will be using.
- Secure the mounting bracket to the wall or door frame using the provided screws or anchors. Use a screwdriver or drill to tighten the screws firmly but avoid over-tightening.
It’s crucial to ensure that the mounting bracket is securely attached to the wall or door frame. This will provide a stable foundation for the doorbell, preventing any movement or misalignment during operation.
Once the mounting bracket is installed, take a moment to check its stability and alignment. Make any necessary adjustments to ensure that the bracket is level and properly positioned. This will ensure that the doorbell fits correctly and functions optimally.
With the mounting bracket securely in place, you’re now ready to move on to the next step: connecting the wires to the Ring Doorbell. Properly installing the mounting bracket sets the stage for a successful installation of the Ring WiFi-Enabled Video Doorbell, bringing you one step closer to enhancing the security of your home.
Step 5: Connect the wires
Now that you have installed the mounting bracket for your Ring WiFi-Enabled Video Doorbell, it’s time to connect the wires. Properly connecting the wires ensures that the doorbell receives power and functions as intended. Follow these steps to connect the wires:
- Locate the wires that were previously connected to your old doorbell. These wires typically consist of two or three strands: a red wire for power, a white wire for the front doorbell button, and sometimes a green wire for the doorbell chime.
- Using wire strippers or a utility knife, strip about 1/2 inch of insulation from the ends of the wires to expose the bare copper.
- Take the wired end of the mounting bracket, which should have labeled terminals, and match them to the corresponding wires. Connect the wires by inserting them into the appropriate terminals and tightening the screws to secure them in place. The red wire should be connected to the “power” or “trans” terminal, the white wire to the “front” or “bell” terminal, and the green wire (if present) to the “chime” or “rear” terminal.
- Once the wires are securely connected, gently tuck any excess wire into the wall or mounting bracket to keep it neat and out of the way.
It’s crucial to ensure that the wire connections are secure and properly seated in the terminals. This will prevent any loose connections, which could affect the functionality of the doorbell.
If you do not have existing wires or are not comfortable working with electrical wiring, you can use the Ring Doorbell’s built-in battery as a power source. Simply skip the wire connection step and proceed with the installation, ensuring that the battery is fully charged.
With the wires properly connected, you have successfully completed the essential step of providing power to your Ring Video Doorbell. In the next step, we will guide you through attaching the doorbell to the mounting bracket.
Step 6: Attach the doorbell to the mounting bracket
Now that the mounting bracket is installed and the wires are connected, it’s time to attach the Ring WiFi-Enabled Video Doorbell to the bracket. Properly securing the doorbell to the bracket ensures stability and allows for optimal functionality. Follow these steps to attach the doorbell:
- Hold the Ring Doorbell in your hand and align the back of the doorbell with the mounting bracket.
- Slide the doorbell down onto the bracket, ensuring that it locks into place. You may need to apply slight pressure to properly secure the doorbell.
- Use the small flathead screwdriver, if necessary, to tighten the screw on the bottom of the doorbell. This will provide an additional level of security, preventing the doorbell from being easily removed by unauthorized individuals.
It’s important to ensure that the doorbell is securely attached to the mounting bracket. This will prevent any movement or misalignment during use, ensuring that the doorbell functions properly and provides optimal performance.
Once the doorbell is attached, take a moment to adjust its positioning if necessary. Ensure that it is level and aligned with the surrounding area. This will enhance the aesthetic appeal of your doorbell installation.
With the doorbell properly attached to the mounting bracket, you’re now ready to move on to the next step: downloading and setting up the Ring app. Attaching the doorbell is a critical step in the installation process, bringing you closer to enjoying the full benefits of the Ring WiFi-Enabled Video Doorbell.
Step 7: Download and set up the Ring app
To fully utilize the features of your Ring WiFi-Enabled Video Doorbell, you’ll need to download and set up the Ring app on your smartphone or tablet. The app allows you to control and customize your doorbell settings, receive notifications, and view live video feeds. Follow these steps to download and set up the Ring app:
- On your smartphone or tablet, open the App Store (for iOS devices) or Google Play Store (for Android devices).
- Search for “Ring” in the app store’s search bar and select the official Ring app from the results.
- Tap the “Install” or “Get” button to download and install the app on your device.
- Once the app is installed, open it and tap “Create Account” or “Sign Up” to create a new Ring account.
- Follow the on-screen prompts to enter your email address, create a password, and complete the account setup process.
- After creating your account, you’ll be prompted to set up your location and address. This is important for receiving accurate notifications and utilizing certain features of the Ring app.
- Next, you’ll be guided through the process of adding your Ring Doorbell to the app. Follow the instructions provided, which may involve scanning a QR code on the back of the doorbell or manually entering a unique identification code.
- Once your Ring Doorbell is successfully added to the app, you can customize your doorbell settings, such as motion sensitivity, motion detection zones, and notification preferences.
Setting up the Ring app is crucial to fully utilize the capabilities of your Ring WiFi-Enabled Video Doorbell. The app provides a seamless user experience, allowing you to easily manage and control your doorbell from the convenience of your smartphone or tablet.
With the Ring app successfully downloaded and set up, you’re now ready to move on to the next step: connecting your Ring Doorbell to your Wi-Fi network. The app will play a crucial role in this process, ensuring a hassle-free and smooth connection experience.
Step 8: Connect the doorbell to your Wi-Fi network
Connecting your Ring WiFi-Enabled Video Doorbell to your Wi-Fi network allows you to access and control your doorbell remotely through the Ring app. This step is essential to enable features such as live video streaming and receiving notifications on your smartphone or tablet. Follow these steps to connect your doorbell to your Wi-Fi network:
- Open the Ring app on your smartphone or tablet and log in to your Ring account.
- Select your Ring Doorbell from the list of devices, if applicable.
- Tap on “Device Settings” or a similar option to access the settings for your Ring Doorbell.
- Look for the Wi-Fi or Network options and tap on it.
- Follow the on-screen instructions to put your Ring Doorbell into setup mode. This typically involves pressing and releasing the small setup button on the side or back of the doorbell.
- In the Ring app, select your Wi-Fi network from the available options. You may need to enter your Wi-Fi network password to proceed.
- Allow the Ring Doorbell to connect to your Wi-Fi network. This process may take a few moments.
- Once the connection is established, you’ll see a confirmation message in the Ring app indicating that your doorbell is now connected to your Wi-Fi network.
It’s important to ensure that your Ring Doorbell is within range of your Wi-Fi network for a stable and reliable connection. If you’re experiencing connectivity issues, consider moving your Wi-Fi router closer to the doorbell or using Wi-Fi range extenders to boost the signal strength.
After connecting your Ring Doorbell to your Wi-Fi network, the app will give you the option to perform a firmware update if one is available. It’s recommended to keep your doorbell’s firmware up to date to ensure optimal performance and access to the latest features and improvements.
With the Ring Doorbell successfully connected to your Wi-Fi network, you can now enjoy the convenience of remote access and control. In the next step, we will guide you through customizing your settings and notifications to suit your preferences and needs.
Step 9: Customize your settings and notifications
Customizing your settings and notifications for your Ring WiFi-Enabled Video Doorbell allows you to tailor the device to your specific preferences and needs. By personalizing these options, you can optimize the functionality of your doorbell and ensure that you receive relevant and timely notifications. Follow these steps to customize your settings and notifications:
- Open the Ring app on your smartphone or tablet and log in to your Ring account.
- Select your Ring Doorbell from the list of devices.
- Tap on “Device Settings” or a similar option to access the settings for your Ring Doorbell.
- Explore the various options available in the settings menu. Some of the key settings you may want to customize include:
- Motion Settings: Adjust the motion detection sensitivity and define specific motion zones to minimize false alerts.
- Video Settings: Customize the video quality and enable or disable features such as night vision.
- Live View Settings: Configure the settings related to the live video streaming feature, such as enabling or disabling audio.
- Notification Settings: Choose the types of notifications you want to receive, such as motion alerts or doorbell rings, and set their frequency.
- Chime Settings: Control the settings for your Ring Chime or other compatible devices, including volume and tone.
- Make adjustments to these settings based on your preferences. You can experiment with different settings to find the perfect balance between security and convenience.
- Once you have customized your settings, tap on “Save” or “Apply” to save the changes.
Customizing your settings allows you to fine-tune the performance of your Ring Doorbell to fit your unique requirements. By adjusting the motion sensitivity and defining motion zones, you can reduce false alerts and ensure that you only receive notifications for important events. Furthermore, configuring the video and live view settings ensures that you have the best visual experience when accessing your doorbell’s video feed.
Take your time to explore the various settings available in the app and experiment with different configurations until you find what works best for you. This customization process allows you to tailor your Ring Doorbell experience to your liking, providing you with peace of mind and convenience.
With your settings and notifications customized, you’re now ready to move on to the final step: testing the doorbell and adjusting the motion settings. In the next step, we will guide you through these important tasks to ensure smooth operation and optimal performance of your Ring Doorbell.
Step 10: Test the doorbell and adjust the motion settings
Testing your Ring WiFi-Enabled Video Doorbell and adjusting the motion settings are crucial final steps to ensure that your doorbell is functioning properly and providing accurate notifications. By conducting a test and fine-tuning the motion detection settings, you can optimize the performance of your doorbell. Follow these steps to test your doorbell and adjust the motion settings:
- Position yourself outside your front door or in the area where your Ring Doorbell is installed.
- Press the doorbell button or trigger the motion sensor, depending on your desired test scenario.
- Monitor the Ring app on your smartphone or tablet to see if you receive a notification and whether the live video feed is activated.
- Check the quality of the video feed, the clarity of audio, and the overall performance of the doorbell.
- If the doorbell is not capturing motion or providing notifications as expected, return to the app’s settings and make adjustments to the motion sensitivity and motion detection zones.
- Start by slightly increasing or decreasing the motion sensitivity to see if it improves the doorbell’s performance.
- Experiment with adjusting the motion detection zones to fine-tune the areas where you want the motion sensor to be most active.
- Perform another test by triggering the motion sensor or pressing the doorbell button to see if the changes you made have improved the performance of your doorbell.
By testing your doorbell and refining the motion settings, you can ensure that it is accurately detecting and notifying you of relevant events. Adjusting the motion sensitivity and detection zones allows you to minimize false alerts caused by unrelated movements and focus on recording and capturing events that truly matter.
Keep in mind that finding the optimal motion settings may take some trial and error. It’s recommended to test your doorbell in different scenarios and adjust the settings accordingly until you achieve the desired performance.
With your Ring Doorbell successfully tested and the motion settings adjusted, you’re now ready to fully enjoy the benefits of your newly installed doorbell. Whether it’s monitoring package deliveries, ensuring the safety of your home, or simply enhancing your convenience, the Ring WiFi-Enabled Video Doorbell provides peace of mind and security at your fingertips.
Conclusion
Congratulations! You have successfully installed and set up your Ring WiFi-Enabled Video Doorbell. This advanced home security device not only provides you with convenience but also enhances the safety and security of your home.
Throughout this guide, we have covered the step-by-step process of installing the Ring Doorbell, from gathering the necessary tools and materials to customizing your settings and notifications. By following these instructions, you have ensured that your doorbell is properly installed and optimized for optimal performance.
With your Ring Doorbell in place, you can now monitor and interact with visitors at your front door from anywhere. The real-time video and two-way audio communication feature allows you to see and speak to visitors even when you’re not home. This is particularly useful for package deliveries and deterring potential burglars.
The motion detection capabilities of the doorbell provide an added layer of security. With the ability to customize motion sensitivity and detection zones, you can minimize false alerts and receive notifications only when it truly matters.
The Ring app empowers you to control and manage your doorbell easily. From adjusting settings to viewing live video feeds and recorded events, the app ensures a seamless user experience and puts you in control.
Remember to periodically check for firmware updates for your Ring Doorbell. Keeping your device updated ensures that you have access to the latest features, improvements, and security enhancements.
We hope that this installation guide has been helpful in setting up your Ring WiFi-Enabled Video Doorbell. Enjoy the peace of mind and convenience that this innovative device brings to your home security. Should you have any further questions or need assistance, refer to the Ring app or reach out to Ring’s customer support.
Stay connected, stay secure with your new Ring Doorbell!