Introduction
Replacing the charging port cover on your Xperia Z3V can be a straightforward and cost-effective solution to restore the functionality and aesthetics of your device. Over time, the charging port cover may wear out or become damaged, compromising the device's water resistance and overall appearance. By following this DIY guide, you can easily replace the charging port cover without the need for professional assistance, saving time and money.
This comprehensive guide will walk you through the step-by-step process of removing the old charging port cover, installing the new one, and testing its functionality. With the right tools and materials, you can successfully complete this repair, ensuring that your Xperia Z3V remains protected against dust, debris, and water ingress.
Whether you're an experienced DIY enthusiast or a novice looking to take on a new challenge, this guide is designed to provide clear and concise instructions, empowering you to tackle the task with confidence. By taking the initiative to replace the charging port cover on your Xperia Z3V, you can prolong the lifespan of your device and maintain its original quality.
Now, let's gather the necessary tools and materials before diving into the step-by-step process of replacing the charging port cover on your Xperia Z3V.
Tools and Materials Needed
Before embarking on the process of replacing the charging port cover on your Xperia Z3V, it's essential to gather the necessary tools and materials to ensure a smooth and efficient repair. Here's a comprehensive list of items you'll need for this DIY project:
Tools:
- Small Phillips head screwdriver: This tool is essential for removing the screws securing the back cover of your Xperia Z3V. Ensure that the screwdriver is compatible with small screws to avoid damaging them during the removal process.
- Plastic opening tool or spudger: Use this tool to carefully pry open the back cover of your device without causing any damage. Opt for a plastic opening tool to minimize the risk of scratching or denting the device's exterior.
- Tweezers: Precision tweezers will come in handy for handling small components and connectors during the repair process. They allow for delicate maneuvering and placement of parts, ensuring a secure and accurate fit.
- Replacement charging port cover: Acquire a high-quality replacement charging port cover specifically designed for the Xperia Z3V. Ensure that the new cover is compatible with your device model to guarantee a proper fit and functionality.
Materials:
- Clean, well-lit workspace: Set up a dedicated workspace with ample lighting to carry out the repair. A clean and organized environment will help prevent misplacement of small components and facilitate a focused repair process.
- Soft cloth or microfiber towel: Keep a soft cloth or microfiber towel on hand to gently clean the exterior of your Xperia Z3V before and after the repair. This will help remove any dust, fingerprints, or debris, ensuring a pristine finish.
- Adhesive (optional): Depending on the replacement charging port cover, you may require adhesive to secure it in place. Check the replacement cover's specifications to determine if adhesive is necessary for installation.
By ensuring that you have the aforementioned tools and materials ready, you'll be well-prepared to proceed with the subsequent steps of removing the old charging port cover and installing the new one. With these essentials at your disposal, you can approach the repair process with confidence and precision, ultimately rejuvenating your Xperia Z3V's charging port cover with ease.
Step 1: Removing the Old Charging Port Cover
To begin the process of replacing the charging port cover on your Xperia Z3V, it is crucial to carefully remove the old cover without causing damage to the device. Follow these detailed steps to ensure a smooth and successful removal:
-
Power Off and Prepare Workspace: Start by powering off your Xperia Z3V to prevent any electrical mishaps during the repair. Set up a clean and well-lit workspace, free from any potential obstructions, to provide ample room for maneuvering the device.
-
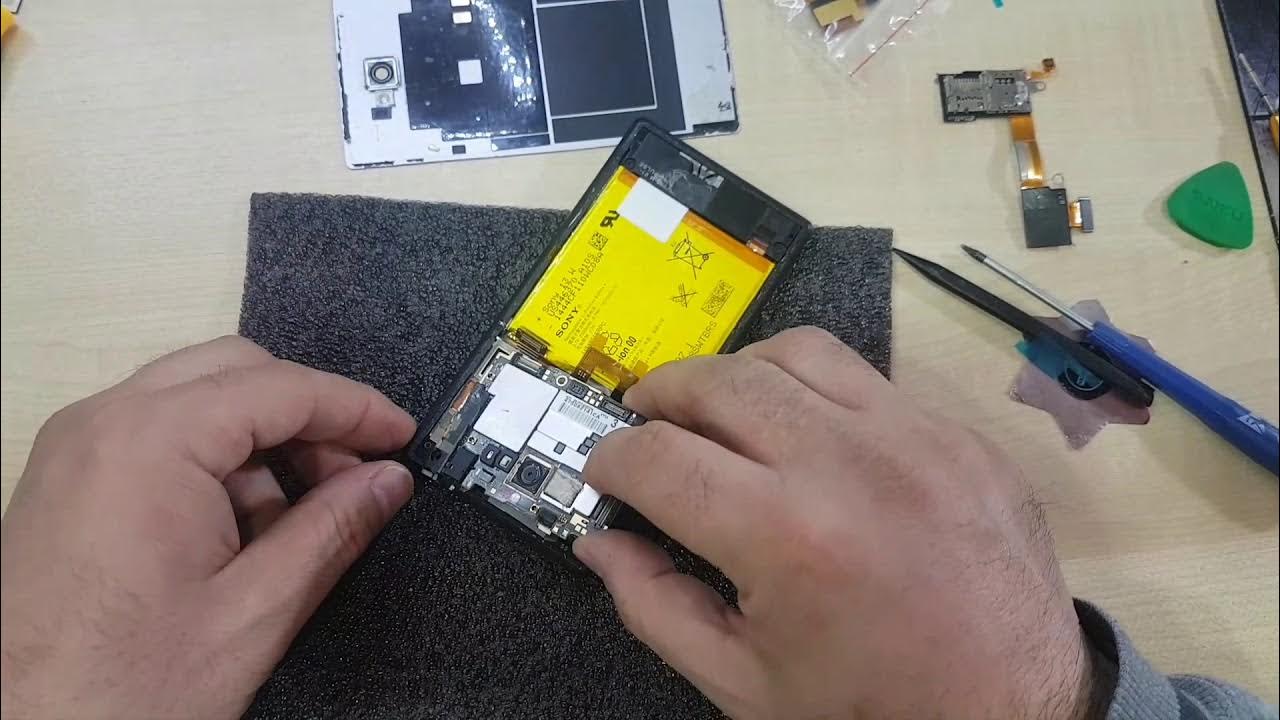
Remove Back Cover: Using a small Phillips head screwdriver, carefully unscrew the screws securing the back cover of your Xperia Z3V. Place the screws in a secure location to prevent misplacement. Once the screws are removed, gently pry open the back cover using a plastic opening tool or spudger. Exercise caution to avoid applying excessive force, as this may cause damage to the cover or the device's interior components.
-
Locate the Charging Port Cover: With the back cover removed, locate the existing charging port cover on your Xperia Z3V. It is typically positioned near the bottom edge of the device, adjacent to the charging port itself.
-
Detach the Old Cover: Depending on the design of the charging port cover, it may be secured in place by clips or adhesive. Carefully detach the old cover by applying gentle pressure and leveraging the plastic opening tool or spudger as needed. Take your time to avoid any abrupt movements that could potentially damage the device's exterior.
-
Disconnect Any Cables (If Applicable): In some cases, the charging port cover may be connected to the device via a small cable. If this is the case, delicately disconnect the cable from the device's internal connector, ensuring that no excessive force is applied. Use tweezers if necessary to facilitate a precise and controlled disconnection.
By meticulously following these steps, you can safely remove the old charging port cover from your Xperia Z3V, setting the stage for the subsequent installation of the new cover. Taking a methodical and patient approach during this phase of the repair process is essential to preserve the integrity of your device and prepare it for the installation of the replacement charging port cover.
Step 2: Installing the New Charging Port Cover
With the old charging port cover successfully removed from your Xperia Z3V, it's time to proceed with the installation of the new cover. This pivotal step in the repair process requires precision and attention to detail to ensure a seamless fit and optimal functionality. Follow these comprehensive guidelines to effectively install the new charging port cover:
-
Inspect the Replacement Cover: Before proceeding with the installation, carefully examine the replacement charging port cover to verify its compatibility with your Xperia Z3V. Ensure that the design, dimensions, and connector alignment align with the original specifications to guarantee a proper fit.
-
Reconnect Any Cables (If Applicable): If the new charging port cover comes with a pre-attached cable, delicately reconnect it to the device's internal connector. Exercise caution to align the connector properly and apply gentle pressure to secure the connection without causing any damage.
-
Align and Position the New Cover: Place the new charging port cover in the designated position on your Xperia Z3V, ensuring that it aligns perfectly with the corresponding port and surrounding contours. Take your time to position the cover accurately, as a precise fit is essential for maintaining the device's water resistance and aesthetic appeal.
-
Secure the Cover in Place: Depending on the design of the replacement cover, it may feature clips or adhesive for secure attachment. If adhesive is required, apply it sparingly and precisely to the designated areas on the cover, following the manufacturer's recommendations. If the cover utilizes clips, gently press it into position, ensuring that each clip engages securely without excessive force.
-
Test the Cover's Functionality: Once the new charging port cover is securely installed, perform a brief functionality test to ensure that it operates as intended. Open and close the cover several times to verify smooth movement and secure closure. Additionally, connect a charging cable to the port to confirm that the cover does not obstruct the connection and maintains a snug seal when closed.
By meticulously following these steps, you can effectively install the new charging port cover on your Xperia Z3V, rejuvenating the device's appearance and safeguarding its internal components. With careful attention to detail and a methodical approach, you can complete this crucial phase of the repair with confidence, setting the stage for the final testing and assessment of the new cover's functionality.
Step 3: Testing the New Charging Port Cover
After successfully installing the new charging port cover on your Xperia Z3V, it is imperative to conduct a comprehensive testing process to ensure that the cover functions optimally and meets the device's operational requirements. This critical step allows you to verify the cover's ability to maintain water resistance, facilitate seamless charging, and provide reliable protection for the charging port. Follow these detailed testing procedures to validate the performance of the new charging port cover:
-
Water Resistance Test: To assess the effectiveness of the new charging port cover in preserving the device's water resistance, carefully expose the Xperia Z3V to a controlled water environment. Submerge the device in a shallow container of water for a brief duration, ensuring that the charging port cover is securely closed. After removing the device from the water, thoroughly inspect the interior and charging port area for any signs of water ingress. If the interior remains dry and free from moisture, it indicates that the new cover effectively maintains the device's water resistance.
-
Charging Cable Compatibility: Connect a compatible charging cable to the device's port with the new cover in the closed position. Verify that the cable securely engages with the port and establishes a stable connection for charging. Additionally, observe the cover's ability to accommodate the charging cable without hindrance, ensuring that it does not impede the connection or create any instability during the charging process.
-
Cover Closure and Seal Assessment: Open and close the new charging port cover multiple times to evaluate its functionality and durability. Confirm that the cover opens smoothly without resistance and securely latches into the closed position without any signs of looseness. Pay close attention to the seal formed when the cover is closed, ensuring that it maintains a tight and reliable barrier against dust, debris, and moisture.
-
Visual Inspection and Aesthetic Evaluation: Carefully examine the exterior of the device to assess the visual integration of the new charging port cover. Verify that the cover aligns seamlessly with the device's design and contours, maintaining a cohesive and aesthetically pleasing appearance. Additionally, inspect the cover for any signs of damage, misalignment, or irregularities that may affect its functionality or visual appeal.
By meticulously conducting these testing procedures, you can confidently validate the performance and functionality of the new charging port cover on your Xperia Z3V. This comprehensive assessment ensures that the cover meets the device's operational standards, providing reliable protection and preserving the overall integrity of your Xperia Z3V. With the successful completion of the testing phase, you can rest assured that the new charging port cover effectively restores the device's functionality and appearance, allowing you to enjoy a rejuvenated Xperia Z3V experience.
Conclusion
In conclusion, successfully replacing the charging port cover on your Xperia Z3V is a rewarding accomplishment that not only restores the device's functionality and aesthetics but also prolongs its overall lifespan. By following this comprehensive DIY guide, you have taken a proactive approach to address a common issue faced by Xperia Z3V users, demonstrating your ability to undertake practical repairs with confidence and precision.
Throughout the repair process, you have acquired valuable insights into the intricate components and mechanisms of your device, fostering a deeper understanding of its internal structure and assembly. This hands-on experience not only empowers you to address charging port cover issues but also instills a sense of ownership and familiarity with your Xperia Z3V, strengthening your connection to the device.
Furthermore, the meticulous attention to detail and methodical approach demonstrated during the removal, installation, and testing phases reflects your commitment to maintaining the highest standards of quality and functionality for your Xperia Z3V. By prioritizing the proper handling and installation of the new charging port cover, you have safeguarded the device against potential damage, ensuring its continued reliability and performance.
As you reflect on the successful completion of this DIY repair, you can take pride in the fact that you have effectively revitalized your Xperia Z3V, enhancing its resilience against environmental elements and preserving its visual appeal. The seamless integration of the new charging port cover not only reinforces the device's water resistance but also contributes to its overall durability and longevity.
Moving forward, the knowledge and skills gained from this repair experience can serve as a foundation for future DIY endeavors, empowering you to tackle similar challenges with confidence and proficiency. Whether it involves device maintenance, repairs, or enhancements, your newfound expertise positions you as a capable and resourceful custodian of your Xperia Z3V, capable of preserving its functionality and appearance for years to come.
In essence, the successful replacement of the charging port cover exemplifies your dedication to maintaining the optimal condition of your Xperia Z3V, underscoring your ability to overcome technical obstacles and uphold the device's performance standards. By embracing the DIY spirit and taking proactive measures to address device-related concerns, you have not only revitalized your Xperia Z3V but also cultivated a sense of empowerment and self-reliance in managing its maintenance and care.