Introduction
Venmo has become a popular mobile payment service that allows users to easily send and receive money from friends and family. However, there may be times when you need to cancel a Venmo payment for various reasons. Whether you sent the payment to the wrong person, made an incorrect transaction, or simply changed your mind, knowing how to cancel a Venmo payment can save you from potential headaches.
Canceling a payment on Venmo is generally a straightforward process, but it’s crucial to understand the steps involved and any limitations that may apply. This article will guide you through the process of canceling a Venmo payment and provide some best practices to ensure a smooth experience.
In the following sections, we’ll explore the reasons why you may need to cancel a Venmo payment, the steps to cancel a payment, and how to refund a payment request. Additionally, we’ll share some best practices to help you avoid common pitfalls and make the process as seamless as possible.
So, whether you accidentally sent money to the wrong person or need to reverse a transaction for any other reason, read on to learn how to cancel a Venmo payment effectively.
Reasons for Canceling a Venmo Payment
There are several reasons why you might find yourself needing to cancel a Venmo payment. Understanding these reasons can help you identify when it is necessary to take action and initiate the cancellation process.
One common scenario is sending a payment to the wrong person. It’s easy to make a mistake, especially if you have multiple contacts with similar names or if the recipient’s username is difficult to distinguish. In such cases, canceling the payment promptly can save you from potential financial loss and ensure that the intended recipient receives the funds.
Another reason for canceling a Venmo payment is if you realize that you made an incorrect transaction. Perhaps you entered the wrong amount, selected the wrong payment purpose, or accidentally sent the payment to the wrong merchant. It’s crucial to rectify these mistakes as soon as possible to avoid any complications and ensure that your finances are accurately reflected.
Additionally, you may find yourself needing to cancel a Venmo payment due to a change of plans or a change of mind. Perhaps you made a purchase or paid for a service but then decided to cancel or return it. In such cases, canceling the Venmo payment allows you to reverse the transaction and recover the funds.
Lastly, unforeseen circumstances can also warrant canceling a Venmo payment. For example, if a seller fails to deliver a promised item or service, you may choose to cancel the payment to protect yourself from any potential fraud or dispute. It’s important to exercise caution in these situations and act promptly to safeguard your finances.
Overall, there are various reasons why canceling a Venmo payment may be necessary, ranging from simple human error to changing circumstances. By being aware of these potential situations, you can promptly take appropriate action to cancel the payment and mitigate any potential issues.
How to Cancel a Venmo Payment
Canceling a Venmo payment is a relatively straightforward process, but it’s essential to act quickly to increase the chances of successfully stopping the transaction. Here’s a step-by-step guide on how to cancel a Venmo payment:
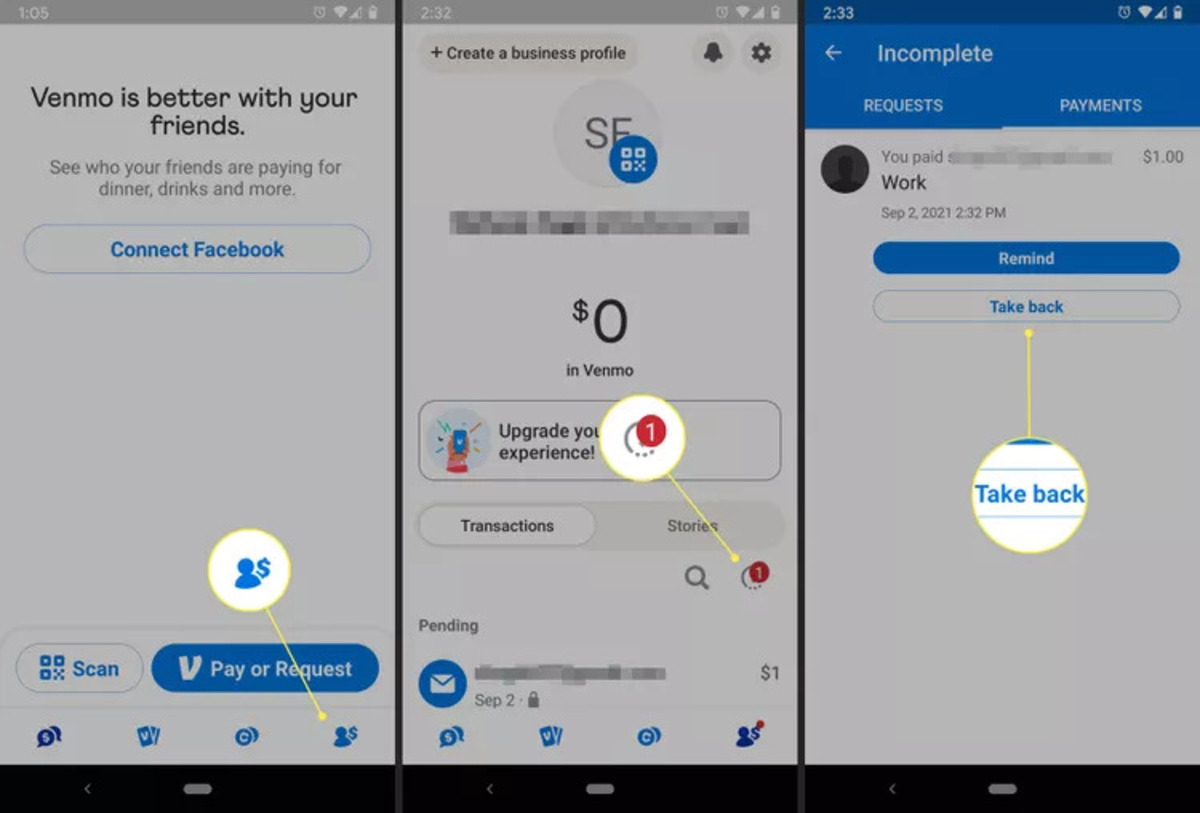
1. Open the Venmo app: Launch the Venmo mobile app on your smartphone. If you don’t have it installed, you can download it from the App Store for iOS or Google Play Store for Android.
2. Navigate to the payment: Locate the payment you want to cancel. You can access your payment history by tapping on the “☰” menu icon in the top left corner of the app and selecting “Payments” from the menu.
3. Select the payment: Once you are in the Payments section, find the specific payment you wish to cancel. Tap on it to view its details and transaction history.
4. Access the payment options: Within the payment details screen, you will find options related to the payment. Look for the “Cancel Payment” option and tap on it. Note that this option is only available for a limited time after sending the payment, typically within 24 hours.
5. Confirm the cancellation: After tapping on the “Cancel Payment” option, you will be prompted to confirm your decision. Review the details of the payment once more to ensure it is the correct transaction that you want to cancel, and then confirm the cancellation.
6. Verify the cancellation: Once you’ve confirmed the cancellation, Venmo will display a confirmation message informing you that the payment has been canceled successfully. It’s recommended to take a screenshot or note down the cancellation confirmation for your records.
7. Contact Venmo support (if needed): In some cases, if you encounter any issues or are unable to cancel the payment through the app, you can reach out to Venmo support for assistance. They can provide further guidance and help resolve any payment-related concerns.
Remember, canceling a Venmo payment is time-sensitive, so it’s crucial to act quickly. If the payment has already been claimed by the recipient before you cancel it, you may need to request a refund from them directly.
By following these steps, you can effectively cancel a Venmo payment and ensure that the funds are returned to your account or redirected to the intended recipient.
Canceling a Payment Request
In addition to canceling a payment you have sent, Venmo also allows you to cancel a payment request that you have made. Canceling a payment request can be useful if you no longer need the funds or if there has been a change in circumstances. Here’s how you can cancel a payment request in Venmo:
1. Open the Venmo app: Launch the Venmo mobile app on your smartphone and log in to your account.
2. Access the payment requests: Navigate to the “☰” menu icon in the top left corner of the app and select “Payments” from the menu.
3. Locate the payment request: Within the Payments section, find the specific payment request that you want to cancel. Tap on it to view its details and options.
4. Cancel the request: Once you are on the payment request details screen, look for the option to cancel the request. It is usually labeled as “Cancel Request” or something similar. Tap on that option to initiate the cancellation process.
5. Confirm the cancellation: Venmo will prompt you to confirm your decision to cancel the payment request. Review the details of the request once more to ensure it is the correct one that you want to cancel, and then confirm the cancellation.
6. Verify the cancellation: After confirming the cancellation, Venmo will display a confirmation message indicating that the payment request has been successfully canceled.
It’s important to note that canceling a payment request does not automatically refund any funds that have already been paid by other users. If someone has already sent you money in response to the payment request, you will need to initiate a separate refund transaction to return the funds.
Canceling a payment request in Venmo is a straightforward process that allows you to manage your requests and avoid any confusion or unnecessary transactions. By following these steps, you can effectively cancel a payment request and update your Venmo account accordingly.
The Process of Refunding a Venmo Payment
There may be situations where you need to refund a Venmo payment that you have received. Whether it’s due to a canceled order, a returned item, or any other reason, Venmo provides a straightforward process for issuing refunds. Here is a step-by-step guide on how to refund a Venmo payment:
1. Open the Venmo app: Launch the Venmo mobile app on your smartphone and log in to your account.
2. Access the payment details: Navigate to the “☰” menu icon in the top left corner of the app and select “Payments” from the menu.
3. Find the payment: Locate the specific payment that you want to refund in the Payments section. Tap on it to view its details and transaction history.
4. Initiate the refund: Within the payment details screen, look for the “Refund” option and tap on it. This option is typically available if the payment was received within the last 120 days.
5. Enter the refund details: Venmo will prompt you to enter the refund amount. Specify the exact amount that you want to refund to the sender. You can also include a note or reason for the refund if necessary.
6. Confirm the refund: Review the refund details one last time to ensure accuracy. Tap on the “Confirm” button to initiate the refund process.
7. Notify the sender (optional): While not mandatory, it is often helpful to communicate with the sender to inform them about the refund. You can use Venmo’s messaging feature or any other means of communication to provide them with an update.
8. Complete the refund: Venmo will process the refund, and the funds will be returned to the sender’s Venmo account. The sender will receive a notification confirming the refund.
Remember, if you are unable to refund the payment through the Venmo app for any reason, you can reach out to Venmo support for further assistance. They can guide you through the process and help resolve any issues that may arise during the refund process.
By following these steps, you can effectively refund a Venmo payment and maintain good communication with the sender. Refunding payments promptly and accurately contributes to a positive user experience and fosters trust between Venmo users.
Best Practices for Canceling Venmo Payments
Canceling a Venmo payment can be a smooth process if you follow some best practices. These practices can help you avoid potential complications and ensure a seamless experience. Here are some recommendations for canceling Venmo payments:
1. Act promptly: Time is of the essence when canceling a Venmo payment. The longer you wait, the higher the chances that the recipient may have already claimed the funds. Therefore, it’s crucial to initiate the cancellation process as soon as you realize the need to cancel the payment.
2. Double-check the details: Before canceling a payment, thoroughly review the payment details to ensure that you are canceling the correct transaction. Verify the recipient’s username or email address, the payment amount, and any additional notes or descriptions associated with the payment.
3. Check payment status: Understand the status of the payment before attempting to cancel it. If the payment is still pending, you can typically cancel it without any complications. However, if the payment has already cleared or been claimed by the recipient, you may need to initiate a refund request instead.
4. Communicate with the recipient (if necessary): If you’ve sent a payment to the wrong person or made an incorrect transaction, it can be helpful to reach out to the recipient via Venmo messaging or another communication method. Explain the situation and kindly request a refund, if applicable. Clear communication can facilitate the return of funds and resolve any misunderstandings.
5. Follow up on canceled payments: After canceling a Venmo payment, it’s a good practice to monitor your account and ensure that the payment is reflected accurately. Check your transaction history to confirm that the canceled payment no longer appears, and the funds are either returned to your account or redirected to the intended recipient.
6. Keep records: Take screenshots or note down the cancellation confirmation for your records. Having documentation of the canceled payment can serve as proof if any issues arise in the future or if you need to reference the cancellation details.
7. Stay vigilant with payment requests: If you receive a payment request on Venmo, ensure its legitimacy before accepting and transferring the funds. Verify the sender’s identity and the purpose of the payment to prevent potential scams or fraudulent requests. If you suspect a fraudulent request, report it to Venmo support immediately.
By following these best practices, you can effectively navigate the process of canceling Venmo payments and minimize any potential complications or misunderstandings. Act promptly, double-check details, maintain clear communication, and stay diligent to ensure a smooth cancellation experience.
Conclusion
Canceling a Venmo payment can be necessary for various reasons, such as sending money to the wrong person, making an incorrect transaction, or changing your mind about a payment. Understanding the process and best practices for canceling Venmo payments is essential to ensure a smooth experience and prevent any financial complications.
In this article, we explored the reasons why you might need to cancel a Venmo payment, such as human error, changing circumstances, or unforeseen events. We also provided a step-by-step guide on how to cancel a Venmo payment, including canceling a payment request and refunding a payment that you received.
Additionally, we discussed some best practices to follow when canceling Venmo payments. Acting promptly, double-checking the details, communicating with the recipient when necessary, and keeping records are all important practices to ensure a successful cancellation process.
Remember to always review the payment status and timeframe for canceling a payment to maximize your chances of success. If you encounter any difficulties or have further questions, don’t hesitate to reach out to Venmo support for assistance.
By following these guidelines and leveraging the features and functions of the Venmo app, you can confidently navigate the process of canceling Venmo payments and manage your finances effectively.