There are times that you’d think of something random and you will feel the need to jot it down on paper. It may be because you don’t want to lose that thought or you want to be reminded of it later. Fortunately, there are available apps today that would help you create and organize notes. However, you have to familiarize yourself first with its functions. Using an app for the first time would make you feel a little lost sometimes, so make the most out of it with this Evernote tutorial.
What is Evernote?
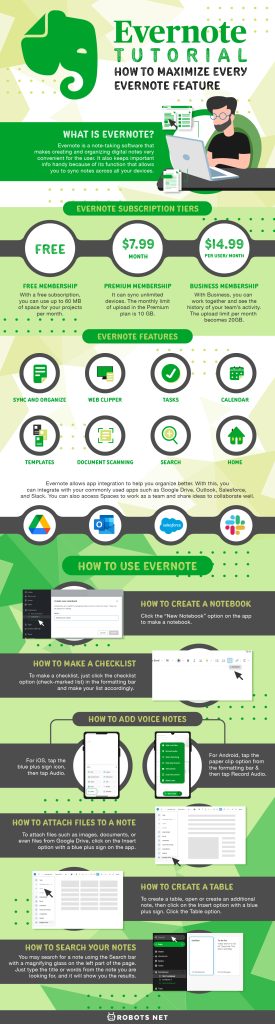
Evernote is a note-taking software that makes creating and organizing digital notes very convenient for the user. It also keeps important info handy because of its function that allows you to sync notes across all your devices. Aside from being able to add text, Evernote can also add images, audio, and even documents to a note. This feature makes it a great tool to have your notes in your way. It can help you sort your projects for school or even for work, and manage your day-to-day activities. With Evernote, you could only worry about how to do tasks rather than what tasks you need to do.
Evernote is also a superb app as it can be accessed using different kinds of devices such as iOs, Android, Mac, Windows, and on the web. You can also have access to your notes offline and have more storage features. However, it is only available for those who paid for a subscription.
Evernote Subscription Tiers
Aside from learning the amazing features of the app, part of the Evernote tutorial is knowing which functions you can access or avail of. There are specific features available exclusively for a certain type of membership. Of course, you would be getting more if you upgrade your plan and pay a monthly or yearly subscription. But before doing that, you might first want to try the subscription that won’t cost you any amount of money. If you find the free membership insufficient for your needs, you may get the paid membership and pick the one you think is best suited for you.
There are three types of membership in Evernote: Free, Premium, and Business. These three have common functions, but the paid plans offer more benefits than free membership. The more you pay, the more exceptional features you’ll be able to unlock.
Free Membership
What better way to enjoy an app than to experience it for free? This subscription wouldn’t cost you anything but the time since there are a lot of features available to spend your time on. With a free subscription, you can use up to 60 MB of space for your projects per month. You can also sync across two devices, clip web pages as well as images and PDF files. Searching for specific text within images is also possible with the free tier.
You can also share notes with anyone if you allow them, and a passcode lock may be added to your mobile app if you want to feel a little secure. Accessing notebooks offline is also available from the desktop app, and community support is also available for free accounts. These features may be limited, but it’s still good enough for those who don’t want to spend money.
Premium Membership
Everyone would be out of business if everything is free. This type of subscription has more functions and storage compared to the free subscription. The Premium membership can offer all the functions of the Basic membership, but it does more in most aspects. It can sync unlimited devices compared to two of the Basic, and it can also access notes offline across all devices. You can also annotate PDF files and search text inside documents.
The monthly limit of upload in the Premium plan is 10 GB compared to 60 MB of the Basic. You can also create custom templates as well as scan and digitize business cards. There is a discount for a year’s subscription available for the students who want to use Evernote Premium.
Business Membership
The subscription that has the best features is the Business tier. This offers everything that the other types of subscriptions do, but more and better. With Business, you can work together and see the history of your team’s activity. In Evernote Business, the upload limit per month becomes 20GB compared to the 10GB of Evernote Premium with an additional 2GB per user.
Managing team and data access is also easier as this offers centralized account administration. This subscription has also unveiled its additional feature -Spaces. This feature allows users to share and collaborate easily. You can also log in conveniently with a single sign-on and most importantly, you will receive priority business support.
Evernote Features

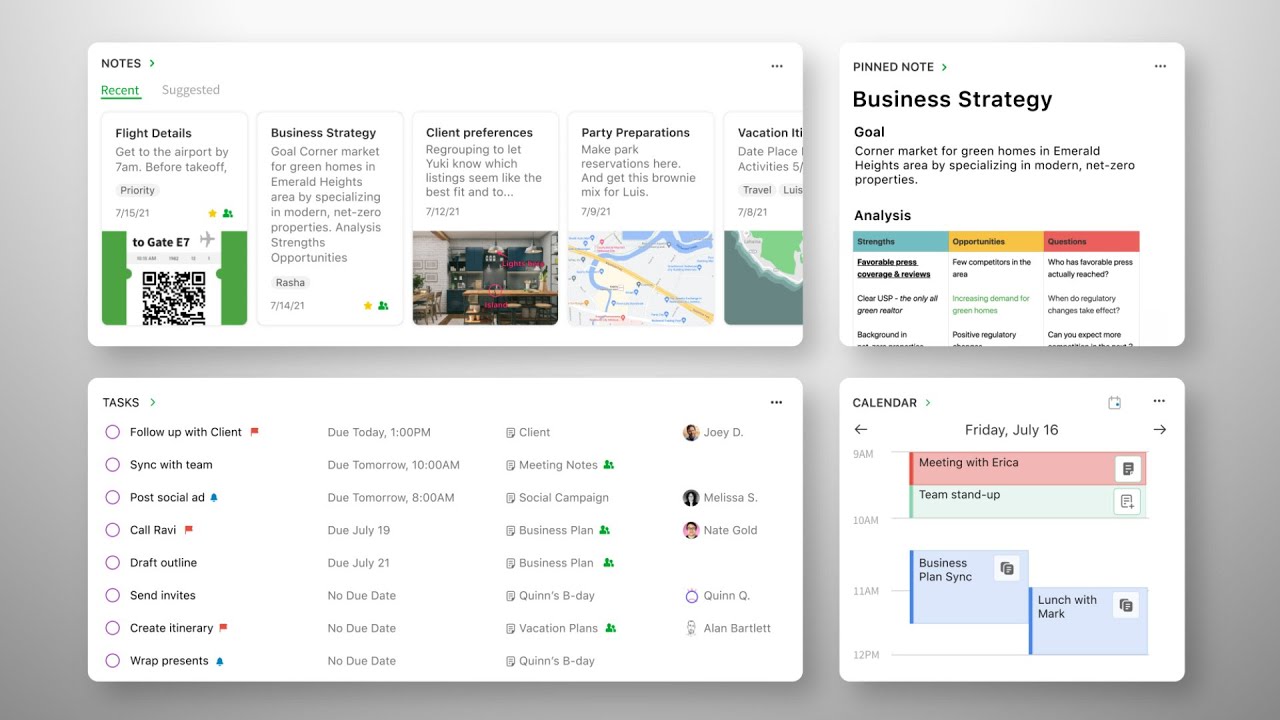
The Evernote tutorial would not be essential without identifying the core features that you can explore. With Evernote, you can sync and organize your devices to provide easy access. There is also a web clipper that can save web pages or clip useful information by saving a full-page screen or just a portion of the page. Templates are also available and are also customizable, depending on your preferences.
Was it mentioned that you can search for handwriting as well? Evernote can also recognize handwriting and find it from your notes. Searching for PDF and document files is one of Evernote’s features also, where it lets you search for text in any document files instantly. Also, this note-taking software allows you to scan documents anywhere you are.
Evernote allows app integration to help you organize better. With this, you can integrate with your commonly used apps such as Google Drive, Outlook, Salesforce, and Slack. You can also access Spaces to work as a team and share ideas to collaborate well.
Please note that some of the mentioned features may or may not be available in a specific Evernote plan and device. Now, let’s proceed with the how-tos in this Evernote tutorial to find out how you can maximize all its features.
How to Use Evernote
In this Evernote tutorial, we’ll teach you everything you need to know about the basics. Once you get the hang of it, you can reap the benefits of one of the best productivity apps available.
How to Create a Notebook
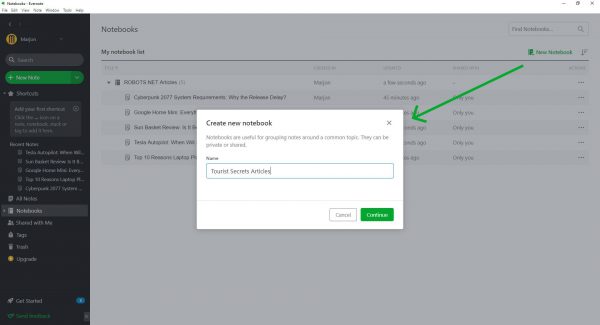
Notebooks in Evernote is like a folder used to organize notes according to category or purpose. It would be easier to view notes if you will cluster them, so creating a notebook would help you be efficient.
Click the “New Notebook” option on the app’s top-right corner to make a notebook. You may rename it whatever you want based on the notes you’re going to put in that notebook. You can make it private or available to other users. You can further organize your notebooks with Stacks, which is only available in downloaded Evernote apps. This allows users to group many notebooks in one pile.
How to Make a Checklist
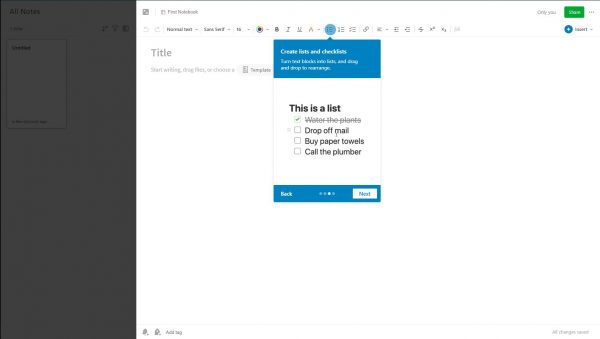
Some notes don’t just need to be taken down, but also to be marked as done. This is most common in to-do lists and also in some people’s grocery lists. Checklists allow you to mark items from your notes as complete using the checkboxes.
To make a checklist, just click the checklist option (check-marked list) in the formatting bar and make your list accordingly. You can also turn bulleted, numbered, or simply a group of items into a checklist. You can do this by highlighting the list and clicking the checklist option in the formatting bar. You can even customize sections like changing colors and fonts according to your preference.
How to Add Voice Notes
If you’re not in the mood for typing or are still trying to regain your strength because you had an all-nighter, voice notes are good for you. Unfortunately, you cannot record an audio note with the new Evernote for Windows and Mac as it is not yet available. To add an audio note using iOS and Android, open an existing note or create a new one. For iOS, tap the blue plus sign icon, then tap Audio. For Android, tap the paper clip option from the formatting bar and then tap Record Audio. Tap the stop option then save after you’re done with your audio reminder.
Recording audio may be faster than typing, but Evernote cannot convert audio recordings into text. This makes it impossible to search for a word in the recorded file. Fortunately, ome devices have speech-to-text features that you can use if you wish to dictate text notes into the Evernote app.
How to Attach files to a Note
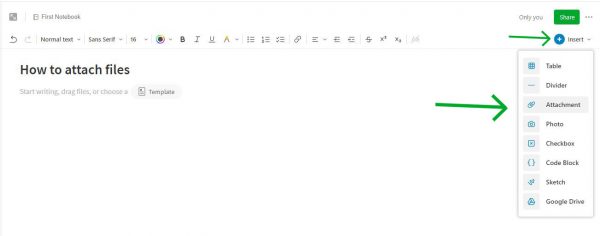
Some notes are better with the attached documents for reference. Others attach an image to make their notes visually appealing. Some students take photos of the writings on the board, which they want to attach to their notes to make it more convenient. Whatever the reason it may be, some notes are more useful and better with some attachments.
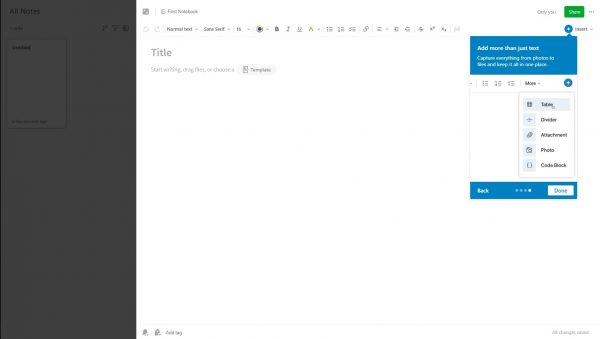
To attach files such as images, documents, or even files from Google Drive, click on the Insert option with a blue plus sign on the upper right part. The options will appear below, so click which kind of file you want to attach.
How to Create a Table
Tables can be very useful, especially when you’re trying to organize the data in your notes. While you can add a table in your notes, you cannot format the table where you put formulas or other advanced functions like what a spreadsheet does. The only customizable things on the table are the color, size, and border.
To create a table, open or create an additional note, then click on the Insert option with a blue plus sign on the upper right part. Click the Table option. Creating a table is not available on Android devices and the older version of Evernote for iOS, so make sure that you have the right version before you start complaining.
How to Scan Documents With Evernote
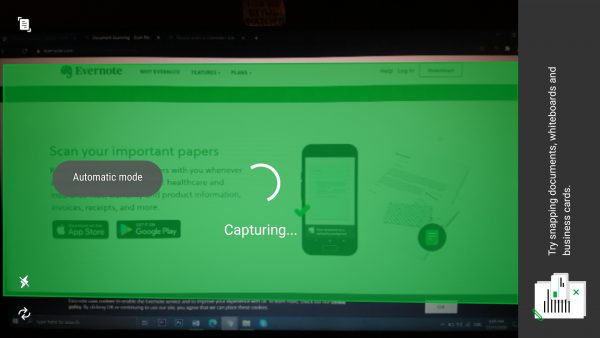
It is very important to keep your important papers with you because you wouldn’t know when you’ll need them. This Evernote tutorial also covers the steps to keep your documents with you anytime and anywhere by scanning them. To scan documents, open an existing note, or create another one. Next, launch the in-app camera. You can choose from either manual or automatic mode when scanning. Using automatic mode, hold it steadily over the document or card to have visible edges of the document within the frame. In manual mode, you can scan documents and tap the capture button once you’ve fitted the necessary details in the frame.
With Evernote Premium or Business, you can have an additional feature. This plan allows you to scan business cards and turn them into individual contact notes. The information from the scanned business card will be saved and searchable. This means that the name, title, or company name stated in the business card will be easier to look for so you wouldn’t need to worry.
How to Search Your Notes
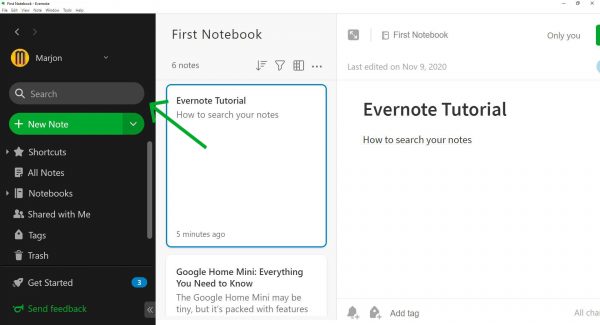
Some people can lose or misplace notes on a different notebook. This often happens when you have a lot of notes and weren’t able to organize it well. You may search for a note using the Search bar with a magnifying glass on the left part of the page. Just type the title or words from the note you are looking for, and it will show you the results.
There are also additional search features available in the recent version. Those features are Search suggestions, Search filters, Fuzzy matches, and Saved searches. The search suggestions would as you type on the search field. The search filter option would help the user narrow results by tags, attachments, checkboxes, and more. The fuzzy matches would suggest possible corrections if you made a typographical error. Lastly, the saved searches would show you some items about complex or frequent searches.
How to Share a Note
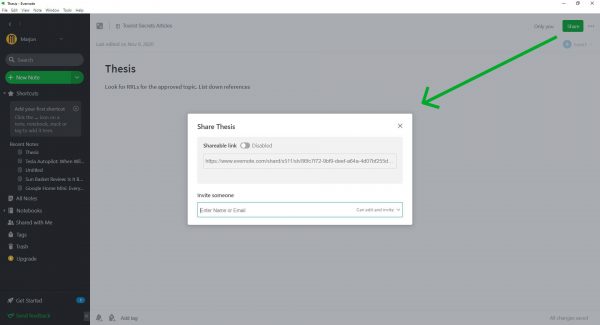
Sharing a note is much easier now without having to send it through an email that sometimes loses proper formatting. This function is like what you normally do with Google Drive: editing the privacy settings will allow other users to see your notes.
To share a note, open the existing note that you want to share. After that, click the green Share button on the upper right part of the page. A pop-up will appear so you’ll be needing to enter at least one email that you will share your note with. Set the permission level then click Send Invitation.
How to Use Work Chat
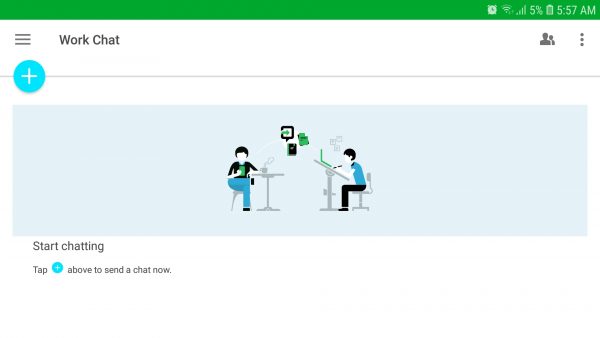
One of the best features of Evernote is it allows users to collaborate on shared notes and even notebooks. With Work Chat, sending a message to other users was more convenient. To send a message using Work Chat on the new Evernote for Windows or Mac, you only need to select Work Chat from the navigation menu. Click the New Chat option, which is a pencil in a square icon. The mentioned steps also apply to Evernote for iOS, Android, and Web. However, with Android devices, the new chat icon would show the plus (+) button. Please also note that the recent version of Evernote Web does not support Work Chat, so you may have to resort to the older version instead.
Work Chat also allows you to add many participants to a chat. You would not worry about the security because it is exclusive to you and those participants in the chat. When the chat has started, only the added participants can view it. Adding a new participant will create another chat so new participants won’t be able to read previous chats. You can invite participants by selecting their name from the list of your colleagues or just enter their name. For more efficient real-time use, you need to learn how to check your internet speed for more convenience.
How to Export a Notebook

If you feel the need to move from one Evernote account to another, transferring notes and notebooks would be a little harder. Worry not, because this Evernote tutorial would help you learn how to export your Evernote files. Please note that you can only export notebooks using the Mac or Windows versions of this app.
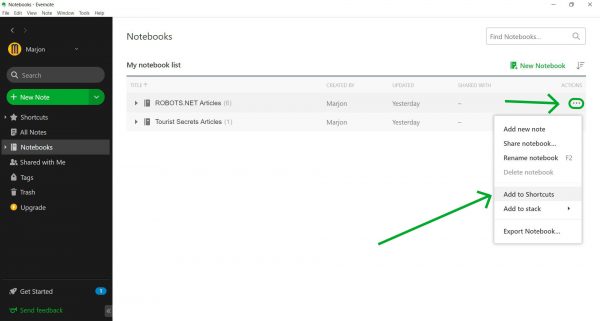
To export a notebook, click Notebooks on the navigation menu. Pick the notebook you want to export and right-click to see options. Select Export Notebook… and rename it according to your preference. You can also click the three dots on the Actions column and you will see the same options. Once done, save your export file. It will be saved in the Evernote XML (.enex) file format.
How to Clip Web Articles with Evernote
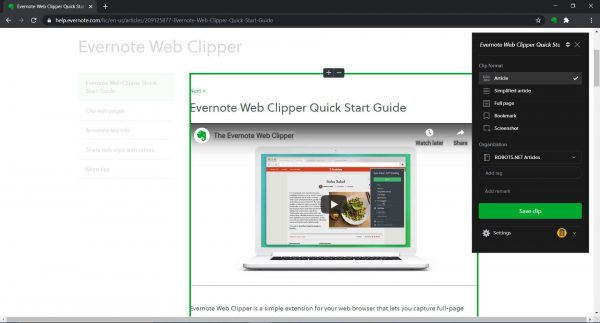
There will come a time that you would need to save an article or a reading material online to read for later. Perhaps you are working on a research paper but don’t feel like listing URLs because it would be harder to find the content you’re looking for. Web clipping could be the answer to these dilemmas. However, you would first need to download the Evernote extension to your browser if you want to be able to clip article. This is one of the best Google Chrome extensions you can get for your browser. Pin that extension to your browser after installation for easier access. You will see the elephant icon on the top right portion of the browser.
When you are already on the website you want to clip, click the Evernote extension and choose a format depending on your needs or preference. Choose which notebook you want to save the clipping to and view it later. You can also add a tag or remark on the clip you want to save.
How to Add Shortcuts
You are not only limited to organizing your notes through your notebooks. You can also try another way to cluster files from the Evernote app that you think you’d access most frequently. Here you can use the shortcuts feature. You can add your notes, notebooks, notebook stacks, tags, or saved searches to your shortcuts list for quicker access.
To add a shortcut using Evernote for Windows and Mac, right-click on the note, notebook, notebook stack, or tag. When the options appear, click on the Add to Shortcuts option. You can also click the three dots on the Actions column and you will see the same options. This also applies to the new Evernote Web. Tags, however, cannot be added to shortcuts using the recent version of Evernote for Windows and Mac because it’s not available.
For iOS devices, click the three dots option in the right corner of a note or notebook then select Add to Shortcuts. You can add a shortcut for tags by opening the navigation menu and selecting Tags. Swipe left on the tag then tap Add to Shortcuts. For Android devices, you just have to long-press on the note, notebook, notebook stack, or tag and then tap the Add to Shortcuts option.
How to Annotate Images or PDF Files
Evernote allows you to customize notes in a wide range of possibilities. It provides you various tools to communicate visual ideas and collaborate with your team. With this Evernote tutorial, you’ll learn how to annotate images and PDFs. The option to annotate PDFs, however, is only available for Evernote Premium and Business members.
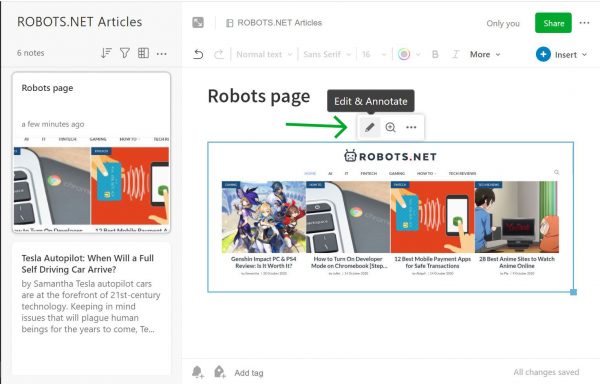
To annotate images or PDFs using Evernote for Windows and Mac, click on the image or PDF that you want to edit from the note. Select the pencil icon that will appear above the image and select Annotate This Image from the pop-up menu. For the iOS and Android devices, tap and open, or hold the image/PDF file from the note. Select Annotate when it pops up.
Annotation Tools
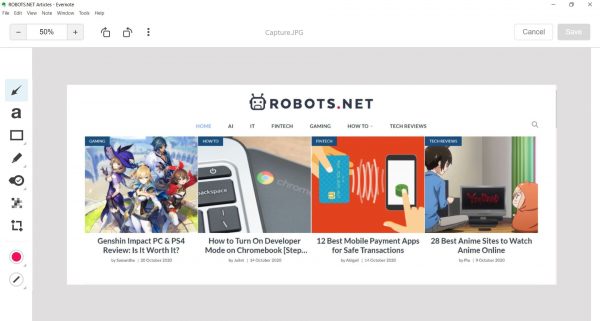
There are a lot of tools available from the annotation feature. You can do everything with the image or PDF to make it more detailed. You can put an arrow, text, stamp, line, and shape using the corresponding tools that you will see on the left portion of the Evernote app. There are also color and stroke options available to make your texts or arrows more personalized.
You can also highlight and pixelate portions of an image or a PDF file according to your preference. For resizing and cropping of images, Evernote also offers the Crop & Resize tool. Aside from these tools, you also have the option to Clear Annotations, which will remove all the annotations done on a specific image or PDF file.
Evernote app will surely give you convenience, but it doesn’t just stop at that. It would also allow you to be more creative and be the most organized person you can be. Hopefully, this Evernote tutorial helped you explore and maximize its features. Not only will it save you time, but it will also help you accomplish tasks efficiently.