Common Reasons Why Emails Are Not Updating
Have you ever experienced the frustration of your email not updating? It’s a common issue that many people encounter, and it can be caused by a variety of factors. Understanding these common reasons can save you time and help you get back to receiving and sending messages smoothly.
One of the most common reasons why emails are not updating is a poor internet connection. If your internet connection is weak or unstable, it can prevent your email client from syncing with the server and fetching new emails. Ensure that you have a strong, stable internet connection to resolve this issue.
Another reason could be incorrect email settings. Double-check the settings on your email client, including the incoming and outgoing server information, the username, and password. Any mistakes in these settings can prevent your emails from updating. Make sure you’ve entered the correct information to resolve this issue.
Over time, your email cache can also become clogged, leading to syncing issues. Clearing your email cache can help refresh the connection between your email client and the server, allowing new emails to load properly. Look up the instructions for clearing the cache on your specific email client to resolve this issue.
Outdated software can also cause problems with email updating. Ensure that both your email client and operating system are up to date with the latest software versions. Updates often include bug fixes and improvements that can address email syncing issues.
There might also be instances when the email server itself is experiencing an outage or maintenance. In such cases, you can verify the server status by checking the website or contacting your email provider’s support team. If the server is down, you’ll need to wait for it to be restored before your emails can update.
In some cases, disabling email sync and then re-enabling it can help resolve updating issues. This action essentially resets the sync process and can help address any temporary glitches. Locate the sync settings on your email client and perform this action to see if it resolves the problem.
Deleting and re-adding the email account on your device can also be a solution. This process ensures that all the account settings are refreshed and may fix any configuration issues causing the email updating problem. Remember to back up any important emails before deleting the account.
If none of these troubleshooting steps work, it’s advisable to contact your email provider’s customer support for further assistance. They have specialized knowledge and tools to diagnose and resolve complex email syncing issues.
By understanding these common reasons why your emails are not updating and following the troubleshooting steps, you can overcome this frustrating problem and ensure a smooth email experience.
How to Troubleshoot Email Updating Issues
Dealing with email updating issues can be frustrating, but there are several troubleshooting steps you can take to resolve the problem. Whether you’re using a desktop email client or a web-based service, these troubleshooting tips can help you get your emails updating smoothly again.
The first step is to check your internet connection. Ensure that you have a stable and reliable internet connection. If you’re connected via Wi-Fi, try switching to a wired connection or vice versa. A strong and consistent internet connection is vital for syncing your email client with the server.
Next, verify your email settings. Double-check the incoming and outgoing server settings, username, and password for your email account. Any errors or typos in these settings can prevent your emails from updating. If necessary, update the settings by referring to your email provider’s instructions or contacting their support team.
If you’re using a desktop email client, clearing the email cache can help resolve updating issues. The cache stores temporary data, and over time, it can become corrupted and hinder the syncing process. Consult the settings or preferences of your email client and locate the option to clear the cache. After doing so, restart the email client and check if the issue is resolved.
Keep your software updated to prevent compatibility issues. Ensure that both your email client and operating system are running the latest versions. Software updates often include bug fixes and performance improvements that can address syncing problems.
It’s also important to check if the email server is experiencing any downtime or maintenance. Look up your email provider’s website or social media channels to see if there are any reported issues. If the server is down, you’ll need to wait for it to be resolved before your emails can update.
Temporarily disabling email sync and then re-enabling it can sometimes resolve updating issues. This step refreshes the syncing process and can help overcome any temporary glitches. Look for the sync settings in your email client and toggle the sync function off and then back on.
In more persistent cases, deleting and re-adding the email account may be necessary. This process ensures that all settings are reset, and any configuration issues causing the updating problem can be resolved. Before deleting the account, ensure that you back up any important emails.
If all else fails, contacting your email provider’s support team is recommended. They have the expertise and tools to diagnose and address complex email syncing issues. Provide them with detailed information about the problem, including any error messages you’ve encountered, to facilitate a quicker resolution.
By following these troubleshooting steps, you can effectively address email updating issues and regain a smoothly functioning email experience.
Check Your Internet Connection
When your emails are not updating, one of the first things to check is your internet connection. A weak or unstable internet connection can prevent your email client from syncing with the server and fetching new messages. Here are some steps to ensure that your internet connection is not the culprit:
1. Check the Wi-Fi or Ethernet connection: If you are using a Wi-Fi connection, make sure that you have a strong signal. Move closer to the router if necessary. If you are using an Ethernet cable, check that it is securely plugged into your device and router.
2. Test your connection: Open a web browser and visit a few websites. If the web pages load slowly or do not load at all, your internet connection may be the issue. Contact your Internet Service Provider (ISP) for assistance.
3. Restart your router: Sometimes, restarting your router can resolve connectivity issues. Unplug the power cable, wait for about 10 seconds, and then plug it back in. Allow the router to fully restart before testing your email client.
4. Switch to a different network: If you have access to another Wi-Fi network or a mobile data connection, try connecting your device to that network and check if your emails start updating. This step will help determine if the issue is specific to your internet connection.
5. Use a network troubleshooting tool: Many operating systems have built-in network troubleshooting tools that can diagnose and fix common connection problems. Consult your device’s user manual or search online for instructions on using the network troubleshooting tool specific to your operating system.
6. Disable VPN or proxy settings: If you are using a VPN or proxy service, try disabling it temporarily. Some VPN or proxy configurations can interfere with email syncing. Disable the service, restart your device, and check if your email updates successfully.
Ensuring that you have a stable internet connection is crucial for seamless email syncing. By following these steps, you can identify and resolve any internet connection issues that may be preventing your emails from updating.
Verify Email Settings
Incorrect email settings can also be a reason why your emails are not updating. Double-checking and verifying your email settings is an essential troubleshooting step. Here are some tips to verify your email settings:
1. Incoming and outgoing server information: Ensure that you have entered the correct incoming and outgoing server addresses in your email client settings. The server information is typically provided by your email provider. Make sure there are no typos or mistakes in the server addresses.
2. Username and password: Confirm that the username and password you have entered for your email account are correct. Mistyping or using an outdated password can prevent your email client from connecting to the server and fetching new messages.
3. Security settings: Some email providers require specific security settings for accessing emails. Check with your email provider or refer to their documentation to ensure that you have set up the necessary security options correctly. This may include SSL/TLS encryption, specific port numbers, or authentication methods.
4. Email client-specific settings: Different email clients may have additional settings that need to be correctly configured. These settings might include options for sync frequency, email storage limits, or server timeouts. Refer to your email client’s documentation or support resources for guidance on configuring these settings properly.
5. Test the settings: Most email clients provide options to test the settings you have entered. Use this feature to verify that your email client is able to connect to the server successfully. If the test fails, carefully review your settings and make any necessary corrections.
6. Contact your email provider: If you are uncertain about any of the email settings or are unable to find the correct information, reach out to your email provider’s customer support. They can guide you through the process of verifying and updating your email settings.
Remember to save any changes you make to your email settings and restart your email client to ensure the updates take effect. Verifying your email settings is a crucial step in resolving email updating issues, as even the slightest mistake or oversight can prevent your emails from syncing properly.
Clear Email Cache
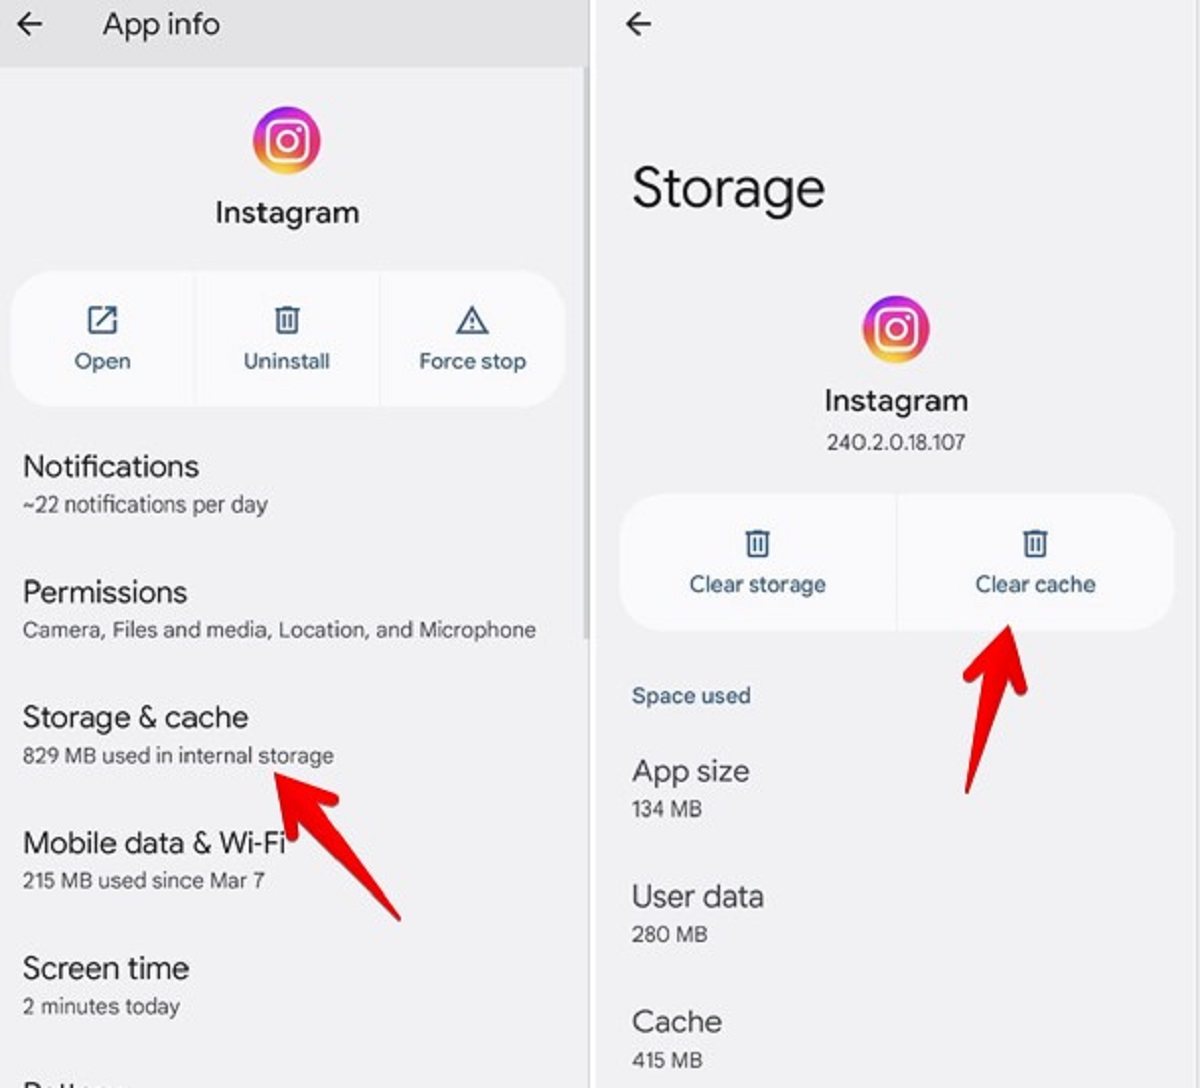
If you’re experiencing issues with email updates, one possible solution is to clear the email cache. Over time, the cache can accumulate temporary data and become cluttered, potentially causing syncing problems. Clearing the cache can help refresh the connection between your email client and the server. Here’s how you can clear the email cache:
1. Locate the email client settings: Open your email client and navigate to the settings or preferences section. The exact location of the cache-clearing option may vary depending on the email client you’re using.
2. Find the cache settings: Look for the cache or storage settings within the email client settings. This may be labeled as “Cache,” “Temporary Files,” or “Storage.” Refer to your specific email client’s documentation if you’re having trouble finding this option.
3. Clear the cache: Once you’ve located the cache settings, select the option to clear or delete the cache. Confirm the action when prompted. The time it takes to clear the cache may vary depending on the amount of data stored.
4. Restart your email client: After clearing the cache, close your email client completely and then reopen it. This will allow the changes to take effect and refresh the connection between your email client and the server.
5. Test the email update: Check if your emails are now updating properly. The cache clearing process should resolve any issues caused by a cluttered cache and help your email client sync with the server more efficiently.
It’s worth noting that clearing the email cache will remove any stored data related to email accounts, such as auto-complete suggestions or locally saved drafts. However, it does not affect any of your emails stored on the server, so you won’t lose any important messages.
If you’re using a web-based email service, clearing the cache can be done by clearing your browser cache. This step will not only clear the email cache but also remove temporary files and data from your browser, potentially improving overall performance.
If clearing the email cache doesn’t resolve the updating issue, consider trying other troubleshooting steps or contacting your email provider’s support team for further assistance. They can provide you with more guidance specific to your email client and help you resolve any lingering issues.
Clearing the email cache is a simple yet effective way to address email syncing problems caused by a cluttered cache. By following these steps, you can ensure a smooth and seamless email experience.
Check for Software Updates
If your emails are not updating, it’s important to check for software updates. Outdated software, including your email client and operating system, can cause compatibility issues and prevent proper email synchronization. Here’s how you can check for software updates:
1. Email Client Updates:
Check if there are any updates available for your email client. Most email clients have built-in update mechanisms that automatically check for updates. Look for the “Check for Updates” option within the settings or preferences menu of your email client. Follow the prompts to download and install any available updates.
If your email client doesn’t have an automatic update feature, visit the official website of the email client or check the app store (for mobile email clients) to see if a newer version is available. Download and install the latest version to ensure you have the most up-to-date features and bug fixes.
2. Operating System Updates:
Your operating system plays a crucial role in the functioning of your email client. It’s important to keep your operating system up to date to ensure compatibility with the latest versions of your email client and its associated protocols.
For Windows users, go to “Settings” and select “Update & Security.” Click on “Check for updates” to see if any new updates are available. Follow the instructions to install the updates.
macOS users can go to the Apple menu and choose “System Preferences.” Click on “Software Update” to check for new updates. If any updates are available, click “Update Now” to install them.
3. Antivirus Software:
Sometimes, antivirus software can interfere with email updating. Ensure that your antivirus software is up to date by opening the antivirus program and following the instructions for updating the software. Keeping your antivirus software current can help resolve any conflicts that may be preventing your email client from functioning properly.
Regularly checking for software updates is essential for maintaining a secure and optimized email environment. Updated software often includes bug fixes, performance enhancements, and security patches that can address syncing issues and improve overall performance.
If you have multiple devices that are experiencing email updating issues, make sure to update the software on each device independently. Keeping all of your devices on the latest software versions will help maintain consistency and compatibility across platforms.
If updating your software doesn’t resolve the email updating issue, consider exploring other troubleshooting steps or contacting your email provider’s support team for further assistance. They can help identify and resolve any underlying issues specific to your software configuration.
By regularly checking for software updates, you can ensure that your email client and operating system are optimized for proper email syncing and provide you with a seamless and efficient email experience.
Check If the Email Server Is Down
If your emails are not updating, it’s crucial to check if the email server is experiencing any issues. An email server outage or maintenance can prevent your email client from connecting to the server and syncing new messages. Here’s how you can check if the email server is down:
1. Check the email provider’s website: Visit the website of your email provider and look for any notifications or status updates regarding email service disruptions. Some email providers have dedicated pages or support forums where they provide real-time information about server downtimes or maintenance windows.
2. Search for server status updates: Use a search engine to look for any news or updates related to your email provider’s server status. Often, tech news websites or online forums will have discussions or articles if there’s a widespread server outage affecting multiple users.
3. Monitor social media channels: Many email providers use their official social media channels, such as Twitter or Facebook, to communicate service disruptions or provide updates. Check the official social media accounts of your email provider for any announcements regarding server issues.
4. Check with other users: Reach out to friends, colleagues, or online communities that use the same email provider. If others are experiencing similar email updating issues, it is likely that the email server is down. Sharing information with other users can provide insights and confirm if the server is experiencing problems.
5. Contact customer support: If you have checked the website, search engine results, social media channels, and other users’ experiences, and still suspect that the email server may be down, contact your email provider’s customer support. They can provide you with detailed information about the server status and the estimated time for the issue to be resolved.
Remember that email server outages can occur for various reasons, including power outages, hardware failures, software updates, or maintenance. In most cases, the email provider works to resolve the issue as quickly as possible to minimize any disruptions to their users’ email service.
If the email server is indeed down, unfortunately, there is no immediate solution other than waiting for the provider to resolve the issue. However, keeping oneself informed about the status and progress of the server’s restoration can provide peace of mind and help plan alternative communication methods if necessary.
Regularly checking the email provider’s website, searching for server status updates, monitoring social media channels, and contacting customer support are important steps to determine if the email server is down and stay informed about the progress of its restoration.
Disable Email Sync and Re-enable It
If you’re experiencing issues with email updating, one solution to try is disabling email sync and then re-enabling it. This action essentially resets the sync process and can help address any temporary glitches that may be preventing your emails from updating. Here’s how to disable email sync and re-enable it:
1. Open your email client: Launch your email client on your device. This can be a desktop email client like Microsoft Outlook, Mozilla Thunderbird, or a web-based email service like Gmail or Yahoo Mail.
2. Locate the sync settings: Look for the settings or preferences section within your email client. The location of these settings may vary depending on your email client.
3. Disable email sync: Once you’ve located the sync settings, find the option to disable or turn off email sync. This option may be labeled as “Sync,” “Refresh,” or “Update.” Toggle the sync function off to temporarily stop the synchronization process.
4. Wait for a few minutes: After disabling email sync, wait for a few minutes before proceeding to the next step. This allows time for the email client to recognize the sync is disabled.
5. Re-enable email sync: Return to the sync settings and toggle the sync function back on. This action will reconnect your email client to the server and prompt it to start syncing new emails again.
6. Check for email updates: Once you have re-enabled email sync, observe if your emails start updating properly. Give it some time to sync with the server and fetch the latest messages. Depending on the number of emails and the speed of your internet connection, it may take a few moments for all the updates to appear.
Disabling email sync and then re-enabling it can often resolve temporary syncing issues, especially if there was a glitch or inconsistency in the sync process. This quick reset allows your email client to establish a fresh synchronization connection with the server, potentially resolving any updating problems.
If disabling and re-enabling email sync doesn’t fix the issue, consider trying other troubleshooting steps or reaching out to your email provider’s customer support for further assistance. They can provide you with specific guidance based on your email client and offer additional troubleshooting solutions.
Remember to regularly check for updates or changes in the sync settings or preferences of your email client. Some email clients offer the option to adjust the sync frequency or enable specific syncing options, which could also help improve the updating process.
By disabling and re-enabling email sync, you can potentially overcome syncing issues and ensure that your emails are consistently updated in your email client.
Delete and Re-add the Email Account
If you’re still facing issues with email updating, deleting and re-adding the email account on your device can help resolve any configuration or settings-related problems. This process essentially refreshes the account settings and can fix issues that may be preventing proper email updating. Here’s how you can delete and re-add the email account:
1. Open your email client: Launch your email client on your device. This can be a desktop email client like Microsoft Outlook or a web-based email service like Gmail.
2. Locate the account settings: Look for the settings or preferences section within your email client. The specific location of these settings may vary depending on your email client.
3. Remove the email account: Find the option to manage your email accounts. In this section, you should see the list of email accounts you have added to your email client. Select the account you’re experiencing issues with and choose the option to remove or delete it.
4. Confirm deletion: A confirmation prompt will appear asking if you want to delete the email account. Make sure you have backed up any important emails or contacts associated with that account as they will be removed along with the account settings. Confirm the deletion to completely remove the account from your email client.
5. Re-add the email account: After deleting the account, go back to the account settings section and locate the option to add a new email account. Follow the prompts and enter the required information for the email account, including the email address, password, and any additional settings specific to your email provider.
6. Test the email update: Once you have re-added the email account, check if the email updates are now working properly. Give it some time for the email client to sync with the server and fetch the latest messages. Verify that new emails are appearing in your inbox and that the updating issue has been resolved.
Deleting and re-adding the email account can help resolve configuration or settings-related issues that may be hindering proper email updating. However, it’s important to note that this process removes the account from your email client, along with any associated data. Ensure you have backed up any important emails or contacts before proceeding.
If deleting and re-adding the email account doesn’t fix the updating problem, consider reaching out to your email provider’s customer support. They can provide you with further assistance and help diagnose any persistent issues that may be affecting the syncing process.
Regularly reviewing and managing your email account settings can help ensure smooth email updating and a seamless user experience.
Contact Your Email Provider for Assistance
If you’ve tried various troubleshooting steps and your email is still not updating, it’s time to reach out to your email provider’s customer support for expert assistance. They have specialized knowledge and tools to diagnose and resolve complex email syncing issues. Here’s how you can contact your email provider for assistance:
1. Visit the email provider’s website: Start by visiting your email provider’s official website. Look for a “Support” or “Help” section, as most providers have dedicated support resources available online.
2. Look for customer support options: Browse through the support section and locate the contact options for customer support. This may include live chat, phone support, or an email contact form.
3. Determine the preferred contact method: Choose the contact option that best suits your preferences and situation. Live chat or phone support can provide immediate assistance, whereas submitting an email contact form allows you to provide a detailed description of the issue.
4. Provide detailed information: When contacting customer support, provide as much information as possible about the email updating issue you’re facing. Explain the troubleshooting steps you’ve already taken and provide any error messages or specific details about the problem you’re experiencing.
5. Follow the instructions provided: Once you’ve initiated contact with customer support, follow their instructions for further troubleshooting or diagnostics. They may request additional information or guide you through specific steps to help identify and resolve the issue.
6. Be patient and cooperative: Keep in mind that the customer support team may need some time to investigate the issue and provide a solution. Cooperate with them by responding promptly to any queries or requests for information.
By contacting your email provider’s customer support, you’re tapping into their expertise and resources to resolve the email updating issue. They have access to diagnostic tools and can look into server logs or account settings to identify any underlying problems that might be affecting the syncing process.
If possible, provide screenshots or error messages that you’ve encountered during the troubleshooting process. This information can help the customer support team pinpoint the issue and provide a more accurate solution.
Remember to be polite and patient when communicating with customer support. They are there to assist you and are dedicated to resolving your email syncing issues as efficiently as possible.
If needed, follow up with the customer support team to inquire about the progress of your ticket or to request additional updates. Open communication can help ensure that your email updating issue is resolved in a timely manner.
Contacting your email provider’s customer support is often the most effective way to address complex email syncing issues that remain unresolved through general troubleshooting steps. Their expertise and assistance can help you regain smooth and uninterrupted access to your emails.
Conclusion
Experiencing issues with email updating can be frustrating, but by following the troubleshooting steps outlined in this article, you can resolve many common problems and get your emails syncing properly again.
Checking your internet connection ensures you have a stable and reliable connection for email syncing. Verifying email settings helps to confirm that you have entered the correct server information, username, and password. Clearing the email cache can address syncing issues caused by a cluttered cache. Checking for software updates ensures that your email client and operating system are up to date and compatible. Checking if the email server is down helps identify any server-related outages or maintenance issues. Disabling email sync and re-enabling it can resolve temporary synchronization glitches. Deleting and re-adding the email account can refresh the account settings and resolve configuration-related issues. Lastly, contacting your email provider’s customer support provides expert assistance for more complex problems.
Remember, maintaining a smooth and uninterrupted email experience often requires regular maintenance, keeping software up to date, and following best practices for internet connectivity. By staying proactive and addressing any issues promptly, you can ensure that your emails update reliably and efficiently.
If you’ve gone through these troubleshooting steps and are still experiencing issues, don’t hesitate to reach out to your email provider’s customer support. They are there to assist you and provide specialized guidance tailored to your specific email client and account settings.
By combining technical know-how with strong communication and support, you can overcome email updating issues and enjoy a seamless email experience.