Introduction
When you glance inside your computer case and notice that your case fan appears to be running slower than usual, it can be quite concerning. A slow-looking case fan can give the impression that your system is not receiving adequate cooling, potentially leading to overheating issues and reduced performance.
However, it’s important to note that appearances can be deceiving. A case fan may appear to be running slowly due to a variety of reasons, some of which are completely normal and not cause for alarm. Understanding the factors that can contribute to a slow-looking case fan can help you determine whether there is actually a problem that needs to be addressed.
In this article, we will explore several possible reasons for a slow-looking case fan. From dust build-up to fan cable issues, we will discuss the common culprits behind this phenomenon. By understanding these factors, you will be better equipped to identify and address any potential issues with your case fan, ensuring optimal cooling and performance for your system.
Reasons for a Slow-Looking Case Fan
There are several factors that can contribute to a case fan appearing to run slower than usual. While each situation may vary, here are some common reasons for this phenomenon:
- Dust Build-Up: Over time, dust can accumulate on the fan blades, causing them to spin less efficiently. This can create the illusion of a slow-moving fan despite it operating at its normal speed. Regular cleaning and maintenance can help alleviate this issue.
- Fan Cable Issues: Sometimes, a loose or damaged fan cable can disrupt the power supply to the fan, resulting in reduced speed. Ensure that the fan cable is securely connected to both the fan and the motherboard to eliminate this possibility.
- Motherboard Fan Settings: The fan speed can be controlled through the motherboard’s BIOS settings. If the fan speed is set to a lower level, the case fan may appear to be running slower than usual. Check the BIOS settings to ensure that the fan speed is appropriately configured.
- Fan Power Supply: In some cases, a faulty power supply can cause the fan to receive inadequate power, resulting in slower rotation. Consider checking the power supply unit and replacing it if necessary.
- Fan Size and RPM: Different case fans come in varying sizes and have different maximum revolutions per minute (RPM) capabilities. If you’re comparing a smaller fan with a lower maximum RPM to a larger fan with a higher maximum RPM, the smaller fan may appear to be running slower in comparison.
- Fan Bearings: The bearings in a case fan can wear out over time, causing the fan to spin less freely. This can lead to a slower-looking fan movement. If this is the case, replacing the fan may be necessary.
- Temperature Control: Some case fans adjust their speed based on system temperature. If your system is running cool, the fan may operate at a lower speed, appearing slower. Monitoring your system’s temperature can help determine if this is the reason for the slow-looking fan.
- Obstructions or Blockages: Objects obstructing the fan blades or airflow paths can impede the fan’s movement, making it appear slower. Check for any blockages or obstructions and remove them as necessary.
- Fan Controller Settings: If you have a third-party fan controller installed, ensure that the settings are configured correctly. Improper settings can restrict the fan’s speed, resulting in a slower-looking fan.
- Fan Age and Wear: Over time, the performance of a case fan can degrade due to wear and tear. As a result, the fan may not spin as quickly as it once did, giving the appearance of a slower movement. Consider replacing older fans that exhibit signs of wear.
By examining these potential factors, you can determine the cause of a slow-looking case fan and take appropriate measures to address the issue. Regular maintenance, proper configuration, and prompt replacement when necessary can help ensure optimal cooling performance for your system.
Dust Build-Up
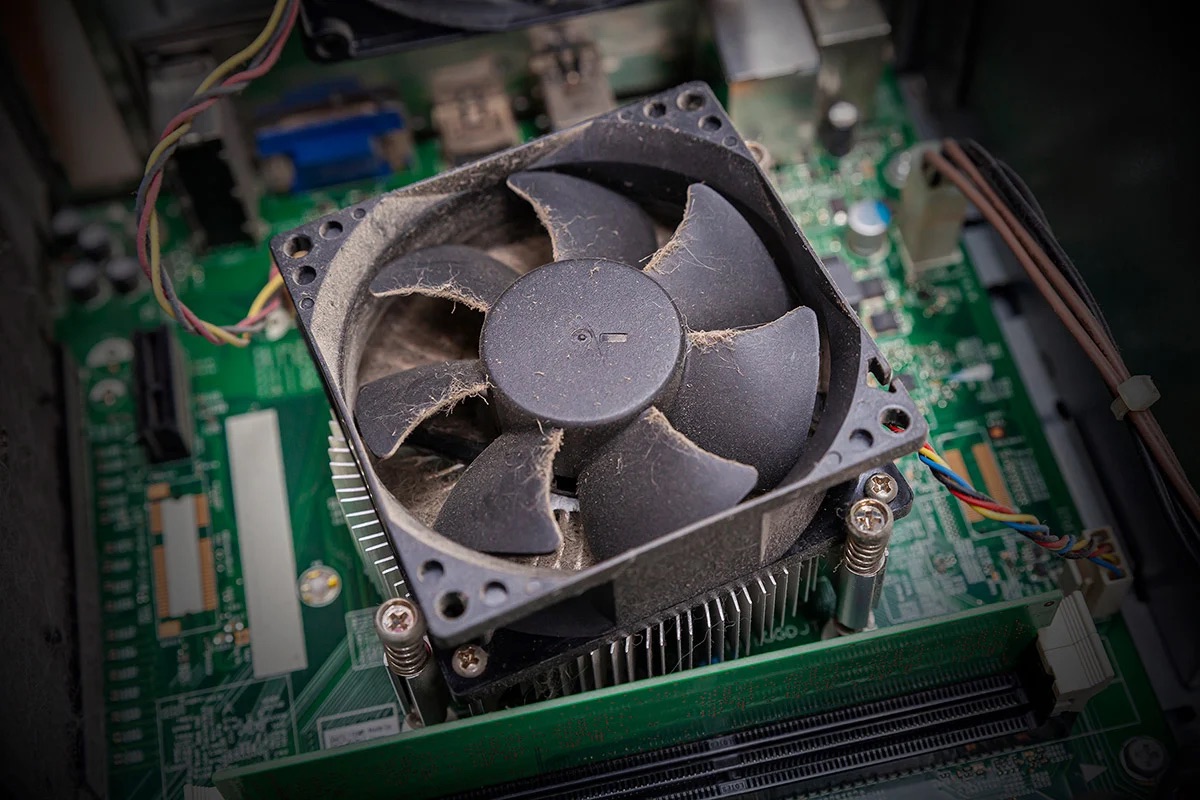
One of the most common reasons for a slow-looking case fan is the accumulation of dust and debris on the fan blades. Over time, as the fan pulls in air to cool your system, dust particles in the air settle on the fan blades. The build-up of dust restricts the airflow and causes the fan to spin less efficiently, resulting in a slower appearance.
To address this issue, regular cleaning and maintenance of your case fan are essential. Start by shutting down your computer and unplugging it from the power source. Open up your computer case and locate the case fan. Use a can of compressed air or a soft brush to gently remove the dust from the fan blades. Be careful not to apply excessive force to avoid damaging the fan. You can also use a vacuum cleaner with a nozzle attachment to remove loose dust particles.
It’s important to note that dust build-up is a natural occurrence in any computer system. Therefore, it is recommended to clean your case fan at least every few months or more frequently if you live in a particularly dusty environment. Regular cleaning not only helps maintain optimal fan performance but also prevents overheating issues that can arise from restricted airflow.
In addition to cleaning the fan blades, it is also crucial to inspect and clean the surrounding areas, such as the fan grill and the vents. These areas can accumulate dust and hinder proper airflow, reducing the effectiveness of the case fan. Use a cloth or brush to gently remove any dust or debris from these areas.
By regularly cleaning your case fan and ensuring a dust-free environment within your computer case, you can prevent the build-up of dust that hampers the fan’s performance. This will help maintain optimal cooling and keep your system running smoothly.
Fan Cable Issues
In some cases, a slow-looking case fan may be caused by issues with the fan cable. A loose or damaged fan cable can disrupt the power supply to the fan, resulting in reduced speed and a slow-moving appearance.
To troubleshoot fan cable issues, start by ensuring that the fan cable is securely connected to both the fan itself and the corresponding fan header on the motherboard. Sometimes, due to vibrations or movement, the cable may become loose over time. Gently push the connector into place to ensure a firm connection.
Inspect the fan cable for any signs of damage, such as fraying or wear and tear. If you notice any damage, it is recommended to replace the fan cable to prevent further issues. You can purchase replacement fan cables from computer hardware stores or online retailers.
In some cases, using a fan cable extension or splitter can also impact the fan’s performance. These additional cables can introduce resistance and voltage drops, leading to decreased fan speed. Consider removing any unnecessary extensions or splitters and connecting the fan directly to the motherboard to eliminate any potential issues caused by these additional cables.
It’s worth noting that some modern computer cases come with fan controllers or hubs. These devices allow you to connect multiple fans to a single fan header on the motherboard. However, if the fan controller is not properly configured or functioning correctly, it can lead to a slower-looking case fan. Make sure to check the fan controller settings and consult the manufacturer’s instructions for proper configuration.
By addressing any issues with the fan cable, ensuring a secure connection, and eliminating any unnecessary extensions or splitters, you can resolve any potential fan cable-related problems that may be causing your case fan to appear slow.
Motherboard Fan Settings
The fan speed of a case fan is often controlled through the motherboard’s BIOS settings. If the fan speed is configured to run at a lower level, it can give the impression of a slow-looking case fan. Therefore, it is important to check the motherboard’s fan settings to ensure they are properly adjusted.
To access the BIOS settings, restart your computer and repeatedly press the designated key (usually Del, F2, or F10) during the startup process. Once in the BIOS, navigate to the “Fan Settings” or “Hardware Monitor” section, where you can adjust the fan speed options.
Depending on the motherboard model, you may have several options to control the fan speed. One common method is through the use of fan profiles, which allow you to set predefined speed curves based on temperature thresholds. Make sure that the fan profile is set to an appropriate level that provides sufficient cooling without sacrificing performance.
Some motherboards also offer manual control of the fan speed, allowing you to adjust it to your desired level. However, keep in mind that setting the fan speed too low can result in inadequate cooling, while setting it too high can lead to increased noise levels.
It’s worth noting that not all motherboards support advanced fan control options. Some older or basic models may only offer limited control over the fan speed. In such cases, consider using third-party software that allows for more granular control of the fan speed, compatible with your motherboard model.
If you have recently made changes to the BIOS settings or updated your motherboard firmware, it is also possible that the fan settings were reset or altered. Double-check the settings to ensure they are configured correctly for optimal fan performance.
By reviewing and properly adjusting the motherboard’s fan settings, you can ensure that the case fan operates at the desired speed, eliminating any concerns of a slow-looking fan and maintaining efficient cooling for your system.
Fan Power Supply
An often overlooked factor that can contribute to a slow-looking case fan is the power supply to the fan itself. If the fan is not receiving adequate power, it may not spin at its intended speed, giving the appearance of a slower movement.
To address potential issues with the fan’s power supply, there are a few steps you can take:
1. Check the fan connector: Ensure that the fan cable is securely connected to both the fan and the motherboard or fan controller. Sometimes, the connector may become loose over time due to vibrations or movement. Reconnecting the cable firmly can help establish a proper power supply to the fan.
2. Replace the fan cable: If the fan cable shows signs of damage or wear, it is recommended to replace it. A damaged cable can impact the power supply to the fan, resulting in reduced speed. Look for replacement fan cables at computer hardware stores or online retailers.
3. Test with a different fan: If possible, try swapping the case fan with a different one to see if the issue persists. This can help determine if the problem lies with the fan itself or other components of the system.
4. Check the power supply unit (PSU): A faulty or insufficient power supply from the PSU can affect the performance of the case fan. Consider checking the PSU for any issues or ensuring that it provides enough power for all system components, including the case fan.
It’s important to note that case fans typically operate using the 12V line from the PSU. However, some fans may have additional connectors, such as Molex or SATA, that draw power directly from the PSU. Ensure that these connectors are securely inserted and not damaged, as they can affect the fan’s performance.
By verifying the fan connector, replacing the fan cable if necessary, testing with a different fan, and checking the power supply unit, you can address potential power supply-related issues that may be causing your case fan to appear slow. Proper power supply is crucial for the fan to spin at its intended speed and provide optimal cooling for your system.
Fan Size and RPM
When comparing case fans, it’s important to consider both their size and their maximum revolutions per minute (RPM). The size and RPM of a fan can impact its perceived speed.
Fan Size: Case fans come in various sizes, such as 80mm, 120mm, or 140mm. Larger fans tend to move more air at a given RPM compared to smaller fans. This means that a larger fan operating at the same RPM as a smaller fan will likely appear slower due to its larger size. It’s essential to consider the fan size when comparing the speed of different fans. If you have a mix of fan sizes in your system, keep in mind that the larger fans may appear to be spinning slower even if they are functioning at their intended speed.
RPM (Revolutions Per Minute): The RPM or rotational speed of a fan refers to the number of full rotations it makes in one minute. Fans with higher RPM can move more air, resulting in greater cooling capacity. However, it’s important to note that higher RPM often means higher noise levels as well. When comparing fan speeds, consider the RPM rating to determine if the fan is operating at its expected speed. If the fan is spinning at a lower RPM than indicated, it may give the appearance of running slower than it actually is.
It’s worth mentioning that most case fans have a recommended operating range of RPM specified by the manufacturer. This range ensures optimal performance and longevity of the fan. If the fan is running significantly outside of this range, it may indicate a problem with the fan itself or its power supply.
Overall, when comparing the speed of case fans, it’s important to take into account both the size and the RPM rating. Keep in mind that larger fans may appear to be running slower due to their size, while the RPM rating provides insight into the actual rotational speed. By understanding these factors, you can better assess the performance of your case fans and determine if any adjustments or replacements are necessary for optimal cooling in your system.
Fan Bearings
The bearings in a case fan play a crucial role in its smooth operation and longevity. Over time, these bearings can wear out, causing the fan to spin less freely and giving the appearance of a slow-moving fan.
There are three common types of bearings used in case fans:
1. Sleeve Bearings: Sleeve bearings consist of a thin layer of lubricant between the fan shaft and the sleeve. With use, the lubricant can dry up, leading to increased friction and decreased fan performance. As a result, a case fan with worn sleeve bearings may appear to be running slower. If you suspect that your fan has sleeve bearings, consider replacing it with a fan that utilizes a different bearing type.
2. Ball Bearings: Ball bearings use small metal balls to reduce friction between the fan shaft and the bearing casing. They tend to be more durable and long-lasting compared to sleeve bearings, providing smoother operation and a longer lifespan. However, even ball bearings can wear out over time, leading to decreased fan speed. If you notice a significant decrease in the speed of your fan, it may be an indication that the ball bearings are nearing the end of their lifespan.
3. Fluid Dynamic Bearings (FDB): Fluid dynamic bearings use a thin layer of lubricant to reduce friction and improve fan performance. This type of bearing offers a balance between durability and noise level, providing efficient and quiet operation. However, like other bearing types, FDBs can wear out over time, leading to a decrease in fan speed. If your fan utilizes FDBs and it appears to be spinning slower than usual, it may be time to consider replacing it.
If you suspect that the bearings in your case fan are worn and causing a decrease in speed, replacing the fan is the most effective solution. When selecting a replacement fan, consider choosing one with high-quality bearings to ensure smooth and reliable operation.
Regular maintenance, such as cleaning and lubricating the fan bearings, can help prolong their lifespan and maintain optimal fan performance. However, keep in mind that not all fans are designed for lubrication, and attempting to lubricate them can cause damage. It’s always best to consult the manufacturer’s guidelines before attempting any maintenance on your case fan bearings.
By paying attention to the condition of the fan bearings and replacing worn-out fans when necessary, you can ensure consistent and efficient cooling for your system.
Temperature Control
The speed of a case fan can be influenced by the temperature of the system components. Many modern motherboards and fan controllers offer temperature-based fan control functionality to adjust the fan speed based on the system’s thermal conditions.
When the system is running cool, the fan speed may be automatically set to a lower level to conserve energy and keep noise levels down. Consequently, the case fan may appear to be running slower. However, as the system temperature increases, the fan speed will ramp up to provide increased cooling capacity.
To ensure the case fan is running at its optimal speed, it’s essential to monitor the system’s temperature regularly. There are various software applications available that allow you to monitor the temperature of your CPU, GPU, and other components. By monitoring the temperature, you can verify whether the slow-looking fan is a result of temperature control settings.
If you find that the fan speed is consistently lower than expected, you may need to adjust the temperature control settings on your motherboard or fan controller. Check the BIOS or software utility provided by the manufacturer of your motherboard or fan controller to access the temperature control settings.
Adjusting the temperature control settings can involve multiple parameters, such as temperature thresholds, fan curves, or fan speed profiles. Refer to the manufacturer’s documentation or online resources specific to your motherboard or fan controller for instructions on how to modify these settings.
Keep in mind that it’s important to strike a balance between cooling performance and noise levels. Setting the fan speed too high can result in excessive noise, while setting it too low may compromise system cooling. Experiment with different temperature control settings to find the optimal balance for your specific needs.
By ensuring that the temperature control settings are properly configured and monitoring the system temperature, you can optimize the fan speed for efficient cooling while maintaining an acceptable noise level.
Obstructions or Blockages
One possible reason for a slow-looking case fan is the presence of obstructions or blockages that impede the fan’s movement. Such obstructions can disrupt the airflow and make the fan appear to be running slower.
It’s important to inspect the area surrounding the case fan to ensure there are no objects obstructing the fan blades or the airflow paths. Common obstructions may include dust, cables, wires, or even loose components within the computer case.
Start by shutting down your computer and unplugging it from the power source. Open up the case and carefully examine the fan area. If you notice any debris or dust accumulation on the fan blades, gently clean them with a soft brush or a can of compressed air, ensuring not to damage the fan in the process.
Check the surrounding area for any cables, wires, or components that may be interfering with the fan’s movement. Secure any loose cables or wires, and ensure that they are properly routed and kept away from the fan blades. If necessary, reposition components that may be blocking the airflow to allow for better fan performance.
Additionally, check for any physical objects that may have accidentally fallen into the computer case and are obstructing the fan or the airflow paths. Remove any foreign objects that you find, as they can severely impact the fan’s ability to function optimally.
It’s worth mentioning that some computer cases come with dust filters that can become clogged with dust and obstruct the airflow. These filters should be regularly cleaned or replaced depending on the manufacturer’s guidelines to prevent them from hindering the fan’s performance.
By inspecting and removing any obstructions or blockages around the case fan, you can ensure that the airflow remains unimpeded and the fan can operate at its intended speed. This will help maintain proper cooling for your system and prevent any slow-looking fan issues caused by physical obstructions.
Fan Controller Settings
If you have a fan controller installed in your system, it’s essential to check the settings to ensure they are properly configured. Incorrect fan controller settings can result in a slow-looking case fan.
Start by identifying the type of fan controller you have. Some fan controllers are integrated into the motherboard’s BIOS, while others are standalone devices that connect to the motherboard via USB or external controls.
If your fan controller is within the motherboard’s BIOS, access the BIOS settings by restarting your computer and repeatedly pressing the designated key (usually Del, F2, or F10) during the startup process. Once in the BIOS, navigate to the fan control settings. Depending on your motherboard model, you may have options to set the fan speed curves or select pre-defined profiles. Ensure that these settings are appropriately configured to provide the desired fan speed.
If you have a standalone fan controller, consult the manufacturer’s instructions to access the control settings. These settings may be adjusted through software provided by the manufacturer or through physical knobs or buttons on the fan controller itself. Review the settings to ensure they align with your desired fan speed and performance.
It’s important to note that some fan controllers offer automatic fan speed control based on temperature. This means that the fan speed will be adjusted based on the system’s thermal conditions. If your fan controller is set to an automatic control mode, monitor the system’s temperature to verify whether the slow-looking fan is a result of temperature-based control.
Make sure to consider the noise level as well. While increasing the fan speed may improve cooling performance, it can also lead to increased noise. Strike a balance between cooling efficiency and noise levels that best suits your needs.
If you are unsure about the optimal fan controller settings, consult the manufacturer’s documentation or online resources specific to your fan controller model. These resources can provide guidance on adjusting the settings correctly for optimal fan performance.
By reviewing and properly configuring the fan controller settings, you can ensure that the case fan operates at the desired speed, eliminating any concerns of a slow-looking fan and maintaining efficient cooling for your system.
Fan Age and Wear
As with any mechanical component, case fans are subject to wear and tear over time. The age and overall condition of the fan can impact its performance, including its perceived speed.
Over time, the moving parts of the fan, such as the bearings or motor, can experience wear. This wear can lead to decreased efficiency, resulting in a slower-looking fan. Additionally, accumulated dust and debris can further contribute to the fan’s deterioration and affect its performance.
If you have had the case fan for an extended period, it may be worth considering its age and condition. If the fan is several years old or exhibiting signs of wear, it may be approaching the end of its lifespan.
Replacing an aging or worn-out case fan with a new one can provide several benefits. A new fan will likely operate more efficiently, providing better cooling performance while minimizing noise levels. Additionally, newer fans often come with improved design and features, further enhancing their effectiveness.
Before replacing the fan, ensure that the issue is indeed related to age and wear. Clean the fan and its components thoroughly to remove any dust and debris. If cleaning does not improve the fan’s performance, you can consider replacing it with a new one.
When selecting a replacement fan, consider the specifications that best suit your needs. Look for high-quality fans from reputable manufacturers that offer appropriate airflow and noise levels for your system. Reading user reviews and consulting online resources can help you make an informed decision.
Regular maintenance and cleaning can also extend the overall lifespan of case fans. Remove accumulated dust and debris on a regular basis to ensure proper airflow and fan performance. Additionally, some fans may have removable fan blades or an accessible space behind the fan for lubrication. Check the manufacturer’s guidelines to determine if your fan requires lubrication and how to safely perform this maintenance.
By monitoring the age and condition of your case fan and replacing it when necessary, you can ensure optimal cooling performance for your system. Regular maintenance, such as cleaning and lubrication, can also help prolong the lifespan of the fan and maintain its efficiency.
Conclusion
A slow-looking case fan can be concerning, but it’s important to consider various factors that may contribute to this appearance. By understanding the possible reasons for a slow-looking fan, you can identify and address any underlying issues to ensure optimal cooling and performance for your system.
Dust build-up on the fan blades, fan cable issues, incorrect motherboard fan settings, fan power supply problems, fan size and RPM differences, worn fan bearings, temperature control settings, obstructions or blockages, fan controller configurations, and the age and wear of the fan itself are all factors that can contribute to a slow-looking case fan.
To resolve these issues, regular cleaning and maintenance of your case fan are crucial. Ensure that the fan blades are free from dust build-up and that there are no obstructions or blockages hindering the fan’s movement. Secure fan cables, check the motherboard fan settings, and ensure a stable power supply. Consider replacing worn fan bearings and fans that have reached the end of their lifespan.
Additionally, temperature monitoring and control, as well as adjusting fan controller settings, can optimize fan speed based on system thermal conditions. Be mindful of striking the right balance between cooling efficiency and noise levels.
Ultimately, by addressing these potential issues and maintaining your case fan properly, you can ensure that it operates at its intended speed, providing efficient cooling for your system and avoiding any potential risks associated with overheating.
Regular cleaning, maintenance, and periodic replacement of case fans as needed will help keep your system running smoothly and ensure that the slow-looking case fan phenomenon remains just an illusion.


