Introduction
Welcome to our guide on where to mount the H55 Quiet CPU Cooler in an NZXT Full Tower! If you’re looking to upgrade your CPU cooling system for improved performance and reduced noise levels, the H55 Quiet CPU Cooler is a fantastic choice. Not only does it provide excellent cooling capabilities, but its quiet operation ensures a peaceful computing experience. However, determining the optimal location for mounting the cooler can be a bit challenging, especially if you’re not familiar with the specifics of your NZXT Full Tower case.
In this article, we will explore the various mounting options available for the H55 Quiet CPU Cooler in an NZXT Full Tower case. We’ll discuss the benefits of using this cooler, factors to consider when selecting a mounting location, and step-by-step instructions for installation. By the end of this guide, you’ll have a clear understanding of where to place your CPU cooler for optimal performance and efficient heat dissipation.
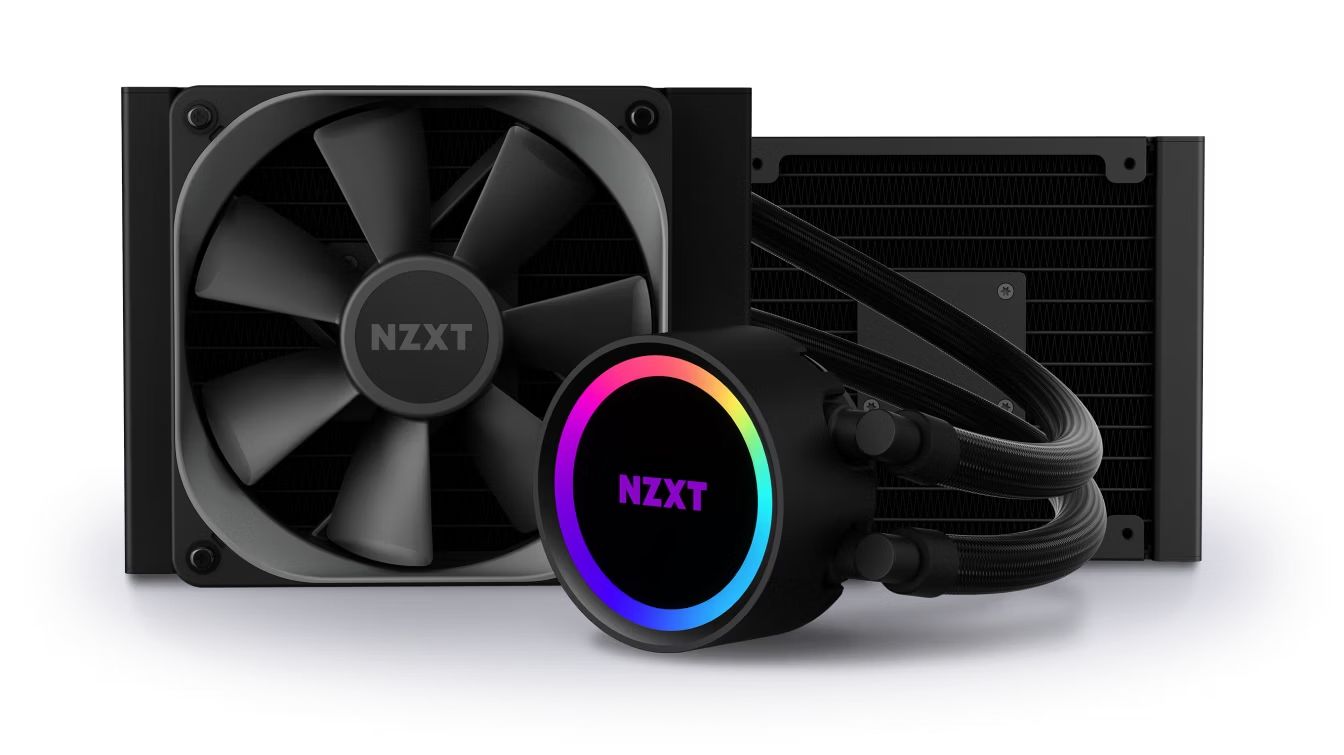
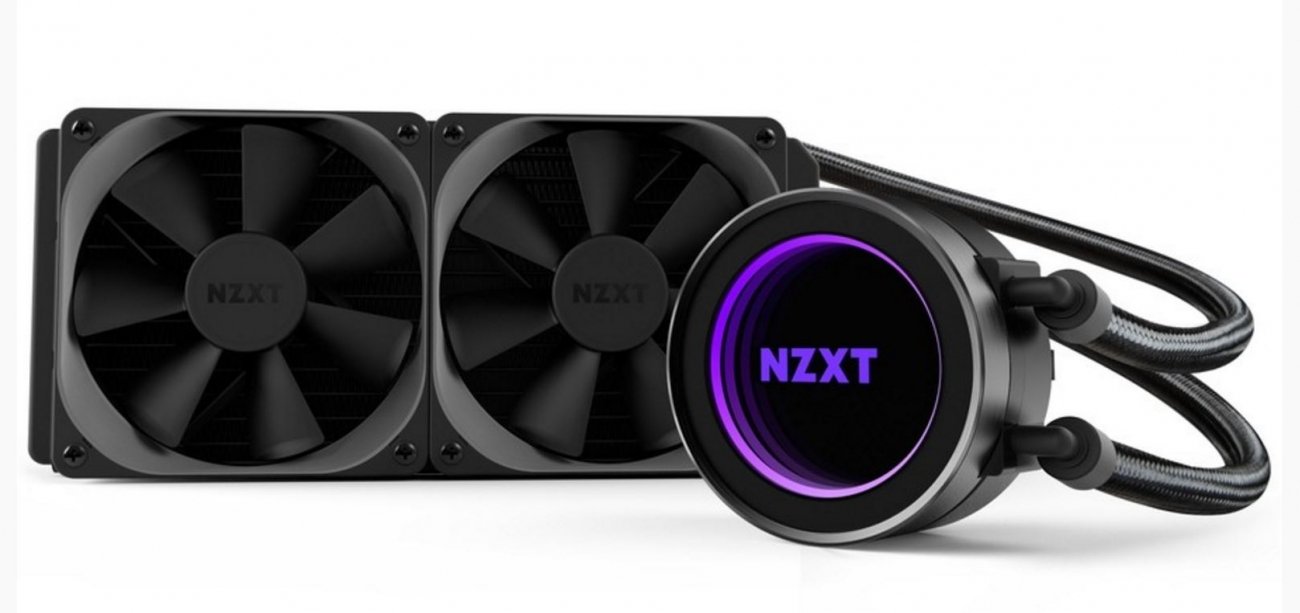
Before we delve into the different mounting options, let’s take a moment to appreciate the benefits of the H55 Quiet CPU Cooler. This all-in-one liquid cooler delivers excellent heat dissipation, thanks to its efficient design and high-quality materials. The H55 not only keeps your CPU temperatures under control, but it also operates quietly, ensuring a peaceful computing environment without the obtrusive noise associated with traditional air coolers.
When it comes to choosing a mounting location for your H55 Quiet CPU Cooler, several factors should be taken into consideration. The size and layout of your NZXT Full Tower case play a significant role in determining the available options. The airflow within your case, especially the intake and exhaust configurations, can also impact the cooling efficiency of the CPU Cooler. Another crucial factor to consider is the clearance around the motherboard and other components, as certain mounting locations may be more suitable if you have limited space.
Benefits of the H55 Quiet CPU Cooler
The H55 Quiet CPU Cooler offers several advantages that make it an excellent choice for your NZXT Full Tower case. Let’s take a closer look at the key benefits:
- Efficient Heat Dissipation: The H55 features an all-in-one liquid cooling system that efficiently dissipates heat from your CPU. By utilizing liquid cooling technology, the H55 is able to provide superior cooling performance compared to traditional air coolers. This ensures that your CPU remains at optimal temperatures, even during demanding tasks or overclocking.
- Quiet Operation: One of the standout features of the H55 is its quiet operation. The liquid cooling design minimizes fan noise, allowing you to enjoy a silent computing experience. This is especially important for users who value a quiet environment, whether they are working on complex projects or enjoying multimedia content.
- Space-Saving Design: The compact size of the H55 makes it a great option for cases with limited space. It eliminates the need for bulky heatsinks and fan towers, making it easier to fit into your NZXT Full Tower case without obstructing other components or reducing airflow.
- Improved Aesthetics: The sleek and minimalist design of the H55 adds a touch of sophistication to your PC build. The absence of large heatsinks and fans provides a clean and uncluttered appearance, allowing your components to shine aesthetically. This is particularly appealing if you’re aiming for a visually appealing and cohesive PC setup.
In addition to these primary benefits, the H55 Quiet CPU Cooler also offers features such as durable tubing for long-lasting performance, easy installation for hassle-free setup, and compatibility with a wide range of AMD and Intel processors. With its combination of efficient cooling, quiet operation, space-saving design, and aesthetic appeal, the H55 Quiet CPU Cooler is an excellent investment for users who prioritize performance, noise reduction, and aesthetics in their NZXT Full Tower builds.
Factors to Consider
When determining the best mounting location for your H55 Quiet CPU Cooler in an NZXT Full Tower case, several factors should be taken into consideration:
- Case Size and Layout: The size and layout of your NZXT Full Tower case will play a significant role in determining the available mounting options for your H55 CPU Cooler. Consider the dimensions of your case, as well as any potential obstructions or clearance issues that may affect the cooler’s installation.
- Airflow Configuration: The airflow within your PC case is crucial for effective cooling. Take note of the intake and exhaust configurations to ensure that the mounting location you choose for the H55 does not disrupt the overall airflow pattern. Optimal airflow helps dissipate heat efficiently and prevents the buildup of hot spots within the case.
- Motherboard Clearance: Check the clearance around your motherboard and other components to ensure that the mounting location you choose for the H55 does not interfere with their operation. Consider the proximity of RAM modules, VRM heatsinks, and other components to ensure that there is sufficient space for the installation of the CPU cooler.
- Compatibility: Verify the compatibility of your NZXT Full Tower case with the H55 Quiet CPU Cooler. Check the manufacturer’s specifications to ensure that the case supports the necessary mounting options for the cooler. Some cases may have specific CPU cooler clearance requirements or mounting hole placements that need to be considered.
- Noise Level: Depending on your preferences, you may want to consider the noise level produced by the H55 and how it will affect your overall computing experience. Mounting the cooler in a location that helps minimize noise transmission, such as away from the front of the case or near sound-damping materials, can help create a quieter PC environment.
By carefully considering these factors, you can choose the optimal mounting location for your H55 Quiet CPU Cooler in an NZXT Full Tower case. Taking the time to assess these aspects will ensure that your CPU cooler operates effectively, without hindrance, and contributes to the overall performance and longevity of your PC.
Different Mounting Locations
When it comes to mounting the H55 Quiet CPU Cooler in your NZXT Full Tower case, there are several different locations you can consider. Each location has its own advantages and considerations. Let’s explore the options:
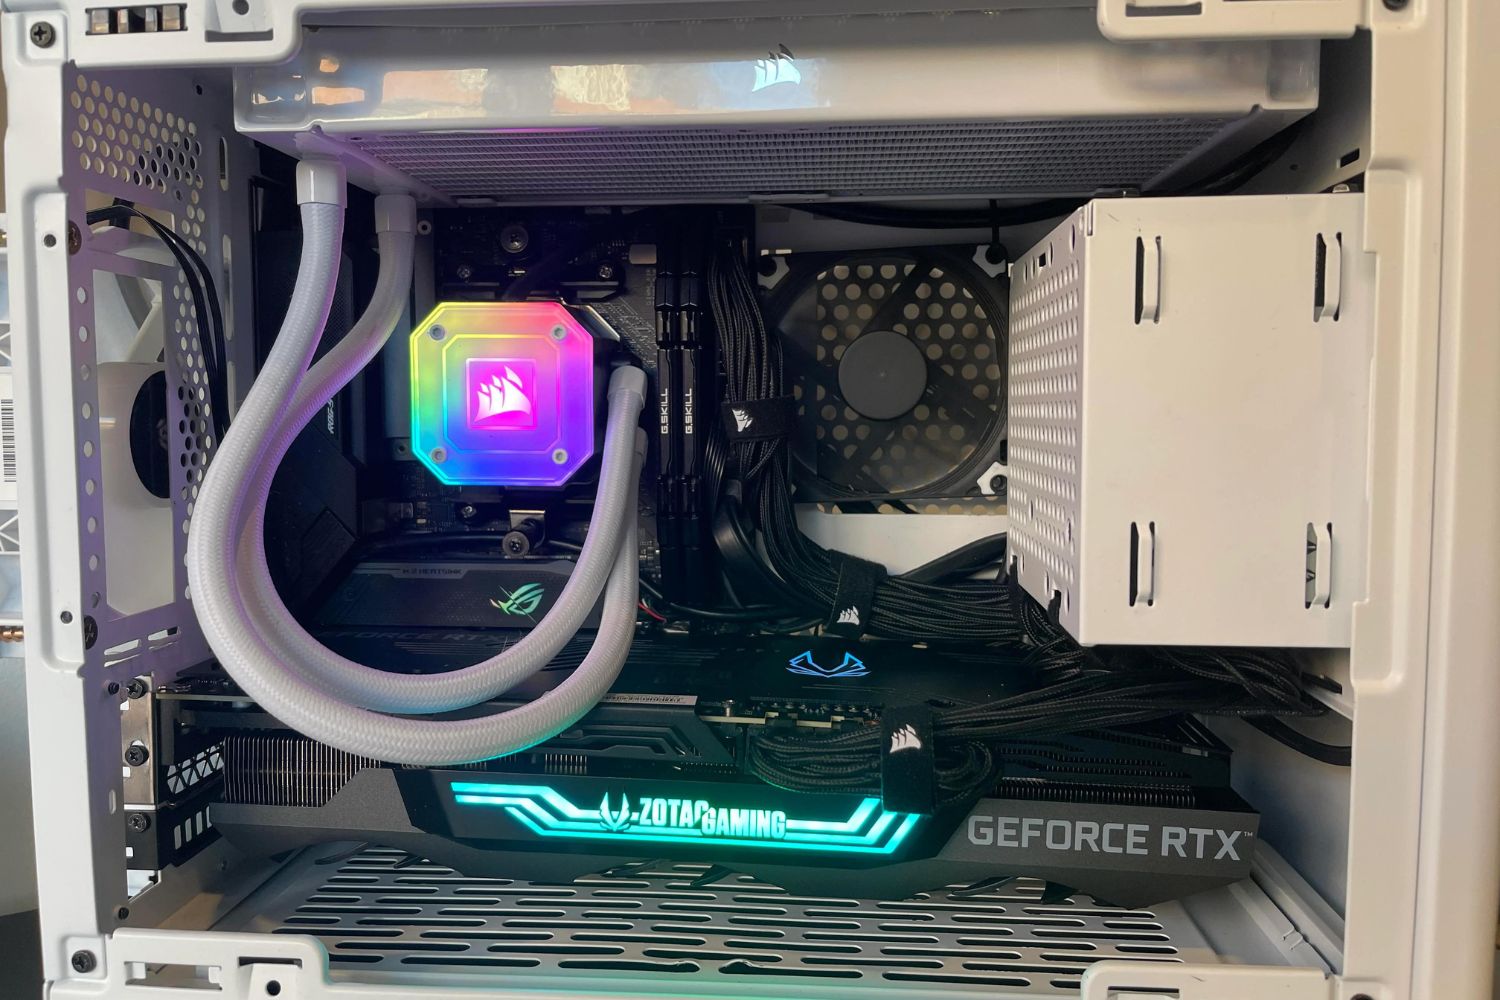
- Front Mounting: Mounting the H55 in the front of your case allows for direct intake of cool air from outside the case. This can help ensure efficient cooling for your CPU. However, this location may interrupt the front airflow and may require relocating other components, such as hard drives or fans, to create enough space.
- Top Mounting: Mounting the H55 on the top of your case provides an excellent option for efficient heat dissipation. The upward airflow in this location allows for the natural rise of hot air, helping to keep your CPU cool. However, you need to ensure that your case has sufficient clearance and space for installation, especially if you have other components occupying the top area.
- Rear Mounting: Mounting the H55 at the rear of your case is a common option and typically offers good compatibility. This location takes advantage of the existing rear fan slot for easy installation. It also helps in expelling hot air directly away from the CPU, contributing to efficient cooling. However, if your case has limited airflow at the rear, it may affect the overall cooling performance.
- Side Mounting: Some NZXT Full Tower cases offer the option to mount the H55 on the side panel. This location allows for unique cooling configurations, such as blowing cool air directly onto the CPU or utilizing an additional fan for improved airflow. However, side mounting may require additional modifications to your case, and not all cases have this option available.
Each mounting location has its own pros and cons, and the optimal choice will depend on several factors, including your case model, cooling requirements, and component layout. Consider the available space, airflow patterns, and clearance requirements when deciding on the best location for mounting your H55 Quiet CPU Cooler. It’s also worth checking the manufacturer’s recommendations or your case’s documentation for any specific guidance regarding CPU cooler mounting locations.
Front Mounting
Front mounting the H55 Quiet CPU Cooler in your NZXT Full Tower case is a popular choice for many builders. This location offers direct intake of cool air from outside the case, which can help to ensure efficient cooling for your CPU. However, there are a few factors to consider when front mounting your H55:
1. Airflow Interruption: Mounting the CPU cooler in the front may interrupt the front airflow, especially if your case has a mesh or vented front panel. The H55 radiator and fans will block some of the incoming cool air, affecting the overall airflow within the case. Make sure to consider the impact on the other components that rely on the front intake for cooling, such as hard drives or additional case fans.
2. Space and Clearance: Front mounting the H55 requires enough space in the front area of your case. Check the internal dimensions of your NZXT Full Tower case to ensure sufficient clearance for the radiator and fans. Additionally, consider whether there is enough room for other components or cables that may be in close proximity to the CPU cooler.
3. Fan Configuration: When front mounting the H55, you can choose between a push or pull fan configuration. In a push configuration, the fans are placed between the radiator and the front of the case, pushing cool air through the radiator. In a pull configuration, the fans are mounted behind the radiator, pulling cool air through. Experiment with different fan configurations to find the setup that provides the best cooling performance for your specific case and components.
4. Positive Pressure: Front mounting the H55 can contribute to a positive pressure airflow setup, where the intake airflow exceeds the exhaust airflow. This can be advantageous in keeping dust out of the case, as the positive pressure helps to push air out through any available gaps and prevent dust from entering. Consider the dust management capabilities of your case and whether front mounting the H55 aligns with your dust control strategy.
Before front mounting the H55 Quiet CPU Cooler, thoroughly assess the airflow, available space, and compatibility of your NZXT Full Tower case. Consider any potential trade-offs in terms of interruption of front airflow and the impact on other components. By carefully weighing these factors, you can determine whether front mounting the H55 is the best choice for your specific PC cooling needs.
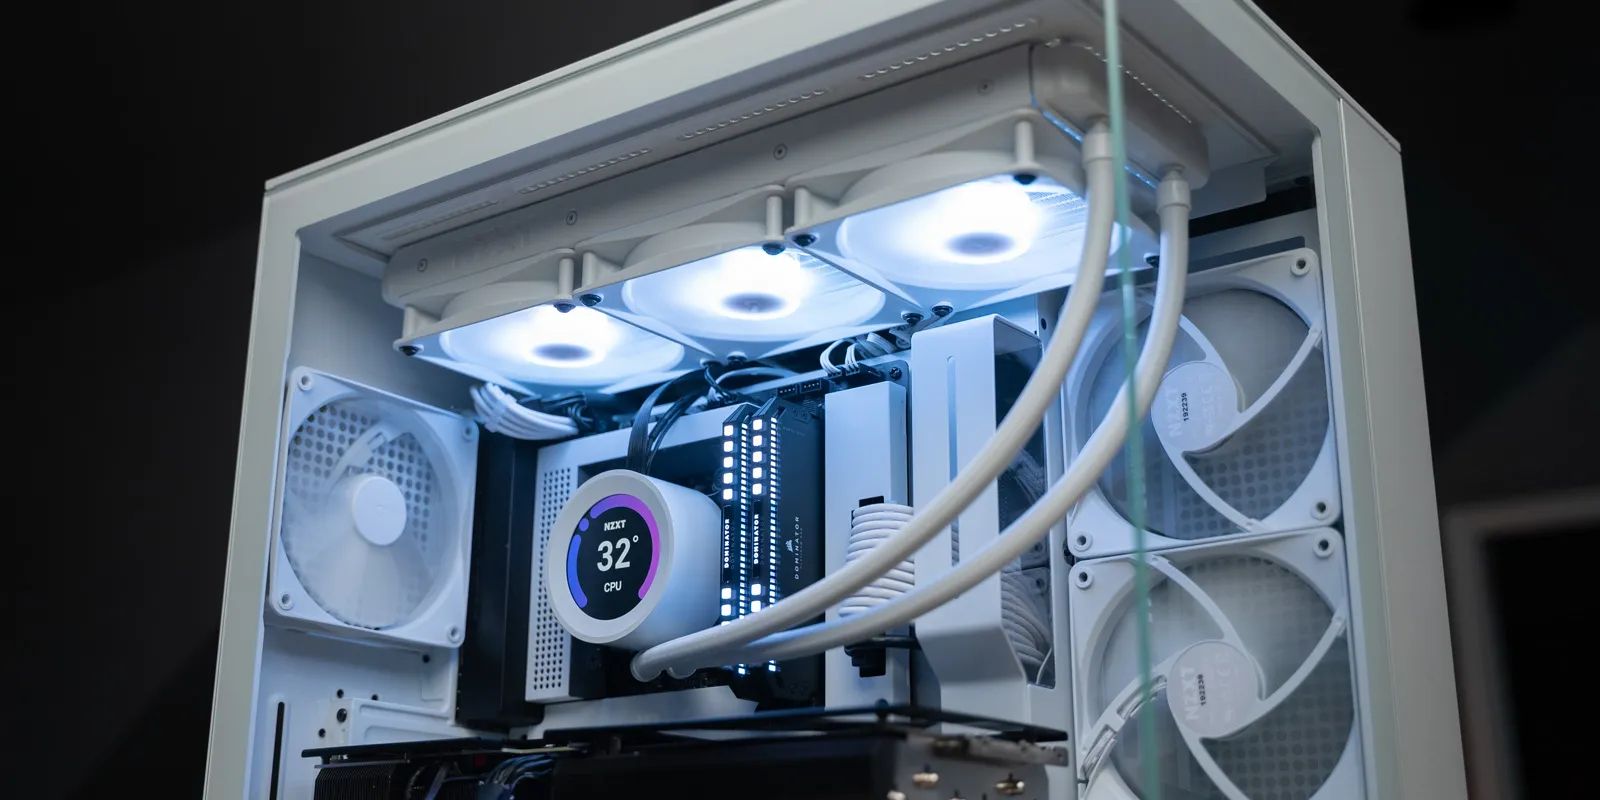
Top Mounting
Top mounting the H55 Quiet CPU Cooler in your NZXT Full Tower case is a popular option for efficient heat dissipation. This location takes advantage of the upward airflow within the case, allowing for the natural rise of hot air and helping to keep your CPU cool. When considering top mounting your H55, there are a few key factors to take into account:
1. Space and Clearance: Check the internal dimensions of your NZXT Full Tower case to ensure that it has sufficient clearance and space at the top for mounting the H55. Consider the distance between the motherboard and the top panel, as well as the available clearance for the radiator and fans. Ensure that there are no obstructions, such as other components or cables, that may interfere with the installation or airflow.
2. Airflow Optimization: Top mounting the H55 can help optimize the overall airflow within your case. As hot air naturally rises, the H55 positioned at the top of the case can efficiently expel the warm air generated by the CPU. This placement can contribute to improved cooling performance and help maintain lower CPU temperatures. However, make sure that there is enough space for the warm air to exit the case properly, either through a top ventilation grille or exhaust fans.
3. Radiator Orientation: Consider the orientation of the radiator when top mounting the H55. You have the option of mounting it with the tubes on the left or right side, depending on your case design and tubing length. Choose an orientation that allows for easy installation and tube management, ensuring that it does not interfere with other components or obstruct the airflow within the case.
4. Clearance for Other Components: Take into account the clearance needed for other components, such as memory modules or VRM heatsinks, when top mounting the H55. Ensure that there is enough space between the top of the motherboard and the radiator/fans for easy installation and proper functioning of these components.
Top mounting the H55 Quiet CPU Cooler in your NZXT Full Tower case can provide efficient heat dissipation and contribute to a well-balanced airflow system. However, it is essential to verify the space availability, ensure proper clearance, and consider the impact on other components in your system. By carefully addressing these factors, you can confidently decide if top mounting the H55 is the ideal choice for your CPU cooling needs.
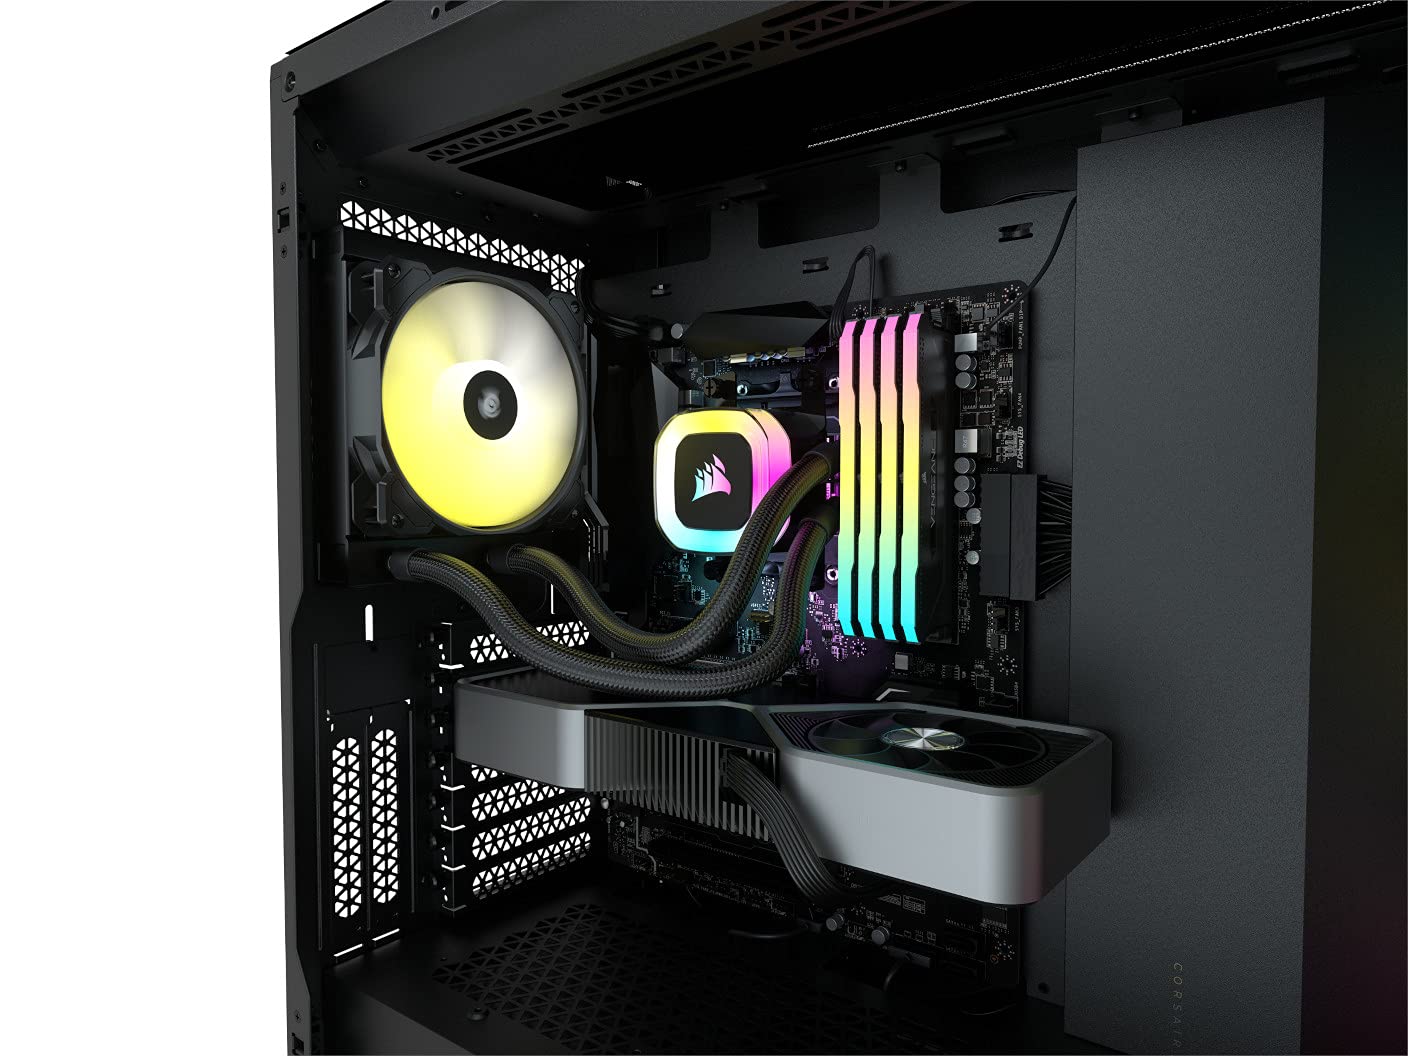
Rear Mounting
Rear mounting the H55 Quiet CPU Cooler in your NZXT Full Tower case is a common and convenient option. This location takes advantage of the existing rear fan slot, making installation straightforward. Rear mounting offers several advantages, but there are a few factors to consider before choosing this option:
1. Efficiency and Heat Dissipation: Rear mounting the H55 allows for efficient heat dissipation by expelling hot air directly away from the CPU. The rear fan slot provides a natural pathway for the hot air to exit the case, contributing to improved cooling performance. This location is especially suitable for cases with adequate rear ventilation and airflow.
2. Compatibility and Clearance: Verify that your NZXT Full Tower case has a rear fan slot that is compatible with the H55 CPU Cooler. Check the dimensions and clearance of the case to ensure that it can accommodate the radiator and fans comfortably. Additionally, consider the proximity of other components, such as the rear I/O shield, motherboard connectors, or PCI-E slots, to ensure there is enough space for the cooler’s installation.
3. Rear Fan Relocation: Rear mounting the H55 requires relocating the existing rear fan to a different location or removing it altogether. You will need to assess the impact of this change on overall cooling performance and consider whether additional case fans or alternative cooling configurations may be necessary to compensate for the relocated fan.
4. Fan Configuration: When rear mounting the H55, you have the option to configure the fans in either push or pull configuration. In a push configuration, the fans are placed between the radiator and the exterior of the case, pushing cool air through the radiator. In a pull configuration, the fans are positioned on the interior side of the radiator, pulling cool air through. Experiment with different fan configurations to determine the setup that provides the best cooling performance for your specific case and components.
Rear mounting the H55 Quiet CPU Cooler offers a straightforward installation process and efficient heat dissipation. However, it is crucial to ensure compatibility, consider clearance requirements, and evaluate the impact on existing rear fan placement. By carefully assessing these factors, you can determine if rear mounting the H55 is the ideal choice for your NZXT Full Tower case and achieve optimal cooling performance for your CPU.
Side Mounting
Side mounting the H55 Quiet CPU Cooler in your NZXT Full Tower case offers a unique and alternative cooling configuration. While not available in all cases, this location can provide specific advantages depending on your system requirements. Consider the following factors when evaluating side mounting as an option:
1. Cooling Efficiency: Side mounting the H55 allows you to blow cool air directly onto the CPU, which can contribute to efficient cooling. By positioning the radiator and fans on the side panel, cool air is directed towards the CPU area, helping to lower temperatures effectively. This configuration can be beneficial if your case has limited airflow from other directions.
2. Additional Fan Possibilities: Side mounting provides the opportunity to add extra fans to the H55 configuration. By using additional fans on the side panel, you can create a push-pull setup that further enhances cooling performance. It’s crucial to ensure that your case has the necessary mounting points and clearance for these additional fans.
3. Case Compatibility: Side mounting is not available in all NZXT Full Tower cases. Verify whether your particular case model has provisions for side panel fan or radiator installations. Check the manufacturer’s specifications or documentation to determine if side mounting is a viable option for your specific case.
4. Cable Management: Side mounting the H55 may require careful cable management, particularly for the tubing connecting the CPU cooler to the radiator. Plan the routing of the cables in a way that avoids any interference with other components, minimizes strain on the tubing, and maintains an organized and uncluttered internal system layout.
Side mounting the H55 Quiet CPU Cooler can offer an alternative and effective cooling configuration, especially if your case lacks direct airflow to the CPU area. However, it is essential to verify case compatibility, plan cable management, and ensure sufficient clearance for the side panel installation. By considering these factors, you can determine if side mounting the H55 is the right choice for your NZXT Full Tower case and optimize the cooling performance of your CPU.
Installation Process
Installing the H55 Quiet CPU Cooler in your NZXT Full Tower case is a straightforward process. Following these steps will ensure a successful installation:
1. Preparation: Start by gathering the necessary tools, including a Phillips screwdriver and any additional components that may come with the H55 CPU Cooler. Ensure that you are working in a well-lit and static-free environment to prevent any damage to your components.
2. Mounting Bracket Installation: Prepare your motherboard by installing the appropriate mounting bracket for the H55 Cooler. Refer to the instruction manual to identify the correct bracket for your CPU socket. Attach the bracket securely to the back of the motherboard, aligning it with the mounting holes provided.
3. Radiator and Fan Placement: Determine the mounting location for the H55 radiator and fan(s) based on your chosen configuration (front, top, rear, or side). Carefully position the radiator and secure it into place using the included screws or mounting hardware. Ensure that the radiator is oriented correctly, with the tubing connecting to the CPU block without any excessive tension or bending.
4. CPU Block Installation: Apply a small amount of thermal paste onto the CPU surface. Place the H55 CPU block on top of the CPU, aligning the mounting screws with the brackets on the motherboard. Gently tighten the screws in a diagonally-opposite pattern, gradually increasing the pressure to ensure even and secure mounting.
5. Fan Connection: Connect the fans to the appropriate fan headers on the motherboard or a fan controller. Refer to your motherboard’s manual for guidance on optimal fan header assignments for CPU cooling. Ensure that the fans are securely connected and that the cables are neatly routed to prevent any obstruction or interference.
6. Pump Connection: Connect the pump power cable to a dedicated pump header on the motherboard or a fan controller. Consulting your motherboard’s manual will help you identify the appropriate header for the pump connection. Confirm that the pump cable is properly connected and secured.
7. Cable Management: Proper cable management is essential for maintaining an organized and unobstructed airflow path within your case. Take the time to neatly route and secure the power and data cables, ensuring that they do not interfere with the CPU cooler or other components.
8. Final Checks: Double-check all connections and ensure that everything is securely in place. Verify that there is no excessive tension or strain on the radiator tubing or cables. Close the case and ensure that any additional case fans or ventilation systems are properly aligned to facilitate optimum airflow within the case.
Following these steps will guide you through a successful installation process for the H55 Quiet CPU Cooler in your NZXT Full Tower case. Always refer to the product manual or manufacturer’s instructions for any specific guidance or recommendations to ensure a smooth and hassle-free installation experience.
Conclusion
Choosing the optimal mounting location for your H55 Quiet CPU Cooler in an NZXT Full Tower case is essential for efficient cooling and optimal performance. By considering factors such as case size, airflow configuration, motherboard clearance, compatibility, and noise level, you can determine the best placement for your CPU cooler.
We explored various mounting options, including front, top, rear, and side mounting, each with its own benefits and considerations. Front mounting offers direct intake of cool air, but it may interrupt front airflow and require additional space. Top mounting takes advantage of natural airflow and efficient heat dissipation, but clearance and space must be considered. Rear mounting offers convenience and efficient heat expulsion, but compatibility and clearance must be verified. Side mounting provides unique cooling configurations but may not be available in all cases and requires careful cable management.
The H55 Quiet CPU Cooler offers several advantages, including efficient heat dissipation, quiet operation, space-saving design, and improved aesthetics. These benefits make it a compelling choice for users seeking better CPU cooling performance and reduced noise levels in their NZXT Full Tower builds.
Regardless of the mounting location chosen, following the proper installation process is crucial. Preparing the motherboard, positioning the radiator and fans, securely attaching the CPU block, connecting the fans and pump, organizing cables, and performing final checks are key steps to ensure a successful installation and optimal performance of the H55 CPU Cooler.
By carefully assessing your requirements, considering the available options, and following the installation process, you can confidently mount the H55 Quiet CPU Cooler in your NZXT Full Tower case, improving your CPU cooling capabilities and enjoying a quieter computing experience.