Introduction
Have you ever found yourself wondering where the “Insert” key is on your keyboard? Whether you’re a casual computer user or a seasoned professional, knowing the location of the “Insert” key can save you time and effort when working with text documents.
The “Insert” key is a special function key found on most computer keyboards. It offers a unique set of functions that can be incredibly useful in various situations. However, locating this elusive key can sometimes be a challenge, especially with the myriad of keyboard layouts available today.
In this article, we will explore the different types of keyboards and provide a comprehensive guide on where to find the “Insert” key on each of them. So, whether you’re using a standard QWERTY keyboard, a laptop keyboard, a Mac keyboard, or a Chromebook keyboard, we’ve got you covered.
But before we dive into the specifics of finding the “Insert” key, let’s first understand its function and why it is essential for your keyboard usage.
By knowing the location of the “Insert” key and mastering its usage, you can become more efficient and productive when working with documents, spreadsheets, code editors, and other applications that involve text manipulation.
So, without further ado, let’s begin our journey to unravel the mystery of the “Insert” key and discover its hidden powers!
Defining Insert
Before we delve into the specifics of where to find the “Insert” key on different keyboards, let’s first clarify what the “Insert” key does and why it is an integral part of keyboard functionality.
The “Insert” key, typically abbreviated as “Ins” on keyboards, is a function key that allows you to control the behavior of your text input. Its primary function is to toggle between two different text entry modes: “Insert” mode and “Overwrite” mode.
In “Insert” mode, the cursor moves forward as you type, pushing existing characters to the right. This mode is useful for adding or inserting new text into a document without overwriting or deleting the existing content. It functions similarly to the blinking vertical line or caret you see in text editors or word processors.
In contrast, in “Overwrite” mode, when you type new characters, they replace the existing characters in the text. This mode is handy when you want to overwrite or delete text without the need for manual deletion or backspacing.
Understanding the difference between these two modes is crucial when working with text documents that require editing or making changes in specific sections.
Additionally, the “Insert” key also has additional functions in certain applications or software. For example, in Microsoft Excel, pressing the “Insert” key allows you to insert cells, rows, or columns within a spreadsheet. In some text editors, you can use the “Insert” key to toggle between insert and overwrite modes for code editing.
Now that we have a clear understanding of the purpose and functionality of the “Insert” key, let’s explore its location on different types of keyboards.
The Function of the Insert Key
The “Insert” key, often overlooked and underutilized, serves several important functions that can greatly enhance your productivity and efficiency while working with text documents or certain applications. Let’s take a closer look at the key functions of the “Insert” key:
- Toggle between Insert and Overwrite mode: As mentioned earlier, the primary function of the “Insert” key is to toggle between these two text entry modes. When in Insert mode, new characters are inserted at the cursor position without overwriting the existing text. Conversely, in Overwrite mode, new characters replace the existing characters.
- Text editing and manipulation: The “Insert” key is particularly useful when editing text documents or working with code. In Insert mode, you can easily add or insert text within a paragraph or line without having to manually delete or shift existing content. This is especially handy when making changes or additions in the middle of a sentence or code snippet.
- Selective text overwrite: In Overwrite mode, the “Insert” key allows you to selectively overwrite specific characters or sections of text. Instead of manually deleting the content and typing anew, simply position the cursor at the desired location and start typing. The new text will replace the old characters in real-time.
- Inserting cells, rows, or columns: In certain applications like Microsoft Excel, pressing the “Insert” key enables you to insert cells, rows, or columns within a spreadsheet. This functionality is valuable when you need to add or rearrange data without disrupting the structure of the entire spreadsheet.
- Toggling between insert and overwrite mode in code editors: Code editors often have their own keybindings and configurations for the “Insert” key. Depending on the setup, pressing the “Insert” key may allow you to toggle between insert and overwrite mode specifically for code editing, providing more flexibility and control over your coding workflow.
By understanding and utilizing the various functions of the “Insert” key, you can streamline your editing process, be more precise in your text manipulation, and save valuable time when working with text documents, spreadsheets, code editors, and other applications that involve text input.
Now that we have explored the functionality of the “Insert” key, let’s move on to the next section to uncover its whereabouts on different types of keyboards.
Where to Find the Insert Key on Different Types of Keyboards
The location of the “Insert” key on a keyboard can vary depending on the type of keyboard you are using. Below, we will explore where to find the “Insert” key on different types of keyboards:
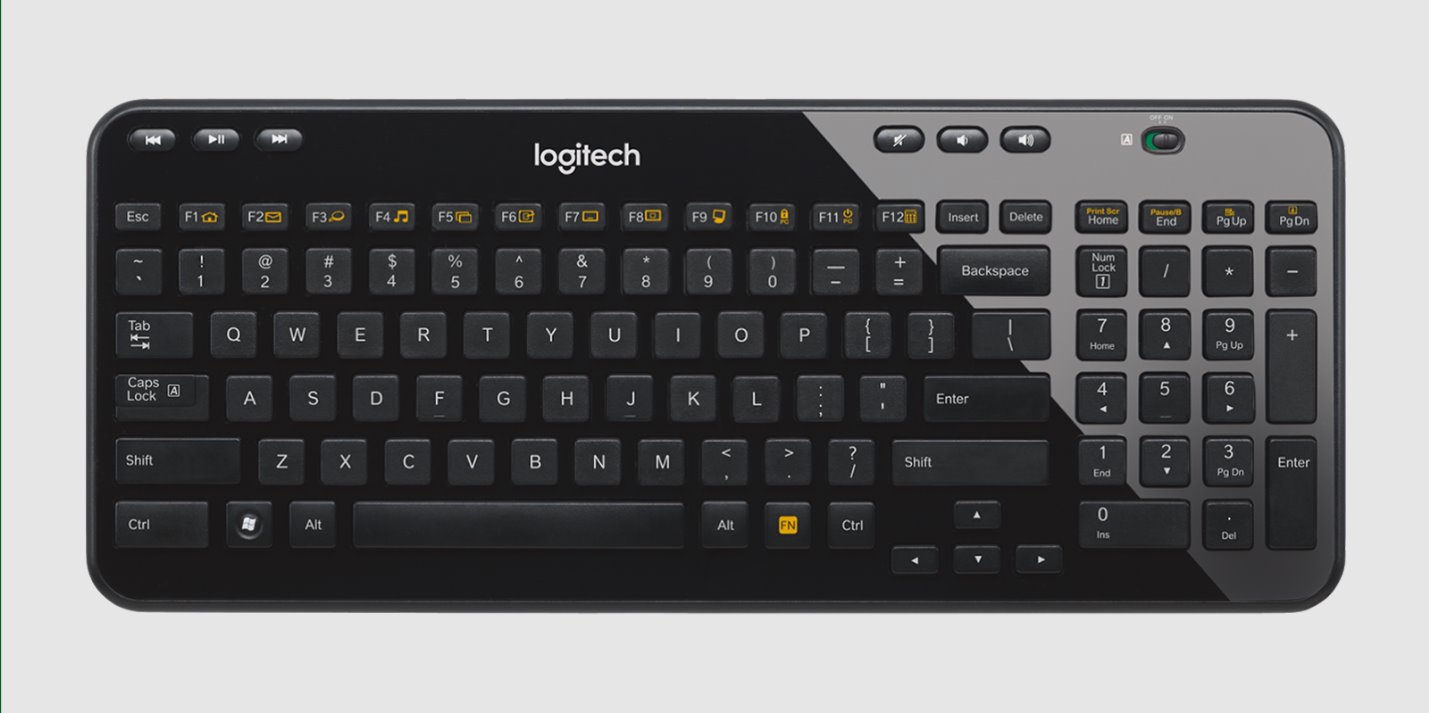
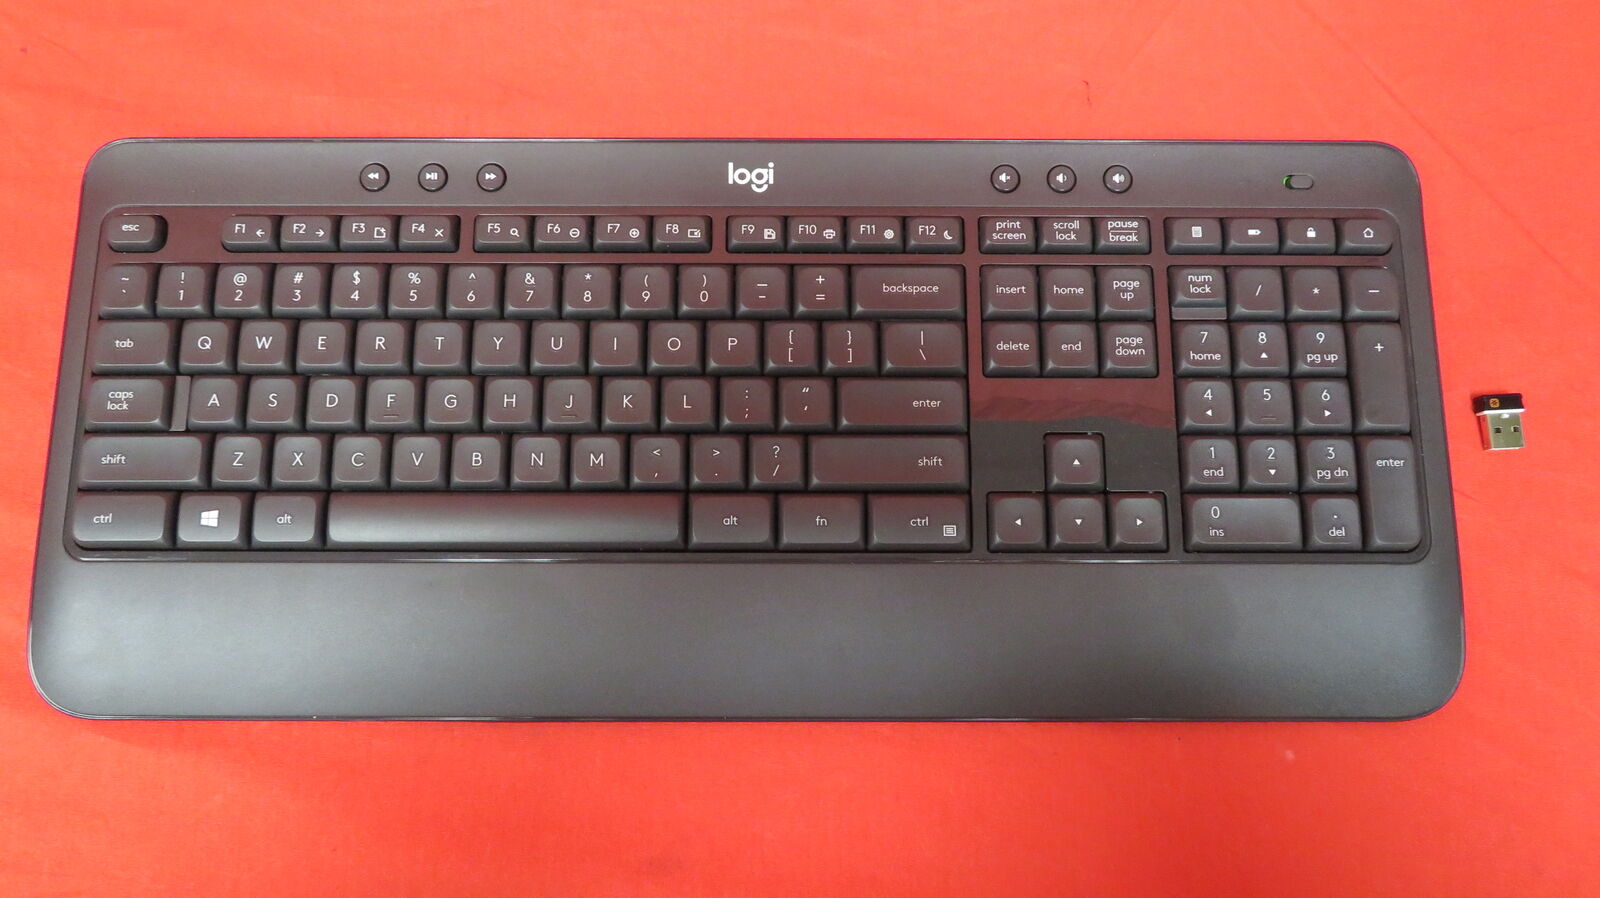
1. Standard QWERTY Keyboard:
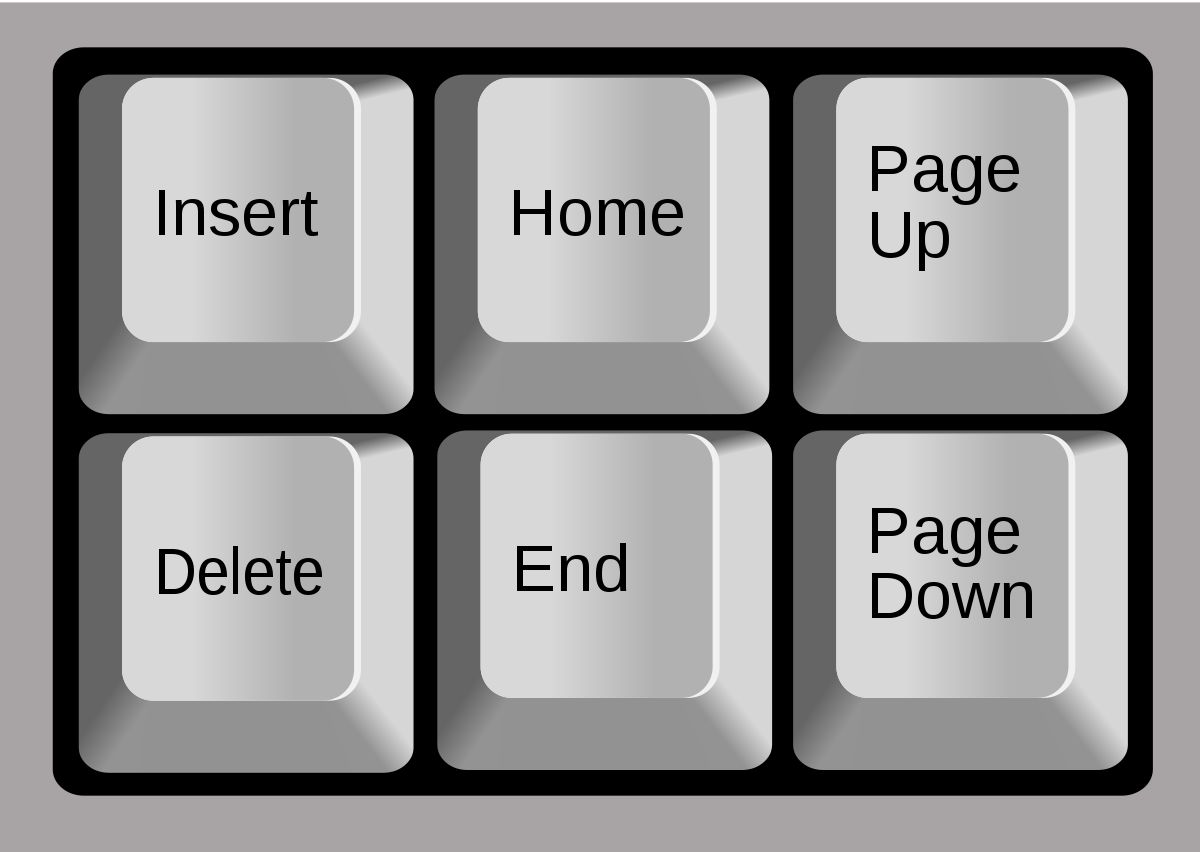
On a standard QWERTY keyboard, the “Insert” key is typically located in the top-right corner of the main key area, just above the arrow keys. It is often placed alongside other function keys such as Home, Page Up, Page Down, and End.
2. Laptop Keyboard:
Laptop keyboards are usually more compact, so the placement of the “Insert” key may differ from that of a standard QWERTY keyboard. On most laptop keyboards, you can access the “Insert” function by pressing the “Fn” key along with another designated key. The exact combination varies between different laptop models, but it is commonly located near the top-right portion of the keyboard.
3. Mac Keyboard:
Mac keyboards, especially those for desktops, typically have a layout similar to standard QWERTY keyboards. The “Insert” key on a Mac keyboard is labeled as “fn” and is located in the bottom-left corner, next to the Control (Ctrl) and Option (Alt) keys. To access the “Insert” function, you need to press the “fn” key along with the designated key combination.
4. Chromebook Keyboard:
On a Chromebook keyboard, the “Insert” key is usually absent. Chromebooks utilize a simplified keyboard layout, and the “Insert” function is not deemed as essential. However, you can still achieve the same functionality by using a key combination. For example, pressing the “ALT” key along with the “Search” or “Launcher” key can activate the “Insert” function.
It’s important to note that keyboard layouts may slightly differ based on the manufacturer or model, so it’s a good practice to refer to the keyboard’s documentation or manuals for specific instructions on locating the “Insert” key.
Now that you know where to find the “Insert” key based on the type of keyboard you are using, let’s move on to the next section to explore the specific placement of the “Insert” key on a standard QWERTY keyboard.
Where Is Insert on a Standard QWERTY Keyboard
On a standard QWERTY keyboard, the “Insert” key is typically located in the top-right corner of the main key area, just above the arrow keys. Its placement is consistent across most keyboards that follow the standard layout.
The “Insert” key is often positioned alongside other function keys such as Home, Page Up, Page Down, and End. It is commonly labeled as “Insert” or abbreviated as “Ins”. The key itself is usually rectangular in shape, similar to other function keys on the keyboard.
When you locate the “Insert” key, you can easily toggle between the Insert and Overwrite modes by simply pressing the key while working with text documents, spreadsheets, or other applications that involve text input. The current mode is typically indicated by a small status indicator on the screen, such as “Insert” or “Overwrite”.
On some keyboards, you may also find secondary functions assigned to the “Insert” key, which can be accessed by using the Fn key in combination with the “Insert” key. These secondary functions may vary depending on the keyboard model and manufacturer.
If you are having trouble locating the “Insert” key on your specific keyboard, it’s recommended to refer to the keyboard’s documentation or manual, which should provide a detailed key layout and labeling for your specific model.
Now that you know where to find the “Insert” key on a standard QWERTY keyboard, let’s move on to exploring its location on a laptop keyboard.
Where Is Insert on a Laptop Keyboard
Laptop keyboards are designed to be more compact than standard desktop keyboards, which often leads to a different placement of keys, including the “Insert” key. On most laptop keyboards, the “Insert” key itself may be absent or assigned to a secondary function. However, you can still access the “Insert” function through a key combination.
To activate the “Insert” function on a laptop keyboard, you typically need to press the “Fn” (Function) key along with another designated key. The specific key combination varies depending on the laptop’s manufacturer and model.
On many laptops, the “Insert” function is achieved by pressing the “Fn” key along with the “Ins” or “Insert” key, which is usually positioned in the top-right portion of the keyboard. The “Insert” key may be marked with the abbreviation “Ins” or the word “Insert”.
It’s important to note that the exact location of the “Insert” key may differ slightly between laptop models. However, it is generally found near the top-right corner of the keyboard or in close proximity to other function keys.
If you’re unsure about the specific key combination to activate the “Insert” function on your laptop, the best resource is the laptop’s documentation or manual. It should provide detailed instructions on how to access the “Insert” function on your particular laptop model.
Now that you know how to find the “Insert” key on a laptop keyboard, let’s explore its location on a Mac keyboard.
Where Is Insert on a Mac Keyboard
Mac keyboards, whether for desktops or laptops, have a slightly different layout compared to standard PC keyboards. The “Insert” key is no exception, as it is labeled differently and located in a distinct position on a Mac keyboard.
On a Mac keyboard, you won’t find a dedicated “Insert” key. Instead, the “Insert” function is accessed by pressing the “fn” (Function) key along with another designated key combination.
The “fn” key on a Mac keyboard is located in the bottom-left corner, next to the Control (Ctrl) and Option (Alt) keys. To activate the “Insert” function, press and hold the “fn” key and then press the designated key combination.
The specific key combination to activate the “Insert” function on a Mac keyboard may vary depending on the application or context. For example, in text editors or word processors, the “fn” key combined with the “Return” or “Enter” key may serve as the “Insert” key combination.
It’s worth noting that the “fn” key on a Mac keyboard is typically used to access secondary functions or symbols on the function keys (F1-F12). The “Insert” function is just one of the secondary functions accessible through the “fn” key.
To get precise instructions on the key combination for the “Insert” function on your Mac keyboard, it’s recommended to refer to the documentation or manual specific to your Mac model or consult the built-in help resources on your Mac operating system.
Now that you know how to activate the “Insert” function on a Mac keyboard, let’s move on to exploring its location on a Chromebook keyboard.
Where Is Insert on a Chromebook Keyboard
Chromebook keyboards have a simplified layout compared to traditional keyboards, and as a result, the “Insert” key is often absent. However, you can still access the “Insert” function on a Chromebook keyboard by using a key combination.
On most Chromebook keyboards, the “Insert” function can be activated by pressing the “ALT” key along with another designated key. The specific key combination to activate the “Insert” function may vary depending on the Chromebook model and manufacturers.
Commonly, the “ALT” key, also known as the “Alternate” or “Option” key, is found on the bottom-left area of the keyboard, next to the Spacebar. The “ALT” key on a Chromebook is typically adorned with the word “ALT” or the symbol “⎇”.
To trigger the “Insert” function, press and hold the “ALT” key and simultaneously press the designated key on your Chromebook keyboard. The key assigned for the “Insert” function may vary between different Chromebook models.
Chromebooks being designed with simplicity in mind, the “Insert” function is not considered crucial for everyday user tasks. Therefore, it is not assigned a dedicated key but rather accessed through a key combination.
If you are unsure about the specific key combination to activate the “Insert” function on your Chromebook, it is advisable to consult the documentation or manual that came with your device or refer to the Chromebook’s help resources provided by the manufacturer or Google.
Now that you know how to access the “Insert” function on a Chromebook keyboard, let’s proceed to the next section to learn how to use the “Insert” key effectively.
How to Use the Insert Key
Now that you are familiar with the location of the “Insert” key on different types of keyboards, let’s explore how to utilize its functionality effectively.
Using the “Insert” key is straightforward once you understand its purpose. Here are some practical tips on how to make the most of the “Insert” key:
1. Toggling between Insert and Overwrite Modes:
Press the “Insert” key to toggle between Insert mode and Overwrite mode. In Insert mode, new characters are inserted at the cursor position without overwriting existing text. In Overwrite mode, new characters replace the existing characters at the cursor position.
2. Editing and Inserting Text:
In Insert mode, you can easily edit or insert text within a document or line by positioning the cursor at the desired location and entering new characters. This feature is particularly valuable in situations where you want to add or modify content without manually deleting or moving existing text.
3. Selective Text Overwrite:
In Overwrite mode, you can selectively replace specific characters or sections of text by positioning the cursor at the desired location and typing new characters. This allows for real-time character substitution and makes updating or modifying text seamless.
4. Inserting Cells, Rows, or Columns:
If you’re working with a spreadsheet application such as Microsoft Excel, use the “Insert” key to insert cells, rows, or columns within the spreadsheet. This functionality helps you maintain the structure and integrity of the data while making necessary adjustments or additions.
5. Toggling between Insert and Overwrite in Code Editors:
In certain code editors or integrated development environments (IDEs), you may configure the “Insert” key to toggle between Insert and Overwrite mode specifically for code editing. This allows you to control how new characters are inserted or replace existing ones, streamlining your coding workflow.
By mastering the usage of the “Insert” key, you can significantly improve your productivity and efficiency when working with text documents, spreadsheets, code editors, and other applications that involve text input.
Now that you’re well-equipped with the knowledge of utilizing the “Insert” key effectively, let’s wrap up this informative journey.
Conclusion
The “Insert” key may seem like a small and often overlooked part of your keyboard, but its functionality can greatly impact your productivity and efficiency when working with text documents, spreadsheets, coding, and more. By understanding where to find the “Insert” key on different types of keyboards and how to use it effectively, you can harness its power to streamline your editing process and make precise text manipulations.
We explored the various locations of the “Insert” key on different keyboards, including standard QWERTY keyboards, laptop keyboards, Mac keyboards, and Chromebook keyboards. While the placement may differ slightly, knowing where to find the “Insert” key is crucial for accessing its functions.
We also highlighted the key functions of the “Insert” key, such as toggling between Insert and Overwrite modes, editing and inserting text, selectively overwriting text, inserting cells in spreadsheets, and toggling modes in code editors.
Whether you’re a student, a professional, or a casual computer user, mastering the usage of the “Insert” key can improve your efficiency and save valuable time in your daily tasks.
So, the next time you find yourself needing to insert or overwrite text, remember to locate the “Insert” key on your specific keyboard and utilize its hidden powers to enhance your text editing experience.
Now that you’re equipped with the knowledge of the “Insert” key, go ahead and conquer your text documents with precision and dexterity!