Introduction
Welcome to the fascinating world of digital photography! One of the key elements that contribute to capturing stunning photos is understanding and utilizing the aperture setting on your digital camera. Whether you’re a photography enthusiast or a professional photographer, having a good grasp of how aperture works can greatly elevate the quality of your images.
Aperture refers to the opening in the lens that allows light to pass through and reach the image sensor. It acts like the pupil of your eye, controlling the amount of light that enters the camera. Understanding aperture is crucial because it not only affects the exposure of your images but also plays a role in determining the depth of field. These two factors, exposure and depth of field, have a significant impact on the overall look and feel of your photographs.
As an aspiring photographer, you might wonder: how does the aperture setting affect my photos? Well, in this article, we will delve into the world of aperture, exploring its role in creating captivating images. We’ll discuss how aperture affects the depth of field and exposure, and how you can use it creatively to achieve different effects. So, grab your camera and let’s get started!
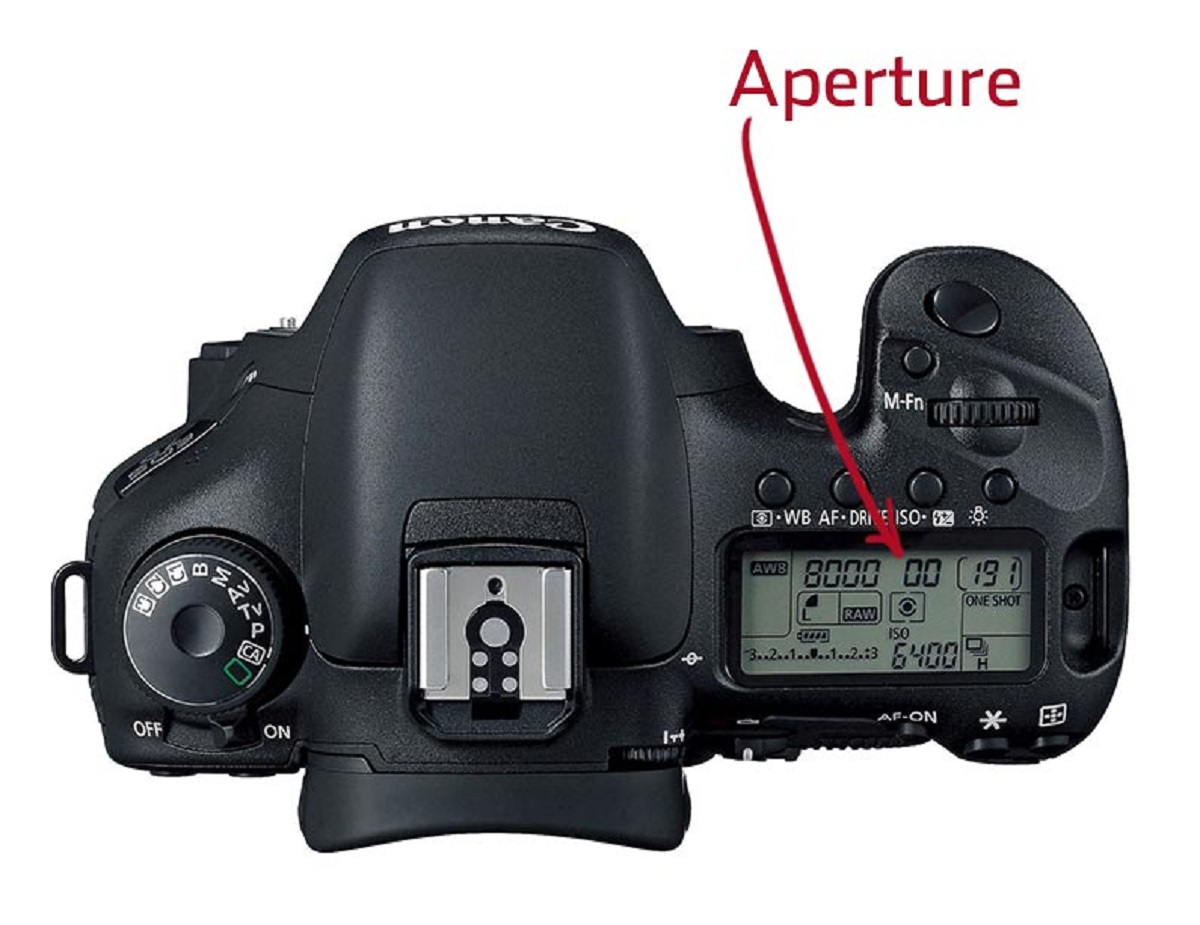
Before we get into the technical aspects, it’s important to note that aperture is measured in f-stops. Each f-stop represents a specific aperture setting and determines the amount of light reaching the image sensor. The lower the f-stop number, the larger the aperture opening and the more light that enters the camera. Conversely, a higher f-stop number indicates a smaller aperture opening and less light reaching the sensor.
Understanding aperture is crucial for every photographer, as it allows you to control the amount of light entering your camera and determine the depth of field in your images. Next, we’ll dive deeper into how aperture affects your photos, starting with the concept of depth of field.
Definition and Explanation of Aperture
Aperture, in photography, refers to the opening in the lens that controls the amount of light entering the camera. It is measured in f-stops, represented by numbers such as f/1.8, f/4, f/8, and so on. The lower the f-stop number, the wider the aperture opening, and the more light that enters the camera. Conversely, a higher f-stop number indicates a smaller aperture opening and less light reaching the camera’s image sensor.
Understanding aperture is essential because it has a significant impact on two critical aspects of photography: the depth of field and exposure.
When it comes to depth of field (DOF), aperture plays a crucial role in determining the amount of the image that appears sharp and in focus. A wider aperture (lower f-stop number) results in a shallow depth of field, meaning that only a small portion of the image, such as the subject, appears sharp while the foreground and background are blurry. This effect is commonly used in portrait photography, where the focus is on the subject, creating a pleasing separation between the person and the background.
On the other hand, a smaller aperture (higher f-stop number) increases the depth of field, resulting in a larger portion of the image, from foreground to background, appearing sharp and in focus. This technique is often applied in landscape photography, where the photographer wants to capture the intricate details of the entire scene.
Besides depth of field, the aperture setting also affects the exposure of your photos. Aperture, along with shutter speed and ISO, is one of the three pillars of exposure in photography. By adjusting the aperture, you can control the amount of light entering the camera and consequently impact the overall brightness of your images.
For example, if you are shooting in low-light conditions and want to capture a well-exposed image, using a wider aperture (lower f-stop number) allows more light to reach the camera’s sensor, resulting in a brighter photo. Alternatively, if you’re shooting in bright sunlight and want to limit the amount of light entering the camera, you can choose a smaller aperture (higher f-stop number) to achieve proper exposure without overexposing the image.
Understanding aperture and its impact on depth of field and exposure is crucial for mastering photography. By experimenting with different aperture settings in various shooting situations, you can gain a better understanding of how it affects your images. In the next section, we will explore how aperture interacts with depth of field and exposure in greater depth.
How Aperture Affects Your Photos
Aperture plays a crucial role in shaping the overall look and feel of your photographs. By understanding how aperture affects your photos, you can harness its power to create stunning images that captivate viewers.
One of the main ways aperture impacts your photos is through the control of depth of field (DOF). As mentioned earlier, a wider aperture (lower f-stop number) results in a shallow depth of field, while a smaller aperture (higher f-stop number) increases the depth of field.
Let’s take a closer look at these two scenarios. When using a wider aperture, such as f/2.8, for a portrait, you can achieve a beautifully blurred background, also known as bokeh. This effect draws attention to the subject and creates a visually pleasing separation between the subject and the surroundings. This technique is commonly used in portrait and close-up photography to emphasize the main subject and add a sense of depth to the image.
On the other hand, when using a smaller aperture, like f/8 or f/16, for landscape photography, you can ensure that both the foreground and background of the scene are in focus. This allows you to capture intricate details throughout the entire image, from the flowers in the foreground to the mountains in the distance. Such a wide depth of field is beneficial when you want to represent the scene as faithfully as possible.
In addition to depth of field, aperture also has a direct impact on exposure. By adjusting the aperture setting, you can control the amount of light entering the camera and influence the overall brightness of your images.
A wider aperture (lower f-stop number) allows more light to pass through the lens, which is beneficial in low-light situations or when you want to achieve a shallow depth of field. This is particularly useful for capturing indoor shots, nighttime photography, or creative shots with selective focus.
Conversely, using a smaller aperture (higher f-stop number) reduces the amount of light entering the camera. This is beneficial when shooting in bright conditions, as it helps prevent overexposure and balances the exposure across the entire frame. It is commonly used in landscape photography or when you want to capture a scene with great detail.
Understanding how aperture affects depth of field and exposure empowers you to have full creative control over your images. By experimenting with different aperture settings and understanding their effects, you can elevate your photography to the next level. In the next section, we will explore the aperture priority and manual modes, which allow you to adjust the aperture precisely to achieve your desired outcome.
Aperture and Depth of Field
Depth of field (DOF) refers to the area of sharp focus in your photographs, from the foreground to the background. Aperture plays a critical role in determining the depth of field in your images. Understanding how aperture affects depth of field can help you create visually impactful photos with the desired focus and blur.
Using a wider aperture (lower f-stop number) leads to a shallower depth of field, meaning that only a small portion of the image appears in sharp focus while the rest becomes blurred. This effect is particularly useful in portrait photography, where you want to isolate the subject and create a pleasing separation from the background.
Let’s say you’re taking a portrait of someone against a busy street. By using a wide aperture like f/2.8 or f/1.8, you can achieve a shallow depth of field where the subject’s face is crisp and clear, while the background becomes beautifully blurred. This separation helps draw the viewer’s attention to the subject, making them the main focal point of the image.
On the other hand, using a smaller aperture (higher f-stop number) increases the depth of field, resulting in more of the image being in focus. This is beneficial for capturing landscapes or scenes where you want everything sharp, from the foreground to the background.
For example, imagine you’re photographing a breathtaking mountain vista. To capture all the intricate details of the foreground and the distant peaks, you would opt for a smaller aperture like f/8 or f/11. This allows you to achieve a deep depth of field, ensuring that everything from the flowers in the foreground to the mountain range in the distance is sharp and well-defined.
Keep in mind that other factors also influence the depth of field, such as the distance between the camera and the subject, the focal length of the lens, and the size of the camera’s image sensor. However, aperture remains one of the most significant factors in controlling and manipulating the depth of field.
By understanding how aperture impacts depth of field, you can create stunning images that effectively convey your intended message or evoke a particular mood. Whether you want to isolate your subject or capture every detail in a landscape, adjusting the aperture allows you to achieve the desired balance between sharpness and blur. In the next section, we will explore how aperture interacts with exposure, another essential aspect of photography.
Aperture and Exposure
Aperture, along with shutter speed and ISO, is one of the key components that determine the exposure of your photographs. Understanding how aperture affects exposure is essential for achieving well-balanced and properly exposed images.
Aperture controls the amount of light that enters the camera through the lens. A wider aperture (lower f-stop number) allows more light to reach the image sensor, resulting in a brighter image. Conversely, a smaller aperture (higher f-stop number) limits the amount of light entering the camera, resulting in a darker image.
Let’s say you’re photographing a sunset scene with vibrant colors. To capture the scene in all its glory, you may choose to use a wider aperture, such as f/2.8 or f/4. This allows more light to enter the camera, producing a brighter exposure that showcases the vivid hues of the sunset.
On the other hand, if you’re shooting in bright daylight and want to avoid overexposure, you can opt for a smaller aperture, such as f/11 or f/16. By reducing the aperture size, you limit the amount of light reaching the camera’s sensor, resulting in a properly exposed image without losing detail in the highlights.
Understanding the relationship between aperture and exposure gives you control over the artistic and technical aspects of your photography. By adjusting the aperture setting, you can balance the exposure according to the lighting conditions and the desired creative outcome.
It’s important to note that adjusting the aperture also influences the depth of field, as discussed in the previous section. So, when making decisions about exposure, you need to consider its effect on depth of field as well. Balancing these two factors is crucial in creating visually appealing and well-exposed photographs.
Additionally, it’s worth mentioning that aperture setting alone may not guarantee a perfectly exposed photo. The exposure of an image is a combination of aperture, shutter speed, and ISO. These three aspects work together to determine the overall brightness and quality of the photograph. By finding the right balance between these factors, you can achieve the desired exposure for your images.
Understanding how aperture affects exposure allows you to overcome challenging lighting conditions and achieve the desired artistic outcome. Balancing aperture with other exposure settings empowers you to capture the essence of a scene with accuracy and creative flair. In the next section, we will explore two shooting modes that give you greater control over the aperture setting: aperture priority and manual mode.
Aperture Priority and Manual Modes
Aperture priority and manual modes are two shooting modes that offer photographers greater control over the aperture setting. These modes allow you to adjust the aperture according to your creative vision and shooting conditions.
In aperture priority mode (often denoted by “A” or “Av” on the camera’s mode dial), you select the desired aperture, and the camera automatically determines the appropriate shutter speed to achieve proper exposure. This mode is ideal when you want to have precise control over the depth of field while allowing the camera to handle the exposure calculations.
By selecting a wider aperture (lower f-stop number), you can create a shallow depth of field and achieve a pleasing background blur. Conversely, choosing a smaller aperture (higher f-stop number) increases the depth of field, ensuring more of the image remains in focus.
Aperture priority mode is particularly useful in situations where depth of field is a critical factor, such as portrait or macro photography. You can focus on composing your shot and capturing the desired subject while letting the camera handle the exposure settings for you.
On the other hand, manual mode (often denoted by “M” on the camera’s mode dial) provides complete control over both the aperture and shutter speed settings. In this mode, you have the flexibility to adjust both settings based on your creative intent and the specific lighting conditions.
Manual mode is beneficial when you want full control over the exposure and don’t want the camera to make any automatic adjustments. It allows you to fine-tune the aperture, shutter speed, and ISO to achieve the desired exposure and creative effect.
While manual mode requires more technical knowledge and practice, it offers unparalleled control over the final outcome of your photographs. It empowers you to experiment with different aperture and shutter speed combinations, providing the freedom to capture images exactly as you envision them.
Both aperture priority and manual modes give you the ability to manipulate the aperture setting to achieve the desired depth of field and exposure. Whether you prefer the convenience of aperture priority mode or the complete control of manual mode, these shooting modes enable you to unleash your creativity and capture stunning images.
Now that you have a better understanding of these shooting modes and how they relate to aperture control, you can confidently explore and experiment with different settings to achieve your desired photographic results. In the next section, we will discuss how to choose the right aperture for various shooting situations.
Choosing the Right Aperture for Different Situations
Choosing the right aperture for different shooting situations is a key skill that every photographer should develop. The aperture setting directly impacts the depth of field, exposure, and creative effects in your photos. Here are some guidelines to help you select the ideal aperture for various scenarios:
- Portraits: When shooting portraits, a wide aperture (such as f/2.8 or lower) is often preferred to create a shallow depth of field and achieve a blurred background. This allows the subject to stand out prominently, creating a professional and eye-catching look.
- Landscape: In landscape photography, a smaller aperture (such as f/8 to f/16) is commonly used to achieve a larger depth of field. This ensures that the entire scene, from the foreground to the background, is in sharp focus, capturing the beauty of the landscape in great detail.
- Macro: When photographing close-up shots or tiny subjects in macro photography, a small aperture (such as f/11 to f/16) is ideal to maximize the depth of field. This ensures that even the tiniest details are in focus, resulting in stunning macro images.
- Action: In sports or fast-paced situations, where capturing motion is crucial, a wider aperture (such as f/2.8 or wider) allows for faster shutter speeds, freezing the action. This helps you capture sharp and dynamic images without motion blur.
- Low Light: In low-light situations, using a wider aperture (such as f/1.8 or f/2.8) allows more light to reach the camera’s sensor, resulting in brighter and well-exposed images. This is especially important when shooting indoors or during nighttime photography.
Remember, these guidelines are just starting points, and there’s room for experimentation and personal preference. Depending on your creative vision and the specific shooting conditions, you may choose different aperture settings to achieve the desired look and feel.
It’s also important to consider the trade-offs of different aperture settings. While wide apertures offer a shallow depth of field, they also lead to less of the image being in sharp focus. On the other hand, smaller apertures provide a larger depth of field but may require longer shutter speeds or higher ISO settings to compensate for the decrease in light.
As you gain experience and familiarity with your camera and lenses, you’ll develop a better intuition for selecting the right aperture setting for different situations. Take the time to experiment and practice, and don’t be afraid to push the boundaries of aperture to create unique and compelling images.
Now that you understand how aperture influences various shooting scenarios, you can confidently make informed decisions and select the appropriate aperture setting for each situation. In the next section, we will explore some commonly used aperture settings and their specific effects on your photos.
Common Aperture Settings and their Effects
Aperture settings have a significant impact on the appearance and creative effects of your photographs. Understanding the effects of different aperture settings will allow you to make informed choices and achieve your desired outcome. Here are some common aperture settings and their effects:
- Wide Aperture (e.g., f/1.8, f/2.8): Using a wide aperture creates a shallow depth of field, resulting in a blurred background and drawing attention to the main subject. This is commonly used in portrait photography to create a pleasing separation between the subject and the background.
- Moderate Aperture (e.g., f/4, f/5.6): A moderate aperture provides a balance between depth of field and sharpness. It is a versatile setting that is commonly used in various genres of photography, including landscape, street, and general everyday photography.
- Small Aperture (e.g., f/8, f/11, f/16): A small aperture increases the depth of field, resulting in more of the image being in sharp focus. This is ideal for landscape photography or when you want to capture intricate details throughout the entire scene.
- Total Small Aperture (e.g., f/22, f/32): Using a very small aperture provides a maximum depth of field, ensuring everything in the frame remains sharp. However, be aware that using extremely small apertures can introduce diffraction, which may slightly reduce overall image sharpness.
- Bokeh Effect (e.g., f/1.4, f/1.8): A wide aperture allows for a shallow depth of field, creating a bokeh effect. Bokeh refers to the aesthetic quality of the out-of-focus areas in an image. By using a wide aperture, you can achieve a dreamy and creamy background blur, which is often desirable for certain types of portraits or artistic photography.
It’s important to note that the specific effects of aperture can also be influenced by other factors such as the distance between the camera and the subject, the focal length of the lens, and the distance of the subject from the background.
Experimenting with different aperture settings in various shooting scenarios will help you better understand their impact and enable you to make more creative and intentional choices. Consider the desired depth of field, the subject, the lighting conditions, and the mood you want to convey when selecting the aperture setting.
By developing a familiarity with the effects of different aperture settings, you can add depth, dimension, and interest to your photographs. Embrace the versatility of aperture and use it as a tool to enhance the visual impact of your images.
In the next section, we will explore how you can use aperture creatively to achieve unique effects in your photography.
Using Aperture to Create Creative Effects
Aperture is not just a technical aspect of photography but also a creative tool that allows you to add artistic flair and visual interest to your images. By manipulating the aperture setting, you can achieve unique and captivating effects. Here are some creative ways to use aperture:
- Selective Focus: Using a wide aperture (low f-stop number) allows you to create a shallow depth of field and selectively focus on a specific subject. By isolating the main subject and blurring the background, you can draw attention to the focal point and create a dramatic and visually appealing image.
- Bokeh Highlights: A wide aperture not only creates a shallow depth of field but also produces beautiful bokeh highlights in out-of-focus areas. Bokeh refers to the aesthetic quality of the blurred background or foreground elements. By using a wide aperture and including points of light in the background, such as city lights or twinkle lights, you can create stunning bokeh effects that add a touch of magic to your photos.
- Starbursts: When using a smaller aperture (higher f-stop number), such as f/16 or f/22, you can create starbursts around bright light sources, such as the sun or streetlights. These star-shaped bursts of light add a unique and captivating element to your images.
- Foreground/Background Relationship: By adjusting the aperture, you can control the relationship between the foreground and background elements in your composition. A wide aperture can create a distinct separation between the subject and the blurred background, while a smaller aperture allows more of the background details to be visible, making it an integral part of the storytelling within the image.
- Softening Textures: Using a wide aperture can help soften and blur textures in the background, making your subject stand out and creating a sense of depth. This technique is effective when photographing portraits or close-up subjects, as it adds an element of smoothness and emphasis on the main subject.
Experimentation is key when using aperture creatively. Don’t be afraid to push the boundaries and try different aperture settings to achieve the desired effect. Combine aperture with other compositional techniques, lighting, and subjects to create unique and compelling images that reflect your artistic vision.
Remember, creativity knows no limits, and using aperture imaginatively allows you to transform ordinary scenes into extraordinary works of art. Take the time to explore and experiment, and let your creativity shine through your photography.
In the next section, we will wrap up our exploration of aperture and summarize the key takeaways from this article.
Conclusion
Understanding and harnessing the power of aperture is a fundamental skill for any photographer. It directly influences the depth of field, exposure, and creative effects in your photographs, allowing you to capture images that truly convey your artistic vision. Through this article, we have explored the definition and explanation of aperture, how it affects your photos, its relationship with depth of field and exposure, and the creative possibilities it offers.
Aperture control provides you with the ability to create stunning portraits with creamy bokeh, capture breathtaking landscapes with a wide depth of field, freeze action in fast-paced moments, and use selective focus to draw attention to the main subject. By adjusting the aperture, you can achieve the desired balance between sharpness and blur, conveying emotions, guiding the viewer’s gaze, and adding depth and dimension to your images.
Remember, aperture is just one of the many tools in your photographic arsenal. By combining it with other elements such as composition, lighting, and subject matter, you can elevate your photography to new heights.
As a photographer, continue to practice, experiment, and refine your understanding of aperture. Familiarize yourself with your camera’s settings, and don’t be afraid to step out of your comfort zone and try new techniques. Embrace the versatility of aperture and use it as a tool to express your creativity and tell compelling visual stories.
Now that you have a comprehensive understanding of aperture and its various applications, take your camera and start capturing images that showcase your unique perspective. Explore the possibilities, push your creative boundaries, and let the power of aperture guide you towards capturing truly remarkable photographs.