Introduction
Welcome to the guide on how to turn on subtitles in Resident Evil 4. Subtitles play a crucial role in enhancing the gaming experience by providing text-based representations of the game’s dialogue and audio cues. This is particularly helpful for players who are hearing impaired or prefer to have a visual reference for the in-game conversations. Whether you’re diving into the world of survival horror for the first time or revisiting this classic game, enabling subtitles will ensure that you don’t miss out on any vital information or atmospheric details.
Resident Evil 4 is an action-packed game developed and published by Capcom. With its intense gameplay, immersive storyline, and cinematic cutscenes, the game has earned a special place in the hearts of gamers worldwide. However, the game doesn’t have subtitles enabled by default, so you’ll need to manually activate them to enhance your gaming experience.
In this guide, we’ll walk you through the steps to turn on subtitles in Resident Evil 4. Whether you’re playing on a console or PC, the process is relatively straightforward. By following these simple instructions, you’ll be able to enjoy the game with subtitles and fully immerse yourself in the chilling atmosphere and gripping narrative that Resident Evil 4 offers.
So, let’s dive in and get those subtitles up and running so you can embark on your thrilling adventure in Resident Evil 4!
Step 1: Launch the Game
The first step to enable subtitles in Resident Evil 4 is to launch the game on your chosen platform. Whether you’re playing on a console or PC, make sure the game is installed and ready to go.
If you’re playing on a console, such as PlayStation or Xbox, insert the game disc into the console’s disc drive and follow the on-screen prompts to start the game. Alternatively, if you have a digital copy of the game, navigate to your console’s library or game menu, locate Resident Evil 4, and select it to launch the game.
If you’re playing on PC, open the game client or platform where you purchased the game, such as Steam or Epic Games Store. Locate Resident Evil 4 in your game library, and click on the “Play” button to start the game. Depending on your computer’s specifications, it may take a few moments to load the game.
Once the game is successfully launched, you’ll be ready to proceed to the next step.
Step 2: Select the Desired Level
After successfully launching Resident Evil 4, you’ll need to select the level or game mode you want to play. The game offers various levels and difficulty settings, each providing a unique challenge and experience.
Using the game’s menu or interface, navigate to the “New Game” or “Continue” option, depending on whether you’re starting a new game or continuing from a previous save. This will take you to the level selection screen, where you can choose the desired level or game mode.
Resident Evil 4 typically offers a variety of levels, including the main story mode, bonus missions, or extra game modes. Take your time to browse through the available options and select the level that appeals to you the most.
Make sure to consider your skill level and desired gameplay experience when choosing a level. If you’re new to the game or prefer a more casual experience, selecting a lower difficulty setting can provide a smoother and less challenging gameplay experience. On the other hand, if you’re up for a real test of your survival skills, opting for a higher difficulty setting will provide a more intense and demanding gameplay experience.
Once you’ve made your selection, you’re ready to progress to the next step and enable subtitles in Resident Evil 4.
Step 3: Navigate to the Options Menu
Now that you’ve selected the desired level in Resident Evil 4, it’s time to navigate to the options menu. In this menu, you’ll find various settings and configurations that allow you to customize your gaming experience.
To access the options menu, look for an icon or button that represents settings. This is usually denoted by a gear or similar symbol. It’s typically located in the main menu or pause menu, depending on the platform you’re playing on.
Once you’ve located the options menu button, select it to access the settings screen. This will open up a range of options and configurations that you can modify to suit your preferences.
It’s worth noting that the exact placement and appearance of the options menu may vary slightly depending on the version of Resident Evil 4 you’re playing and the platform you’re using. However, in most cases, the options menu can be easily identified and accessed from the main menu or pause menu.
Now that you’ve successfully navigated to the options menu, you’re ready to move on to the next step and find the option to enable subtitles in Resident Evil 4.
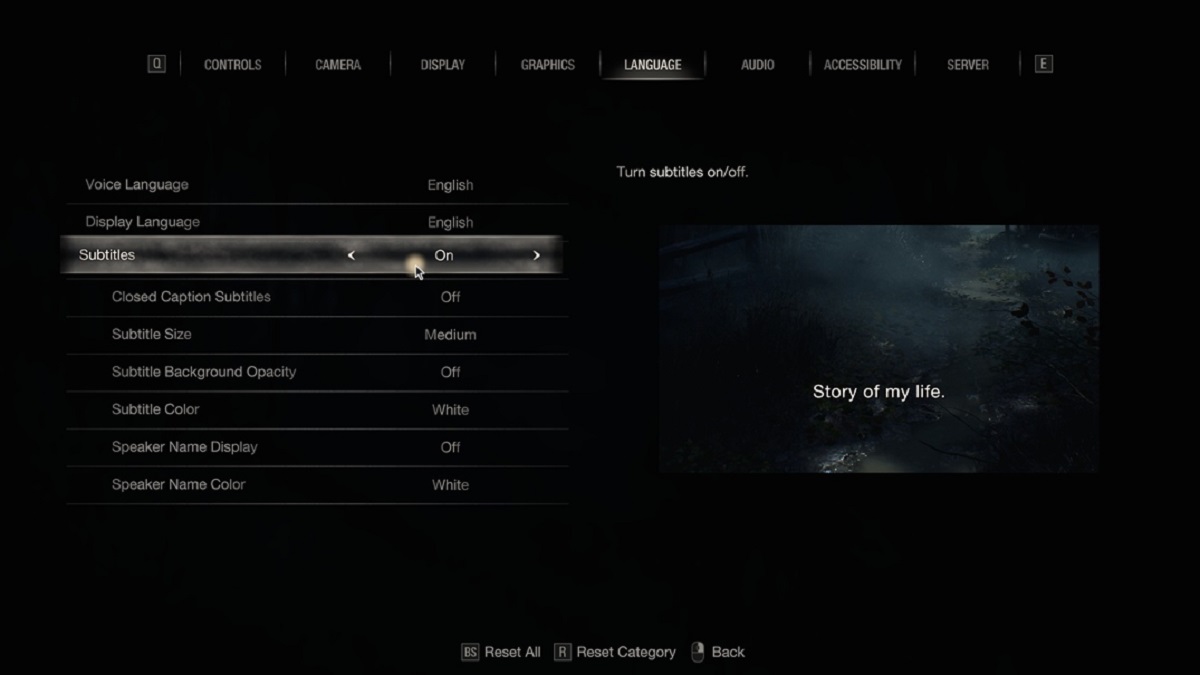
Step 4: Locate the Subtitles Option
With the options menu open in Resident Evil 4, you’ll need to locate the option to enable subtitles. The subtitles option may be found within the audio or display settings, depending on how the game is set up.
Scan through the various menu tabs or sections to find the “Audio” or “Display” options. These are the most common locations where you’ll find the subtitles setting. However, if you’re unable to locate it in these sections, take a moment to explore other settings categories such as “Gameplay,” “Accessibility,” or “Language.”
Once you’ve found the appropriate section, look for a toggle switch or checkbox that corresponds to subtitles. The option may be labeled as “Subtitles,” “Captioning,” or something similar. It’s worth noting that the exact wording and placement of the subtitles option could differ depending on the version of Resident Evil 4 you’re playing.
Take the time to ensure that you’ve correctly identified the subtitles option before proceeding. If you’re unsure, refer to the game’s manual or online resources for further clarification.
Now that you’ve located the subtitles option, you’re ready to move on to the next step and enable subtitles in Resident Evil 4.
Step 5: Toggle Subtitles On
Now that you’ve found the subtitles option in Resident Evil 4, it’s time to toggle them on. The process may vary slightly depending on the platform you’re playing on and the game’s interface, but the basic principle remains the same.
If the subtitles option is presented as a toggle switch, simply click or select the switch to turn it on. The switch may change color or position to indicate that subtitles are now enabled. Some games may require you to press a specific button, such as “X” or “Enter,” to activate the subtitles.
If the subtitles option is a checkbox, click or select the checkbox to mark it. This action will enable subtitles for the game.
Once you’ve toggled on the subtitles, take a moment to ensure that the option is properly activated. You may see a confirmation message or an icon indicating that subtitles are now enabled.
If you encounter any difficulties enabling the subtitles, refer to the game’s manual or online resources for further assistance. Additionally, check for any game updates or patches that may address any known issues with subtitles.
With the subtitles now toggled on, you’re ready to proceed to the next step and apply the changes in Resident Evil 4.
Step 6: Apply Changes
After toggling on the subtitles in Resident Evil 4, it’s essential to apply the changes you’ve made to ensure that they take effect in the game. This step is crucial as it finalizes the adjustments you’ve made to enable subtitles.
To apply the changes, look for a “Save” or “Apply” button within the options menu. This button is typically located at the bottom or top of the screen, and may be labeled as “Confirm” or “Accept” as well.
Click or select the “Save,” “Apply,” or equivalent button to save the changes you’ve made to the subtitles setting. This action will ensure that the subtitles are now active and ready to be displayed during gameplay.
Take a moment to review the other settings in the options menu and make any additional adjustments or modifications as desired. Once you’re satisfied with the changes, you can proceed to start playing Resident Evil 4 with subtitles.
Remember, if you encounter any issues or are unsure about the changes you’ve made, consult the game’s manual or check online resources for further guidance.
With the changes applied, you’re now ready to embark on your Resident Evil 4 adventure with subtitles. Enjoy the immersive gaming experience and delve into the thrilling storyline with the assistance of subtitles!
Step 7: Start Playing with Subtitles
With subtitles enabled and changes applied in Resident Evil 4, it’s time to start playing the game! You can now dive into the intense action, gripping storylines, and cinematic cutscenes, all with the added benefit of having subtitles to enhance your gaming experience.
As you progress through the game, you’ll notice that the subtitles will appear on the screen whenever there is dialogue or important audio cues. This feature ensures that you don’t miss any crucial information or atmospheric details, even during intense combat sequences or fast-paced gameplay.
Pay close attention to the subtitles as they will provide you with essential dialogues, character interactions, and plot developments. They will help you immerse yourself fully in the world of Resident Evil 4 and engage with the story on a deeper level.
Subtitles can be especially helpful if you are hearing impaired or prefer visual cues to complement the audio in the game. They ensure that you can fully enjoy the game’s narrative and follow along with the conversations between characters.
While playing with subtitles, take the opportunity to appreciate the game’s immersive environment, strategic gameplay, and stunning visuals. By having subtitles enabled, you can fully focus on the gameplay while still understanding the plot intricacies and character interactions.
Remember to adjust the subtitle settings further if needed. Some games offer customization options, such as changing the font size or color of the subtitles, to suit your preferences and make them more comfortable to read.
With the subtitles now active, immerse yourself in the captivating world of Resident Evil 4 and enjoy the game to its fullest with enhanced accessibility and storytelling!
Conclusion
Congratulations! You’ve successfully learned how to turn on subtitles in Resident Evil 4. By following the steps outlined in this guide, you can now enjoy the game with subtitles enabled, enhancing your gaming experience and ensuring that you don’t miss any vital information or atmospheric details.
Subtitles play a crucial role in providing a visual representation of the game’s dialogue and audio cues, making it accessible for individuals who are hearing impaired or prefer to have a visual reference. With subtitles, you can fully immerse yourself in the chilling atmosphere and gripping narrative that Resident Evil 4 offers.
We covered the essential steps, from launching the game and selecting the desired level to navigating the options menu, locating the subtitles option, and toggling them on. Remember to always apply the changes you made in the options menu to ensure that subtitles are active during gameplay.
Now that you have enabled subtitles, you can embark on your thrilling adventure in Resident Evil 4 and fully engage with the captivating story and intense gameplay. Pay close attention to the subtitles as they provide essential dialogue, character interactions, and plot developments.
Remember, subtitles can be customized in some games, so if you need to make further adjustments such as font size or color, explore the settings to ensure the subtitles are comfortable and easy to read.
Thank you for using this guide, and we hope you have a fantastic time exploring the world of Resident Evil 4 with subtitles enabled. Enjoy the immersive gameplay, unravel the mysteries, and survive the horrors that await you in this iconic survival horror experience!