Introduction
The Logitech G502 is a popular gaming mouse known for its advanced features and ergonomic design. However, there may come a time when you need to take it apart, whether it’s for cleaning, customization, or repairs. While disassembling a mouse may seem intimidating, it can be a straightforward process if you have the right tools and guidance.
In this guide, we will walk you through the step-by-step process of taking apart a Logitech G502 mouse. We will cover each stage in detail, ensuring that you are equipped with the knowledge to disassemble and reassemble your mouse correctly. Whether you are a gaming enthusiast or just curious about the inner workings of your device, this guide will help you confidently navigate through the disassembly process.
Before we get started, it is important to note that disassembling your Logitech G502 mouse may void any existing warranty. If your mouse is still under warranty, we recommend contacting Logitech or your authorized retailer for assistance or repairs. Proceed with caution, and be aware of any potential risks involved.
Now, let’s dive into the tools you will need to have prepared before starting the disassembly process.
Tools Required
Before you begin taking apart your Logitech G502 mouse, it is essential to have the necessary tools at hand. Here are the tools you will need:
- Small Phillips head screwdriver – This will be used to remove the screws holding the mouse panels together.
- Plastic spudger or pry tool – This tool will help you safely separate the top and bottom panels of the mouse without causing any damage.
- Tweezers – Tweezers can be handy for handling small components, such as screws or connectors, during the disassembly process.
- Cotton swabs or a soft brush – These will be used to clean the components of the mouse during the disassembly process.
- Isopropyl alcohol – This is an optional tool for cleaning the mouse components. It can help remove dirt, grease, and debris from the components effectively.
- Clean cloth or paper towels – These will be needed to dry the components after cleaning.
With these tools, you will be well-prepared to take apart your Logitech G502 mouse and proceed with the disassembly process. Remember to handle the tools and mouse components with care to avoid any accidental damage.
Now that you have the necessary tools ready, let’s move on to the first step of the disassembly process: gathering the tools and preparing for the disassembly.
Step 1: Gather the necessary tools
The first step in taking apart your Logitech G502 mouse is to gather all the tools you will need. Before starting the disassembly process, it is essential to have the following tools prepared:
- Small Phillips head screwdriver – This tool will be used to remove the screws that hold the mouse panels together. Make sure you have a small enough size that fits the screws on your particular model of the Logitech G502.
- Plastic spudger or pry tool – This tool will help you safely separate the top and bottom panels of the mouse without causing any damage. It is important to use a plastic tool to prevent scratching or damaging the mouse’s exterior.
- Tweezers – Having a pair of tweezers on hand can be useful for handling small components, such as screws or connectors, during the disassembly process. It allows for precise maneuvering and reduces the risk of dropping or losing any crucial parts.
- Cotton swabs or a soft brush – These tools will come in handy for cleaning the components of the mouse. They allow for effective removal of dirt, dust, and debris accumulated over time.
- Isopropyl alcohol (optional) – Using isopropyl alcohol can help in removing stubborn stains, grease, or grime from the mouse components. If you decide to use it, ensure it is at least 70% concentration and be careful when applying it to sensitive parts.
- Clean cloth or paper towels – These will be needed to dry the components after cleaning. Having a lint-free cloth or disposable paper towels will prevent fibers or particles from getting stuck on the mouse components.
Once you have gathered all the necessary tools, place them in a clean and easily accessible workspace. Ensure that the area is well-lit to facilitate the disassembly process and minimize the chances of losing any small components.
With the tools ready, you are now prepared to move on to the next step: removing the mouse feet.
Step 2: Removing the mouse feet
Now that you have gathered the necessary tools, it’s time to begin the disassembly process of your Logitech G502 mouse. In this step, we will focus on removing the mouse feet, which are adhesive pads located on the bottom of the mouse that allow it to glide smoothly.
To remove the mouse feet:
- Start by gently lifting one corner of a mouse foot using your fingernail or a plastic spudger. Avoid using excessive force to prevent tearing or damaging the foot.
- Once a corner is lifted, slowly peel off the mouse foot using your fingers or the plastic spudger. Take your time and apply even pressure to avoid leaving any residue or adhesive on the mouse.
- Repeat the process for the remaining mouse feet until all four have been removed.
It’s important to note that the mouse feet are designed to be single-use and may lose their adhesive properties after removal. Therefore, it is recommended to have a replacement set of mouse feet on hand, especially if you plan to reassemble the mouse after disassembly. Replacement mouse feet can typically be purchased online or from computer hardware retailers.
With the mouse feet removed, you can now see the screws that hold the mouse panels together. In the next step, we will guide you through accessing these screws to continue with the disassembly process.
Step 3: Accessing the screws
With the mouse feet removed, you can now proceed to access the screws that hold the Logitech G502 mouse panels together. Follow these steps to access the screws:
- Inspect the exposed area where the mouse feet were previously attached. You will notice a small circular depression or groove.
- Using a screwdriver or a plastic spudger, gently pry open the circular depression by inserting the tool into the groove and applying slight pressure. Be careful not to exert excessive force to avoid damaging the mouse’s exterior.
- Once the circular depression is partially or fully open, you should be able to see the screws located underneath. They may be Phillips head screws or a different type depending on the model of your Logitech G502 mouse.
If you have difficulty prying open the circular depression, try flexing the bottom panel of the mouse slightly to create a gap. This can provide better access to the screws. However, exercise caution not to apply too much force, as it could lead to unintended damage.
It is worth mentioning that some Logitech G502 models may have additional screws hidden beneath labels or rubber plugs. Carefully inspect the mouse’s exterior to ensure you have accessed all the screws before proceeding to the next step.
With the screws accessible, you are now ready to move on to the next step: removing the screws and separating the top and bottom panels of the mouse.
Step 4: Removing the screws
Now that you have accessed the screws holding the Logitech G502 mouse panels together, it’s time to remove them. Follow these steps to remove the screws:
- Using a small Phillips head screwdriver, carefully unscrew each screw in a counterclockwise direction. Ensure that you have a firm grip on the screwdriver to prevent slipping and damaging the screw or mouse panels.
- As you remove each screw, set it aside in a safe place to avoid misplacing or losing them. It can also be helpful to organize them in a small container or a magnetic tray, so they are easily accessible when it’s time for reassembly.
- Continue removing all the screws until they have been fully taken out of the mouse. Take note of the number and positioning of the screws as different models may have varying screw placements.
It’s important to handle the screws with care and avoid mixing them up, as they may vary in size or threading. Keeping them organized will save you time and ensure a smooth reassembly process later on.
Once all the screws have been removed, you will be able to separate the top and bottom panels of the Logitech G502 mouse. In the next step, we will guide you through the process of separating these panels to access the inner components of the mouse.
Step 5: Separating the top and bottom panels
With the screws removed, you can now proceed to separate the top and bottom panels of your Logitech G502 mouse. Follow these steps to safely separate the panels:
- Hold the mouse firmly with one hand and use your other hand to gently lift or pry open the top panel. You can use your fingertips or a plastic spudger for this step.
- Apply even pressure and slowly work your way around the edges of the mouse, gradually separating the top and bottom panels. Be cautious and avoid using excessive force to prevent any damage.
- As you continue separating the panels, you may hear slight clicking or snapping sounds. This is normal and indicates that the panels are being released from their locking mechanisms.
- Once the panels are slightly separated, you can use your fingers to lift and fully detach the top panel from the bottom panel. Set aside the top panel in a clean and safe area.
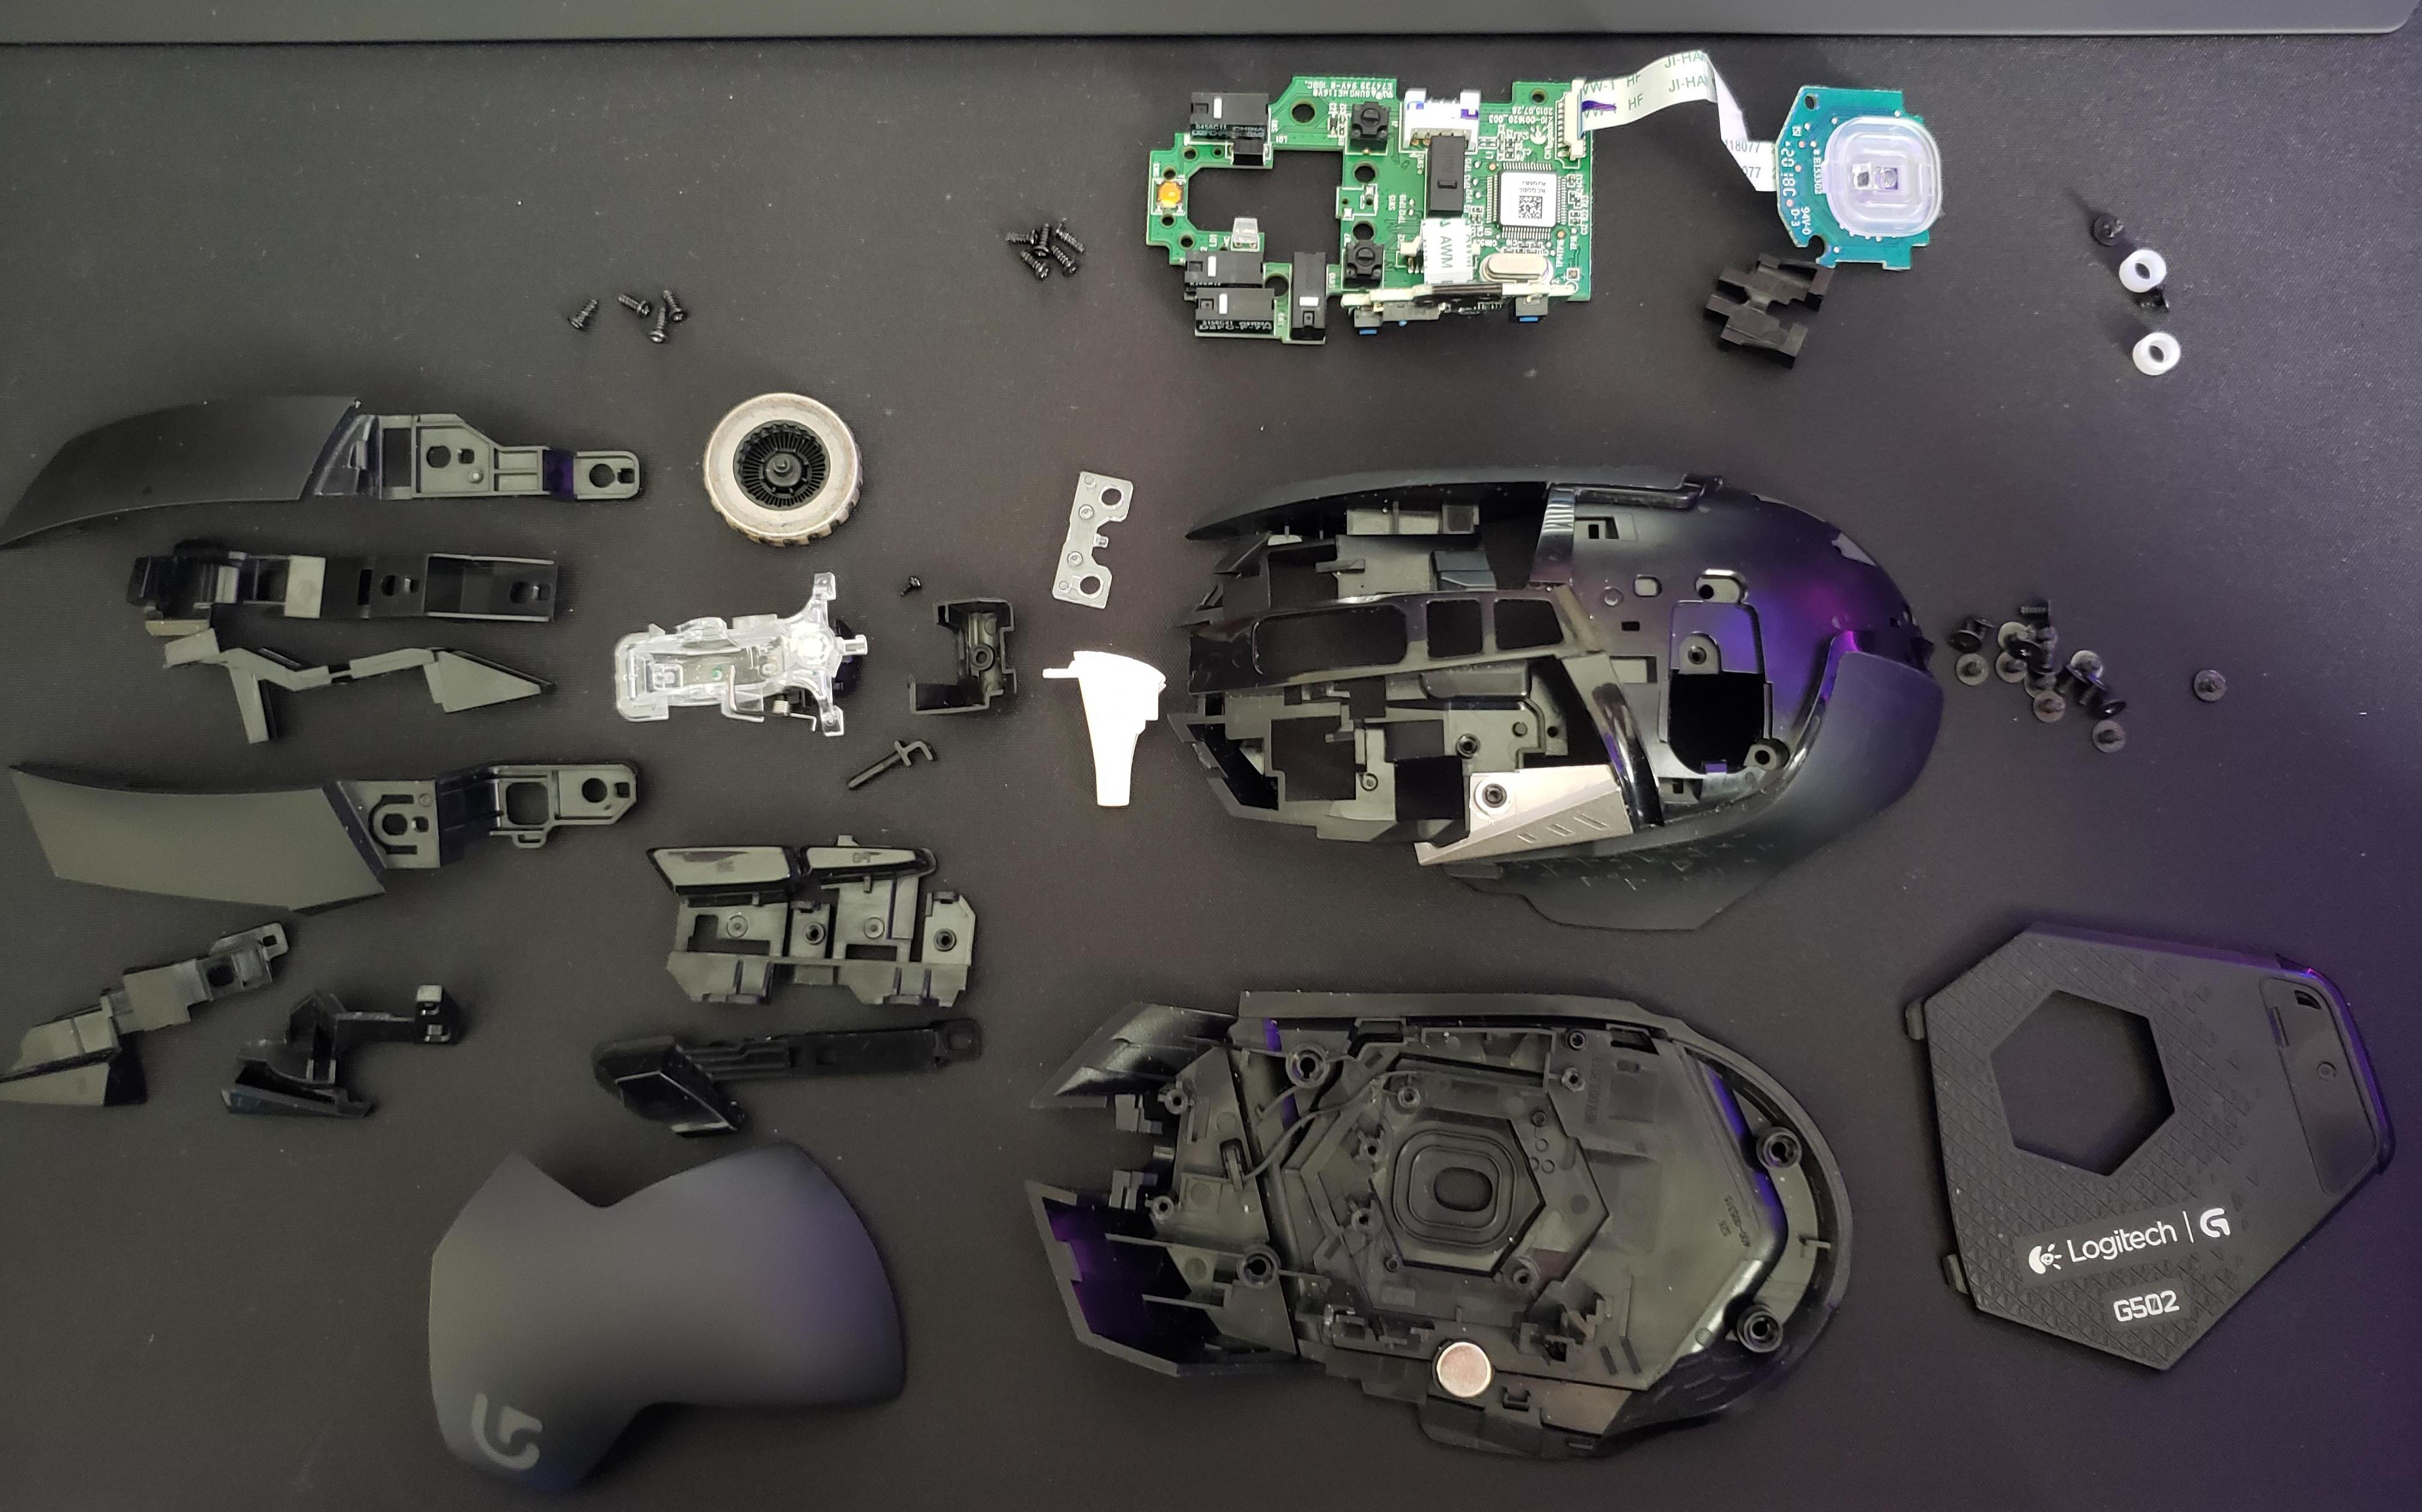
With the top and bottom panels separated, you will now have access to the internal components of your Logitech G502 mouse, such as the cables, scroll wheel, buttons, sensor, and PCB (printed circuit board). Take a moment to familiarize yourself with the layout and arrangement of these components before proceeding to the next steps of disassembly.
Continue to the next step to learn how to disconnect the cable connecting the top and bottom panels of the mouse.
Step 6: Disconnecting the cable
Now that you have separated the top and bottom panels of your Logitech G502 mouse, the next step is to disconnect the cable that connects the two panels. Follow these steps to disconnect the cable:
- Locate the cable that runs from the top panel to the bottom panel of the mouse. This cable is usually flat and ribbon-like, connecting the buttons and scroll wheel to the PCB.
- Identify the connector where the cable is attached to the PCB. It will typically have a locking mechanism or a small latch to secure the connection.
- Using your fingers or a pair of tweezers, gently lift the latch or unlock the mechanism to release the cable. Be careful not to pull on the cable itself, as it may damage the connector or the cable.
- Once the cable is detached, you can set aside the top panel or place it in a safe location.
By disconnecting the cable, you have successfully separated the top and bottom panels completely. Take a moment to inspect the cable for any signs of damage or wear. If necessary, you can replace the cable with a new one before reassembling the mouse.
Now that the panels are fully separated and the cable is disconnected, you can proceed to the next steps, which involve removing the scroll wheel and disassembling the mouse buttons.
Step 7: Removing the scroll wheel
Once you have disconnected the cable and separated the top and bottom panels of your Logitech G502 mouse, you can now proceed to remove the scroll wheel. Follow these steps to safely remove the scroll wheel:
- Locate the scroll wheel, which is usually positioned between the left and right mouse buttons.
- Inspect the scroll wheel assembly and identify any securing mechanisms in place.
- Depending on your Logitech G502 model, there might be a small retaining clip or a screw holding the scroll wheel in place. If there is a retaining clip, gently press or lift it to release the scroll wheel. If there is a screw, use the appropriate screwdriver to unscrew and remove it.
- Once the securing mechanism is undone, carefully lift or slide the scroll wheel out of its position. Take care not to damage the wheel or the surrounding components.
As you remove the scroll wheel, pay attention to the orientation and alignment of any components, such as the encoder or spindle. This will help ensure proper reassembly later on.
Place the scroll wheel in a safe location, away from dust or debris, until it’s time to clean or reassemble it. With the scroll wheel removed, you can now move on to the next step, which involves disassembling the mouse buttons.
Step 8: Disassembling the mouse buttons
After removing the scroll wheel, the next step in disassembling your Logitech G502 mouse is to disassemble the mouse buttons. Follow these steps to safely disassemble the mouse buttons:
- Take a closer look at the mouse buttons, which are typically the left and right buttons and possibly additional buttons positioned on the sides or top of the mouse.
- Inspect the buttons and identify any securing mechanisms, such as small retaining clips or screws.
- If there are retaining clips, use a plastic spudger or a pair of tweezers to gently lift or press them to release the buttons. Be cautious not to apply too much force to avoid damaging the buttons.
- If there are screws, use the appropriate screwdriver to unscrew and remove them before gently lifting or sliding the buttons out of their positions.
- Once the buttons are removed, they can be further disassembled by carefully separating any individual components, such as the button mechanism and the plastic cover.
As you disassemble the mouse buttons, be mindful of the arrangement and orientation of the components. Pay attention to any small springs or mechanisms that may be present. Take note of the positioning and order of these components for easier reassembly later on.
Set aside the disassembled mouse buttons in a clean and safe location, ensuring they are protected from dust or debris. This will allow for easier cleaning or customization, as well as facilitate the reassembly process.
Now that the mouse buttons are disassembled, you are one step closer to accessing and cleaning the sensor and PCB. In the next step, we will guide you through the process of removing the sensor and PCB from your Logitech G502 mouse.
Step 9: Removing the sensor and PCB
With the mouse buttons disassembled, it’s time to move on to the next step: removing the sensor and PCB (printed circuit board) from your Logitech G502 mouse. Follow these steps to safely remove the sensor and PCB:
- Locate the sensor, which is usually positioned at the bottom of the mouse, beneath the scroll wheel area.
- Inspect the sensor assembly and identify any securing mechanisms, such as screws or clips.
- If there are screws, use the appropriate screwdriver to unscrew and remove them. Set the screws aside in a safe place for later reassembly.
- If there are clips, carefully release them using a plastic spudger or a pair of tweezers. Apply gentle pressure to lift or disengage the clips, allowing for the sensor and PCB to be separated.
- Once any securing mechanisms have been undone, gently lift or slide the sensor and PCB assembly out of its position.
As you remove the sensor and PCB, be cautious of any delicate cables or connectors that may be attached. Take care not to put unnecessary stress on these components to avoid causing any damage.
Place the removed sensor and PCB assembly in a safe and clean location, ensuring that they are protected from dust or debris. This will allow for easier cleaning or replacement of components, if necessary.
Now that the sensor and PCB have been removed, you can proceed to the next step, which involves cleaning the components and preparing them for reassembly.
Step 10: Cleaning the components
After removing the sensor and PCB from your Logitech G502 mouse, it’s important to clean the components thoroughly. Regular cleaning helps maintain optimal functionality and extends the lifespan of your mouse. Follow these steps to effectively clean the components:
- Start by using a soft brush or compressed air to remove any loose debris, dust, or particles from the components. Gently brush or blow away the dirt from the sensor, PCB, buttons, and other areas of the mouse.
- If there are stubborn stains or grime on the components, dampen a cotton swab or a clean cloth with isopropyl alcohol. Make sure to use at least 70% concentration alcohol to effectively remove dirt and grease.
- Gently wipe the components, taking care not to apply excessive moisture. Avoid getting liquid inside any openings or connectors, as this can cause damage to the electronic parts.
- For hard-to-reach areas and crevices, use a toothpick or a small brush to dislodge any dirt or debris. Be gentle to avoid scratching the components.
- Allow the components to dry completely before reassembling the mouse. You can use a lint-free cloth or paper towels to gently pat dry the cleaned parts.
It’s crucial to exercise caution when cleaning the electrical components to avoid damaging them. Take your time to ensure a thorough yet gentle cleaning process. Additionally, make sure to follow any specific cleaning instructions provided by Logitech for your particular mouse model.
With the components cleaned and dry, you are now ready to proceed to the final steps of reassembling your Logitech G502 mouse. In the next step, we will outline the process of reassembling the mouse for use.
Step 11: Reassembling the mouse
Now that you have cleaned the components of your Logitech G502 mouse, it’s time to reassemble the mouse. Follow these steps to successfully put the mouse back together:
- Take the sensor and PCB assembly and carefully place it back into its original position within the bottom panel of the mouse. Ensure that any cables or connectors are properly aligned and seated.
- If you had removed any screws or clips during the disassembly process, reinsert them to secure the sensor and PCB assembly in place. Tighten the screws gently, being mindful not to overtighten and risk causing damage.
- Next, reattach the mouse buttons to their respective locations on the top panel. Align them properly and secure them using any retaining clips or screws that were previously removed. Take note of the positioning and order of components if there were multiple layers to the buttons.
- Connect the cable from the top panel to the PCB by carefully aligning the connector and inserting it into the appropriate port. Ensure that it is securely fastened and locked in place.
- Once the cable is connected, carefully align the top panel with the bottom panel of the mouse. Gently press down on all edges to ensure a snug fit.
- If your Logitech G502 mouse had removable mouse feet, retrieve the replacement set of feet and affix them to the bottom of the mouse. Press them down firmly to adhere them properly.
With the mouse fully reassembled, take a moment to double-check all the connections, screws, and buttons to ensure everything is properly aligned and secured. This will help avoid any potential issues or malfunctions during use.
Once you are confident that everything is in place, you can now connect the mouse to your computer and test its functionality. Move the mouse around and click the buttons to ensure that all components are working correctly.
Congratulations! You have successfully disassembled, cleaned, and reassembled your Logitech G502 mouse. Enjoy using your clean and refreshed mouse for improved gaming or productivity experiences.
Conclusion
Taking apart and reassembling a Logitech G502 mouse may seem like a daunting task, but with the right tools and guidance, it can be a straightforward process. By following the step-by-step instructions outlined in this guide, you can successfully disassemble, clean, and reassemble your mouse, allowing for better performance and longevity.
Throughout the disassembly process, it is crucial to handle the components with care and avoid using excessive force to prevent damage. Take your time and pay attention to the orientation and order of the components, as this will ease the reassembly process.
Regular cleaning of your Logitech G502 mouse is essential to maintain optimal functionality and performance. By removing dust, debris, and grime from the components, you can ensure smooth movement, accurate tracking, and a comfortable grip during use.
Always remember to exercise caution when cleaning electrical components and avoid getting any liquids inside openings or connectors. Following the specific cleaning instructions provided by Logitech for your particular mouse model is essential to prevent any damage.
After reassembling your Logitech G502 mouse, don’t forget to test its functionality by using the buttons, scroll wheel, and sensor. Ensure that all components are working correctly before engaging in intense gaming sessions or demanding tasks.
With the knowledge and skills gained from this guide, you can confidently disassemble, clean, and reassemble your Logitech G502 mouse whenever necessary. Enjoy the improved performance and reliability of your refreshed mouse.