Introduction
Have you ever wished you could easily stream your favorite TV shows, movies, and videos directly to your non-smart TV? Well, with the help of Chromecast, now you can! Chromecast is a nifty device developed by Google that allows you to stream media from your smartphone, tablet, or computer to your television. Even if you have an older TV that lacks smart capabilities, you can still enjoy the benefits of streaming services like Netflix, YouTube, and more on the big screen.
In this guide, we will walk you through the step-by-step process of setting up Chromecast on your non-smart TV. Don’t worry if you’re not a tech guru – the setup is straightforward and doesn’t require any technical expertise. All you need is a few minutes, a stable Wi-Fi connection, and the right equipment.
Once you have successfully set up Chromecast, you’ll be able to easily cast content from your mobile devices or computer to your TV with just a tap or click. Say goodbye to squinting at small screens and enjoy a more immersive viewing experience from the comfort of your living room.
Ready to transform your non-smart TV into a streaming powerhouse? Let’s dive right in and get started with the setup process!
What You Will Need
Before you begin setting up Chromecast on your non-smart TV, there are a few essential items that you’ll need to gather. Don’t worry; these are common household items that you may already have.
Here’s a list of what you’ll need:
1. Non-smart TV: This is the television on which you want to set up Chromecast. It can be an older TV without smart capabilities.
2. Chromecast device: You’ll need a Chromecast device, which is a small dongle that plugs into the HDMI port of your TV. There are several generations of Chromecast available, so make sure you have the appropriate one for your needs.
3. Wi-Fi network: To connect Chromecast to your non-smart TV, you’ll need a stable Wi-Fi network. Make sure your Wi-Fi is turned on and that you have the necessary login credentials.
4. Smartphone, tablet, or computer: You’ll need a compatible device to set up and control Chromecast. Most devices running on Android, iOS, or the Google Chrome browser will work. Ensure that your device is updated to the latest software version for optimal performance.
5. Power source: Chromecast requires power to function. You’ll need a USB port or a power outlet nearby to plug in the Chromecast device. If your TV has a USB port, you can use that to power the Chromecast. Otherwise, you can use the included power adapter and plug it into an electrical outlet.
Remember, gathering these items beforehand will ensure a smooth and uninterrupted setup process. Once you have everything ready, it’s time to move on to the next step: connecting the Chromecast device to your TV.
Step 1: Connect the Chromecast device to your TV
The first step in setting up Chromecast on your non-smart TV is to connect the Chromecast device to your TV. Follow these simple instructions:
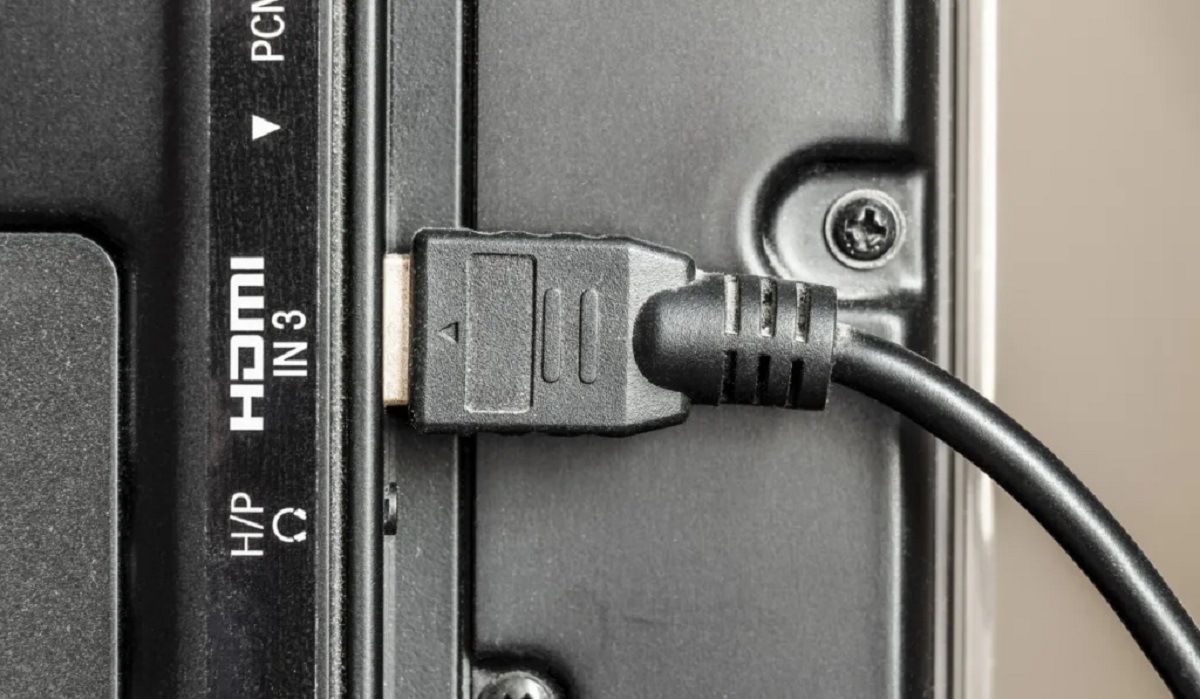
1. Locate the HDMI port: Identify the HDMI port on your TV. It’s usually located at the back or side of the TV. Make sure you have easy access to the HDMI port.
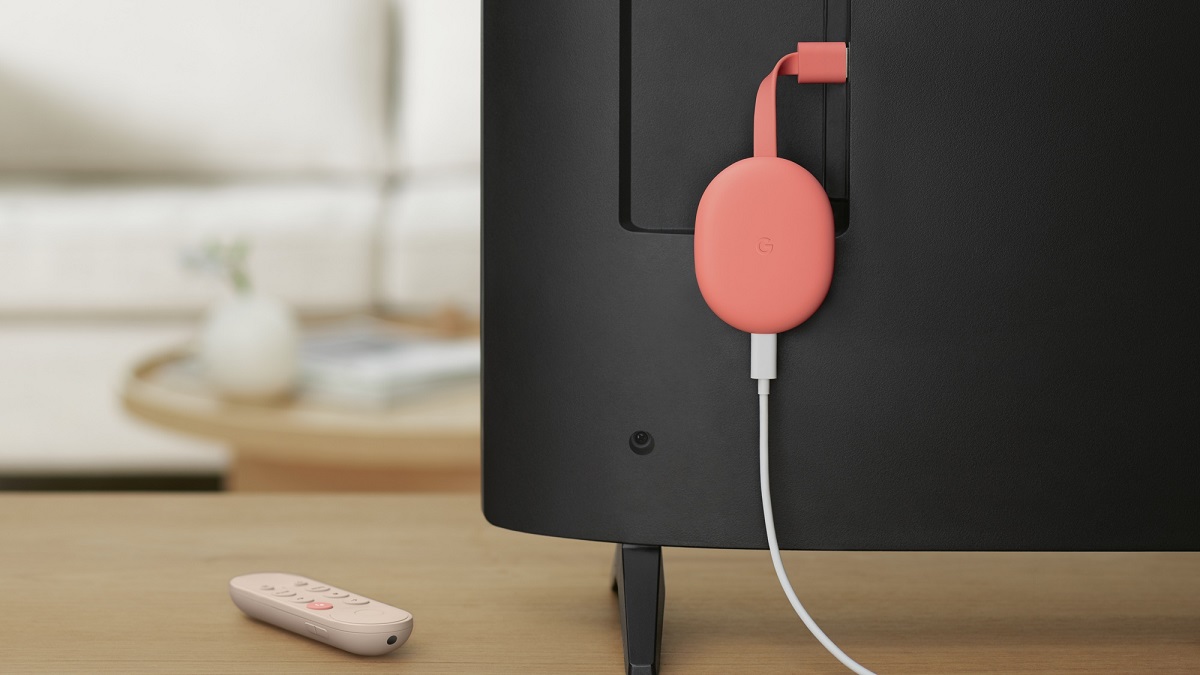
2. Plug in the Chromecast: Take the Chromecast device and insert it into the HDMI port. Ensure that the device is firmly connected and properly seated in the HDMI port.
3. Connect the power source: After inserting the Chromecast device, you’ll need to provide power to it. If your TV has a USB port, you can use it to power the Chromecast. Simply plug the USB end of the Chromecast into the USB port on your TV. If you don’t have a USB port on your TV, use the included power adapter and connect it to an electrical outlet.
4. Switch to the correct HDMI input: Turn on your TV and use the remote control to navigate to the correct HDMI input. Most TVs have multiple HDMI inputs, so you’ll need to select the one to which you connected the Chromecast. Consult your TV’s user manual if you’re unsure how to change the input.
5. Check for the Chromecast setup screen: Once you’ve switched to the correct HDMI input, you should see the Chromecast setup screen on your TV. If you don’t see the setup screen, make sure that the TV is set to the correct input and that the Chromecast is plugged in correctly and receiving power.
Congratulations! You have successfully connected the Chromecast device to your non-smart TV. Now it’s time to move on to the next step, which involves downloading and installing the Google Home app on your mobile device or computer.
Step 2: Download and install the Google Home app
In order to set up and control your Chromecast device on your non-smart TV, you’ll need to download and install the Google Home app on your smartphone, tablet, or computer. Here’s how:
1. Open the app store: On your mobile device or computer, open the app store that corresponds to your operating system. For Android users, this is the Google Play Store, while iOS users will go to the App Store. If you’re using a computer, visit the Google Chrome web store.
2. Search for Google Home: In the app store, search for “Google Home.” Look for the official Google Home app, which is developed by Google LLC, and ensure that it has good ratings and reviews.
3. Download and install the app: Once you’ve located the Google Home app, tap on the “Install” or “Get” button to download it. Wait for the app to download and install on your device. This may take a few moments, depending on your internet connection speed.
4. Open the Google Home app: Once the installation is complete, open the Google Home app on your device. You may need to create a Google account or sign in with an existing account to proceed.
5. Grant necessary permissions: The Google Home app may request certain permissions to access your device’s location, microphone, or other settings. Grant the necessary permissions for the app to function correctly. Rest assured that Google takes privacy and data security seriously.
6. Follow the on-screen instructions: After granting the required permissions, the Google Home app will guide you through the initial setup process. Make sure your mobile device or computer is connected to the same Wi-Fi network that you intend to use with your Chromecast.
That’s it! You have now successfully downloaded and installed the Google Home app. In the next step, we’ll cover how to set up your Chromecast device on your Wi-Fi network using the app.
Step 3: Set up the Chromecast on your Wi-Fi network
Now that you have the Google Home app installed on your device, it’s time to set up your Chromecast on your Wi-Fi network. Follow these steps to get started:
1. Open the Google Home app: Launch the Google Home app on your smartphone, tablet, or computer. Make sure that your device is connected to the same Wi-Fi network that you want to connect your Chromecast to.
2. Add a device: On the home screen of the Google Home app, tap on the “+” icon or the “Add” button. This will initiate the process of adding a new device to the app.
3. Set up a new device: From the list of available options, select “Set up device” or “Set up new devices.” The app will now guide you through the process of setting up your Chromecast.
4. Select your Chromecast: On the next screen, you’ll see a list of available devices. Choose the Chromecast device that you want to set up. The app may display the device name or a unique identifier to help you identify the correct Chromecast.
5. Confirm the code: The Google Home app will display a code on your device’s screen. Make sure that the code shown on your device matches the code displayed on your TV. If the codes match, tap on the “Yes” or “Confirm” button to proceed.
6. Connect to Wi-Fi: The app will now prompt you to connect your Chromecast to your Wi-Fi network. Select your Wi-Fi network from the list of available networks and enter your Wi-Fi password if prompted. Wait for the app to connect your Chromecast to the network.
7. Update Chromecast (if required): In some cases, your Chromecast may need a firmware update. If necessary, the Google Home app will automatically check for and install any available updates. This process may take a few minutes, so be patient.
8. Rename your Chromecast (optional): After the Wi-Fi setup is complete, you have the option to give your Chromecast a custom name. You can choose a name that reflects the room or location where the Chromecast is installed. If you don’t want to rename it, you can skip this step.
That’s it! Your Chromecast is now successfully set up on your Wi-Fi network. In the next step, we’ll cover how to customize Chromecast settings and preferences using the Google Home app.
Step 4: Customize Chromecast settings and preferences
Now that your Chromecast is connected to your Wi-Fi network, you can customize its settings and preferences using the Google Home app. Follow these steps to personalize your Chromecast experience:
1. Open the Google Home app: Launch the Google Home app on your device.
2. Select your Chromecast: On the app’s home screen, you should see a list of connected devices. Tap on your Chromecast name to access its settings.
3. Adjust display settings: In the Chromecast settings, you can adjust the display settings such as screen resolution and screen mirroring. You can also enable or disable the Guest mode if you want to allow others to cast to your Chromecast without being connected to your Wi-Fi network.
4. Customize backdrop: The Chromecast backdrop feature allows you to display personalized content like photos, artwork, news headlines, and more when the Chromecast is idle. You can customize the backdrop from the Google Home app. Choose from a variety of sources or select your own photo albums to display.
5. Manage connected apps: The Google Home app allows you to manage and control the apps and services that are compatible with Chromecast. From the app’s settings, you can install new apps, remove unwanted apps, and organize the app order for more convenient casting.
6. Explore advanced settings: If you’re a tech enthusiast, you can dig deeper into the advanced settings of your Chromecast. From the Google Home app, you can access options like device reboots, factory resets, and preview future experimental features.
7. Casting from the Google Home app: One useful feature of the Google Home app is the ability to cast directly from the app itself. You can play music, videos, or photo slideshows directly on your Chromecast without needing to open individual apps. Simply tap on the “Cast” button within the Google Home app and select your Chromecast device.
By personalizing your Chromecast settings and preferences, you can make the most out of your streaming experience. Take some time to explore the available options and create a customized setup that suits your preferences.
Step 5: Start casting to your non-smart TV!
Now that you have set up your Chromecast and customized its settings, it’s time to start casting your favorite content to your non-smart TV. Here’s how:
1. Open a compatible app: Make sure that the app you want to cast from is compatible with Chromecast. Popular apps like Netflix, YouTube, Spotify, and many more support Chromecast. Open the app on your mobile device or computer.
2. Look for the cast icon: Within the app, look for the cast icon. It’s usually located in the top right corner or in the playback controls. The icon typically looks like a rectangle with a Wi-Fi symbol in the corner.
3. Tap on the cast icon: Once you’ve located the cast icon, tap on it to see a list of available Chromecast devices. Select your Chromecast from the list.
4. Choose the content: After selecting your Chromecast, choose the content you want to cast to your TV. It can be a video, a movie, a TV show, a song, or any other compatible media.
5. Enjoy the show on your TV: Once you’ve selected the content, it will start playing on your non-smart TV through the Chromecast. You can use your mobile device or computer as a remote control to pause, play, adjust the volume, and manage playback options.
6. Explore additional casting features: Depending on the app you’re casting from, you may have access to additional casting features. For example, in YouTube, you can create playlists, queue videos, and even continue browsing while your content plays on the TV.
7. End casting: When you’re done watching or listening to your content, you can end the casting session by tapping on the cast icon again and selecting “Stop casting” or “Disconnect”. This will return your Chromecast to standby mode.
With the ability to cast from compatible apps, you can easily enjoy a wide range of entertainment options on your non-smart TV. Whether it’s binge-watching your favorite series, streaming music, or watching viral videos, Chromecast lets you bring it all to the big screen.
Troubleshooting Common Issues
While setting up and using Chromecast on your non-smart TV is generally a smooth process, sometimes you may encounter common issues. Here are some troubleshooting tips to help you resolve them:
1. Wi-Fi connectivity issues: If your Chromecast is experiencing trouble connecting to your Wi-Fi network, make sure that your Wi-Fi signal is strong and stable. Try moving your router closer to your Chromecast or consider using a Wi-Fi extender to boost the signal in that area.
2. App compatibility issues: Some apps may have compatibility issues with Chromecast. Ensure that you have the latest version of the app installed on your device. If the problem persists, try force-quitting the app and relaunching it. You can also check the app’s settings for any specific Chromecast options.
3. Chromecast not appearing in the app: If your Chromecast device is not showing up in the list of available devices within the app, ensure that your device and Chromecast are connected to the same Wi-Fi network. If they are, try restarting the Google Home app and ensure that your Chromecast is powered on.
4. Poor video or audio quality: If you’re experiencing low-quality video or audio playback, check your internet connection speed. Make sure you have a stable high-speed internet connection. You can also try adjusting the video quality settings within the app or reducing the number of devices connected to your Wi-Fi network to improve performance.
5. Chromecast not responding: If your Chromecast becomes unresponsive or freezes, try unplugging it from the power source for a few seconds and then plugging it back in. This can often resolve minor issues. If the problem persists, perform a factory reset using the Google Home app.
6. Mobile device or computer connection issues: If you’re having trouble connecting your mobile device or computer to your Chromecast, ensure that both devices are connected to the same Wi-Fi network. Restart your device and the Google Home app to refresh the connection. Updating the app and your device’s operating system to the latest versions may also help resolve connectivity issues.
Remember, these are just general troubleshooting tips, and specific issues may require further investigation. If you’re still experiencing problems, it’s recommended to visit the Chromecast Help Center or consult the official support resources provided by Google for more in-depth troubleshooting guidance.
Conclusion
Setting up Chromecast on your non-smart TV opens up a world of streaming possibilities, allowing you to enjoy your favorite movies, TV shows, music, and more on the big screen. With its ease of use and compatibility with popular apps, Chromecast provides a convenient and affordable solution for transforming your non-smart TV into a smart entertainment hub.
In this guide, we’ve walked you through the step-by-step process of setting up Chromecast on your non-smart TV. We started by connecting the Chromecast device to your TV, followed by downloading and installing the Google Home app. Then, we guided you through setting up the Chromecast on your Wi-Fi network and customizing its settings and preferences. Finally, we explored how to start casting content from your mobile device or computer to your non-smart TV using compatible apps.
While setting up Chromecast is generally a straightforward process, it’s not uncommon to encounter some issues along the way. We also provided troubleshooting tips for common problems that you may face, including Wi-Fi connectivity issues, app compatibility issues, and more.
Now that you’re equipped with the knowledge and know-how to set up and use Chromecast on your non-smart TV, you can enjoy endless hours of entertainment on the big screen. Sit back, relax, and let Chromecast bring your favorite movies, shows, music, and more to life.
So what are you waiting for? Get started with Chromecast and elevate your TV viewing experience today!
FAQs
Here are answers to some frequently asked questions about setting up Chromecast on a non-smart TV:
Q1: Can I connect Chromecast to any TV?
A1: Chromecast requires an HDMI port on your TV to connect. As long as your non-smart TV has an HDMI port, you should be able to connect Chromecast.
Q2: Can I use Chromecast without Wi-Fi?
A2: Chromecast requires a stable Wi-Fi connection to function. It relies on the internet to stream content from your device to your TV.
Q3: Do I need a separate Chromecast for each TV in my house?
A3: No, you can use a single Chromecast device to cast content to multiple TVs in your home, as long as they have an HDMI port.
Q4: Can I cast content from my iPhone or iPad to Chromecast?
A4: Yes, Chromecast supports casting from iOS devices. You can use compatible apps on your iPhone or iPad to cast content to your non-smart TV.
Q5: How far can my mobile device be from the Chromecast for casting to work?
A5: The casting range depends on the strength of your Wi-Fi signal. In general, keeping your mobile device within 10-15 meters of the Chromecast should provide a reliable connection.
Q6: Can I control Chromecast using voice commands?
A6: Yes, if you have a device with Google Assistant, such as a Google Home speaker or a smartphone with the Google Assistant app, you can use voice commands to control Chromecast. Simply say the command, followed by the content you want to play, and specify the Chromecast device.
Q7: Can I cast content in high-definition (HD) or 4K Ultra HD?
A7: Yes, Chromecast supports HD and 4K Ultra HD content, as long as your TV and the app or service you’re using also support those resolutions.
Q8: Can I cast local media files, such as photos and videos, from my device to Chromecast?
A8: Yes, you can use compatible apps to cast local media files from your device to Chromecast. These apps allow you to browse and play media files stored on your device or on network-attached storage (NAS) devices.
Q9: Do I need to keep my mobile device or computer connected to Chromecast for the content to play on my TV?
A9: No, once you’ve cast content to Chromecast, your mobile device or computer acts as a remote control. You can use it to pause, play, adjust the volume, and navigate between different content without keeping it connected.
Q10: Can I cast to Chromecast from multiple devices simultaneously?
A10: Yes, Chromecast allows you to cast from multiple devices at the same time. However, keep in mind that the performance may vary depending on your Wi-Fi network and the bandwidth requirements of the content being cast.
Hopefully, these FAQs have provided you with answers to some of the common questions about setting up and using Chromecast on a non-smart TV. If you have any other concerns or queries, refer to the Chromecast Help Center or visit the official Google support resources for more detailed information.