Introduction
Welcome to the world of Quickbooks, a powerful accounting software that can help you manage your business finances more effectively. One of the key components of Quickbooks is the Chart of Accounts, which allows you to categorize and track your income, expenses, assets, and liabilities in a structured manner.
The Chart of Accounts is like a roadmap for your financial data, providing a clear and organized view of your business’s financial health. It helps you keep track of your income streams, monitor your expenses, and generate accurate reports for analysis and decision-making.
Whether you’re just starting out or looking to streamline your existing accounting system, setting up a Chart of Accounts in Quickbooks is an essential step. This comprehensive guide will walk you through the process, from choosing the right accounts for your business to customizing and organizing them in a way that suits your needs.
By the end of this guide, you’ll have a solid understanding of how to create and maintain a Chart of Accounts in Quickbooks, enabling you to take control of your finances and make informed business decisions based on accurate and up-to-date financial data.
So, let’s dive in and learn how to set up a Chart of Accounts in Quickbooks!
Why is a Chart of Accounts important in Quickbooks?
A Chart of Accounts plays a crucial role in your Quickbooks accounting system. It serves as the foundation of your financial reporting and provides a clear structure for organizing your financial transactions. Here are some key reasons why a Chart of Accounts is essential:
- Accurate Financial Reporting: The Chart of Accounts helps you generate accurate financial statements, such as the balance sheet, income statement, and cash flow statement. By categorizing your transactions into specific accounts, you can easily track and analyze your business’s financial performance.
- Better Decision-Making: With a properly set up Chart of Accounts, you can gain insights into different aspects of your business. By categorizing income and expenses by type, you can identify which areas of your business are performing well and where you need to make improvements. This allows you to make informed decisions about resource allocation and growth strategies.
- Efficient Tax Preparation: When it’s time to file your taxes, a well-organized Chart of Accounts simplifies the process. By categorizing your income and expenses correctly, you can easily generate reports that provide a clear picture of your tax liabilities, making it easier for your accountant or tax professional to prepare your tax returns accurately.
- Effective Budgeting and Planning: A Chart of Accounts enables you to create budgets for different expense categories. By comparing your actual expenses to the budgeted amounts, you can identify areas where you’re overspending and take corrective actions. This helps you plan for future expenses and ensure that you’re achieving your financial goals.
- Improved Cash Flow Management: With a clear understanding of your cash inflows and outflows through your Chart of Accounts, you can effectively manage your cash flow. By tracking the timing of payments and monitoring your accounts receivable and accounts payable, you can ensure that you have enough cash on hand to meet your obligations and take advantage of business opportunities.
In a nutshell, a properly maintained Chart of Accounts in Quickbooks is essential for accurate financial reporting, informed decision-making, efficient tax preparation, effective budgeting and planning, and improved cash flow management. It provides you with valuable insights into your business’s financial health and empowers you to make strategic and informed business decisions based on accurate and up-to-date financial data.
Choosing the right accounts for your business
When setting up a Chart of Accounts in Quickbooks, it’s crucial to choose the right accounts that accurately reflect the financial activities of your business. Here are some key considerations to keep in mind:
- Business Type: The first step in selecting accounts is to consider the type of business you have. Different industries have unique financial activities that need to be tracked. For example, a retail business may have separate accounts for sales, inventory, and cost of goods sold, while a service-based business may focus more on accounts for service revenue, expenses, and labor costs.
- Legal Structure: The legal structure of your business can also impact the types of accounts you need. For instance, a sole proprietorship may not have separate accounts for owner’s equity, while a corporation may require accounts for retained earnings and dividends.
- Financial Goals and Reporting Requirements: Consider your financial goals and the reporting requirements of your business. If you plan to secure funding or attract investors, you may need specific accounts to track financial ratios or provide detailed breakdowns of revenue and expenses.
- Regulatory Compliance: Ensure that you comply with relevant regulatory guidelines and accounting standards. Research industry-specific regulations that may require specific accounts or categorization of transactions. This will help you stay compliant and avoid any legal or financial issues in the future.
- Flexibility and Scalability: As your business grows, you may need to add or modify accounts to accommodate new products, services, or business activities. Keep your Chart of Accounts flexible and scalable to adapt to changing business needs.
- Consistency: Maintain consistency in your account names and classifications to ensure accurate reporting and analysis. Use clear and concise names that accurately describe the account’s purpose and avoid creating duplicate or overlapping accounts.
Remember, choosing the right accounts for your business is crucial for accurate financial tracking and reporting. Take the time to think through your business’s unique financial activities and goals to ensure that your Chart of Accounts is tailored to your specific needs. By selecting the right accounts, you’ll have a solid foundation for managing and analyzing your business’s financial data effectively.
Creating a new Chart of Accounts in Quickbooks
Setting up a new Chart of Accounts in Quickbooks is a straightforward process. Follow these steps to create a customized and organized structure for your financial transactions:
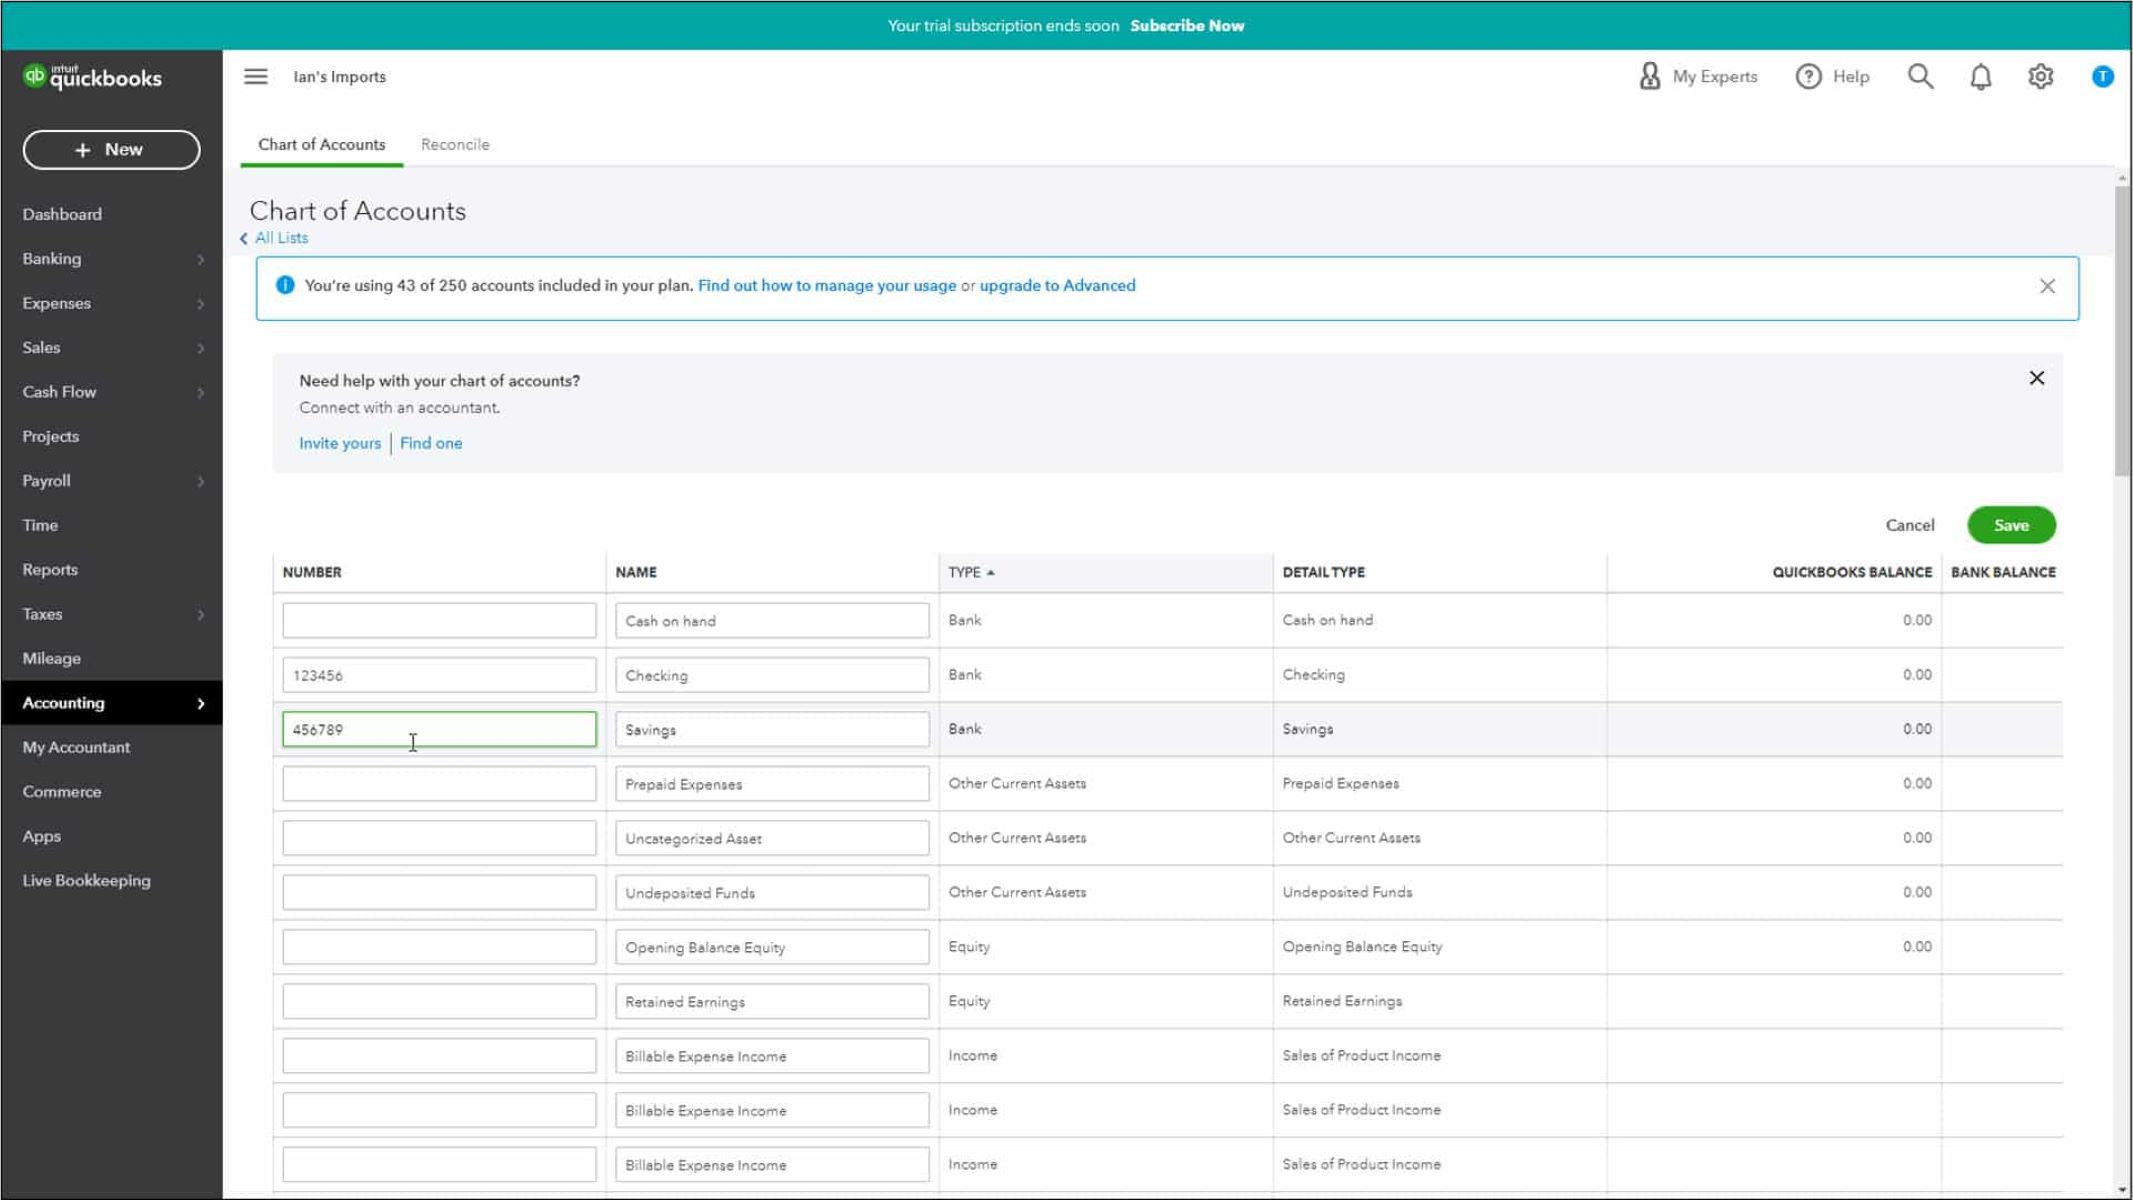
- Access the Chart of Accounts: Log in to your Quickbooks account and navigate to the “Chart of Accounts” section. This can usually be found under the “Accounting” or “Company” tab.
- Create a New Account: Click on the “New” button to create a new account. Choose the account type that best matches the financial activity you want to track, such as income, expenses, assets, or liabilities.
- Name the Account: Provide a descriptive and concise name for the account. This name should accurately represent the purpose of the account for easy identification and categorization of transactions.
- Assign an Account Number: Assign a unique account number to the account. This helps you organize your accounts and facilitates easy navigation in the Chart of Accounts. You can customize the numbering system according to your preferences.
- Select Tax Line Mapping: If the account is applicable to tax reporting, map it to the appropriate tax line item. This ensures that the account is reflected correctly in your tax reports and simplifies the tax preparation process.
- Save the Account: Once you have entered all the necessary details, click “Save” to create the account. Repeat the process for each account you want to include in your Chart of Accounts.
- Organize Accounts into Categories: Now that you have created individual accounts, you can further organize them into categories. This helps group similar accounts together, making it easier to navigate and analyze your finances. Consider categorizing accounts by income types, expense types, assets, liabilities, and equity.
- Create Subaccounts: If you require more detailed tracking within a specific account, you can create subaccounts. Subaccounts allow you to break down transactions further and provide a more granular view of your finances.
- Arrange Account Order: You can adjust the order of the accounts in the Chart of Accounts by using the drag-and-drop function. Arrange the accounts in a way that makes sense for your reporting and analysis requirements.
By following these steps, you can create a new Chart of Accounts in Quickbooks that aligns with your business’s financial activities and organization preferences. Customizing the Chart of Accounts allows you to have a clear and structured view of your financial transactions, making it easier to track, analyze, and report your business’s financial performance accurately.
Organizing accounts by category or type
Organizing your accounts by category or type is an essential step in creating a well-structured and easily navigable Chart of Accounts in Quickbooks. Categorizing accounts allows you to group similar transactions together, making it easier to analyze your financial data and generate meaningful reports. Here are some tips for organizing your accounts effectively:
- Income Categories: Start by creating categories for your different sources of income. Common income categories include sales revenue, service revenue, rental income, and interest income. This helps you track and analyze your revenue streams separately and provides insight into your business’s primary sources of income.
- Expense Categories: Create categories for your various types of expenses. This may include categories such as cost of goods sold, payroll expenses, rent, utilities, marketing expenses, and office supplies. Categorizing your expenses allows you to monitor and control your costs more effectively and identify areas where you can potentially reduce expenses.
- Asset Categories: Organize your assets into categories such as current assets (e.g., cash, accounts receivable) and fixed assets (e.g., property, equipment). This helps you track the value and availability of your assets, aiding in financial analysis and decision-making.
- Liability Categories: Create categories for your liabilities, such as accounts payable, loans, and credit card balances. Organizing your liabilities allows you to stay on top of your financial obligations and track your business’s overall debt levels.
- Equity Categories: Set up categories related to equity, such as owner’s equity or shareholder’s equity. This helps you track changes in equity over time, whether from capital contributions, retained earnings, or distributions.
- Other Categories: Depending on the nature of your business, you may have additional categories specific to your industry or unique financial activities. For example, if you have inventory, you might create a category specifically for inventory-related accounts.
- Consistent Naming: Maintain consistency in naming your categories to ensure clarity and accuracy. Use clear and descriptive names that reflect the purpose of each category. Avoid using vague or ambiguous terms that may lead to confusion later on.
- Review and Refine: Periodically review your account categories to ensure they accurately reflect your business’s financial activities. As your business evolves, you may need to add new categories or make adjustments to existing ones to accommodate changes in your operations or reporting requirements.
By organizing your accounts into categories or types, you create a logical and systematic structure within your Chart of Accounts. This organization allows for easier tracking, analysis, and reporting of financial data, empowering you to make informed decisions that drive the success of your business.
Adding and customizing account names
When setting up your Chart of Accounts in QuickBooks, it’s important to give careful thought to the account names you choose. Account names should be descriptive, concise, and accurately reflect the purpose of each account. Here are some tips for adding and customizing account names:
- Keep it Clear and Concise: Choose account names that are easily understandable and do not contain jargon or abbreviations that may cause confusion. Clear and concise names make it easier for you and other users to quickly identify the purpose of each account.
- Use Descriptive Language: Be specific when naming your accounts to avoid ambiguity. For example, instead of simply using “Expenses,” you may want to use more descriptive names like “Office Supplies Expenses” or “Advertising Expenses.”
- Consider Account Hierarchy: If you have subaccounts or a hierarchical structure within your Chart of Accounts, include this information in the account names. For example, you can use account names like “Rent: Office Space” or “Travel Expenses: Airfare” to indicate the relationship between parent and subaccounts.
- Avoid Duplications: Ensure that each account name is unique within your Chart of Accounts. Duplicating account names can lead to confusion and inaccuracies in reporting. If you have similar accounts, differentiate them by adding additional details or using specific qualifiers.
- Be Consistent: Establish a naming convention and stick to it. Consistency is key in maintaining the integrity of your Chart of Accounts. Choose a system for naming accounts and apply it consistently throughout your organization.
- Review and Refine: Regularly review and refine your account names as your business evolves. As you add or modify accounts, take the opportunity to ensure that the names align with your current business needs and accurately represent your financial activities.
- Consider Reporting Requirements: Keep in mind any specific reporting requirements you may have. If you need to generate reports for specific stakeholders or regulatory purposes, ensure that your account names facilitate the accurate and efficient extraction of relevant data.
- Customize Account Names: QuickBooks allows you to customize the names of accounts to better suit your business requirements. Take advantage of this feature to tailor the account names according to your specific terminology or industry practices.
- Seek Professional Guidance: If you’re unsure about the appropriate account names for your business or need assistance in customizing them, consult with an accounting professional. They can provide valuable insights and help ensure that your Chart of Accounts accurately reflects your financial activities.
Remember, the account names you choose in your Chart of Accounts play a vital role in organizing and understanding your financial data. Thoughtful and customized account names enhance the usability and accuracy of your accounting system, enabling you to effectively track and analyze your business’s finances.
Setting up account numbers and subaccounts
In QuickBooks, setting up account numbers and utilizing subaccounts can help you further organize and classify your Chart of Accounts. Account numbers provide a logical structure, while subaccounts allow for a more detailed breakdown of transactions. Here’s how you can set up account numbers and subaccounts:
- Choose a Numbering System: Decide on a numbering system for your accounts. You can use a simple sequential numbering system (e.g., 100, 200, 300), or you may opt for a more detailed system that incorporates numerical prefixes to represent account types (e.g., 1XXX for assets, 2XXX for liabilities).
- Assign Numbers to Accounts: Assign unique numbers to each account in your Chart of Accounts based on the numbering system you’ve chosen. The account number should reflect the account’s category and position within the hierarchy. For example, “101” could be used for a cash account.
- Consider Subaccounts: If you need to track transactions at a more granular level, create subaccounts. Subaccounts allow you to categorize transactions within a parent account. For example, you can have a parent account called “Office Supplies” with subaccounts for “Pens,” “Paper,” and “Printer Ink.”
- Create Subaccounts: To create a subaccount, select the parent account and click on the “New” button. Enter the subaccount name and assign a unique account number. The account number for a subaccount generally follows the format of the parent account number with an additional digit or code.
- Organize Subaccounts: Arrange subaccounts under their respective parent accounts to maintain a logical structure within your Chart of Accounts. You can usually drag and drop the subaccounts to position them correctly.
- Assign Account Types: Make sure that each account and subaccount is designated with the appropriate account type (e.g., income, expense, asset, liability). This ensures accurate reporting and helps QuickBooks generate the appropriate financial statements and reports.
- Use Hierarchy for Reporting: Utilize the hierarchy created by the parent and subaccounts for reporting and analysis purposes. When generating reports, you can choose to include only the parent account or drill down to view the details of the subaccounts within it.
- Regularly Review and Adjust: Periodically review your account numbers and subaccounts to ensure they align with your business needs. As your Chart of Accounts evolves or your reporting requirements change, it may be necessary to add new accounts, modify account numbers, or reorganize subaccounts.
- Communicate and Document: Clearly communicate the account numbering system and subaccount structure to others who will be using the Chart of Accounts. Additionally, document any specific guidelines or instructions related to the use of account numbers and subaccounts to maintain consistency.
By implementing account numbers and utilizing subaccounts in QuickBooks, you can establish a logical and structured framework for your financial transactions. This not only enhances organization but also facilitates accurate tracking, reporting, and analysis of your business’s financial data.
Mapping accounts to various financial statements
Mapping accounts to various financial statements is an essential step in setting up your Chart of Accounts in QuickBooks. By properly assigning accounts to specific financial statements, you can generate accurate reports that reflect your business’s financial performance. Here’s how you can map accounts to different financial statements:
- Balance Sheet: The balance sheet provides a snapshot of your business’s financial position at a specific point in time. Map accounts related to assets, liabilities, and equity to the balance sheet. Assets should be mapped to the asset section, liabilities to the liability section, and equity to the equity section of the balance sheet.
- Income Statement: The income statement, also known as the profit and loss statement, summarizes your business’s revenues and expenses over a specific period. Map accounts related to income and expenses to appropriate categories in the income statement. This helps in accurately tracking your revenue and expense sources, and understanding the profitability of your business.
- Cash Flow Statement: The cash flow statement shows how cash moves in and out of your business over a specific period. Map accounts related to cash inflows and outflows to the appropriate sections of the cash flow statement, including operating activities, investing activities, and financing activities. This allows for better analysis of your business’s cash flow situation.
- Additional Financial Statements: Depending on your business’s needs, you may also need to map accounts to additional financial statements, such as statement of retained earnings or statement of changes in financial position. Identify the specific accounts that contribute to these statements and ensure they are appropriately mapped.
- Utilize Subaccounts for Specific Reporting: If you have created subaccounts within your Chart of Accounts, you can use them to generate customized reports for specific purposes. For example, you can create a report that focuses on a particular department or project by selecting the relevant subaccounts.
- Review Account Mapping: Regularly review your account mapping to ensure accuracy and consistency. As your business evolves and new accounts are added, it’s important to ensure their proper mapping to the financial statements. Misclassification of accounts can lead to inaccurate reporting and financial analysis.
- Test and Verify: Generate sample financial statements and review them to ensure that the mapped accounts are contributing correctly. Cross-check the amounts on the statements with the balances in your Chart of Accounts to verify the accuracy of the mapping.
- Consult an Accountant: If you’re unsure about mapping specific accounts to financial statements, or if your business requires complex financial reporting, consider consulting with an accounting professional. They can provide guidance and ensure that your accounts are mapped correctly for accurate reporting and compliance with accounting standards.
By mapping accounts to various financial statements, you can generate comprehensive and accurate reports that provide valuable insights into your business’s financial performance. Proper mapping enhances financial analysis and decision-making, enabling you to make informed strategic choices to drive the success of your business.
Creating groups and subgroups within the Chart of Accounts
Creating groups and subgroups within the Chart of Accounts in QuickBooks allows for a more organized and streamlined financial tracking process. By grouping related accounts together, you can gain a clearer picture of your business’s financial performance and generate more meaningful reports. Here’s how you can create groups and subgroups within your Chart of Accounts:
- Identify Common Categories: Start by identifying common categories within your Chart of Accounts. These categories can be based on account types, such as income, expense, assets, liabilities, or equity, or they can be industry-specific classifications that suit your business’s needs.
- Create Parent Accounts: Once you have identified the categories, create parent accounts for each group. Parent accounts act as the main category and will contain the subaccounts within them. For example, you can create a parent account called “Operating Expenses” that will contain subaccounts for various expense categories.
- Add Subaccounts: Under each parent account, create subaccounts to further breakdown the financial activities. Subaccounts provide more specific details within each category. For instance, under the “Operating Expenses” parent account, you can create subaccounts for “Rent,” “Utilities,” and “Office Supplies.”
- Assign Account Numbers: Assign unique account numbers to each parent account and subaccount to maintain a logical order within the Chart of Accounts. Consider using a numbering system that reflects the hierarchy of accounts. For example, parent accounts may have numbers like 100, 200, etc., while subaccounts can have numbers like 101, 102, and so on.
- Organize the Structure: Arrange the parent accounts and subaccounts in a logical order within the Chart of Accounts. This structure should make sense and reflect the relationships between different accounts. You can easily reorder the accounts by using the drag-and-drop functionality in QuickBooks.
- Standardize Naming Conventions: Establish consistent naming conventions for the parent accounts and subaccounts to ensure clarity and ease of understanding. Use descriptive and clear names that accurately represent the purpose of each account. Avoid using acronyms or abbreviations that can lead to confusion.
- Review and Adjust: Regularly review your groupings and subgroups to ensure they align with your business’s financial activities and reporting needs. As your business evolves, you may need to add new parent accounts or subaccounts to capture new income or expense categories.
- Utilize Reporting Tools: Take advantage of the reporting tools in QuickBooks to generate reports based on your groups and subgroups. This allows you to analyze your financial data more specifically and gain deeper insights into different categories of your business’s financial performance.
- Train Users: Ensure that all users who access the Chart of Accounts in QuickBooks understand the group and subgroup structure. Provide training on how to navigate and locate specific accounts within the hierarchy to ensure consistency and accuracy in financial tracking.
By creating groups and subgroups within your Chart of Accounts, you can effectively organize and categorize your financial transactions. This allows for easier tracking, analysis, and reporting, enabling you to make informed decisions based on a comprehensive understanding of your business’s finances.
Adding opening balances to accounts
When setting up your Chart of Accounts in QuickBooks, it’s important to consider the opening balances of your accounts. Adding opening balances ensures that your financial records accurately reflect your business’s financial position at the start of your accounting period. Here’s how you can add opening balances to your accounts:
- Review Existing Balances: Start by reviewing your previous financial records or statements to determine the opening balances for each account. This includes bank account balances, outstanding invoices, pending bills, and any other relevant financial transactions.
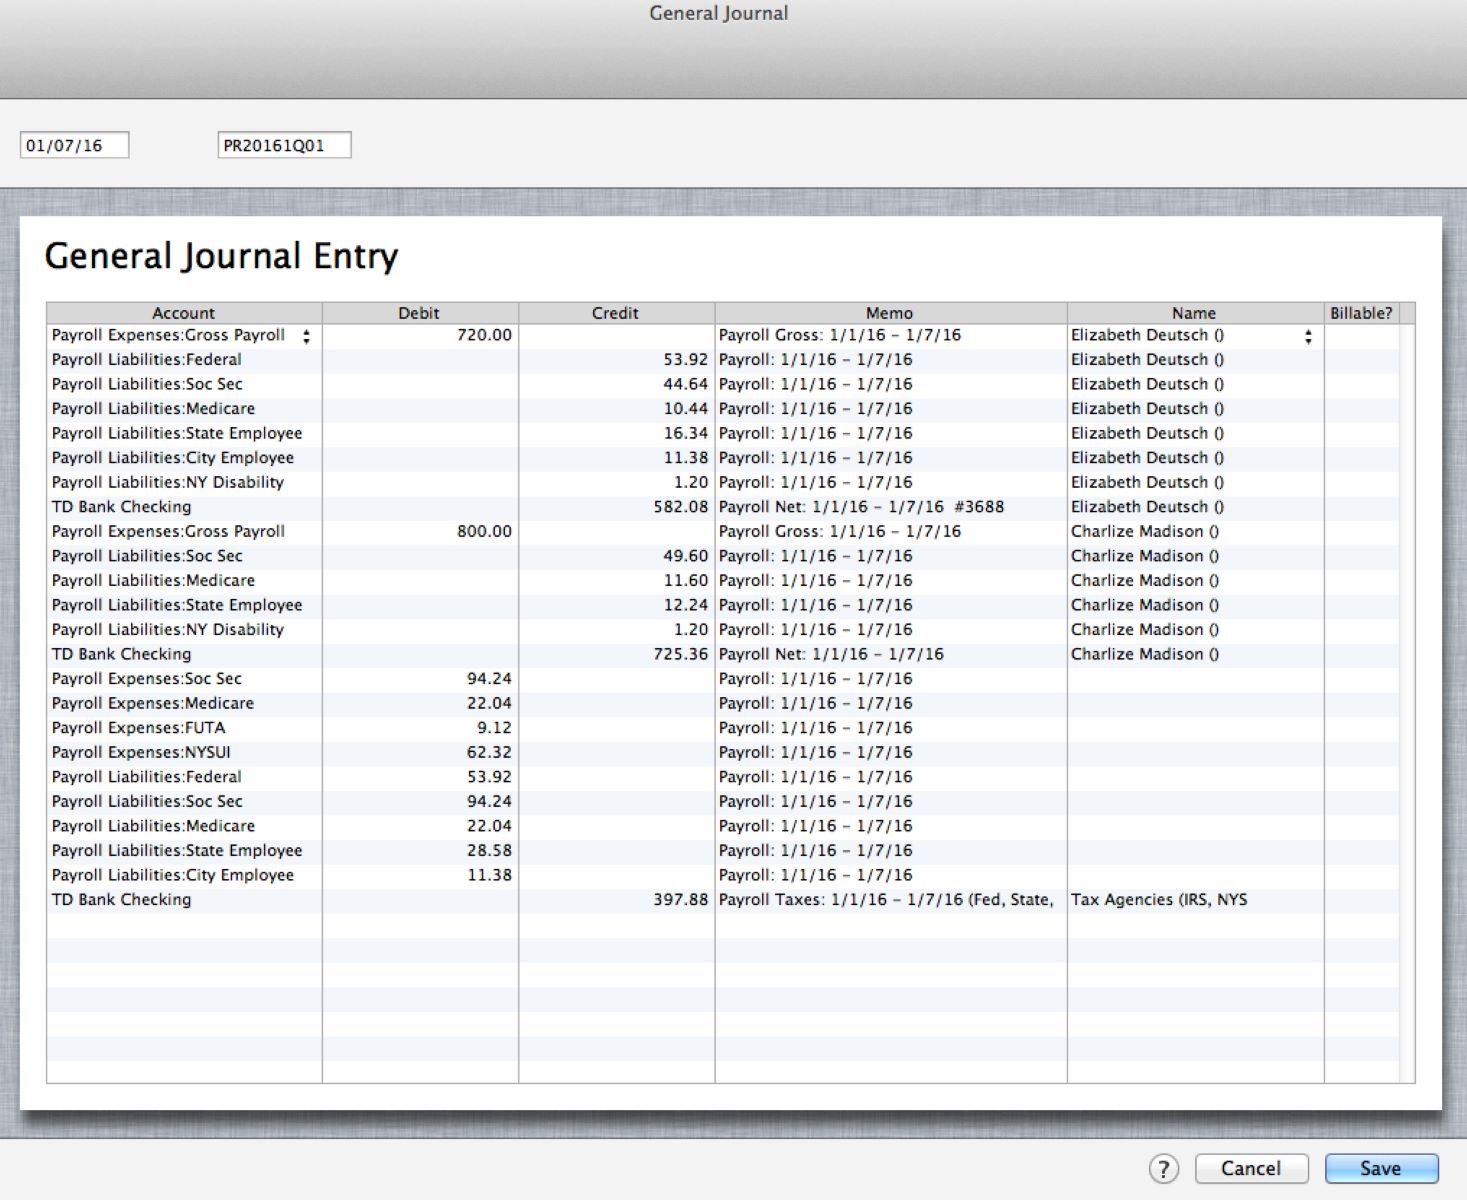
- Create Journal Entries: To input the opening balances in QuickBooks, you will need to create journal entries. Go to the “Company” tab, select “Make General Journal Entries,” and enter the date of the opening balances.
- Identify Accounts: In the journal entry, specify the accounts to which the opening balances will be assigned. Ensure that you select the correct account type, such as cash, accounts receivable, or accounts payable, for each transaction.
- Debit and Credit: Determine whether each account requires a debit or credit entry. Debit represents an increase in assets or expenses and a decrease in liabilities or equity. Credit represents an increase in liabilities, equity, or revenue and a decrease in assets or expenses.
- Enter Amounts: Enter the appropriate amounts for each account, reflecting the opening balances. Be sure to use positive or negative values depending on whether it represents an increase or decrease in the account balance.
- Verify Entries: Double-check the journal entries to ensure accuracy. Review the account names, amounts, and debit/credit balances. Any errors or inconsistencies may impact your financial reports and analysis.
- Save and Post: Once you have verified the journal entries, save and post them in QuickBooks. This records the opening balances in the respective accounts and establishes the starting point for your financial transactions.
- Check Reconciliation: After adding the opening balances, reconcile your bank and credit card accounts to ensure accuracy. This helps to identify any discrepancies and maintain the integrity of your financial records.
- Keep Supporting Documentation: Maintain supporting documentation, such as bank statements, invoices, and bills, to substantiate your opening balances. This documentation serves as evidence and backup for the figures entered in your Chart of Accounts.
- Regularly Review Balances: It’s essential to review your account balances regularly to ensure they align with your ongoing transactions. Reconcile accounts, identify and resolve any discrepancies promptly to maintain accurate and up-to-date financial records.
By adding opening balances to your accounts, you establish the starting point for your financial transactions in QuickBooks. Accurate recording of opening balances ensures that your financial reports reflect the true financial position of your business from the beginning of your accounting period.
Syncing your Chart of Accounts with invoices and expenses
Syncing your Chart of Accounts with invoices and expenses in QuickBooks ensures accurate categorization and tracking of your financial transactions. By aligning your Chart of Accounts with your invoicing and expense management processes, you can generate comprehensive reports and gain valuable insights into your business’s financial health. Here’s how you can sync your Chart of Accounts with invoices and expenses:
- Review Account Mapping: Ensure that your accounts in the Chart of Accounts are correctly mapped to the corresponding income and expense categories in QuickBooks. This allows for proper classification and tracking of your revenue and expenses.
- Create Customized Invoice Templates: Customize your invoice templates in QuickBooks to include the account information for each line item. This ensures that the revenue from each invoice is allocated to the appropriate account in your Chart of Accounts.
- Assign Account Codes or Categories: When creating invoices or recording expenses, assign the appropriate account codes or categories to each transaction. This helps QuickBooks automatically sync the transactions with the corresponding accounts in your Chart of Accounts.
- Use the “Items” Feature: Take advantage of the “Items” feature in QuickBooks to automatically assign account codes or categories to frequently used products or services. This streamlines the invoicing process and ensures consistent mapping of income or expense accounts.
- Review and Approve Expenses: Regularly review and approve expenses entered in QuickBooks. Verify that each expense is categorized correctly and mapped to the appropriate account in your Chart of Accounts. This helps maintain data accuracy and ensures accurate financial reporting.
- Create Expense Rules: Use QuickBooks’s expense rules feature to automate the categorization of recurring expenses. Set up rules that match specific criteria (e.g., vendor, description) to assign the appropriate account codes or categories automatically.
- Train Team Members: If multiple team members enter transactions in QuickBooks, ensure they are trained on the proper account mapping and categorization processes. Consistent practices throughout the organization ensure accurate syncing of transactions with your Chart of Accounts.
- Regularly Run Reports: Generate financial reports in QuickBooks to review your income and expenses. These reports should reflect the information synced with your Chart of Accounts. Analyze the reports to identify trends, monitor cash flow, and make informed decisions based on accurate financial data.
- Adjust Account Mapping as Needed: Periodically review your account mapping to ensure it aligns with your evolving business needs. As your business expands or changes, you may need to add new accounts or update existing mappings to reflect new income or expense categories.
- Reconcile Income and Expense Accounts: Regularly reconcile your income and expense accounts with bank statements to ensure accuracy. This reconciliation process helps identify and resolve discrepancies, ensuring that your Chart of Accounts accurately reflects your financial transactions.
By syncing your Chart of Accounts with invoices and expenses in QuickBooks, you establish a seamless connection between your financial transactions and your financial reporting system. This integration provides accurate and detailed insights into your business’s income and expenses, supporting better decision-making and financial management.
Reviewing and maintaining the Chart of Accounts over time
Reviewing and maintaining your Chart of Accounts is crucial for keeping your financial records accurate and up to date in QuickBooks. As your business evolves, your financial needs may change, and adjustments to your Chart of Accounts may be necessary. Regular review and maintenance help ensure that your accounts align with your evolving business activities and reporting requirements. Here are some key steps to consider:
- Regular Review: Schedule periodic reviews of your Chart of Accounts to assess its relevance and effectiveness. Aim to review it at least annually or whenever significant changes occur in your business.
- Remove Unused Accounts: Identify any accounts that are no longer in use or have become obsolete. Remove these accounts from your Chart of Accounts to prevent clutter and improve clarity.
- Add New Accounts: Evaluate if any new income or expense categories have emerged in your business operations. Determine if these new categories require separate accounts to accurately track and report their financial impact.
- Modify Existing Accounts: Consider if any existing accounts need modification to better reflect the evolving nature of your business. This could involve changing the account name, account number, or account type.
- Reorganize Account Structure: Periodically assess the structure of your Chart of Accounts and determine if any adjustments or reorganizations are necessary. As your business grows, you may want to introduce new parent accounts, subaccounts, or groupings to reflect your changing financial needs.
- Consult with Accountant: If you’re uncertain about making changes to your Chart of Accounts, seek advice from your accountant or financial professional. They can provide valuable insights and guidance based on their expertise and understanding of your business.
- Maintain Consistency: Widespread changes to your Chart of Accounts should be approached with caution. Strive to maintain consistency in account naming conventions and account classification to ensure accurate tracking and reporting of financial data over time.
- Document Changes: Document any changes made to your Chart of Accounts. This documentation serves as a reference and ensures that future users and team members are aware of the changes.
- Train Team Members: If you have team members responsible for managing or entering financial transactions, provide training on the proper usage and maintenance of the Chart of Accounts. Ensure they understand the importance of consistency and accuracy in recording transactions.
- Stay Up to Date with Accounting Standards: Keep yourself informed about any changes in accounting standards or regulations that may impact your Chart of Accounts. Stay compliant and make any necessary adjustments to remain in accordance with established guidelines.
- Regularly Generate Financial Reports: Regularly produce financial reports to assess the effectiveness of your Chart of Accounts. Analyze these reports to identify any inconsistencies, inaccuracies, or areas where further adjustments may be necessary.
By consistently reviewing and maintaining your Chart of Accounts, you ensure that your financial records accurately reflect the financial activities of your business. This guarantees reliable and meaningful financial reporting, allowing you to make informed decisions based on accurate and up-to-date financial data.
Conclusion
Setting up and maintaining a well-structured Chart of Accounts in QuickBooks is vital for effective financial management and reporting. By following the steps outlined in this guide, you can establish a clear and organized framework for categorizing, tracking, and analyzing your business’s financial transactions.
Remember to carefully choose the right accounts for your business, considering factors such as your industry, legal structure, and reporting requirements. Customize and organize your Chart of Accounts by creating groups, subgroups, and assigning account numbers. Ensure accurate mapping of accounts to various financial statements, such as the balance sheet, income statement, and cash flow statement.
Sync your Chart of Accounts with your invoices and expenses by assigning account codes or categories and using customized invoice templates. Regularly review and maintain your Chart of Accounts as your business evolves, adding new accounts, modifying existing ones, and reorganizing the account structure when necessary.
Through regular maintenance and review, you can ensure that your Chart of Accounts remains up to date, accurate, and aligned with your business’s financial activities. Regularly generate financial reports and reconcile account balances to identify any discrepancies and make informed financial decisions based on reliable data.
Remember, a well-maintained Chart of Accounts is the backbone of your bookkeeping system and provides you with valuable insights into your business’s financial performance. By dedicating time and effort to set up and maintain an effective Chart of Accounts, you can achieve better control over your finances, ensure accurate reporting, and make informed decisions to drive the success of your business.