Introduction
Welcome to this comprehensive guide on how to add account numbers in QuickBooks. QuickBooks is a popular accounting software that helps businesses organize their financial data and streamline their bookkeeping processes. By assigning account numbers to your chart of accounts, you can easily categorize and track your transactions, making it easier to analyze your financial information.
Adding account numbers in QuickBooks is a simple process that can provide significant benefits for your business. With account numbers, you can quickly locate specific accounts, generate more accurate financial reports, and simplify the reconciliation process. Whether you are new to QuickBooks or have been using it for a while, adding account numbers is a valuable step to take towards efficient financial management.
In this guide, we will walk you through the step-by-step process of adding account numbers in QuickBooks. We will cover everything from navigating to the chart of accounts to saving your changes. By following these instructions, you’ll be able to easily add account numbers to your QuickBooks accounts and enhance your financial management capabilities.
Before we dive into the steps, it’s important to note that adding account numbers is an optional feature in QuickBooks. If you prefer not to use account numbers or if your business doesn’t require them, you can still follow along with this guide to learn about the process and decide if it’s the right fit for your accounting needs.
Now, without further ado, let’s get started with adding account numbers in QuickBooks.
Step 1: Navigate to the Chart of Accounts
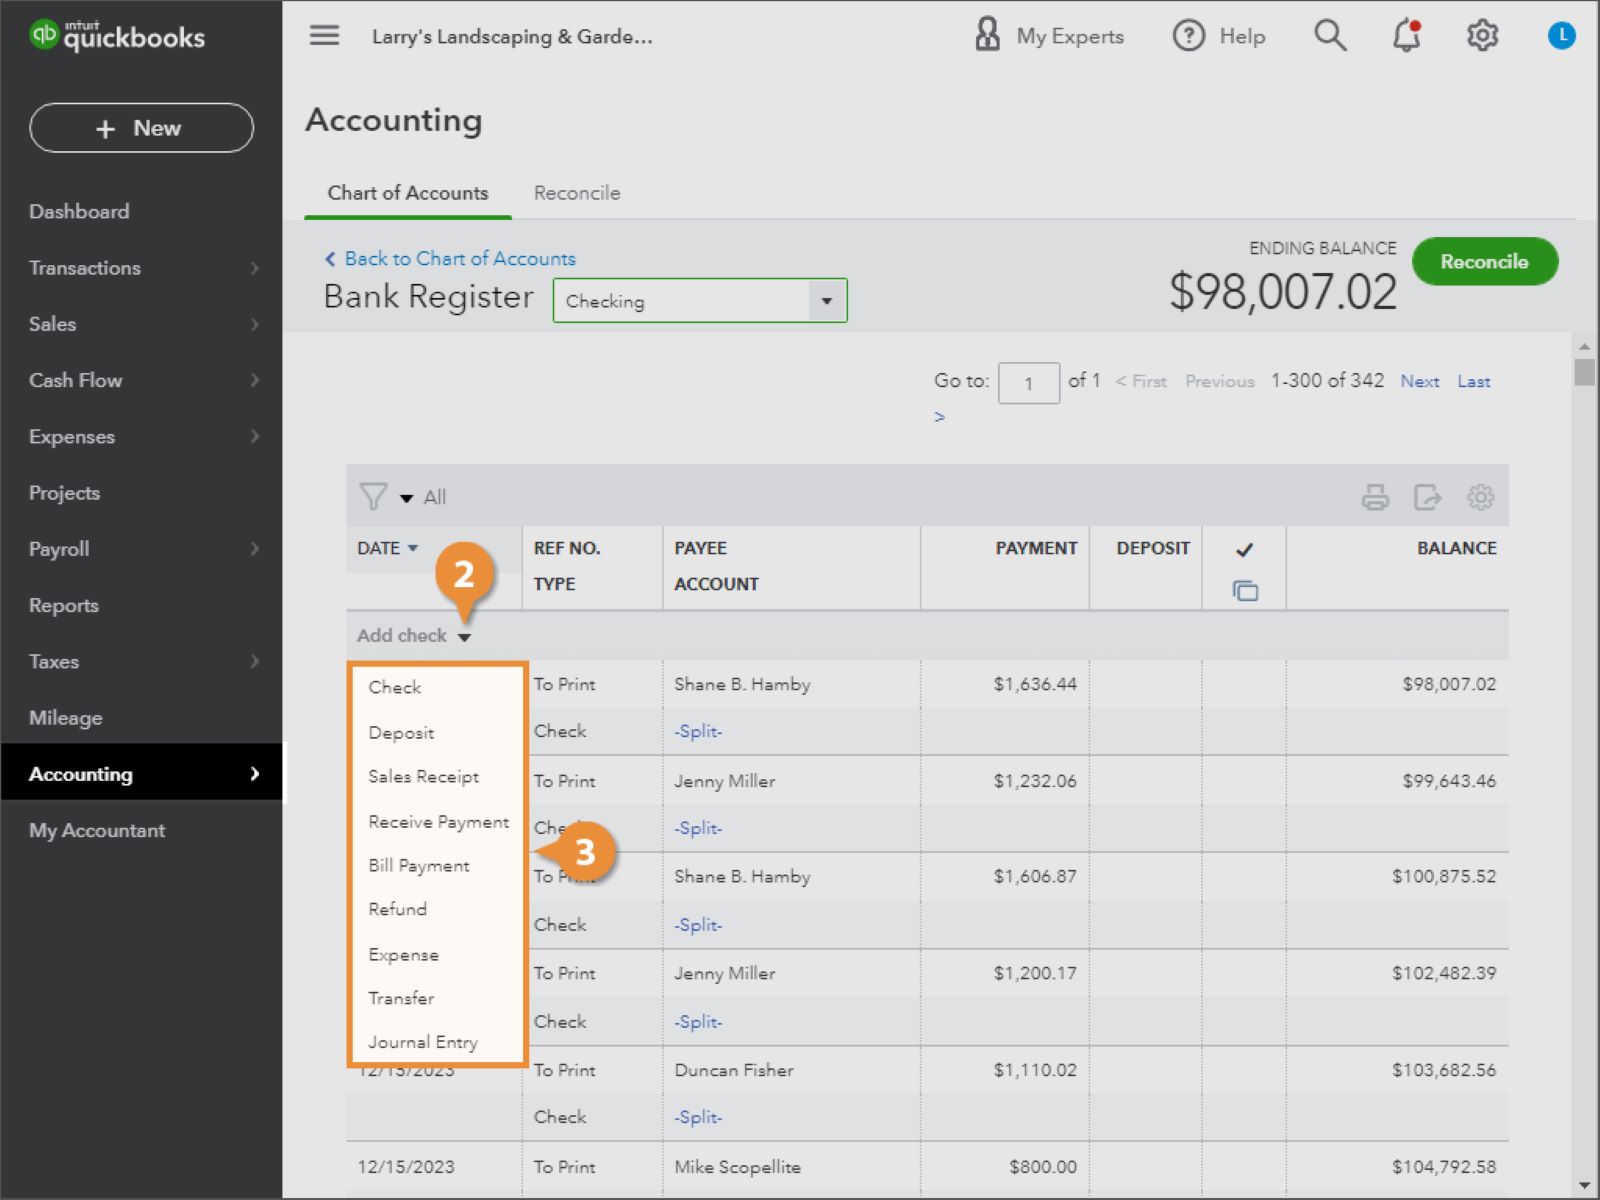
The first step in adding account numbers in QuickBooks is to navigate to the chart of accounts. The chart of accounts is a complete listing of all the accounts you use in your business, including assets, liabilities, income, and expenses.
To access the chart of accounts, follow these simple steps:
- Open QuickBooks and log in to your company file.
- From the main menu, click on “Lists” and select “Chart of Accounts.”
Alternatively, you can use the keyboard shortcut by pressing “Ctrl + A” on your keyboard. This will take you directly to the chart of accounts.
Once you have successfully navigated to the chart of accounts, you will see a list of all your existing accounts. This list provides an overview of the accounts you have set up in QuickBooks, including their names, types, and current balances.
Now that you have accessed the chart of accounts, you are ready to proceed to the next step and select the account to which you want to add a number.
Step 2: Select the Account to Add Numbers
Once you have accessed the chart of accounts in QuickBooks, the next step is to select the specific account to which you want to add a number. By selecting the account, you can edit its information and make the necessary changes.
Follow these steps to select the account:
- In the chart of accounts, locate the account you want to add a number to.
- Click on the account to highlight it.
Once you have selected the account, you will see the account’s details displayed on the right side of the screen. This section contains information such as the account name, description, account type, and current balance.
Before moving on to the next step, double-check that you have selected the correct account. It’s crucial to ensure that you are adding the account number to the intended account to maintain accurate financial records in QuickBooks.
Now that you have selected the account, you are ready to proceed to the next step and edit the account information.
Step 3: Edit Account Information
After selecting the account in QuickBooks to which you want to add a number, the next step is to edit the account information. This step allows you to make changes to the account details, including adding the account number.
Here’s how you can edit the account information:
- In the account details section on the right side of the screen, click on the “Edit” button.
- A form will open up, allowing you to modify the account information.
- Review and update any necessary fields, such as the account name, description, or account type.
It’s important to note that the account number field might not be visible by default. If you don’t see the account number field, you can easily enable it by following these steps:
- In the account form, click on the “Change Columns” button located at the top of the form.
- In the “Columns” window that appears, scroll down and select the “Account # (Number)” checkbox.
- Click “OK” to save the changes and close the “Columns” window.
Once you have enabled the account number field, you will see it as part of the account information on the form. You can now proceed to enter the account number in the designated field.
Now that you have edited the account information, including enabling the account number field if necessary, you are prepared to move on to the next step and enter the account number.
Step 4: Enter the Account Number
With the account information form open and the account number field visible, you are now ready to enter the account number in QuickBooks. Adding the account number will help you easily identify and categorize the account in your financial records.
Follow these steps to enter the account number:
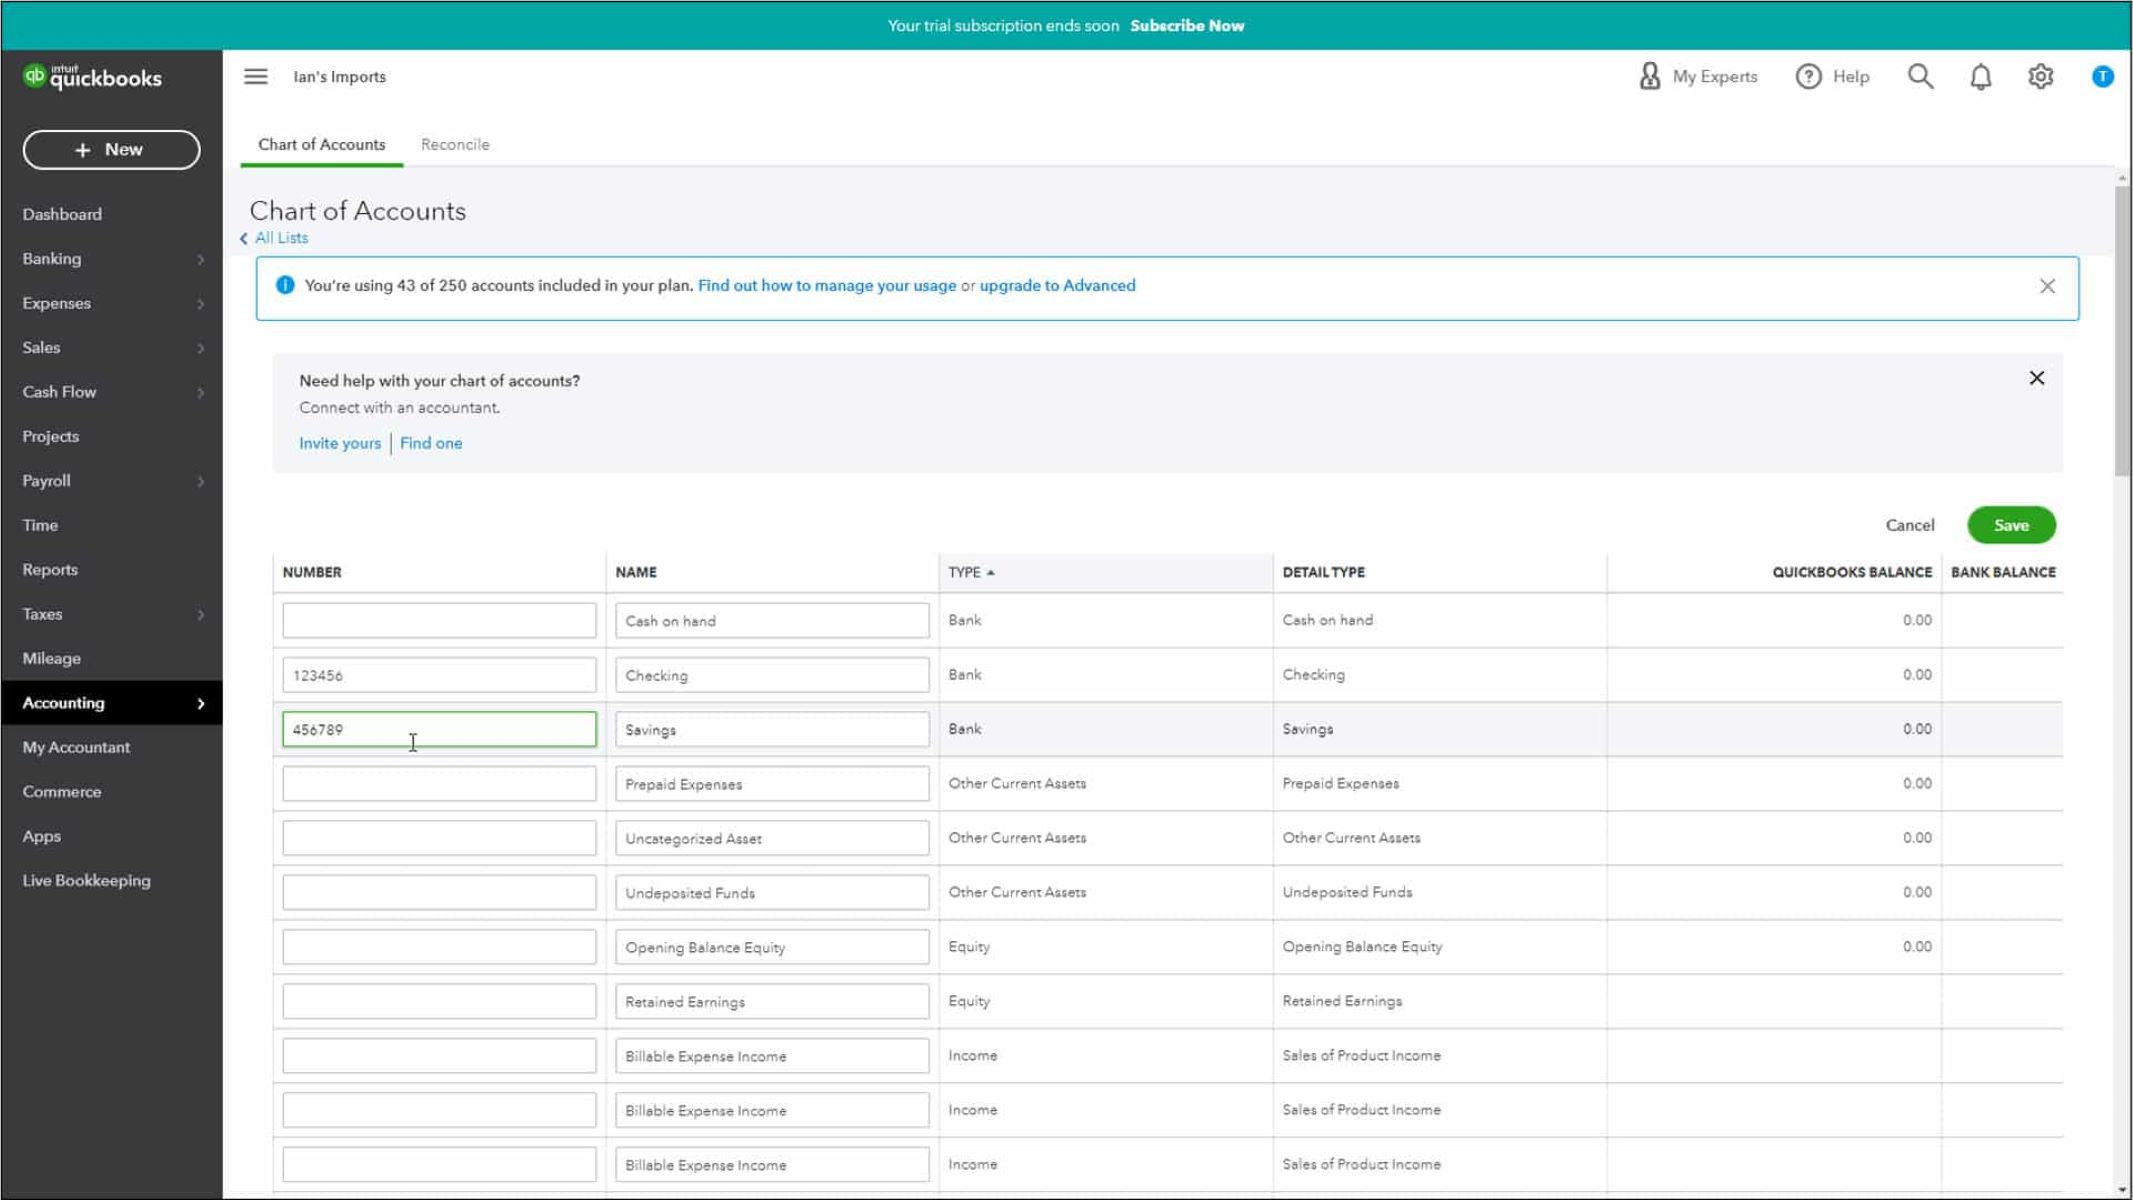
- In the account information form, locate the “Account #” or “Account Number” field.
- Click on the field to activate it and enter the desired account number.
When entering the account number, you can use any numbering system that works best for your business. Some businesses opt for sequential numbers, while others may use a numbering system that aligns with specific categories or departments.
It’s important to note that the account numbers in QuickBooks are alphanumeric, meaning they can include both numbers and letters. This flexibility allows you to create a customized numbering system that suits your business’s needs.
After entering the account number, take a moment to review the rest of the account information for accuracy. Double-check the account name, description, and account type to ensure consistency and clarity in your financial records.
Once you are satisfied with the entered account number and the rest of the details, you can proceed to save the changes.
Now that you have successfully entered the account number, you are ready to move on to the final step.
Step 5: Save Changes
After entering the account number for the selected account in QuickBooks, the final step is to save the changes you have made. Saving the changes ensures that the account number is properly updated and applied to the account in your financial records.
Follow these simple steps to save the changes:
- In the account information form, click on the “Save and Close” button located at the bottom of the form.
By clicking the “Save and Close” button, QuickBooks will save the changes you made to the account information, including the added account number. The account will now be updated with its designated account number, and you can start utilizing this number to identify and track the account in your financial processes.
It’s crucial to note that once the changes are saved, they are permanent. Therefore, it’s recommended to review the account information before saving to ensure accuracy.
After saving the changes, you can repeat these steps for any other accounts to which you wish to add account numbers. You have now successfully learned how to add account numbers in QuickBooks!
Adding account numbers in QuickBooks can greatly enhance your financial management and reporting capabilities. The ability to easily identify and categorize accounts streamlines your bookkeeping processes, making it easier to generate accurate financial reports and analyze crucial financial data.
Now that you have mastered the process of adding account numbers, you can take full advantage of QuickBooks’ robust features for efficient and effective financial management.
Conclusion
Adding account numbers in QuickBooks is a simple yet valuable step towards improving your financial management processes. By assigning account numbers to your chart of accounts, you can easily categorize and track your transactions, generate accurate financial reports, and simplify the reconciliation process.
In this guide, we walked you through the step-by-step process of adding account numbers in QuickBooks. We started by navigating to the chart of accounts, selecting the account to add numbers, editing the account information, entering the account number, and finally saving the changes. By following these steps, you can seamlessly incorporate account numbers into your financial records.
Remember, adding account numbers is an optional feature in QuickBooks. If you decide not to use account numbers or if it’s not necessary for your business, you can still benefit from learning about the process and understanding its potential advantages.
Now that you have the knowledge and skills to add account numbers in QuickBooks, you can enhance your financial management capabilities and streamline your bookkeeping processes. Take advantage of this feature to efficiently organize and analyze your financial data, helping you make informed business decisions and ensuring the accuracy of your financial records.
We hope this guide has been helpful, and we encourage you to explore more features and functionalities of QuickBooks to further optimize your financial management practices.