How to See PC Specs on Windows 10
Knowing the specifications of your Windows 10 computer is essential for troubleshooting issues, optimizing performance, or determining if your system meets the requirements for specific software or games. Fortunately, Windows 10 provides several built-in ways to check your PC’s specs. Here are some methods you can use:
-
Using the System Information Tool
The System Information Tool is a built-in utility that provides comprehensive details about your PC’s hardware and software. To open it, press the Windows key, type “system information,” and select the corresponding option from the search results. You will find information like the CPU, RAM, storage devices, and more.
-
Using the Control Panel
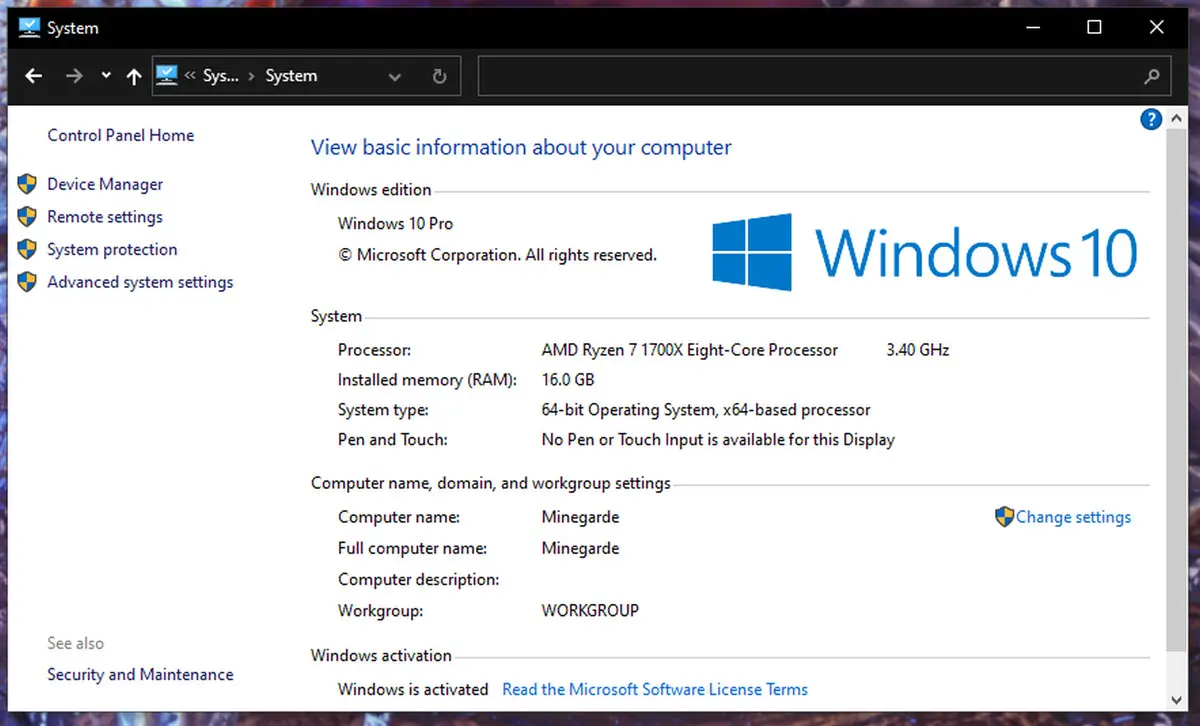
You can also find your PC’s specifications through the Control Panel. Open the Control Panel by searching for it in the Windows search bar, then navigate to System and Security > System. Here you will find the basic information about your computer, including the processor, installed memory (RAM), and system type (32-bit or 64-bit).
-
Using the DirectX Diagnostic Tool
DirectX is a set of APIs used for multimedia and gaming tasks. Windows 10 includes the DirectX Diagnostic Tool that provides detailed information about your graphics card, audio devices, and other related information. To open it, press the Windows key, type “dxdiag,” and select the corresponding option.
-
Using the Task Manager
The Task Manager can also provide you with some basic information about your computer’s performance. To access it, right-click on the taskbar and select “Task Manager” from the menu. In the Task Manager window, navigate to the Performance tab, where you can view details about your CPU, memory, disk usage, and more.
-
Using File Explorer
In File Explorer, right-click on “This PC” or “My Computer” and select “Properties.” This will display details about your computer’s processor, installed memory, and system type.
-
Using Command Prompt or PowerShell
You can access basic system information using Command Prompt or PowerShell. Open either of them by typing “cmd” or “powershell” in the Windows search, then type “systeminfo” and press Enter. This will provide you with details about your PC’s hardware resources, BIOS version, and more.
-
Using Third-Party Software
If you prefer a more comprehensive analysis of your PC’s specs, there are numerous third-party software options available. Some popular choices include CPU-Z, Speccy, and HWiNFO. These tools provide extensive information about your computer’s hardware components, temperatures, voltages, and more.
By using these methods, you can easily see the specifications of your Windows 10 PC. Whether you need the information for troubleshooting or simply out of curiosity, having a clear understanding of your computer’s specs can be incredibly useful.
Using the System Information Tool
The System Information Tool is a built-in utility in Windows 10 that provides detailed information about your PC’s hardware and software. It offers a convenient way to access comprehensive specs without the need for third-party software. Here’s how to use it:
- Press the Windows key on your keyboard and type “System Information” in the search box.
- Click on the “System Information” app that appears in the search results. The System Information window will open.
- In the System Summary section, you will find essential information such as the operating system version, system name, and system manufacturer.
- To view specific hardware details, expand the categories listed on the left-hand side. Here are some key categories you might want to explore:
- Processor: This section provides information about your CPU, including the model, speed, and number of cores.
- Memory: Here, you can find details about your computer’s installed RAM, such as the total capacity and the number of memory slots used.
- Storage: This category displays information about your hard drives and solid-state drives (SSDs), including their capacity and file system type.
- Display: If you’re curious about your graphics card, this section will provide details like the adapter name, resolution, and VRAM (video RAM) size.
- Apart from hardware specifications, the System Information Tool also offers information about your system’s software configuration. Check the Software Environment section for details about your installed drivers, startup programs, and more.
The System Information Tool is an excellent resource for quickly accessing vital information about your computer’s hardware and software. It’s worth exploring when you need to troubleshoot, upgrade your system, or provide specifications for support purposes.
Using the Control Panel
The Control Panel is a central hub for managing various settings and features in Windows 10. It also provides a straightforward way to view some basic specifications of your PC. Here’s how you can access and find your PC’s specs using the Control Panel:
- Click on the Start button on your taskbar, and then select the “Control Panel” option from the menu that appears. Alternatively, you can press the Windows key and type “Control Panel” to search for it.
- In the Control Panel window, ensure that the view mode is set to “Large Icons” or “Small Icons” to see all the available options.
- Look for the “System” option and click on it. This will open a window displaying basic information about your computer.
- In the System window, you can find details such as the operating system version, processor type, and installed memory (RAM). The “System type” will indicate whether your PC is running a 32-bit or 64-bit version of Windows.
- Additionally, you can click on the “Device Manager” option in the Control Panel to access a more comprehensive view of your hardware devices. Here, you can expand categories to see specific hardware components and their properties, such as displays, network adapters, and sound devices.
Using the Control Panel is a convenient method for quickly accessing basic information about your PC’s specifications. While it may not provide as comprehensive details as other tools or utilities, it offers a straightforward approach for users who prefer a familiar interface.
Using the DirectX Diagnostic Tool
The DirectX Diagnostic Tool is a built-in utility in Windows 10 that provides detailed information about your graphics card, audio devices, and other related specifications. It can be particularly useful for gamers or those who need specific information about their display and audio hardware. Here’s how you can access and use the DirectX Diagnostic Tool:
- Press the Windows key on your keyboard and type “dxdiag” in the search box.
- Click on the “dxdiag” app that appears in the search results. The DirectX Diagnostic Tool window will open.
- In the System tab, you will find general information about your operating system, processor, and memory.
- To see detailed specifications about your display and graphics card, navigate to the Display tab. Here, you can find information such as the display name, manufacturer, and the approximate total memory of your graphics card.
- If you’re interested in your audio devices, switch to the Sound tab. This section provides details about your audio card, driver versions, and the default sound playback device.
- The Input tab displays information about your input devices such as keyboards, mice, and game controllers.
- There are also additional tabs, such as the Diagnostics and DirectX Files tabs, which can provide further insights and troubleshooting capabilities.
The DirectX Diagnostic Tool is a valuable tool for obtaining in-depth information about your graphics card, audio devices, and other related specifications. Whether you’re a gamer or simply need specific details about your hardware, this utility can help provide the necessary information in an easily accessible manner.
Using the Task Manager
The Task Manager in Windows 10 is a powerful tool that allows you to monitor and manage running processes, track system performance, and even view basic information about your PC’s specifications. Here’s how you can use the Task Manager to check your PC’s specs:
- To open the Task Manager, right-click on the taskbar at the bottom of your screen and select “Task Manager” from the context menu. Alternatively, you can press the Ctrl + Shift + Esc keys on your keyboard.
- In the Task Manager window, you will find several tabs at the top. Click on the “Performance” tab.
- In the top section of the Performance tab, you will see graphs and real-time data related to your CPU, memory, disk usage, and more. This can give you a quick overview of your system’s performance.
- At the bottom of the Performance tab, you will find a link that says “Open Resource Monitor.” Click on this link to access a more detailed view of your system’s resource usage.
- In the Resource Monitor window, navigate to the “Overview” tab, where you can see details about your CPU, disk, and network usage, along with the amount of RAM that’s in use.
- Although the Task Manager doesn’t provide a comprehensive list of your PC’s specifications, it does offer some basic information. To access it, go back to the Task Manager window and click on the “More details” button at the bottom-left corner.
- Once you have expanded the Task Manager, click on the “Performance” tab. Here, you will find valuable information about your CPU, memory, and GPU under the “CPU,” “Memory,” and “GPU” sections, respectively.
The Task Manager’s Performance tab can give you important insights into your PC’s performance and resource usage, while the expanded view provides limited but useful information about your CPU, memory, and GPU specifications. It’s a handy tool for quickly checking your system’s specs when needed.
Using File Explorer
File Explorer, the default file management tool in Windows 10, can also provide you with some basic information about your computer’s specifications. Here’s how you can use File Explorer to check your PC’s specs:
- Open File Explorer by clicking on the folder icon on the taskbar or by pressing the Windows key + E on your keyboard.
- In the left-hand sidebar of File Explorer, locate and right-click on “This PC” or “My Computer” and select “Properties” from the context menu.
- The System window will open, displaying basic information about your computer. This includes the processor type, installed memory (RAM), and system type (32-bit or 64-bit).
- If you are interested in more specific information, such as the model of your processor or the version of Windows you are running, you can click on the “Device Manager” link in the System window.
- The Device Manager provides a detailed view of the hardware devices connected to your computer. Expand the different categories to see specific hardware components and their properties, such as the display adapter, network adapter, and sound devices.
While File Explorer does not provide as comprehensive specifications as dedicated system information tools, it offers a quick and accessible way to view essential information about your PC’s specifications. It can come in handy when you need a basic overview or need to quickly check certain hardware components.
Using Command Prompt or PowerShell
Command Prompt and PowerShell are powerful command-line interfaces in Windows 10 that can be used to check your PC’s specifications. By using specific commands, you can access a wealth of information about your computer’s hardware and software. Here’s how to use Command Prompt or PowerShell to view your PC’s specs:
- To open Command Prompt, press the Windows key on your keyboard, type “cmd” in the search bar, and hit Enter. To open PowerShell, follow the same steps but type “powershell” instead of “cmd”.
- Once the Command Prompt or PowerShell window opens, type “systeminfo” and press Enter. This command will provide you with a comprehensive list of details about your PC’s hardware resources, BIOS version, and more.
- You can use additional commands to retrieve specific information. For example, typing “wmic cpu get Name” and pressing Enter will display the name of your CPU.
- To find information about your installed RAM, type “wmic memorychip get Capacity” and press Enter. This will show the capacity of each installed memory chip.
- Different commands can provide details about your graphics card, hard drives, network adapters, and more. Explore the available commands and their options to access specific information about your PC’s components.
Using Command Prompt or PowerShell gives you direct access to your PC’s specifications through simple commands. It provides a more technical approach to retrieving detailed information about your computer’s hardware and software, making it valuable for system administrators or users with a deeper understanding of command-line interfaces.
Using Third-Party Software
In addition to the built-in tools and utilities provided by Windows 10, there are numerous third-party software options available for checking your PC’s specifications. These software applications offer more comprehensive and detailed information about your computer’s hardware components, temperatures, voltages, and more. Here are a few popular choices:
- CPU-Z: CPU-Z is a lightweight and widely-used utility that provides in-depth information about your CPU, motherboard, memory, and more. It displays real-time data and technical details, making it useful for enthusiasts and overclockers.
- Speccy: Speccy is a user-friendly tool that provides an overview of your computer’s specifications, including CPU, RAM, storage, graphics card, and more. It also displays real-time temperature and health monitoring for critical components.
- HWiNFO: HWiNFO is a powerful system information and diagnostic tool that offers extensive details about your computer’s hardware and software. It provides real-time monitoring, detailed reports, and customizable options for advanced users.
To use these tools, simply download them from their respective websites, install the software on your PC, and launch the application. You will be presented with a comprehensive overview of your PC’s specifications, allowing you to delve into specific details about your hardware components.
Third-party software offers a more comprehensive analysis of your PC’s specs and can be particularly useful if you require detailed information or if you are an enthusiast looking to optimize your system’s performance. These tools provide an intuitive interface and advanced features not typically found in the built-in Windows utilities, making them a popular choice among users who want a deeper understanding of their computer’s specifications.
Conclusion
Checking your PC’s specifications on Windows 10 is crucial for various reasons, such as troubleshooting issues, optimizing performance, or ensuring compatibility with software and games. Windows 10 provides several built-in methods to view your computer’s specs, giving you the flexibility to choose the option that suits your needs. From the System Information Tool and Control Panel to the DirectX Diagnostic Tool and Task Manager, these tools offer convenient and accessible ways to access essential information about your hardware and software.
Furthermore, File Explorer allows you to quickly view basic information, while Command Prompt and PowerShell provide a more technical approach through specific commands. If you require a more comprehensive analysis of your PC’s specs, there are various third-party software options available, such as CPU-Z, Speccy, and HWiNFO, which offer extensive details and advanced features for in-depth system monitoring.
By utilizing these methods, you can easily access the necessary information about your Windows 10 PC’s specifications. Whether you need it for troubleshooting, upgrading your system, or determining compatibility, having a clear understanding of your computer’s specs is essential in optimizing its performance and ensuring smooth operations.