Introduction
Welcome to this guide on how to rotate a video in Windows Media Player. Windows Media Player is a popular media player application that comes pre-installed on many Windows operating systems. While it offers a range of features for playing and managing media files, it may not have an obvious option to rotate videos. However, with a few simple steps and the help of additional tools, you can easily rotate your videos within Windows Media Player.
Whether you have recorded a video upside down or need to adjust the orientation for a better viewing experience, rotating the video can make a significant difference. While there are dedicated video editing software available that offer more advanced editing options, this guide focuses on using Windows Media Player, which is widely accessible.
In the following sections, we will walk you through the step-by-step process of rotating a video in Windows Media Player. We will cover everything from opening the application to saving the rotated video. So, let’s get started and learn how to rotate videos using this popular media player!
Step 1: Open Windows Media Player
The first step to rotate a video in Windows Media Player is to open the application. Windows Media Player is usually located in the “Windows Accessories” or “Windows Entertainment” folder in the Start menu. Alternatively, you can simply search for “Windows Media Player” in the search bar.
Once you have located the application, click on it to open Windows Media Player. The application will launch and you will see the familiar interface with the menus, playback controls, and library options.
If Windows Media Player is not installed on your computer, you may need to download and install it before you can proceed. You can do this by visiting the official Microsoft website and downloading the appropriate version for your operating system.
It’s worth mentioning that Windows Media Player may not be available on all versions of Windows. In such cases, you can explore alternative media players that offer video rotation features or opt for third-party video editing software.
Once you have successfully opened Windows Media Player, you are ready to move on to the next step of importing the video that you want to rotate.
Step 2: Import the video
After opening Windows Media Player, the next step is to import the video file that you want to rotate. There are a couple of ways to do this:
Option 1: Using the Menu
1. Click on the “File” menu in the top-left corner of the Windows Media Player interface.
2. Select the “Open” option from the dropdown menu. A file browser window will appear.
3. Navigate to the location where your video file is saved on your computer.
4. Select the video file and click on the “Open” button.
Option 2: Using Drag and Drop
1. Open the folder where your video file is located.
2. Resize the Windows Media Player window so that it is visible alongside the folder window.
3. Click and hold the video file you want to rotate and drag it into the Windows Media Player window.
4. Release the mouse button to drop the video file into Windows Media Player, and it will start playing automatically.
Once you have successfully imported the video file into Windows Media Player, it will appear in the library or playlist section of the application, ready to be played and rotated.
It’s important to note that Windows Media Player supports a wide range of video file formats, including MP4, WMV, AVI, and more. However, if you encounter any compatibility issues with your video file, you may need to convert it to a supported format before importing it into Windows Media Player.
Step 3: Play the video
Once you have imported the video into Windows Media Player, you can proceed to play the video to ensure that it is the correct file and that it plays smoothly. Here’s how to play the video:
Option 1: Using the Play button
1. Locate the playback controls at the bottom of the Windows Media Player interface.
2. Click on the “Play” button (usually represented by a right-facing triangle) to start playing the video.
3. The video will start playing in the main viewing area of the Windows Media Player window, and you can use the playback controls to pause, stop, or adjust the volume as needed.
Option 2: Using the keyboard shortcut
If you prefer using keyboard shortcuts, you can press the spacebar on your keyboard to start playing the video. Pressing the spacebar again will pause the video, and you can use other keyboard shortcuts to control the playback.
Playing the video allows you to verify that it is the correct file and that it plays without any issues such as audio-visual synchronization problems or glitches. If you encounter any playback issues, you may need to troubleshoot the file or consider using a different video file format.
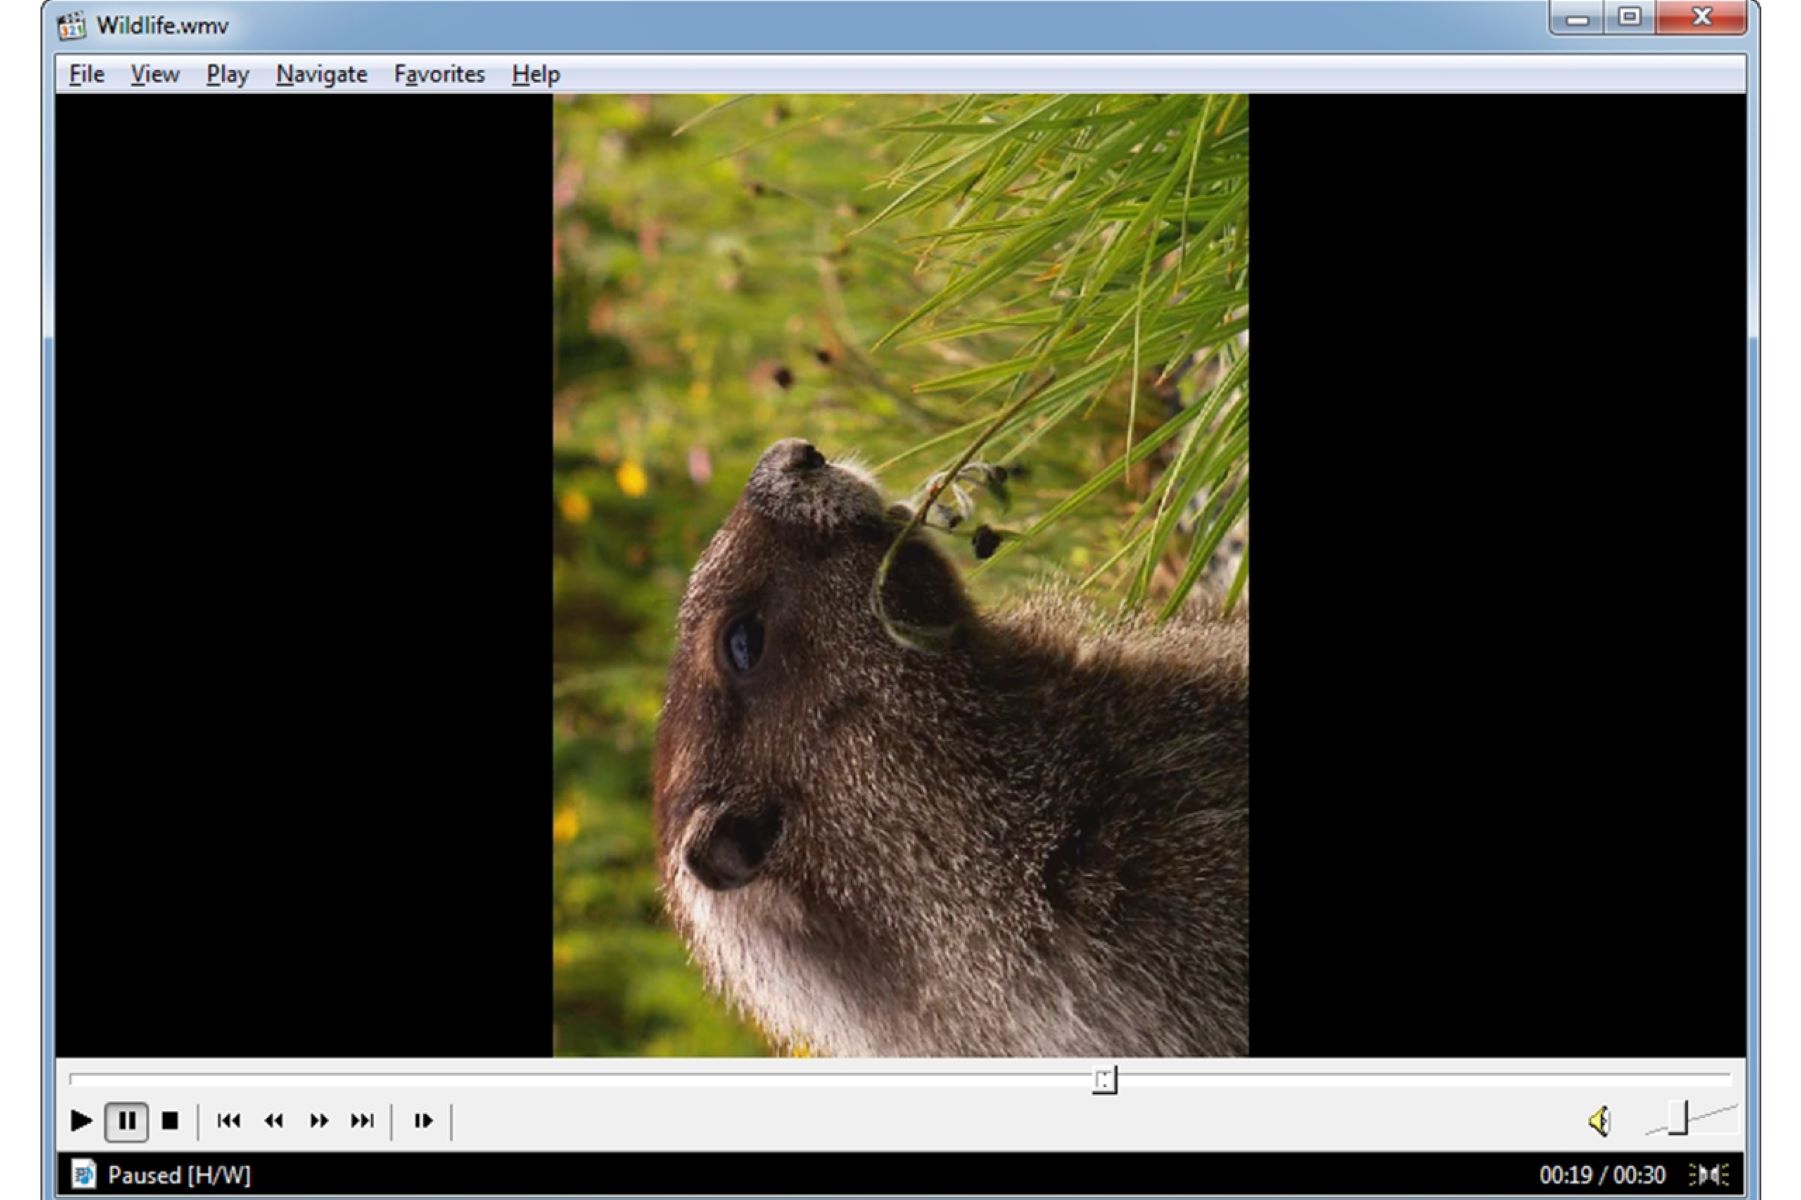
By playing the video, you can also determine if any adjustments need to be made to the orientation or if rotation is necessary to improve the viewing experience. If the video appears to be upside down or sideways, you can proceed to the next step to rotate it using Windows Media Player.
Step 4: Rotate the video
Now that you have played the video and identified the need for rotation, it’s time to proceed with rotating the video in Windows Media Player. Please note that Windows Media Player itself does not have a built-in feature to rotate videos. However, we can utilize the Windows 10 Photos app to accomplish this:
1. Right-click on the video file within Windows Media Player and select the “Open with” option from the context menu.
2. Choose “Photos” from the list of available apps. The video will now open in the Photos app.
3. In the Photos app, click on the “Edit & Create” button located near the top-right corner of the window. This will open a dropdown menu.
4. From the dropdown menu, select the “Rotate left 90°” or “Rotate right 90°” option, depending on the desired direction of rotation. You can repeat this step multiple times if additional rotation is needed.
5. Once you have rotated the video to the desired orientation, click on the “Save a copy” button located at the top-right corner of the window. This will save the rotated video as a new file without modifying the original video.
6. Close the Photos app and return to Windows Media Player.
Now that you have successfully rotated the video using the Photos app, you can proceed to the next step to save the rotated video and play it within Windows Media Player.
It’s important to note that utilizing the Photos app to rotate the video ensures that the changes are non-destructive, meaning that the original video remains unchanged. This allows you to maintain the integrity of the original video while having a rotated version available for playback.
Step 5: Save the rotated video
After rotating the video using the Photos app, you need to save the rotated version so that you can access it separately from the original file. To save the rotated video, follow these steps:
1. In the Photos app, click on the “Save a copy” button located at the top-right corner of the window. This will open a popup window.
2. In the popup window, choose a location on your computer where you want to save the rotated video.
3. Provide a name for the rotated video file, ensuring that it is different from the original file to avoid confusion.
4. Select the desired file format for the rotated video. Windows Media Player supports a variety of video file formats, such as MP4, WMV, AVI, and more.
5. Click on the “Save” button to save the rotated video to the specified location.
Once you have saved the rotated video, it will be available in the location you specified. You can now access and play the rotated video within Windows Media Player.
Remember that the original video file remains unchanged, and the rotated video is a separate file. This ensures that you can always access and use the original video in its original orientation if needed.
Now that the rotated video is saved, it’s time to move on to the final step and learn how to play the rotated video within Windows Media Player.
Step 6: Play the rotated video
Now that you have successfully rotated and saved the video, it’s time to play the rotated video within Windows Media Player. Follow these steps to play the rotated video:
1. Open Windows Media Player if it is not already open.
2. Use the navigation pane or the library section to locate the folder where you saved the rotated video.
3. Double-click on the rotated video file to open it in Windows Media Player.
4. The rotated video will start playing in the main viewing area of Windows Media Player.
5. Utilize the playback controls at the bottom of the window to pause, play, seek, or adjust the volume of the video as desired.
6. Enjoy watching the video in the correct orientation that you have rotated!
Windows Media Player provides a user-friendly interface and smooth playback experience for your rotated videos. You can further enhance your viewing experience by utilizing the various features offered by Windows Media Player, such as adjusting the playback speed, enabling captions, or applying custom audio and video effects.
It’s important to remember that the original video file remains untouched and unmodified. The changes made to the video are applied to the separate rotated video file, ensuring the integrity of the original file is preserved.
Congratulations! You have successfully rotated and played your video using Windows Media Player. Feel free to explore other features of Windows Media Player to enhance your media playback experience.
Conclusion
Rotating a video in Windows Media Player may not be a built-in feature, but with the help of the Windows 10 Photos app, you can easily accomplish this task. By following the step-by-step guide outlined in this article, you can rotate your videos to the desired orientation and play them seamlessly within Windows Media Player.
We started by opening Windows Media Player and importing the video file. Then, we played the video to ensure it was the correct file and identified the need for rotation. Using the Windows 10 Photos app, we rotated the video and saved it as a separate file, preserving the integrity of the original video. Finally, we demonstrated how to play the rotated video within Windows Media Player.
While there are more advanced video editing software available for extensive video manipulation, Windows Media Player offers a simple and accessible solution for basic rotation needs. However, if you require additional video editing functionalities or if Windows Media Player does not meet your requirements, exploring dedicated video editing software is recommended.
Remember to experiment with different file formats, as Windows Media Player supports a variety of formats for optimal compatibility. Additionally, always make sure to keep a backup of your original video files to avoid any loss or damage during the rotation process.
Now that you have learned how to rotate a video in Windows Media Player, you can easily adjust the orientation of your videos for a better viewing experience. Whether you have recorded a video upside down, sideways, or need to make adjustments for a specific purpose, Windows Media Player provides a straightforward solution without the need for complex editing software.
Enjoy your newly rotated videos and the improved viewing experience within Windows Media Player!