Introduction
Welcome to our guide on how to remove the back from a Samsung tablet. Whether you’re looking to replace a worn-out back panel or perform internal repairs, removing the back of your Samsung tablet is an essential step. This process may seem daunting at first, but with the right tools and a little guidance, you’ll be able to successfully remove the back panel and gain access to the internals of your tablet.
Before we dive into the step-by-step instructions, it’s important to note that the specific process for removing the back panel may vary depending on the model of your Samsung tablet. However, the general principles and techniques outlined in this guide should apply to most Samsung tablet models.
As always, it’s important to proceed with caution and take your time during the removal process. Mishandling or applying excessive force could potentially damage your tablet, so it’s crucial to follow the instructions provided carefully. If you’re unsure about any step, it’s best to consult the user manual or seek professional assistance.
In the following sections, we’ll walk you through the necessary steps to remove the back from your Samsung tablet. From gathering the necessary tools to reattaching the back panel, we’ve got you covered. So, let’s get started with Step 1: Gathering the necessary tools!
Step 1: Gather the necessary tools
Before you begin the process of removing the back from your Samsung tablet, you’ll need to gather a few essential tools. Having these tools ready will ensure a smooth and efficient removal process. Here are the tools you’ll need:
- Screwdriver: Depending on your tablet model, you may need a small Phillips or flathead screwdriver. Check the user manual or the back of your tablet to determine the type and size of screwdriver required.
- Prying tools: To safely separate the back panel from the tablet body, you’ll need a set of plastic or metal prying tools. These tools are designed to gently pry open the clips without causing any damage to the device. Avoid using sharp or metal objects that could scratch or dent your tablet.
- Anti-static wrist strap (optional): If you’re planning to perform any internal repairs or modifications, it’s a good idea to use an anti-static wrist strap. This will help prevent any electrostatic discharge that could potentially harm the internal components of your tablet.
- Clean cloth or microfiber cloth: It’s important to have a clean cloth or microfiber cloth on hand to wipe down the tablet’s back and the back panel. This will help remove any dust, fingerprints, or smudges, ensuring a clean and polished look when you reattach the back.
Make sure you have all of these tools readily available before you proceed to the next step. Having the right tools at your disposal will make the removal process easier and minimize the risk of causing any accidental damage to your Samsung tablet.
Step 2: Power off the tablet
Before you begin removing the back panel of your Samsung tablet, it’s crucial to power off the device completely. This step is essential to prevent any potential damage to the tablet or risk of injury during the removal process. Here’s how you can power off your tablet:
- Locate the power button on your tablet. It is usually located on the side or top of the device.
- Press and hold the power button until a pop-up menu appears on the screen.
- Select the “Power Off” or “Shutdown” option from the menu.
- Confirm the action by tapping “OK” or a similar option, depending on your tablet’s interface.
- Wait for the tablet to completely power off. You may see a screen indicating that the device is shutting down.
Once your tablet has powered off, you can proceed to the next step knowing that it’s safe to handle the device without any risk of electrical shock or accidental activation.
Remember, it’s important to power off your tablet before attempting to remove the back panel. Working on a powered-on device can lead to accidental damage or interference with the internal components, so be sure to follow this step carefully.
Step 3: Locate the back panel release latch
Now that your tablet is powered off, it’s time to locate the back panel release latch. This latch is typically located on one side or corner of the tablet and is designed to secure the back panel in place. Here’s how you can find the release latch on your Samsung tablet:
- Take a close look at the edges of your tablet. Look for any small openings or gaps between the back panel and the tablet’s body.
- Inspect each side of the tablet, as well as the corners, to identify the location of the release latch. It may be a small button, switch, or a tab that needs to be pressed or slid to release the back panel.
- Refer to the user manual or online resources specific to your tablet model for more accurate information on the location of the release latch. Different Samsung tablet models may have slightly different latch mechanisms.
Once you have located the release latch, take note of its position and familiarize yourself with how it operates. This will help you when it comes time to remove the back panel in the next step.
Remember, the release latch is designed to keep the back panel securely in place, so exercise caution when handling and operating it. Applying too much force or using excessive pressure could potentially damage the latch or the tablet itself.
In the next step, we will guide you through the process of applying pressure and sliding the back panel out of its position.
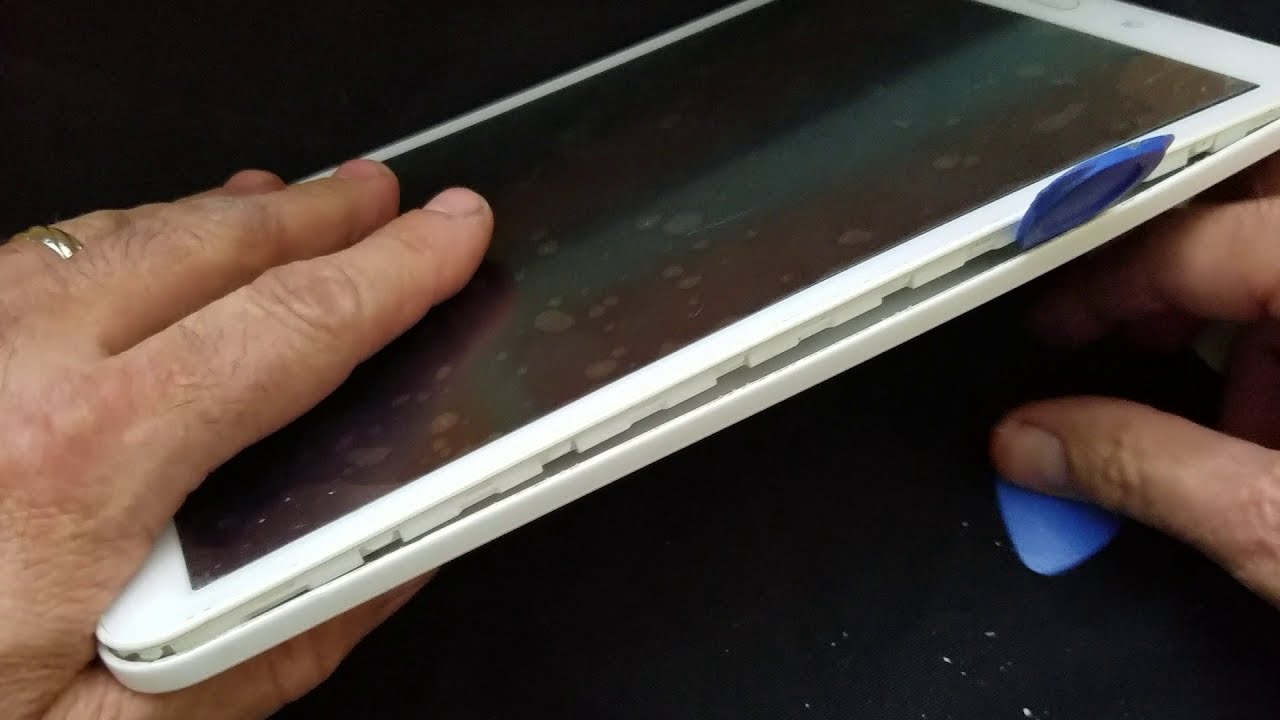
Step 4: Apply pressure and slide the back panel out
Now that you have located the release latch, it’s time to remove the back panel from your Samsung tablet. Follow these steps to apply pressure and slide the back panel out:
- Using your fingers or a prying tool, gently apply pressure near the release latch. This will help disengage any clips or catches holding the back panel in place.
- While maintaining pressure on the release latch, carefully slide your fingers or the prying tool along the edges of the tablet. Gradually move around the perimeter of the tablet while gently pushing or prying against the back panel.
- As you apply pressure and slide, you will notice the back panel becoming slightly dislodged. Continue to apply even pressure along the edges until the back panel starts to loosen.
- Be cautious not to apply excessive force or use sharp objects that could damage the tablet or the back panel. Take your time and proceed slowly to ensure a safe and successful removal.
- Once the back panel is sufficiently loosened, you should be able to slide it out from the tablet’s body. If necessary, wiggle it slightly from side to side to further release any remaining clips or catches.
- Set the back panel aside in a safe location to prevent it from getting scratched or damaged.
With the back panel removed, you now have access to the internal components of your Samsung tablet. This opens up possibilities for maintenance, repairs, or even customization.
Next, we will guide you on how to properly remove the back panel from your tablet without causing any damage.
Step 5: Remove the back panel
With the back panel of your Samsung tablet loosened, it’s time to remove it completely. Follow these steps to safely remove the back panel:
- Using your fingers or a prying tool, carefully lift one corner of the back panel away from the tablet’s body. Make sure to apply even pressure and avoid any sudden or forceful movements.
- Once the corner is lifted, continue to move along the edge of the tablet, gradually working your way around the perimeter. As you do this, you may feel slight resistance as the remaining clips or catches disengage.
- Take your time and be gentle while removing the back panel to avoid any accidental damage to the tablet or the back panel itself.
- As you reach the last corner, be particularly cautious to ensure the back panel is completely detached and can be lifted away without any remaining clips or catches holding it in place.
- Place the removed back panel in a safe, clean location to prevent any scratches or damage.
With the back panel now removed, you have a full view of the internal components of your Samsung tablet. This can be helpful for performing repairs, cleaning, or upgrading specific parts.
Make sure to handle the back panel with care and avoid placing it in areas where it may come into contact with liquids, dust, or other potentially damaging substances.
In the next step, we’ll advise you on how to check for any additional screws or clips that may need to be removed before proceeding further.
Step 6: Check for any additional screws or clips
Now that you have successfully removed the back panel from your Samsung tablet, it’s important to check for any additional screws or clips that may still be holding the internal components in place. Follow these steps to ensure a thorough inspection:
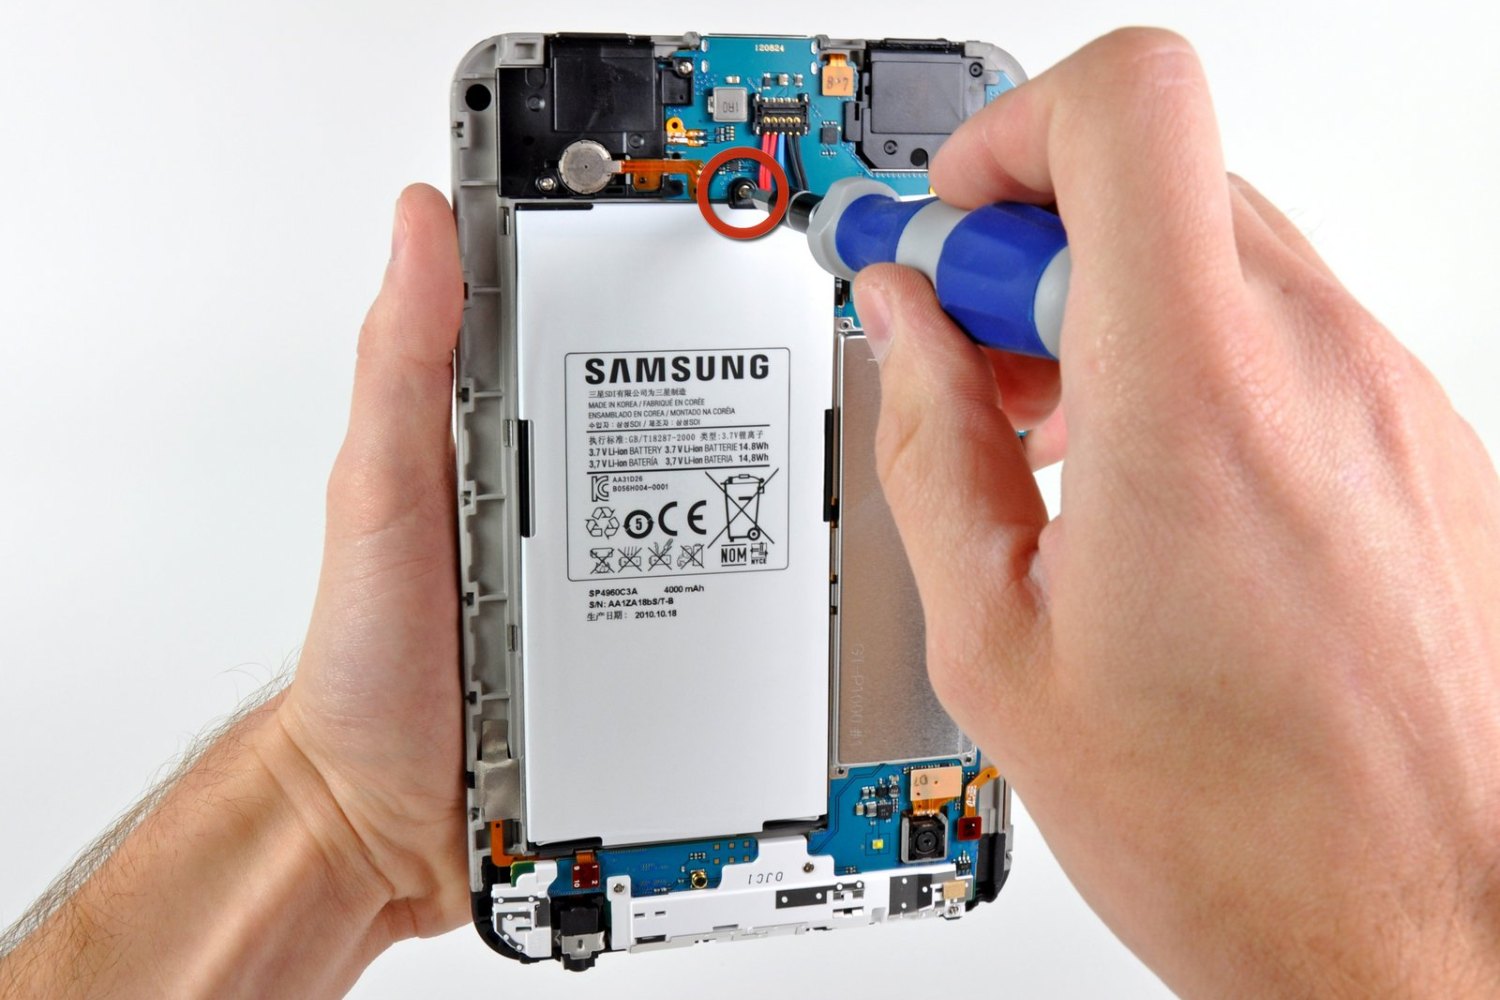
- Inspect the exposed area inside the tablet where the back panel was located. Look for any visible screws, clips, or securing mechanisms attached to the internal components.
- If you notice any screws, use the appropriate screwdriver to carefully remove them. Place the screws in a safe location to prevent loss or misplacement.
- Similarly, if you spot any clips or securing mechanisms, use your fingers or a prying tool to gently release them. Take care not to exert too much force or damage any delicate components.
- Remember to document or take note of the locations and types of screws or clips you remove. This will be helpful when it comes time to reassemble the tablet.
It’s important to check for any additional screws or clips as they may secure vital components such as the battery, motherboard, or other internal hardware. Removing these screws or clips will provide better access to the internal components and facilitate any necessary repairs or maintenance.
Once you have confirmed that no additional screws or clips are holding the internal components, you can proceed to the next steps for cleaning or other tablet-specific procedures.
In the following steps, we’ll guide you on cleaning the tablet’s back and back panel, as well as reattaching the back panel securely.
Step 7: Clean the tablet’s back and back panel
Now that you have removed the back panel from your Samsung tablet, it’s the perfect opportunity to give both the tablet’s back and the back panel a thorough cleaning. Here are the steps to clean them effectively:
- Start by preparing a clean cloth or microfiber cloth. Ensure that it is free from any dirt or debris that could potentially scratch the tablet’s back or the back panel.
- Gently wipe the tablet’s back using the cloth to remove any dust, fingerprints, or smudges. Pay attention to any hard-to-reach areas or corners.
- Similarly, clean the back panel of your tablet by wiping it down with the cloth. Be thorough in removing any dirt or fingerprints that may have accumulated.
- If there are stubborn marks or smudges, you can dampen the cloth slightly with water or a mild cleaning solution recommended for electronics. However, be cautious not to apply excessive moisture that could seep into the tablet.
- Take extra care when cleaning any camera lenses or sensors on the tablet’s back to avoid scratching or damaging them. Use gentle, circular motions with a clean portion of the cloth.
- Allow the tablet’s back and the back panel to air dry completely before proceeding to the next steps. Avoid using any heat sources or blow dryers, as excessive heat can damage the tablet or the back panel.
By cleaning the tablet’s back and the back panel, you not only enhance their appearance but also prevent any dirt or debris from interfering with the reinstallation process. A clean surface ensures a secure and snug fit when the back panel is reattached.
In the next step, we’ll guide you on how to properly reattach the back panel to your Samsung tablet, ensuring it is secure and aligned correctly.
Step 8: Reattach the back panel
After cleaning the tablet’s back and the back panel, it’s time to reattach the back panel securely. Follow these steps to ensure a proper fit and alignment:
- Hold the back panel in the correct orientation, aligning it with the tablet’s body. Pay attention to any slots or notches on the panel that correspond with the tablet’s features.
- Carefully position the back panel against the tablet’s body, ensuring that it is aligned properly with the release latch and any other openings or buttons.
- Apply gentle pressure and press the back panel firmly against the tablet’s body. Start from one side and gradually move to the other, ensuring that all the clips or catches engage securely.
- Check that the back panel is flush with the tablet’s body and there are no visible gaps or uneven areas. If necessary, adjust the position of the panel to achieve a proper fit.
- Once the back panel is in place, apply slight pressure along the edges to ensure all the clips are fully engaged and holding the panel securely.
- Double-check that any screws you removed in previous steps are reinserted in their respective locations. Use the appropriate screwdriver to tighten them gently.
Ensuring a secure attachment of the back panel is essential to protect the internal components and maintain the overall integrity of your Samsung tablet. A snug fit will also prevent any unwanted movement or damage while handling the device.
With the back panel successfully reattached, you’re one step closer to getting your Samsung tablet back in working order. In the next step, we’ll guide you on how to power on the tablet and confirm that the reattachment process was successful.
Step 9: Power on the tablet
Now that you have reattached the back panel of your Samsung tablet, it’s time to power it back on and ensure that the reattachment process was successful. Here’s how you can power on your tablet:
- Locate the power button on your tablet. It is usually located on the side or top of the device.
- Press and hold the power button until the tablet vibrates or the manufacturer logo appears on the screen. This indicates that the tablet is booting up.
- Release the power button and wait for the tablet to complete the startup process. It may take a few moments before the home screen or lock screen appears.
- Once the tablet is powered on, check for any error messages or unusual behavior. Ensure that all the functions, such as the touchscreen, camera, and speakers, are working correctly.
- If you notice any issues or abnormalities, power off the tablet and recheck the reattachment of the back panel. Make sure all the clips and catches are securely in place and that the back panel sits flush against the tablet’s body.
- If everything appears to be in working order, congratulations! You have successfully reattached the back panel to your Samsung tablet.
It’s important to power on the tablet and perform a quick functionality check after reattaching the back panel. This ensures that the internal components are properly connected and that no damage occurred during the removal and reattachment process.
If you encounter any persistent issues or errors, it may be necessary to seek professional assistance or refer to the user manual for troubleshooting steps specific to your tablet model.
Now that your tablet is powered on and functioning correctly, you can start enjoying your Samsung tablet’s features and capabilities once again.
Conclusion
Congratulations! You have successfully learned how to remove the back panel from your Samsung tablet. By following the step-by-step instructions in this guide, you were able to safely detach the back panel, access the internal components, clean the tablet’s back and back panel, and securely reattach the back panel. This process is crucial for performing maintenance, repairs, or exploring customization options for your tablet.
Remember to proceed with caution and take your time when removing and reattaching the back panel. Mishandling or applying excessive force could result in damage to your tablet. Always refer to the user manual or seek professional assistance if you’re unsure about any step.
Now that you have mastered this skill, you are equipped to handle various tasks related to your Samsung tablet’s back panel removal. Whether it’s replacing a worn-out back panel, performing internal repairs, or simply exploring the internals of your tablet, you can confidently approach these tasks.
We hope this guide has been helpful in your journey to remove the back panel from your Samsung tablet. Enjoy the newfound knowledge and the possibilities it brings for maintaining and customizing your device!