Introduction
Recording a YouTube video on your PC can be a great way to share your knowledge, creativity, or experiences with the world. Whether you’re starting a YouTube channel, creating tutorials, or simply documenting your adventures, having the right techniques and tools can make the process much smoother and more professional.
In this article, we will guide you through the step-by-step process of recording a YouTube video on your PC. From choosing the right software to setting up your recording environment, adjusting your recording settings, and finally uploading your video, we’ll cover everything you need to know to get started.
Before diving into the technical details, it’s essential to have a clear vision of what type of video you want to create. Are you planning to create gameplay videos, vlogs, educational tutorials, or product reviews? Understanding your content and target audience will help you make informed decisions throughout the recording process.
Furthermore, keep in mind that recording a YouTube video is not only about the visuals but also about the audio quality. Good audio can greatly enhance the viewer’s experience, so investing in a decent microphone or headset is highly recommended.
Whether you’re using a Windows PC or a Mac, the steps and software recommended in this guide are applicable to both platforms. So, let’s jump right into it and start recording your YouTube video on your PC!
Step 1: Choose the Right Software
When it comes to recording a YouTube video on your PC, selecting the right software is crucial. There are numerous options available, each with its own features and capabilities.
Screen recording software: Screen recording software allows you to capture everything that happens on your computer screen. This is especially useful for creating tutorials, gameplay videos, or software demonstrations. Some popular screen recording software options include OBS Studio, Camtasia, and Bandicam. These software options offer a range of features such as screen capture, audio recording, video editing tools, and more.
Webcam recording software: If you want to incorporate a personal touch into your YouTube videos, using webcam recording software is a great option. This allows you to record yourself using your computer’s built-in webcam or an external webcam. Popular webcam recording software includes Logitech Capture, ManyCam, and Open Broadcaster Software (OBS) Studio.
Video editing software: Once you have finished recording your video, you may want to edit and enhance it before uploading it to YouTube. Video editing software like Adobe Premiere Pro, Final Cut Pro, or iMovie can help you trim and arrange your video clips, apply effects, add transitions, and more. These software options are more advanced and require some learning, but they offer greater control over the final product.
Ultimately, the software you choose will depend on your specific needs, budget, and level of expertise. If you’re just starting out, you might want to start with free software options and then transition to more advanced software as your skills grow.
Remember to do proper research, read reviews, and try out different software to find the one that suits your needs best. Once you’ve chosen the software, it’s time to move on to the next step: setting up your recording environment.
Step 2: Set Up Your Recording Environment
Creating a suitable recording environment is essential to ensure the quality of your YouTube video. Here are some key factors to consider:
Lighting: Good lighting is crucial to ensure that your video looks professional and that viewers can see you clearly. Natural light is ideal, so try to position yourself near a window or use a softbox or ring light to illuminate your face. Avoid harsh shadows or overly dim lighting.
Background: Pay attention to the background in your videos. A cluttered or distracting background can take away from the main focus of your video. Consider using a clean and uncluttered background or utilizing a green screen to add interesting graphics or backgrounds during editing.
Noise control: Minimize background noise as much as possible during your recording. Make sure to choose a quiet location and use tools such as a microphone with noise-canceling capabilities or a pop filter to reduce unwanted sounds.
Camera placement: Position your camera or webcam at eye level or slightly above to create a flattering angle. This helps to maintain proper eye contact with your viewers and presents you in a positive light.
Appearance: Pay attention to your appearance before recording. Dress appropriately for your video’s content and ensure that you are well-groomed and presentable. Additionally, consider using makeup or applying some powder to minimize shine on your face if necessary.
Test recordings: Before you start recording your actual video, take some test recordings to check how you appear on camera, assess the lighting and sound quality, and make any necessary adjustments. This will help you fine-tune your setup and ensure optimal recording conditions.
By taking the time to set up a suitable recording environment, you can greatly enhance the overall quality of your YouTube videos and provide a more enjoyable viewing experience for your audience. Once you’ve set up your recording environment, you’re ready to move on to the next step: adjusting your recording settings.
Step 3: Adjust Your Recording Settings
Before you start recording your YouTube video, it’s important to adjust your recording settings to ensure optimal quality. Here are some key settings to consider:
Resolution: Choose a resolution that suits your needs and the capabilities of your computer. Higher resolutions offer better visual quality but may require more processing power and storage space. Common resolutions for YouTube videos include 1080p (Full HD) and 4K.
Frame rate: Frame rate refers to the number of frames displayed per second in your video. YouTube supports a range of frame rates, but 30 or 60 frames per second (fps) are commonly used for smoother playback. Higher frame rates result in smoother motion but require more processing power.
Audio settings: Pay attention to your audio settings as well. Ensure that your microphone is properly connected and selected as the input device. Adjust the audio levels to prevent distortion or low volume. Select a desirable audio format, such as AAC or MP3, for optimal compatibility.
Recording format: Choose the appropriate recording format for your needs. Common options include MP4, AVI, or MOV. Consider the compatibility of your recording format with your video editing software and YouTube’s upload requirements.
Screen area selection: If you’re using screen recording software, determine the portion of your screen you want to capture. You can choose to capture the entire screen, a specific window, or a selected region. Make sure to adjust the screen area accordingly.
Hotkeys and shortcuts: Familiarize yourself with the hotkeys and shortcuts provided by your recording software. These shortcuts can help you start and stop the recording, pause, or make other adjustments more efficiently, saving you time during the recording process.
Once you’ve adjusted your recording settings, take a moment to do a test recording to ensure that everything is working correctly. Review the recorded video to verify that the resolution, frame rate, audio quality, and other settings meet your expectations.
By taking the time to adjust your recording settings, you can ensure that your YouTube videos are captured with the best possible quality and are ready for the next step: actually recording your video!
Step 4: Start Recording Your Video
With your recording environment set up and your recording settings adjusted, it’s time to start recording your YouTube video. Follow these steps to ensure a smooth recording process:
1. Position yourself and your equipment: Ensure that you are in the frame and centered appropriately. Double-check that your microphone or headset is properly connected and positioned for optimal audio recording.
2. Prepare your script or outline: If you have a script or outline for your video, have it ready and accessible. This will help you stay on track and deliver your content more confidently.
3. Take a deep breath and relax: Feeling nervous is normal, but take a moment to calm your nerves before hitting the record button. Take a deep breath, smile, and remind yourself that you’ve prepared for this moment.
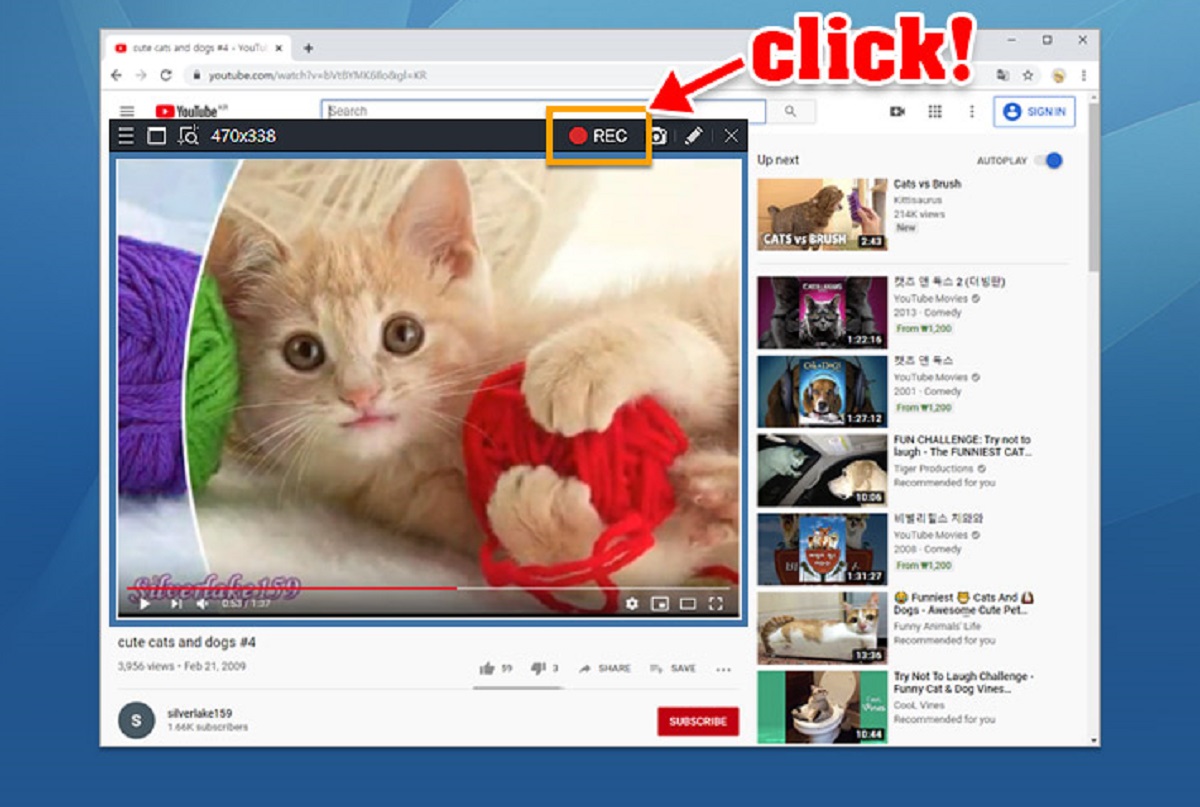
4. Start recording: Click the record button on your chosen recording software or use the designated hotkey. Take a brief pause before starting to speak to allow for easy editing later.
5. Deliver your content: Speak clearly and confidently, delivering your content as planned. Remember to maintain good eye contact with the camera or webcam to engage with your viewers.
6. Pause and edit if necessary: If you make a mistake or stumble during recording, pause for a moment, and then continue from where you left off. You can edit out any errors or pauses during the post-production phase.
7. Be natural and authentic: Your viewers want to connect with a real person, so be yourself and let your personality shine through. Be enthusiastic and passionate about your subject matter to keep your audience engaged.
8. Take breaks when needed: Depending on the length of your video, it may be necessary to take short breaks to rest your voice or gather your thoughts. Remember to pause the recording during these breaks.
9. Review your recording: After you’ve finished recording, take the time to review your footage. Make sure the audio and video are in sync, the content is delivered as intended, and any necessary retakes are noted for editing.
By following these steps, you’ll be able to confidently and smoothly record your YouTube video. Now, it’s time to move on to the next step: reviewing and editing your recording for a polished final result.
Step 5: Review and Edit Your Recording
Once you’ve completed the recording phase of your YouTube video, it’s important to review and edit your footage to ensure a polished final result. Follow these steps to review and edit your recording:
1. Watch the entire recording: Take the time to watch your entire recording from start to finish. Pay attention to any mistakes, pauses, or sections that need improvement. Make note of the timestamps for editing purposes.
2. Trim and cut: Open your chosen video editing software and import your recording. Identify and trim any unnecessary parts or mistakes to keep your video concise and engaging. Cut out any pauses or awkward transitions to maintain a smooth flow.
3. Enhance the audio: Adjust the audio levels to ensure a balanced sound. Remove background noise or any glitches using audio editing tools. Additionally, you can apply filters or equalization to enhance the clarity and quality of your voice.
4. Add visuals or graphics: If you have visuals, images, or graphics that can complement or reinforce your content, consider adding them at relevant points in your video. This can help capture your viewers’ attention and enhance the overall visual appeal.
5. Incorporate transitions and effects: Use transitions, such as fades or cuts, to create smooth transitions between different sections or scenes in your video. Additionally, consider adding effects or animations to make your video visually appealing.
6. Check for consistency: Ensure that your video maintains a consistent style and tone throughout. Check for color correction, font consistency, and any other visual elements that can enhance the overall aesthetic of your video.
7. Add music or sound effects: Consider adding background music or sound effects to enhance the mood or emphasize certain moments in your video. Make sure to choose royalty-free or properly licensed music to avoid copyright issues.
8. Preview and make final adjustments: Preview your edited video in its entirety to ensure that all edits, transitions, and effects are aligned properly. Make any necessary final adjustments before exporting your video.
9. Export your video: Choose the appropriate export settings for your video, including resolution, video format, and file size. Keep in mind YouTube’s recommended video settings to ensure optimal compatibility and quality.
10. Save and backup your project: Save your edited video project file and create backups for future reference or further editing, if needed.
By carefully reviewing and editing your recording, you can achieve a professional-looking YouTube video that captures your audience’s attention and delivers your message effectively. Now, it’s time for the final step: exporting and uploading your video!
Step 6: Export and Upload Your Video
After reviewing and editing your YouTube video, it’s time to export your final video file and upload it to your YouTube channel. Follow these steps to successfully export and upload your video:
1. Choose the appropriate video format: Start by selecting the appropriate video format for your export. Common formats such as MP4 or MOV are widely supported by YouTube and offer good compatibility across different devices.
2. Set the video resolution: Choose the resolution that you have recorded and edited your video in. YouTube supports a wide range of resolutions, including 240p, 360p, 480p, 720p, 1080p, and 4K, so select the one that best suits your video’s quality.
3. Compress the video file (if necessary): If your video file is too large, you may need to compress it to ensure smooth uploading and streaming on YouTube. Video editing software usually provides options to adjust the video’s bitrate or use compression codecs to reduce the overall file size.
4. Add relevant video metadata: Before uploading your video, add important metadata such as a compelling title, clear description, relevant tags, and appropriate thumbnail. These elements will help optimize your video’s discoverability on YouTube’s search and recommendation algorithms.
5. Upload to YouTube: Head to your YouTube account and click on the upload button. Select the video file you just exported and fill in the necessary details, such as the title, description, tags, and visibility settings. You can choose to make the video public, unlisted, or private.
6. Monitor the upload progress: Depending on your internet connection and the size of your video, the upload process may take some time. Monitor the progress bar and ensure a stable internet connection to avoid interruptions.
7. Optimize video settings: Once the video is uploaded, you can further optimize its settings in YouTube’s Creator Studio. Adjust settings such as the video thumbnails, captions, end screens, and promotion options to maximize your video’s impact and reach.
8. Publish and share your video: After finalizing all the settings, preview your video and make sure everything appears as intended. If satisfied, click the “Publish” button to make your video live to the public. Share your video across your social media platforms and engage with your audience to encourage views, comments, and subscriptions.
By successfully exporting and uploading your video to YouTube, you can share your content with the world and start growing your YouTube channel. Congratulations on completing this final step!
Conclusion
Congratulations on successfully recording and uploading your YouTube video on your PC! By following the step-by-step process outlined in this guide, you have learned how to choose the right software, set up your recording environment, adjust your recording settings, start recording, review and edit your footage, and finally export and upload your video to your YouTube channel.
It’s important to remember that creating high-quality YouTube videos is an ongoing process. Continuously refine your recording techniques, invest in better equipment if necessary, and keep experimenting with different editing styles to improve the overall quality of your content.
As you gain more experience and build your audience, keep engaging with your viewers by responding to comments, asking for feedback, and creating content that addresses their needs and interests.
Remember, consistency is key. Schedule regular uploads to maintain a steady flow of content and keep your audience engaged. Stay up to date with the latest trends and techniques in video production and apply them to your own videos to stay relevant.
Lastly, don’t be discouraged by initial challenges or lack of views. Building a successful YouTube channel takes time, effort, and patience. Keep creating content that you are passionate about, and trust that with consistency and dedication, your channel will grow.
Now it’s time to put your newfound knowledge into action. Start recording, editing, and sharing your unique voice and experiences with the world through YouTube. Best of luck on your YouTube journey!