Introduction
Setting up and configuring a wireless router is a crucial step in establishing a stable and secure internet connection for your home or office. Whether you are upgrading to a new router or need to reconfigure your existing one, this article will guide you through the process step-by-step.
Having a reliable and efficient router is essential for seamless browsing, streaming, gaming, and connecting multiple devices. By reconfiguring your wireless router, you can optimize its performance, enhance security features, and customize the settings to suit your specific needs.
Before embarking on the reconfiguration process, it is important to gather some basic information. Familiarize yourself with the router model, locate the default username and password (if applicable), and have an understanding of your internet service provider’s requirements. This will ensure a smooth transition and prevent any potential issues along the way.
In this comprehensive guide, we will walk you through each step necessary to reconfigure your wireless router effectively. From accessing the router’s configuration page to updating the firmware, you will gain the knowledge and skills needed to successfully set up a new wireless network or reconfigure an existing one.
It is worth noting that the specific steps may vary slightly depending on the router model or firmware version you are using. However, the overall process remains consistent, and we will provide general instructions that can be easily applied.
So, without further ado, let’s delve into the step-by-step process of reconfiguring a wireless router to optimize its performance and ensure a secure and reliable internet connection for all your devices.
Step 1: Accessing the router’s configuration page
In order to reconfigure your wireless router, you need to access its configuration page. This page allows you to modify various settings and customize your network according to your preferences.
To access the router’s configuration page, you will need a web browser and a device connected to the router, such as a computer or a smartphone. Follow these steps:
- Open your preferred web browser (e.g., Google Chrome, Mozilla Firefox, Safari).
- In the address bar, type the default IP address for your router. Typically, this is either 192.168.0.1 or 192.168.1.1. If you are unsure, refer to the router’s user manual or contact your internet service provider.
- Press the Enter key to load the router’s login page.
- Enter the username and password for your router. If you haven’t changed these credentials, they are usually set to the default values provided by the manufacturer. Common defaults include “admin” for both the username and password, or “admin” for the username and a blank password field.
- Click the Login or Submit button to access the router’s configuration page.
Note: If you have changed the default username and password and cannot recall them, you may need to perform a factory reset on your router. This will restore the router’s settings to their original state and allow you to access the configuration page using the default credentials. Refer to your router’s user manual for instructions on how to perform a factory reset.
Once you have successfully logged in, you will have access to a wide range of settings that you can modify to reconfigure your router. These settings include but are not limited to:
- Wireless network name (SSID): The name that appears when searching for available Wi-Fi networks.
- Wireless password: The password required to connect to your wireless network.
- Security settings: Choose between WEP, WPA, or WPA2 to protect your network from unauthorized access.
- Port forwarding: Configure specific ports to forward incoming data to a designated device.
- Quality of Service (QoS): Prioritize certain types of network traffic for improved performance.
By accessing the router’s configuration page, you have taken the first step towards reconfiguring your wireless network. In the next step, we will explore how to reset the router to factory settings if necessary.
Step 2: Resetting the router to factory settings
If you are experiencing persistent issues with your wireless router or simply want to start fresh with a clean slate, resetting it to factory settings is a recommended step. This will restore the router to its original configuration, erasing any customized settings you may have made.
Follow these steps to reset your router to factory settings:
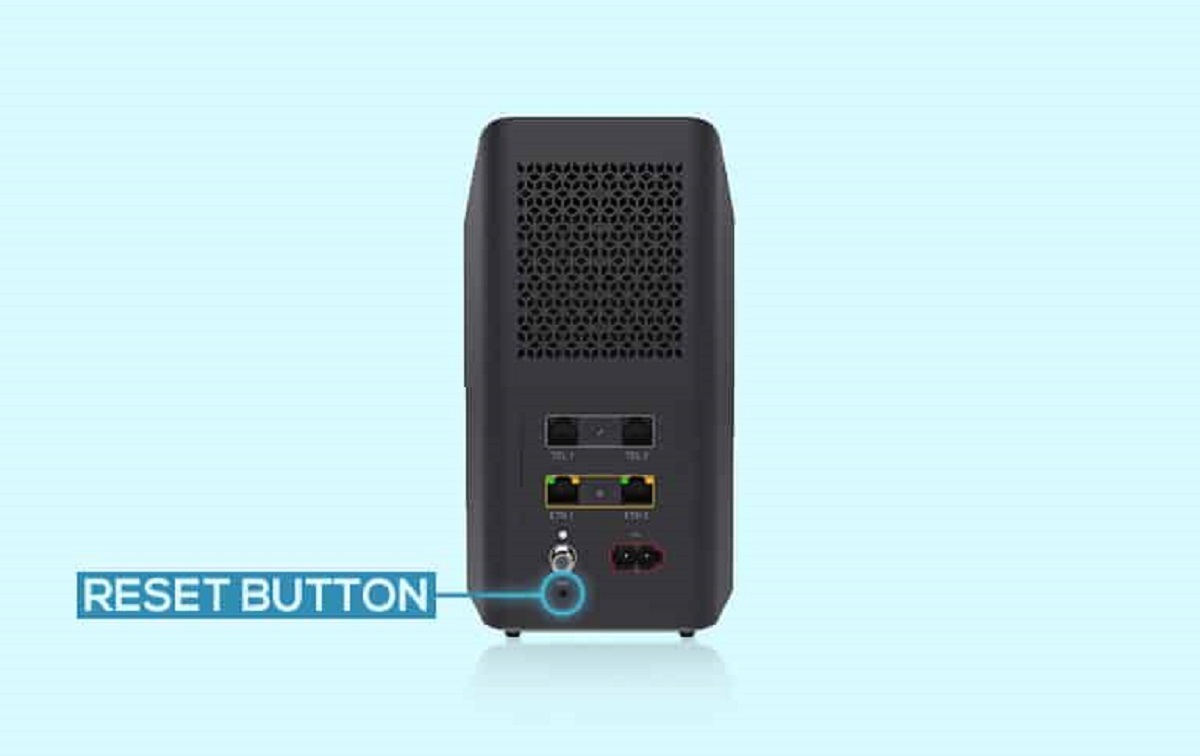
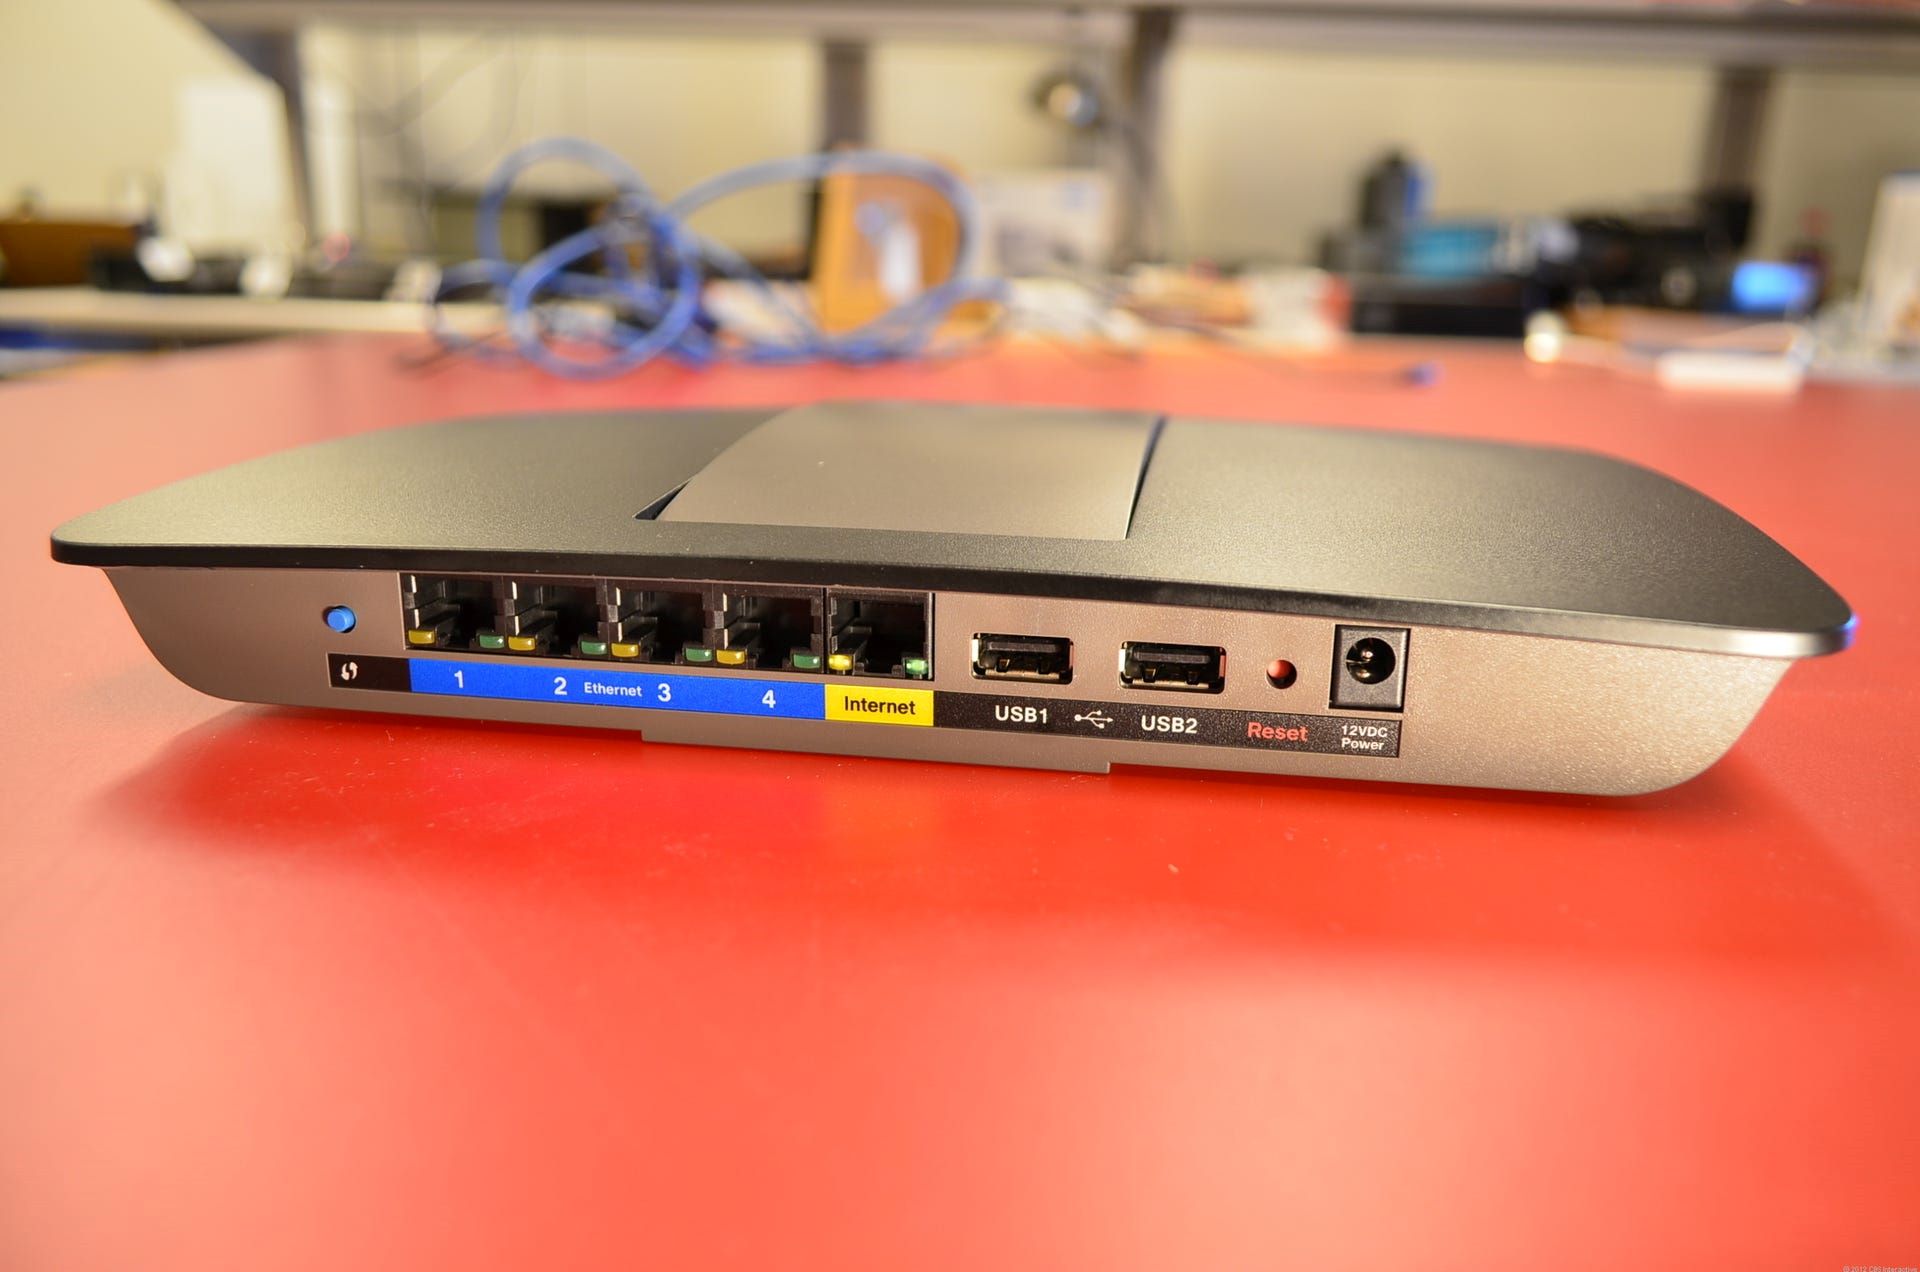
- Locate the Reset button on your wireless router. It is usually a small, recessed button that may require a pin or paperclip to press.
- Make sure the router is powered on.
- Press and hold the Reset button for approximately 10-15 seconds. Be careful not to release it too early.
- Release the Reset button. The router will undergo a reset process, which may take a few minutes. During this time, the router’s lights may flash or change patterns.
- Once the reset process is complete, the router will be restored to its factory settings.
It is important to note that resetting your router to factory settings will erase all customized settings, including your wireless network name, password, port forwarding configurations, and any other modifications you have made. Therefore, it is recommended to only perform a factory reset if necessary or if you want to start fresh.
After the factory reset, you will need to reconfigure your wireless router. Proceed to the next step to learn how to set up a new wireless network name and password.
Step 3: Setting up a new wireless network name and password
After resetting your router to factory settings, it’s time to set up a new wireless network name (SSID) and password. This will ensure that your network is secure and easily identifiable by your devices.
Follow these steps to set up a new wireless network name and password:
- Access your router’s configuration page by following the steps outlined in Step 1.
- Navigate to the Wireless or Wi-Fi settings section.
- Locate the field where you can enter a new network name (SSID). Choose a unique and easily recognizable name for your network.
- Set a strong password for your wireless network. It is essential to use a combination of uppercase and lowercase letters, numbers, and special characters to create a secure password. Avoid using common phrases or easily guessable information.
- Save your new network name and password settings.
Once you have completed these steps, your wireless network will be set up with a new name and password. Keep in mind that all devices currently connected to the network will be disconnected and will need to connect again using the new network name and password.
To ensure the security of your wireless network, it is advisable to regularly change your password and update the firmware of your router. Updating the firmware is covered in Step 5.
Now that your new wireless network is set up, it’s time to move on to Step 4, where we will explore configuring advanced settings such as security options and port forwarding, if needed.
Step 4: Configuring advanced settings (if needed)
Once you have set up your new wireless network name and password, you may want to configure advanced settings on your router to enhance security or optimize performance. While these settings may not be necessary for everyone, they can provide additional customization options for those who require them.
Here are some advanced settings commonly found on routers:
- Security settings: Choose the appropriate security protocol for your wireless network, such as WEP, WPA, or WPA2. WPA2 is the most secure option and is recommended for preventing unauthorized access.
- Port forwarding: If you need to access certain services or applications from outside your network, you can configure port forwarding to allow inbound connections to specific devices or services.
- Quality of Service (QoS): Configure QoS settings to prioritize specific types of network traffic, such as streaming or online gaming, to ensure a smooth and uninterrupted experience.
- Guest network: Create a separate network for guests to access without compromising the security of your main network. This can be useful if you frequently have visitors who need internet access.
- Parental controls: If you have children or want to monitor internet usage, enable parental controls to restrict access to certain websites or set time limits for specific devices.
To access and configure these advanced settings:
- Login to your router’s configuration page.
- Locate and navigate to the appropriate section for the advanced settings you wish to configure.
- Follow the instructions provided by your router’s interface to make changes to the desired settings.
- Save your changes and apply the settings.
It is important to note that making changes to advanced settings can potentially impact the functionality of your network, so proceed with caution and refer to the router’s documentation for more information if needed.
With the advanced settings configured, you have customized your wireless router to suit your specific requirements. In the next step, we will discuss the importance of updating the firmware of your router to ensure optimal performance and security.
Step 5: Updating the firmware of the router
Updating the firmware of your router is an important step to ensure optimal performance, stability, and security. Firmware updates often include bug fixes, feature enhancements, and security patches provided by the manufacturer.
Follow these steps to update the firmware of your router:
- Visit the manufacturer’s website and navigate to the support or downloads section.
- Search for the firmware update specifically designed for your router model. Make sure to download the correct firmware version to avoid compatibility issues.
- Save the firmware file to your computer.
- Login to your router’s configuration page by following the steps outlined in Step 1.
- Navigate to the firmware update section within the router’s settings.
- Click on the “Browse” or “Choose File” button, and select the firmware file you downloaded in Step 2.
- Initiate the firmware update process by clicking the appropriate button or link.
- Wait for the firmware update to complete. This may take a few minutes, during which the router may reboot or display flashing lights.
- Once the update is complete, the router will reboot and load the new firmware.
It is important to note that during the firmware update, the router should not be powered off or unplugged. Doing so may cause damage to the router.
After the firmware update, it is a good practice to revisit the router’s configuration page and double-check that all settings are still correctly configured. If you customized any settings, such as the wireless network name or password, they should remain intact after the firmware update.
By keeping your router’s firmware up to date, you ensure that it operates efficiently, performs optimally, and is protected against potential vulnerabilities. Now that your router’s firmware is updated, you are ready for the final step—connecting devices to your newly reconfigured wireless network.
Step 6: Connecting devices to the new wireless network
Now that you have reconfigured your wireless router and set up a new network, it’s time to connect your devices to the network. This step allows you to enjoy a secure and stable internet connection on all your devices, including smartphones, tablets, laptops, and smart home devices.
Follow these steps to connect your devices to the new wireless network:
- On your device, navigate to the Wi-Fi settings menu.
- Scan for available wireless networks.
- Select the newly created network name (SSID) from the list of available networks.
- Enter the new wireless network password that you set up in Step 3.
- Click on the “Connect” or “Join” button to establish a connection to the network.
After entering the correct network password, your device should successfully connect to the wireless network. Repeat these steps for all the devices you want to connect to the network.
It is essential to note that some devices may have additional network settings that need to be configured, such as proxy settings or static IP address assignment. Refer to the device’s user manual or online documentation for specific instructions on connecting to a wireless network.
Once your devices are connected, you can enjoy a stable and secure wireless internet connection, browse the web, stream media, check emails, and perform various online activities across all of your devices.
Remember to periodically review and update the wireless network password to ensure the security of your network. Additionally, it is advisable to secure your devices with antivirus software and keep them up to date with the latest security patches.
With all your devices now connected to the new wireless network, you have successfully completed the reconfiguration process. You can now enjoy a reliable and secure internet connection across your home or office.
Conclusion
Reconfiguring your wireless router is a vital task that helps optimize its performance, enhance security features, and tailor the network settings to your specific needs. By following the six steps outlined in this guide, you can confidently reconfigure your router and ensure a stable and secure internet connection for your home or office.
We began by accessing the router’s configuration page and proceeding to reset the router to factory settings if necessary. We then set up a new wireless network name and password to improve security and make it easy to identify. Configuring advanced settings, such as security options and port forwarding, was discussed as an optional step for those looking for extra customization. We emphasized the importance of updating the firmware of your router to ensure optimal performance and protect against potential vulnerabilities. Finally, we connected devices to the new wireless network to enjoy a seamless browsing experience on all connected devices.
Remember, the specific steps and options may vary depending on your router model, but the overall process remains consistent. It’s always a good idea to consult your router’s user manual or contact your internet service provider for any specific instructions or troubleshooting guidance.
By reconfiguring your wireless router, you have taken control of your internet connection, making it more reliable, secure, and tailored to your needs. Now you can enjoy uninterrupted browsing, streaming, gaming, and connectivity on all your devices.
Continue to stay proactive in maintaining your network’s security and performance. Regularly update your firmware, change your wireless network password, and keep your devices protected with antivirus software and security patches. These precautions will ensure a safe and efficient internet experience for all users connected to your network.
Now that you have completed the reconfiguration process, you can confidently navigate the digital world with a high-performing and secure wireless network.