Introduction
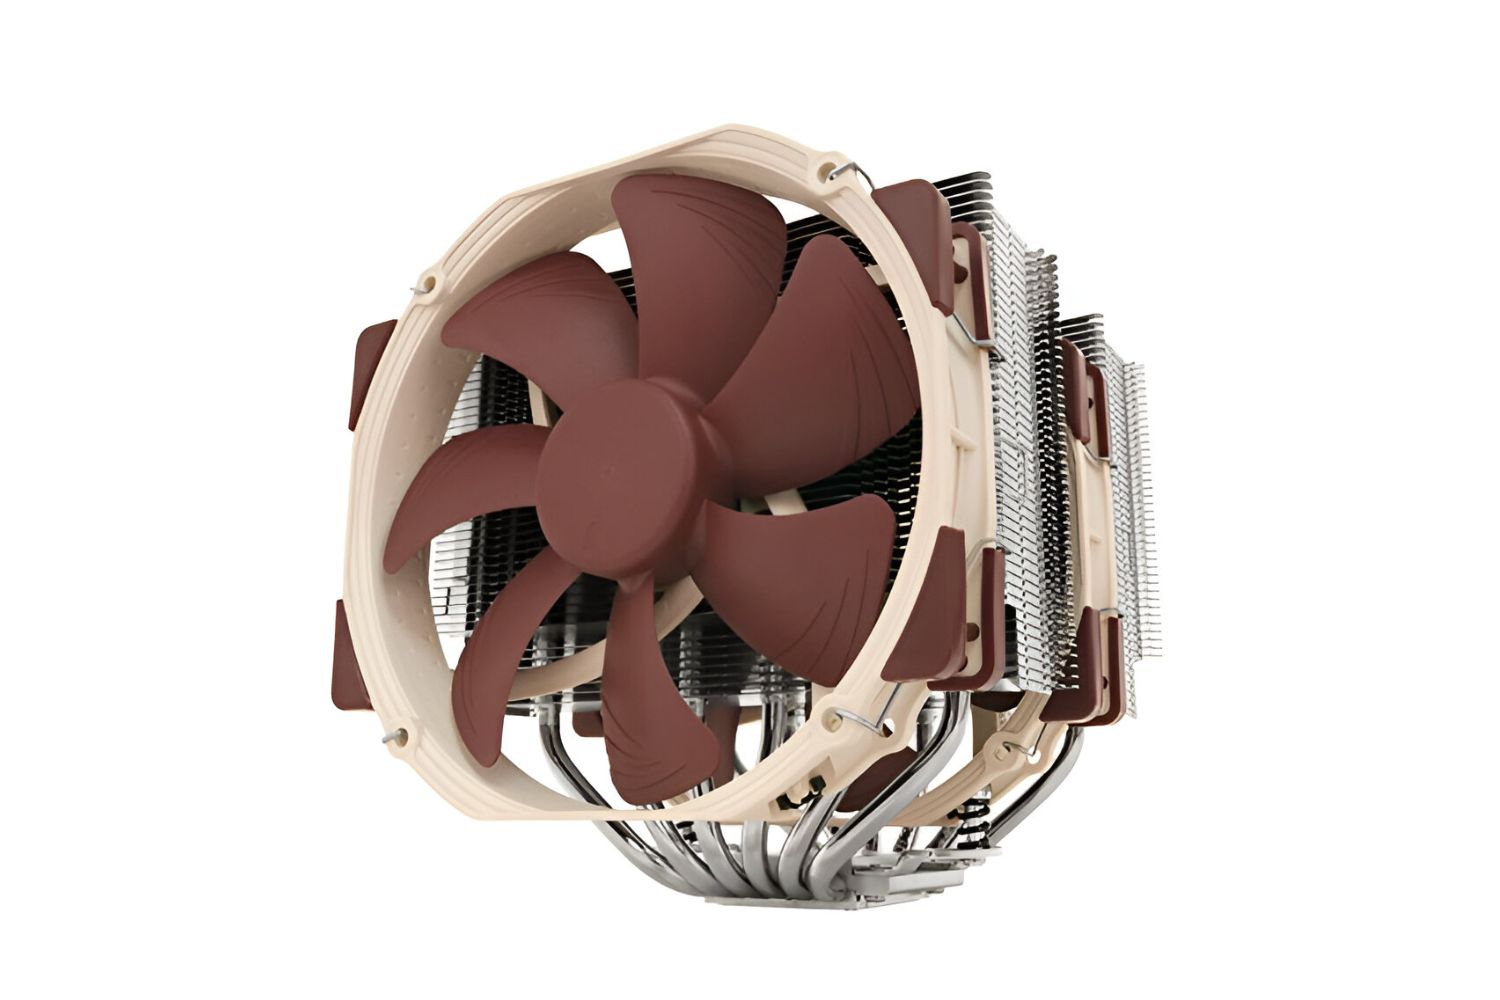
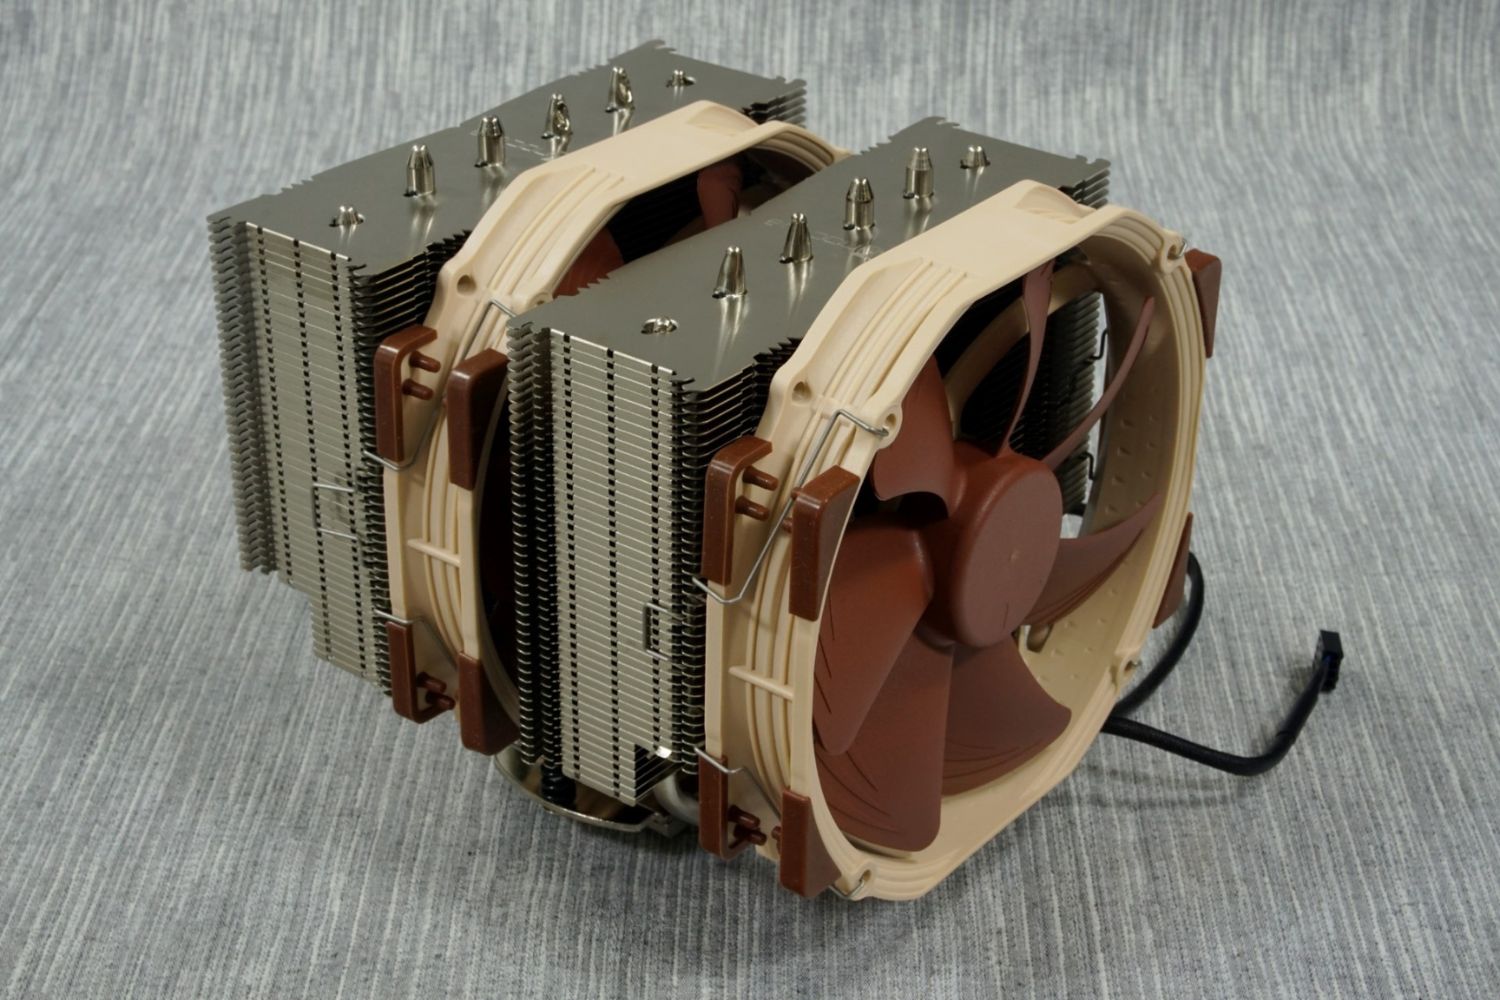
The Noctua NH-D15 SSO2 D-Type Premium CPU Cooler is renowned for its exceptional cooling performance and quiet operation, making it an ideal choice for gamers and PC enthusiasts. In this guide, we will walk you through the steps to properly install the NH-D15 CPU cooler on an X370 Pro Gaming motherboard, ensuring optimal performance and longevity for your CPU.
Before we dive into the installation process, it’s crucial to familiarize yourself with the components you’ll be working with. The NH-D15 cooler consists of a large heat sink, dual fans, mounting brackets, and a backplate. The X370 Pro Gaming motherboard, on the other hand, provides the necessary sockets and connections to securely attach the cooler and ensure proper cooling.
Proper installation of the NH-D15 CPU cooler is vital for efficient heat dissipation and preventing thermal throttling. By following the steps outlined in this guide, you’ll be able to optimize your system’s cooling capacity, ensuring stable performance even during resource-intensive tasks like gaming or video editing.
So, without further ado, let’s gather the necessary tools and get ready to install the Noctua NH-D15 SSO2 D-Type Premium CPU Cooler on our X370 Pro Gaming motherboard.
What You’ll Need
Before you begin installing the Noctua NH-D15 SSO2 D-Type Premium CPU Cooler on your X370 Pro Gaming motherboard, make sure you have the following tools and components:
- X370 Pro Gaming motherboard: Ensure you have this specific motherboard model to ensure compatibility with the NH-D15 cooler.
- Noctua NH-D15 SSO2 D-Type Premium CPU Cooler: This is the main cooling component that will keep your CPU temperatures in check.
- Thermal paste: This is a crucial component for ensuring proper heat transfer between the CPU and the cooler’s heat sink.
- Screwdriver: You’ll need a screwdriver to attach the mounting brackets and secure the cooler to the motherboard.
- Cotton swabs and isopropyl alcohol: These will come in handy for removing any existing thermal paste from the CPU surface.
- Anti-static wrist strap (optional): While not necessary, using an anti-static wrist strap can help protect your components from electrostatic discharge.
It’s important to ensure that all the components and tools are readily available before you start the installation process. This will help you work efficiently and prevent any delays or interruptions during the process.
Once you have gathered all the necessary tools and components, you’re ready to move on to the next step: preparing your workstation for the installation.
Step 1: Preparing Your Workstation
Before you begin the installation process, it’s essential to set up a clean and organized workstation. Here are the steps to prepare your workstation for installing the Noctua NH-D15 SSO2 D-Type Premium CPU Cooler:
- Clear the workspace: Remove any clutter from your work area, ensuring you have enough space to comfortably work with the motherboard and cooler components.
- Ground yourself: It’s important to discharge any static electricity to avoid damaging sensitive components. You can do this by wearing an anti-static wrist strap or by touching a grounded metal object.
- Review the motherboard manual: Familiarize yourself with the layout and specifications of your X370 Pro Gaming motherboard. Refer to the manual for guidance on CPU socket installation and other relevant information.
- Prepare the necessary tools: Ensure that you have all the tools mentioned in the previous section, such as a screwdriver, cotton swabs, isopropyl alcohol, and thermal paste.
- Organize the components: Lay out the NH-D15 cooler components on a clean surface, ensuring they are easily accessible during the installation process.
- Clean the workstation: Wipe down the work area with a clean cloth to remove any dust or debris that could interfere with the installation process. This will help prevent any contaminants from entering your system.
By following these steps, you will create an optimal environment for installing the Noctua NH-D15 SSO2 D-Type Premium CPU Cooler. Having a clean and organized workstation will improve efficiency and minimize the risk of any accidental damage to your components.
Once you have prepared your workstation, you can proceed to the next step: attaching the backplate to the motherboard.
Step 2: Attaching the Backplate
Attaching the backplate is an important step in the installation process of the Noctua NH-D15 SSO2 D-Type Premium CPU Cooler. The backplate provides stability and support for the cooler, ensuring proper contact with the CPU. Follow these steps to attach the backplate:
- Locate the mounting holes: Identify the mounting holes on the back of your X370 Pro Gaming motherboard. These holes are typically found around the CPU socket.
- Prepare the backplate: Take the backplate provided with the NH-D15 cooler and position it on the rear side of the motherboard, aligning it with the mounting holes.
- Secure the backplate: Insert the mounting screws through the backplate holes and thread them into the mounting holes on the motherboard. Use a screwdriver to tighten the screws evenly, ensuring a secure fit.
- Check for stability: Gently shake the motherboard to check if the backplate is securely attached. Make sure there is no movement or looseness, as this can affect the cooler’s performance.
Attaching the backplate provides a solid foundation for the Noctua NH-D15 cooler. It ensures that the cooler remains stable and properly aligned with the CPU for effective heat dissipation.
Once you have successfully attached the backplate, you can proceed to the next step: preparing the heat sink for installation.
Step 3: Preparing the Heat Sink
In this step, we will prepare the heat sink of the Noctua NH-D15 SSO2 D-Type Premium CPU Cooler for installation. The heat sink plays a crucial role in dissipating heat from the CPU, ensuring optimal cooling performance. Follow these steps to prepare the heat sink:
- Remove the protective cover: If the heat sink comes with a protective cover, carefully remove it to expose the cooling fins and heat pipes.
- Clean the heat sink: Use a can of compressed air or a soft brush to remove any dust or debris from the cooling fins. This will help maximize the heat transfer efficiency of the cooler.
- Inspect for any damage: Check the heat sink and heat pipes for any signs of damage, such as bent fins or cracks. If you notice any damage, contact Noctua customer support for further assistance.
- Ensure compatibility with RAM modules: If you have tall RAM modules installed on your motherboard, check if they will interfere with the heat sink. In some cases, you may need to adjust the position of the fans or the RAM modules for proper clearance.
Preparing the heat sink is important to ensure that it is clean, undamaged, and compatible with your system. A clean and well-maintained heat sink will promote efficient heat dissipation and keep your CPU operating at optimal temperatures.
Once you have prepared the heat sink, you can proceed to the next step: applying thermal paste to the CPU.
Step 4: Applying Thermal Paste
Applying thermal paste is a crucial step in the installation process of the Noctua NH-D15 SSO2 D-Type Premium CPU Cooler. Thermal paste is a compound that facilitates heat transfer between the CPU and the heat sink, optimizing cooling performance. Follow these steps to apply thermal paste:
- Clean the CPU surface: Use a cotton swab dipped in isopropyl alcohol to gently clean the surface of the CPU. This will remove any existing thermal paste or debris, ensuring a clean and smooth contact surface.
- Apply thermal paste: Place a small pea-sized or rice-sized amount of thermal paste in the center of the CPU surface. Avoid applying too much paste, as it can lead to excess spread and interfere with heat transfer.
- Spread the thermal paste: Using a plastic card or a thermal paste spreader, carefully spread the thermal paste evenly over the CPU surface. Aim for a thin and uniform layer to optimize heat transfer.
- Avoid air bubbles: Ensure there are no air bubbles trapped between the CPU and the thermal paste. If you notice any bubbles, gently press down on the heat sink to eliminate them.
Proper application of thermal paste is important for establishing efficient heat conduction between the CPU and the heat sink. It helps prevent air gaps and promotes optimal cooling performance for your system.
Once you have applied the thermal paste, you can proceed to the next step: mounting the heat sink on the CPU.
Step 5: Mounting the Heat Sink on the CPU
Now that you have applied thermal paste to the CPU, it’s time to mount the Noctua NH-D15 SSO2 D-Type Premium CPU Cooler onto the CPU. This step is crucial for establishing proper contact and secure attachment. Follow these steps to mount the heat sink:
- Position the heat sink: Carefully place the NH-D15 CPU cooler onto the CPU, aligning the screws with the mounting holes on the motherboard. Take note of the orientation of the cooler to ensure proper alignment.
- Thread the screws: Begin threading the mounting screws through the screw holes on the heat sink. Use a screwdriver to tighten the screws in a diagonal pattern, gradually applying equal pressure to ensure an even distribution of force.
- Tighten the screws: Once all the screws are threaded, tighten them further until they are secure. Avoid overtightening, as this can lead to damage or inefficient heat transfer.
- Double-check the alignment: Confirm that the heat sink is properly aligned with the CPU socket. Make sure it is level and not tilted, as this can impact cooling performance.
Mounting the heat sink onto the CPU requires precision and attention. Ensuring proper alignment and secure attachment is crucial for effective heat dissipation and maintaining optimal CPU temperatures.
Once you have successfully mounted the heat sink, you can proceed to the next step: installing the fans on the NH-D15 cooler.
Step 6: Installing the Fans
Installing the fans on the Noctua NH-D15 SSO2 D-Type Premium CPU Cooler is the next step in the installation process. The fans play a crucial role in maximizing airflow and enhancing cooling performance. Follow these steps to install the fans:
- Identify the fan clips: The NH-D15 cooler comes with fan clips that securely hold the fans in place. Locate these clips, as you will need them to attach the fans.
- Position the first fan: Take one of the fans and position it on one side of the heat sink. Align the fan’s mounting holes with the corresponding holes on the heat sink.
- Attach the fan: Insert the fan clips into the mounting holes, pressing them down until they are securely fastened. Ensure that the fan is firmly attached to the heat sink and does not wobble or move.
- Repeat for the second fan: Repeat the same process to attach the second fan on the other side of the heat sink. Ensure that it is aligned properly and securely attached.
Installing the fans is essential for optimizing airflow and enhancing the cooling efficiency of the NH-D15 CPU cooler. The dual fans work together to efficiently dissipate heat from the heat sink, helping to maintain optimal CPU temperatures even during demanding tasks.
Once you have successfully installed the fans, you can proceed to the next step: connecting the fans to the motherboard.
Step 7: Connecting the Fans to the Motherboard
After installing the fans on the Noctua NH-D15 SSO2 D-Type Premium CPU Cooler, it’s time to connect them to the motherboard. This step ensures that the fans receive power and can be controlled for optimal cooling performance. Follow these steps to connect the fans:
- Locate the fan headers: Identify the fan headers on your X370 Pro Gaming motherboard. These headers are usually labeled and are designed to provide power and control signals to the fans.
- Position the fans: Orient the CPU cooler so that the fan cables are easily accessible and can reach the fan headers on the motherboard.
- Connect the fans: Take the fan cables and plug them into the corresponding fan headers on the motherboard. Ensure a secure connection, making sure that the cable is inserted fully into the header.
- Secure the cables: Use cable ties or clips to neatly secure the fan cables, preventing any potential interference with other components or fans.
Connecting the fans to the motherboard enables proper power delivery and allows you to control their speed and performance. This ensures optimal cooling of your CPU and allows you to customize the fan settings according to your preferences or thermal requirements.
Once you have successfully connected the fans, you can move on to the final step: testing and troubleshooting.
Step 8: Testing and Troubleshooting
After completing the installation of the Noctua NH-D15 SSO2 D-Type Premium CPU Cooler on your X370 Pro Gaming motherboard, it’s important to test its functionality and address any potential issues. Follow these steps to test and troubleshoot your setup:
- Power on your system: Start your computer and monitor the CPU temperatures through the BIOS or appropriate monitoring software.
- Monitor temperature readings: Keep an eye on the CPU temperature readings during various tasks, such as idle usage or running intensive applications. Ensure that the temperatures remain within acceptable ranges to avoid overheating.
- Inspect fan operation: Verify that both fans are spinning and operating correctly. Ensure that there are no unusual noises or vibrations coming from the fans.
- Check for proper airflow: Verify that there is proper airflow around the CPU cooler and that no cables or obstructions are blocking the fans or cooling fins.
- Perform stress tests: Run stress tests or intensive tasks to put a load on the CPU and observe temperature fluctuations. If the temperatures rise excessively or reach dangerous levels, consider checking the thermal paste application, fan curves, or increasing fan speeds.
- Troubleshoot any issues: If you encounter any issues, such as abnormal temperatures or fan malfunctions, refer to the Noctua NH-D15 manual or contact their customer support for guidance. They can provide troubleshooting steps specific to your situation.
Testing and troubleshooting your CPU cooler installation helps ensure the stability and performance of your system. By monitoring temperatures and addressing any potential issues, you can optimize cooling efficiency and maintain safe operating conditions for your CPU.
With the installation, testing, and troubleshooting complete, you can now enjoy the benefits of the Noctua NH-D15 SSO2 D-Type Premium CPU Cooler on your X370 Pro Gaming motherboard.
Conclusion
Congratulations! You have successfully installed the Noctua NH-D15 SSO2 D-Type Premium CPU Cooler on your X370 Pro Gaming motherboard. By following the step-by-step instructions in this guide, you have optimized the cooling performance of your CPU and ensured stable operation during demanding tasks.
The NH-D15 cooler’s superior heatsink design, dual fans, and efficient heat transfer capabilities provide exceptional cooling capacity, allowing your CPU to operate at optimal temperatures. This is especially important for gamers and PC enthusiasts who engage in resource-intensive activities that can generate significant heat.
Remember, the proper preparation of your workstation, attachment of the backplate, preparation of the heat sink, application of thermal paste, mounting of the heat sink, installation of the fans, connection of the fans to the motherboard, and testing and troubleshooting are all critical steps in achieving top-notch cooling performance for your CPU.
Regularly monitor the CPU temperatures and fan operation to ensure that your system continues to function optimally. Should you encounter any issues, refer to the Noctua NH-D15 manual or contact their customer support for assistance.
With the Noctua NH-D15 SSO2 D-Type Premium CPU Cooler installed, you can enjoy improved thermal management, reduced noise levels, and enhanced overall performance from your system. Whether you’re gaming, video editing, or performing other CPU-intensive tasks, your system will stay cool and reliable for years to come.
Thank you for choosing the Noctua NH-D15 SSO2 D-Type Premium CPU Cooler and investing the time to install it correctly. Enjoy your enhanced cooling experience!