Introduction
Welcome to this guide on how to open a Nook HD tablet! Whether you’re looking to replace a broken component or simply curious about the inner workings of your device, understanding how to safely open your Nook HD tablet is essential. In this article, we’ll walk you through the step-by-step process, ensuring that you have the necessary tools and precautions to complete the task successfully.
The Nook HD tablet, a popular device among e-book readers and technology enthusiasts, features a sleek design and a range of impressive functionalities. However, like any electronic device, it may require occasional maintenance or repairs. Knowing how to open the Nook HD tablet will empower you to perform basic troubleshooting or upgrade its internal components, such as the battery or storage.
Before we dive into the steps, it’s crucial to note that opening your Nook HD tablet may void any existing warranty or support from the manufacturer. Therefore, if your device is still under warranty, we recommend consulting the manufacturer or authorized service centers for assistance. Proceed with caution and at your own risk.
By following the instructions in this guide, you’ll gain insight into the inner workings of your Nook HD tablet. Moreover, you’ll have the opportunity to take control of its maintenance and repair, saving both time and money. So, let’s get started with gathering the necessary tools for this operation.
Step 1: Gather the necessary tools
Before you begin the process of opening your Nook HD tablet, it’s essential to gather the required tools. Having the right equipment will ensure a smooth and successful operation. Here are the tools you’ll need:
- Small Phillips head screwdriver: This screwdriver will be used to remove any screws that secure the back cover of your Nook HD tablet.
- Thin, flat object: You’ll need a small, thin, and flat object, such as a plastic opening tool or a guitar pick. This tool will help pry open the back cover without causing any damage to the tablet’s components.
- Clean and soft cloth: It’s essential to have a clean and soft cloth nearby to wipe the tablet’s screen and protect it from any scratches or fingerprints during the opening process.
- Anti-static wrist strap (optional): While not mandatory, an anti-static wrist strap can prevent static electricity discharge onto the tablet’s delicate electronics, reducing the risk of damage. If you have one available, it’s recommended to use it during the process.
Once you have gathered all the necessary tools, ensure you have a clear and well-lit workspace. This will make it easier to handle the tablet and avoid any accidental damage. With the tools in hand and the workspace prepared, you’re ready to proceed to the next step.
Step 2: Turn off the Nook HD tablet
Before you begin opening your Nook HD tablet, it’s crucial to power it off completely. This ensures your safety and prevents any potential damage to the device during the process. Here’s how you can turn off your Nook HD tablet:
- Press and hold the Power button: Locate the Power button on your Nook HD tablet. Press and hold the button until a menu appears on the screen.
- Select “Power off”: On the menu that appears, look for the option labeled “Power off” or “Shut down”. Use the touchscreen to navigate to this option.
- Confirm the power off: Once you have selected the “Power off” option, you might be prompted to confirm your choice. This step ensures that you don’t accidentally turn off your tablet.
- Wait for the tablet to shut down: Once you have confirmed the power off, wait for a few seconds until the tablet completely shuts down. You can verify that it’s powered off by ensuring that the screen is black and displays no activity.
Turning off your Nook HD tablet is an important step to avoid any potential electrical hazards or interference during the opening process. It also minimizes the risk of accidental damage to the internal components of the device.
Now that your Nook HD tablet is powered off, you’re ready to proceed with the next step of opening it. In the following steps, we’ll guide you through the process of removing the back cover of the tablet, allowing you to access its internal components. This will provide you with the opportunity to perform various maintenance tasks or upgrades as needed.
Step 3: Locate the small notch on the side of the tablet
After turning off your Nook HD tablet, the next step in the process is to locate the small notch on the side of the device. This notch is a crucial indicator and will serve as a starting point for opening the tablet’s back cover. Here’s how you can find it:
- Inspect the sides of the tablet: Carefully examine the sides of your Nook HD tablet. Look for a small slot or groove near the edge of the device.
- Identify the small notch: Once you’ve located the slot or groove, focus your attention on the area. You should be able to spot a small notch within the slot or groove.
The small notch on the side of the tablet is usually located towards one of the edges. It may be on the top, bottom, or sides, depending on the specific model of your Nook HD tablet. Locating this notch is essential as it will provide you with an access point to begin opening the back cover.
Once you have identified the small notch, you’re ready to move on to the next step. In the upcoming steps, we’ll guide you on how to insert a thin, flat object into the notch and gently pry open the back cover of your Nook HD tablet. Remember to proceed with caution and refrain from using excessive force to avoid damaging the tablet or its components.
Step 4: Insert a thin, flat object into the notch
Now that you have located the small notch on the side of your Nook HD tablet, it’s time to proceed with the next step – inserting a thin, flat object into the notch. This action will allow you to begin prying open the back cover of the tablet. Here’s what you need to do:
- Select a suitable tool: Choose a small, thin, and flat object that can fit into the small notch comfortably. Some examples include a plastic opening tool or a guitar pick. Ensure that the tool is not too sharp or rough, as it can potentially scratch or damage the tablet’s exterior.
- Position the tool: Align the selected tool with the small notch on the side of the tablet. Gently insert it into the notch until it feels secure.
- Apply gentle pressure: Once the tool is in place, apply gentle and even pressure towards the tablet’s edge. This action will begin separating the back cover from the tablet’s body.
- Work your way around: Slowly move the tool along the edge of the tablet, keeping it inserted into the notch. Gradually exert pressure to release the clips or adhesive that hold the back cover in place. Be patient and take your time to avoid any accidental damage.
It’s important to note that while applying pressure, you should exercise caution to prevent any excessive force that could damage the tablet. Be gentle but firm in your actions and always pay attention to the integrity of the tablet’s components.
Remember, each model of the Nook HD tablet may differ slightly in terms of the location and design of the small notch. Therefore, adapt your technique accordingly to ensure a smooth separation of the back cover from the tablet’s body.
With the tool inserted and pressure applied, you are ready to proceed to the next step – gently prying open the back cover of your Nook HD tablet. We’ll guide you through this process in the following step, so keep reading to continue the journey of opening your tablet successfully.
Step 5: Gently pry open the back cover
With the thin, flat object inserted into the small notch on the side of your Nook HD tablet, it’s time to move on to the next step – gently prying open the back cover. This step requires careful and cautious handling to avoid any damage to the tablet or its internal components. Follow these instructions to proceed:
- Continue applying pressure: Keep the tool inserted into the notch and maintain the pressure you applied in the previous step.
- Slide the tool along the edge: Slowly slide the tool along the edge of the tablet, prying open the back cover as you go. Be gentle and use even pressure to avoid snapping or breaking any clips that hold the cover in place.
- Work your way around the tablet: As you continue to slide the tool along the edge, gradually work your way around the tablet. This process will release the remaining clips or adhesive that secure the back cover.
- Be patient and cautious: Take your time during this step, ensuring that you don’t rush or use excessive force. The goal is to separate the back cover from the tablet’s body without causing any damage.
- Check for any resistance: If you encounter any resistance while prying open the back cover, stop and reassess your approach. Double-check for any missed clips or adhesive that may still be holding the cover in place.
- Remove the back cover: Once you have successfully separated the back cover from the tablet’s body, carefully lift it off and set it aside.
By following these steps, you should be able to gently pry open the back cover of your Nook HD tablet. Remember, patience and caution are key during this process to ensure the integrity and functionality of your device remain intact.
With the back cover removed, you now have access to the internal components of your Nook HD tablet. However, there are still a few more steps to complete the process of opening the tablet. Keep reading to learn how to access and work with these internal components safely and effectively.
Step 6: Remove the back cover completely
Now that you have successfully pried open the back cover of your Nook HD tablet, it’s time to proceed with removing the back cover completely. This step will allow you to fully access the internal components of the tablet and perform any necessary repairs or upgrades. Follow these instructions to safely remove the back cover:
- Inspect the back cover: Take a moment to examine the back cover and ensure that there are no cables or connectors attached to it. If you notice any connections, gently detach them using your fingertips or a pair of tweezers.
- Set the back cover aside: Once you have detached any cables or connectors, carefully lift the back cover off the tablet and set it aside on a clean and safe surface. Be mindful not to place it on any static-inducing materials that can damage the tablet’s sensitive electronics.
- Keep track of any screws: While removing the back cover, pay attention to any screws that may have been released. It’s important to keep track of these screws to ensure they are not lost or misplaced.
With the back cover removed, you now have a clear view of the internal components of your Nook HD tablet. You can proceed with any maintenance tasks or upgrades that you had planned.
Remember, when working with the internal components, handle them with care and avoid touching any delicate circuitry unless necessary. Take note of the location of each component and any connections they may have.
Once you have completed the desired tasks, ensure that you reattach any cables or connectors that were detached during the removal process. Take your time to ensure everything is properly connected before moving on to reassembling the tablet.
Now that you have successfully removed the back cover of your Nook HD tablet, you can confidently proceed with accessing and working on the internal components. Keep reading to discover some additional tips and precautions that will help you throughout the process.
Step 7: Access the internal components of the tablet
Now that you have removed the back cover of your Nook HD tablet, you can begin accessing the internal components. This step will allow you to perform various maintenance tasks or upgrades as needed. Here’s how you can access the internal components:
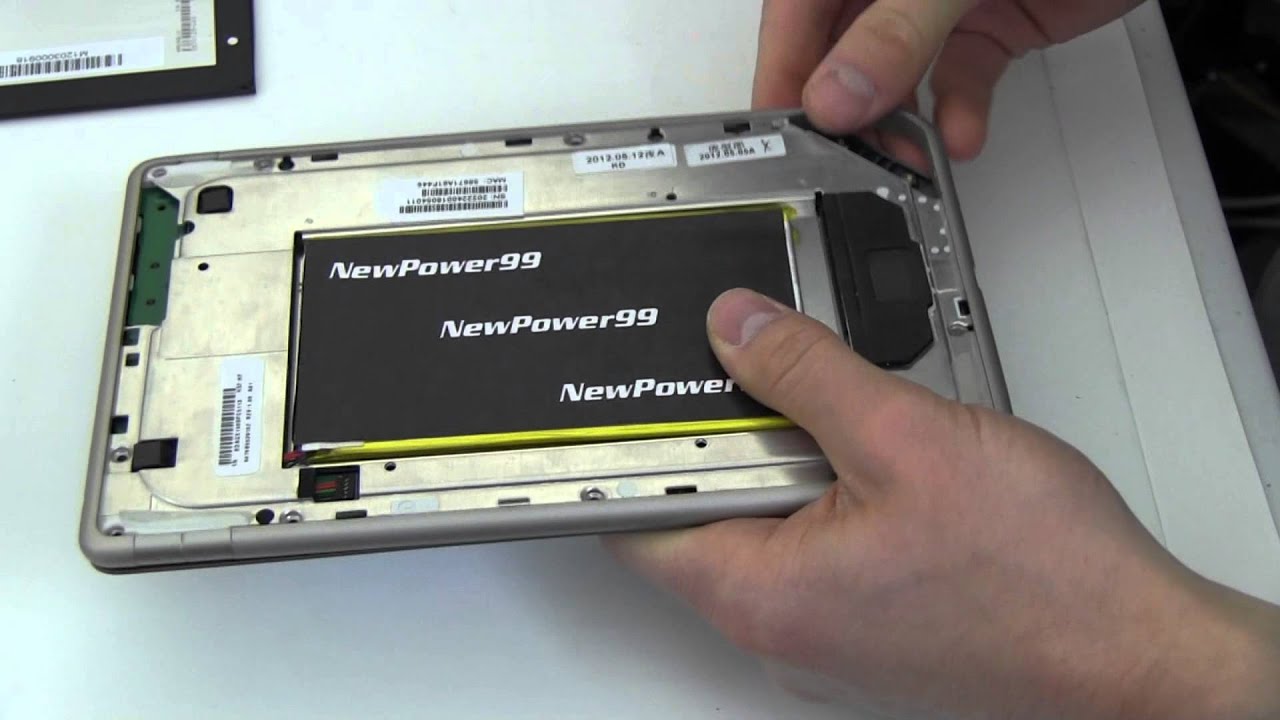
- Locate the internal components: As you examine the exposed area inside your tablet, you will notice various internal components such as the battery, circuit board, storage, and other hardware. Take note of their locations and connections.
- Identify specific components: If you have a specific maintenance or upgrade task in mind, identify the component(s) relevant to your goal. This could be replacing the battery, upgrading the storage, or cleaning the circuit board.
- Follow proper procedures: Each task may require specific procedures. It’s important to refer to the relevant guides or documentation provided by the manufacturer or trusted sources. Follow the recommended steps to ensure the process is carried out safely and effectively.
- Exercise caution: While accessing the internal components, exercise caution and avoid touching any sensitive parts unless necessary. Use proper tools when handling components and ensure you are grounded to prevent static discharge.
- Handle cables and connectors carefully: If you need to detach any cables or connectors, do so gently and keep track of their orientation to ensure proper reconnection later. Avoid applying excessive force or bending any wires.
It’s important to note that accessing the internal components of your Nook HD tablet requires careful handling and knowledge of the specific tasks at hand. If you are unsure or uncomfortable with any aspect of the process, it’s recommended to seek professional assistance or guidance.
By following these steps, you will now be able to access and work on the internal components of your Nook HD tablet confidently. However, there are a few additional tips and precautions that you should be aware of. Keep reading to learn more.
Step 8: Additional tips and precautions
As you navigate the process of opening and accessing the internal components of your Nook HD tablet, it’s important to keep in mind some additional tips and precautions to ensure a successful and safe experience. Consider the following advice:
- Document your steps: Take photos or notes as you disassemble your Nook HD tablet. This will help you remember the proper order and positioning of components when reassembling the device.
- Organize your workspace: Keep your workspace clean and organized to prevent misplacing screws or components. Use containers or trays to separate and label the various parts you remove.
- Handle with care: Always handle the internal components of your Nook HD tablet with caution. Avoid touching sensitive circuitry and only apply gentle pressure when necessary.
- Use appropriate tools: Utilize the correct tools for each task to avoid damage to the tablet or its components. Refer to the manufacturer’s recommendations or trusted sources for guidance on proper tools.
- Protect against static discharge: If possible, wear an anti-static wrist strap or frequently touch a grounded metal surface to prevent static electricity from damaging the tablet’s sensitive electronics.
- Follow guides and resources: Consult reliable guides, tutorials, or official documentation provided by the manufacturer when performing maintenance or upgrade tasks on your Nook HD tablet.
- Keep track of screws and small parts: Ensure you keep track of any screws or small parts that you remove from the tablet. Place them in a secure container and label them accordingly to avoid confusion during reassembly.
- Test before reassembly: Before closing up your Nook HD tablet, consider testing it to ensure that any maintenance or upgrades were successful. Power it on and check for proper functionality.
By adhering to these additional tips and precautions, you’ll enhance the overall experience of opening and working with your Nook HD tablet’s internal components. Remember, if at any point you encounter difficulties or feel unsure about a task, it’s always recommended to seek professional assistance or guidance to avoid any potential damage to your device.
With these steps, tips, and precautions in mind, you’re well-equipped to confidently navigate the process of opening and accessing the internal components of your Nook HD tablet. Good luck with your maintenance or upgrade endeavors!
Conclusion
Congratulations! You have successfully learned how to open a Nook HD tablet. By following the step-by-step instructions, you have gained the knowledge and confidence to safely remove the back cover and access the internal components of your device. Opening your Nook HD tablet provides you with the opportunity to perform maintenance tasks, troubleshoot issues, or even upgrade hardware components.
Throughout the process, it’s crucial to remain cautious and follow all the recommended tips and precautions. Take your time, use the appropriate tools, and be gentle when handling the internal components. Always refer to reliable guides, tutorials, or official documentation to ensure you are following the correct procedures.
Remember, opening your Nook HD tablet may void any existing warranty or support from the manufacturer. If your device is still under warranty, it’s recommended to consult the manufacturer or authorized service centers for assistance.
Now that you have accessed the internal components, you can perform various tasks such as replacing the battery, upgrading the storage, cleaning the circuit board, or resolving any issues that were affecting the performance of your Nook HD tablet.
Once you have completed the desired maintenance or upgrade tasks, it’s crucial to carefully and properly reassemble the tablet. Refer to the documentation or guides you used during the disassembly process to ensure everything is put back in place correctly.
By opening your Nook HD tablet, you have gained valuable insights into the inner workings of your device. This knowledge empowers you to take control of its maintenance and repair, saving both time and money.
Remember, if at any point you feel unsure or uncomfortable with any task, it’s always recommended to seek professional assistance. Your Nook HD tablet is a valuable device, and maintaining it properly is essential for its longevity and optimal performance.
We hope this guide has been informative and helpful in your journey of opening your Nook HD tablet. Enjoy exploring the internal components and making the most out of your device!