Tools and Supplies Needed
Before you begin the process of mounting a motor to your electric skateboard, it’s important to gather all the necessary tools and supplies. Having everything ready will save you time and ensure a smooth installation. Here is a list of what you will need:
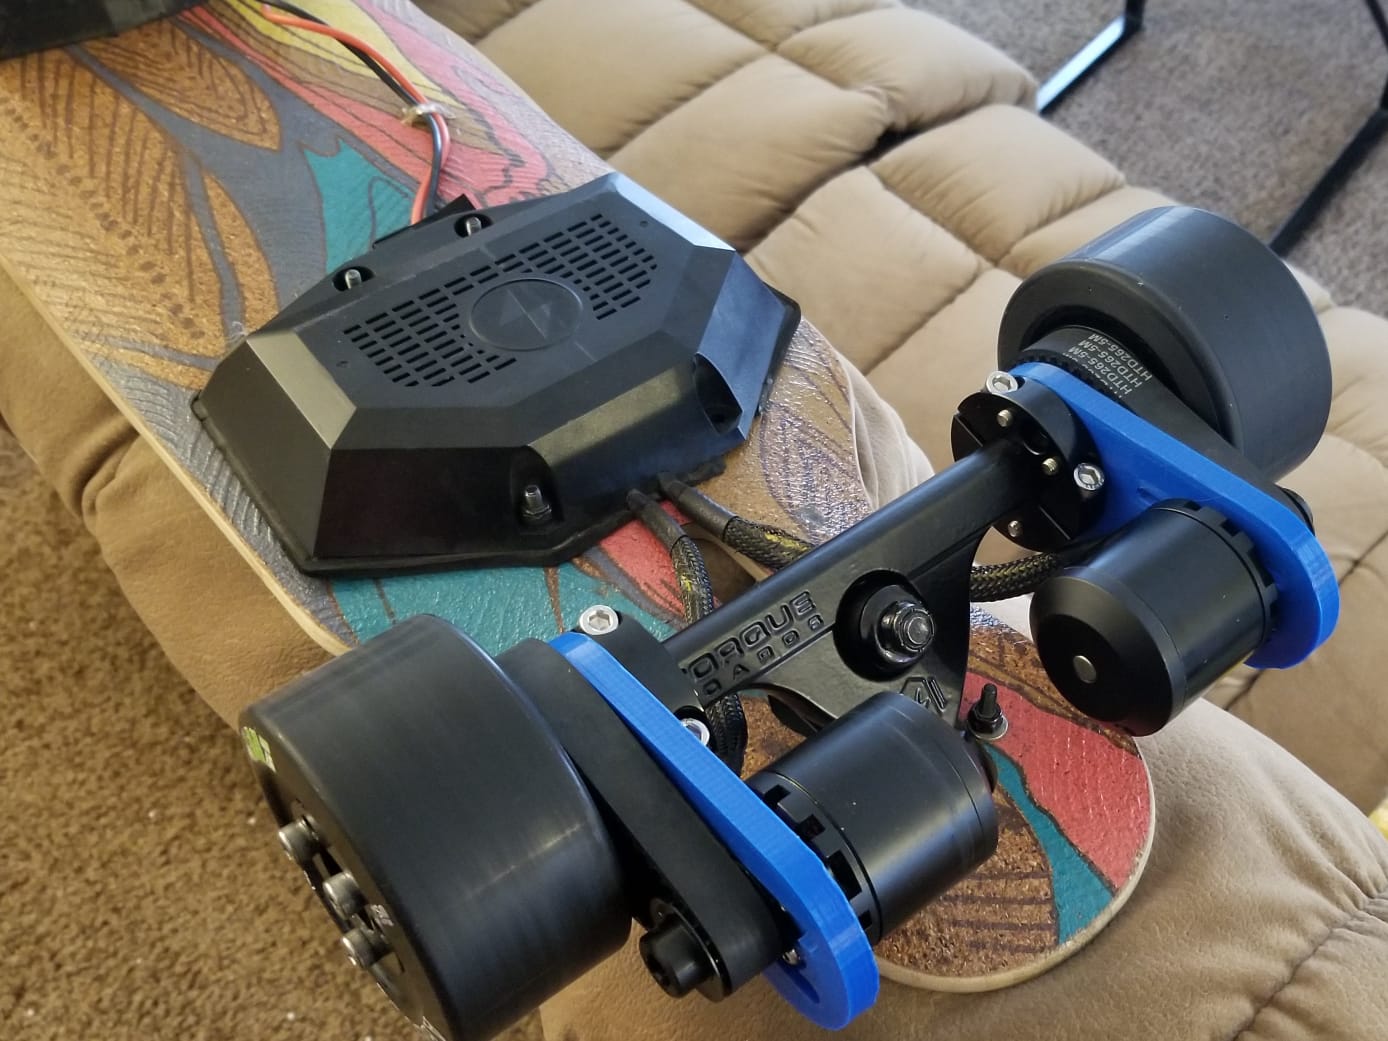
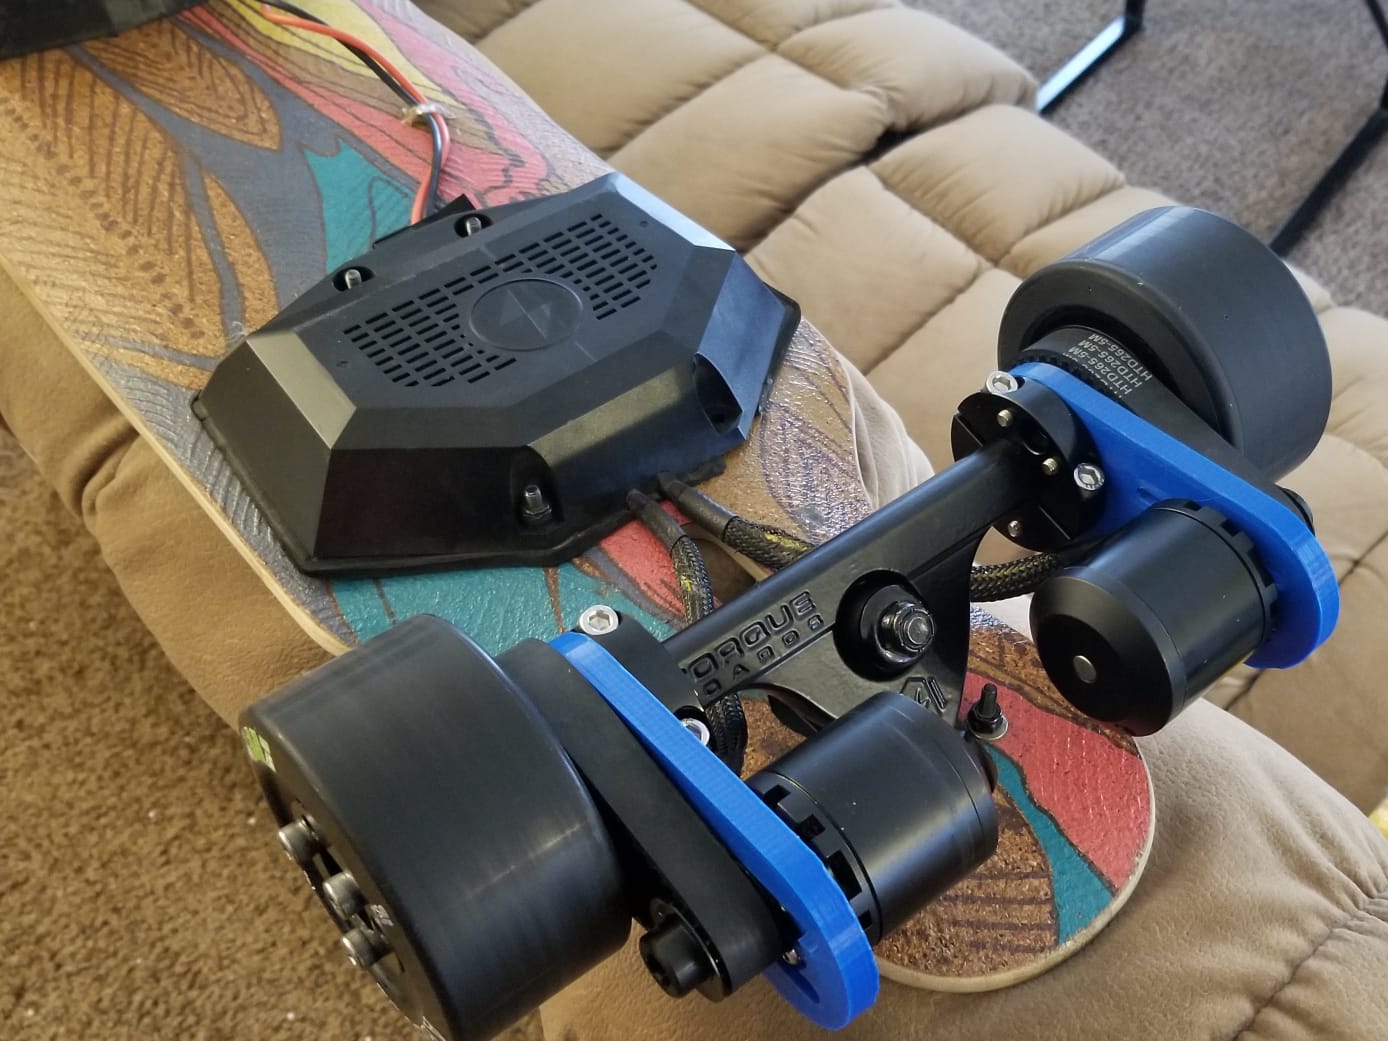
- Motor mount
- Motor mounting plate
- Allen wrench set
- Screwdriver set
- Socket wrench set
- Electric skateboard tool (if applicable)
- Drill and drill bits
- File or sandpaper
- Measuring tape
- Loctite or threadlocker
- Belt tension gauge
- Optional: thread inserts (for additional stability)
By ensuring that you have all the necessary tools and supplies ready, you will be able to complete the motor mounting process without any interruptions. It’s important to have the proper tools to ensure a secure and stable motor mount, preventing any potential issues during your electric skateboard’s operation.
Now that you have your tools and supplies gathered, it’s time to move on to the next step – choosing the right motor mount.
Step 1: Choosing the Right Motor Mount
Choosing the right motor mount is crucial for the proper functioning and stability of your electric skateboard. The motor mount is responsible for securely attaching the motor to the skateboard’s chassis, ensuring smooth and efficient power transfer. Here are some factors to consider when selecting a motor mount:
- Compatibility: Ensure that the motor mount is compatible with your electric skateboard’s motor and mounting plate. Check the specifications provided by the manufacturer to confirm compatibility.
- Materials: Look for a motor mount made from durable materials such as aluminum or steel. These materials offer strength and stability, ensuring that the motor remains securely in place.
- Adjustability: Choose a motor mount that allows for adjustments in positioning. The ability to adjust the angle and height of the motor mount will help you achieve the ideal alignment with the skateboard’s drive system.
- Stability: Opt for a motor mount that provides a secure and stable connection. Look for features such as additional support brackets or built-in vibration dampeners to minimize any unwanted movement of the motor during operation.
- Mounting Method: Consider the mounting method of the motor mount. Some mounts use clamps or brackets to attach to the skateboard’s chassis, while others may require drilling holes for a more permanent installation. Choose a method that suits your preference and skateboard’s design.
Take your time to research and compare different motor mounts available in the market. Read reviews, seek recommendations from fellow electric skateboard enthusiasts, and consider your specific needs and budget. By choosing the right motor mount, you will ensure a secure and reliable connection between the motor and your electric skateboard.
Once you have selected the appropriate motor mount, it’s time to move on to the next step – preparing the motor mounting plate.
Step 2: Preparing the Motor Mounting Plate
Now that you have chosen the right motor mount, it’s time to prepare the motor mounting plate. The motor mounting plate serves as the interface between the motor and the motor mount, ensuring a secure and stable connection. Here’s how to prepare the motor mounting plate:
- Measure and mark: Start by measuring the dimensions of the motor mounting plate. Use a measuring tape to determine the length and width of the plate. Once you have the measurements, mark them on the plate using a pencil or marker.
- Align the holes: Most motor mounting plates come with pre-drilled holes for easy installation. Align these holes with the corresponding holes on the motor mount. If the holes don’t line up perfectly, use a drill with a drill bit slightly larger than the holes to enlarge them for a proper fit.
- Smooth rough edges: Check the edges of the motor mounting plate for any rough or sharp edges. Use a file or sandpaper to smooth out these edges, ensuring a clean and safe installation.
- Apply threadlocker (optional): To further secure the connection between the motor mounting plate and the motor mount, you can apply a small amount of threadlocker, such as Loctite, to the screws or bolts that will be used. This will prevent them from loosening over time due to vibrations.
Once you have prepared the motor mounting plate, double-check that it aligns properly with the motor mount and there are no rough edges that could cause any issues. With the motor mounting plate ready, you can proceed to the next step – installing the motor mounting plate.
Step 3: Installing the Motor Mounting Plate
With the motor mounting plate prepared, it’s time to install it onto your electric skateboard. The motor mounting plate serves as the base for attaching the motor mount and secures the motor in place. Here’s how to install the motor mounting plate:
- Position the plate: Place the motor mounting plate on the skateboard’s chassis in the desired location. Make sure it is aligned with the rest of the drive system, such as the pulleys or gears.
- Mark the holes: Use a pencil or marker to mark the locations of the holes on the skateboard’s chassis. These marks will serve as guide points for drilling or attaching the motor mount.
- Drill or attach: Depending on the mounting method of your motor mount, you may need to either drill holes into the skateboard’s chassis or use clamps or brackets to secure the motor mounting plate. Follow the manufacturer’s instructions for the specific installation method.
- Tighten securely: Once the motor mounting plate is attached to the skateboard, use the appropriate tools, such as a screwdriver or socket wrench, to tighten the screws, bolts, or clamps securely. Ensure that the plate is firmly in place, as any looseness can affect the stability and performance of the motor.
- Double-check alignment: After securing the motor mounting plate, double-check its alignment with the rest of the drive system. Ensure that it is parallel to the deck and perpendicular to the direction of travel. Make any necessary adjustments before proceeding to the next step.
By properly installing the motor mounting plate, you are creating a solid foundation for attaching the motor mount and ensuring stability throughout your electric skateboard. With the plate securely in place, you are now ready to move on to the next step – aligning the motor.
Step 4: Aligning the Motor
Proper alignment of the motor is crucial for optimal performance and longevity of your electric skateboard. When the motor is correctly aligned, it ensures smooth power transfer and reduces unnecessary strain on the components. Follow these steps to align the motor:
- Position the motor mount: Place the motor mount onto the motor mounting plate, aligning it with the holes on both the plate and the motor.
- Adjust the motor angle: Depending on the desired drive system setup, adjust the angle of the motor to ensure proper alignment with the drive pulley or gear. Use an allen wrench or the appropriate tool to tighten or loosen the motor mounting screws to achieve the desired angle.
- Measure alignment: Use a measuring tape to measure the distance between the motor shaft and the edge of the drive pulley or gear. Ensure an equal distance on all sides to maintain proper alignment.
- Check motor height: Verify that the motor is positioned at the correct height in relation to the skateboard’s deck. It should be clear of any obstructions and maintain the recommended clearance to avoid any interference during operation.
- Test fit and make adjustments: Without fully securing the screws or bolts, perform a test fit of the motor onto the motor mounting plate. Ensure that the alignment of the motor is accurate before moving on to the next step. If any adjustments are necessary, make them now to achieve the desired alignment.
By carefully aligning the motor, you are setting the foundation for a smooth and efficient ride. Proper alignment ensures optimal power delivery and minimizes the risk of premature wear and tear on the motor and other drive system components. Once you’re satisfied with the motor’s alignment, it’s time to move on to the next step – attaching the motor to the mounting plate.
Step 5: Attaching the Motor to the Mounting Plate
With the motor aligned properly, it’s time to secure it to the mounting plate. Attaching the motor securely will ensure its stability during operation and prevent any unnecessary vibrations or movements. Follow these steps to attach the motor to the mounting plate:
- Place the motor onto the motor mounting plate, aligning the holes on the motor with the corresponding holes on the plate.
- Insert the screws or bolts through the holes, ensuring they pass through both the motor and the mounting plate.
- Tighten the screws or bolts using the appropriate tool, such as an allen wrench or a socket wrench. Start with a snug fit and then tighten each screw or bolt gradually, alternating between them, to ensure even and secure tightening.
- Double-check the motor’s position and alignment. Ensure that it is still properly aligned with the drive system and that there is no interference or contact with any other components.
- Verify the stability of the motor by gently attempting to move it. It should remain fixed and not have any unnecessary play or movement.
By attaching the motor to the mounting plate securely, you are ensuring the stability and reliability of your electric skateboard’s drive system. This step is crucial to prevent any issues that can arise from loose connections or vibrations during operation. With the motor securely attached, proceed to the next step – adjusting belt tension.
Step 6: Adjusting Belt Tension
Proper belt tension is essential for the smooth operation of your electric skateboard. If the belt tension is too loose, it can slip or skip teeth on the pulleys, resulting in a loss of power and efficiency. If the belt tension is too tight, it can strain the motor and the drive system. Follow these steps to adjust the belt tension:
- Locate the tension adjustment mechanism: Identify the tension adjustment mechanism on your electric skateboard. This may be a set of screws or bolts that hold the motor in place or a separate tensioning system.
- Loosen the tension adjustment mechanism: Using the appropriate tool, such as an allen wrench or a socket wrench, loosen the screws or bolts that secure the tension adjustment mechanism.
- Adjust the tension: With the tension adjustment mechanism loosened, you can now adjust the tension of the belt. Apply gentle pressure to either push the motor closer to the drive pulley or move it away, depending on whether you need to tighten or loosen the belt tension.
- Check the tension: Once you have made the adjustment, check the tension of the belt by pressing down on it with your finger. It should have a slight amount of give, but not be too loose or too tight. A properly tensioned belt should feel firm but not overly rigid.
- Tighten the tension adjustment mechanism: Once you are satisfied with the belt tension, tighten the screws or bolts of the tension adjustment mechanism. Ensure that they are secure but not overly tight to avoid damaging the motor or the mounting plate.
By adjusting the belt tension correctly, you are optimizing the performance and longevity of your electric skateboard’s drive system. It’s important to periodically check and readjust the belt tension as it may naturally loosen or tighten over time. With the belt tension properly adjusted, you can move on to the next step – securing the motor mount.
Step 7: Securing the Motor Mount
Once you have aligned the motor and adjusted the belt tension, the next step is to securely fasten the motor mount. Properly securing the motor mount is crucial for the stability and reliability of your electric skateboard during operation. Follow these steps to secure the motor mount:
- Tighten the mounting bolts: Using the appropriate tool, such as an allen wrench or a socket wrench, tighten the mounting bolts that connect the motor mount to the motor mounting plate or the skateboard’s chassis. Start by loosely tightening the bolts, then gradually tighten them in a crisscross pattern to ensure even pressure.
- Double-check the tightness: After tightening the mounting bolts, double-check their tightness. Ensure that they are securely fastened but not over-tightened to avoid damaging the motor mount or the mounting plate.
- Test for stability: Give the motor and the motor mount a gentle shake to test for any movement or play. A properly secured motor mount should hold the motor firmly in place without any unwanted vibrations or wobbling.
- Inspect for clearance: Check the motor’s clearance from other components on the electric skateboard, such as the battery or the deck. Ensure that there is sufficient space to prevent any interference that could affect the performance or safety of the motor.
- Verify alignment: Once the motor mount is securely fastened, reassess the alignment of the motor with the drive system. Confirm that it remains properly aligned and parallel to the skateboard’s deck.
By properly securing the motor mount, you ensure the stability and reliability of your electric skateboard’s drive system. A secure motor mount will prevent any unnecessary movements or vibrations that could impact the overall performance and lifespan of your skateboard. Once the motor mount is securely in place, you can proceed to the next step – connecting the motor to the drive system.
Step 8: Connecting the Motor to the Drive System
Now that you have secured the motor mount, it’s time to connect the motor to the drive system of your electric skateboard. This step ensures that the power generated by the motor is efficiently transferred to propel the skateboard. Follow these steps to connect the motor to the drive system:
- Identify the drive mechanism: Determine whether your electric skateboard uses a belt drive or a gear drive system. This will dictate the specific steps for connecting the motor.
- For belt drive systems: If your skateboard uses a belt drive system, ensure that the motor pulley and the drive wheel pulley are aligned. Slide the belt onto both pulleys, making sure it fits snugly without any twists or knots.
- For gear drive systems: If your skateboard utilizes a gear drive system, align the motor gear with the drive gear. Ensure that the gears mesh properly and engage securely.
- Inspect tension and alignment: Verify that the belt tension or gear alignment is correct. The belt should have enough tension to prevent slippage but not so tight that it restricts movement. The gears should mesh smoothly without excessive play or binding.
- Check for clearance: Ensure that the belt or gears do not make contact with any other components on the skateboard, such as the battery enclosure or the deck. Adequate clearance is essential to prevent interference and potential damage.
- Perform a test run: Before fully securing all components, perform a test run to ensure that the motor and drive system are functioning correctly. Check for any unusual noises, vibrations, or irregularities in performance.
- Finalize the connections: Once you are satisfied with the motor and drive system’s performance, secure any remaining screws, bolts, or fasteners to ensure the components are firmly in place.
By effectively connecting the motor to the drive system, you enable the transfer of power and propulsion for your electric skateboard. Careful attention to belt tension or gear alignment is crucial to ensure optimal performance and efficiency. With the motor successfully connected, your electric skateboard is almost ready for a test ride. Proceed to the next step – testing the motor mount.
Step 9: Testing the Motor Mount
After completing the installation process, it’s essential to thoroughly test the motor mount to ensure its reliability and functionality. Proper testing will confirm that the motor mount is securely fastened and aligned, providing a stable foundation for your electric skateboard. Follow these steps to test the motor mount:
- Visual inspection: Start by visually inspecting the motor mount and its connections. Verify that all screws, bolts, or fasteners are tight and secure. Check for any signs of looseness or misalignment.
- Gently shake the motor: Give the motor a gentle shake to test its stability. It should remain securely in place without any noticeable movement or play.
- Perform a test ride: Take your electric skateboard for a test ride in a controlled environment such as an open area or an empty parking lot. Pay attention to any unusual noises, vibrations, or irregularities in performance.
- Check belt or gear tension: During the test ride, monitor the tension of the belt or the meshing of the gear. Ensure that the belt does not slip or skip teeth, and the gear engagement is smooth.
- Verify motor alignment: Assess the motor alignment during the test ride. Ensure that it remains properly aligned with the drive system, both in terms of angle and height.
- Check for clearance: Confirm that there is sufficient clearance between the motor and other components on the electric skateboard. Ensure that there is no interference or contact during operation.
- Make any necessary adjustments: If you encounter any issues during the test ride, such as belt slippage or misalignment, make the necessary adjustments to address them. This may involve tightening or loosening the belt tension, or realigning the motor.
By thoroughly testing the motor mount, you can identify and address any potential issues before they cause further problems. It ensures the overall performance and safety of your electric skateboard. Once the motor mount passes the test, you can confidently enjoy a ride knowing that your motor is securely mounted.
Final Thoughts
Mounting a motor to an electric skateboard is an exciting project that can greatly enhance your riding experience. By following the steps outlined in this guide, you can ensure a secure and reliable motor mount that will provide optimal performance. Here are a few final thoughts to keep in mind:
First and foremost, always prioritize safety. Double-check all connections, fasteners, and alignment before riding your electric skateboard. It’s crucial to regularly inspect the motor mount to ensure that everything remains secure during use. Maintenance and periodic checks will help prevent any potential issues.
Additionally, take your time during the installation process. Rushing through it may result in improper alignment or loose connections, which can negatively affect the performance of your electric skateboard. Patience and attention to detail are essential for a successful motor mount installation.
Lastly, don’t hesitate to seek assistance or guidance if needed. If you have any doubts or questions, reach out to experienced riders or consult online forums and communities dedicated to electric skateboards. They can provide valuable insights and advice based on their own experiences.
By successfully mounting the motor to your electric skateboard, you can enjoy enhanced speed, power, and efficiency in your rides. Remember to always ride responsibly, wear appropriate safety gear, and stay within your skill level. Now, go out there, have fun, and enjoy the electrifying ride!


