Introduction
Welcome to this guide on how to merge tasks in Asana. Asana is a powerful project management tool that helps teams stay organized and collaborate effectively. It offers a wide range of features, including task management, team communication, and project tracking, to streamline workflows and drive productivity.
One common challenge that arises when working with tasks in Asana is the need to merge multiple tasks into one. This can happen when tasks are duplicated, or when two tasks are found to be closely related and should be consolidated for better organization and clarity. Fortunately, Asana provides a simple and efficient way to merge tasks, allowing you to keep your projects neat and tidy.
In this guide, we will walk you through the step-by-step process of merging tasks in Asana. Whether you are an Asana beginner or a seasoned user, you’ll find this guide helpful in reducing duplicate tasks and improving the overall efficiency of your workflows.
Before we dive into the details, it’s important to note that merging tasks is a permanent action. When you merge tasks, the selected tasks will be combined into one, and the merged tasks will no longer exist as separate entities. Therefore, it’s crucial to review and confirm your merge carefully to avoid any unintended consequences.
Now, let’s get started with understanding why merging tasks is beneficial and how to do it in Asana.
What is Asana?
Asana is a web-based project management tool that allows individuals and teams to plan, organize, and track their work. It provides a centralized platform where users can create tasks, assign them to team members, set due dates, and track progress from start to finish.
Founded in 2008 by Dustin Moskovitz and Justin Rosenstein, both former Facebook employees, Asana was created with the goal of enabling teams to work more efficiently and effectively. With its intuitive interface and robust features, Asana has become one of the leading project management tools used by businesses of all sizes across various industries.
One of the key features that sets Asana apart is its ability to facilitate collaboration and communication. Within Asana, users can create projects and invite team members to join. This allows for seamless teamwork and real-time collaboration, as team members can view, comment on, and update tasks as needed.
Asana offers a range of functionalities to help users stay organized and manage their tasks effectively. Users can create task lists, set priorities, attach files, and add important details to each task. They can also create subtasks and dependencies, helping to break down larger projects into manageable steps.
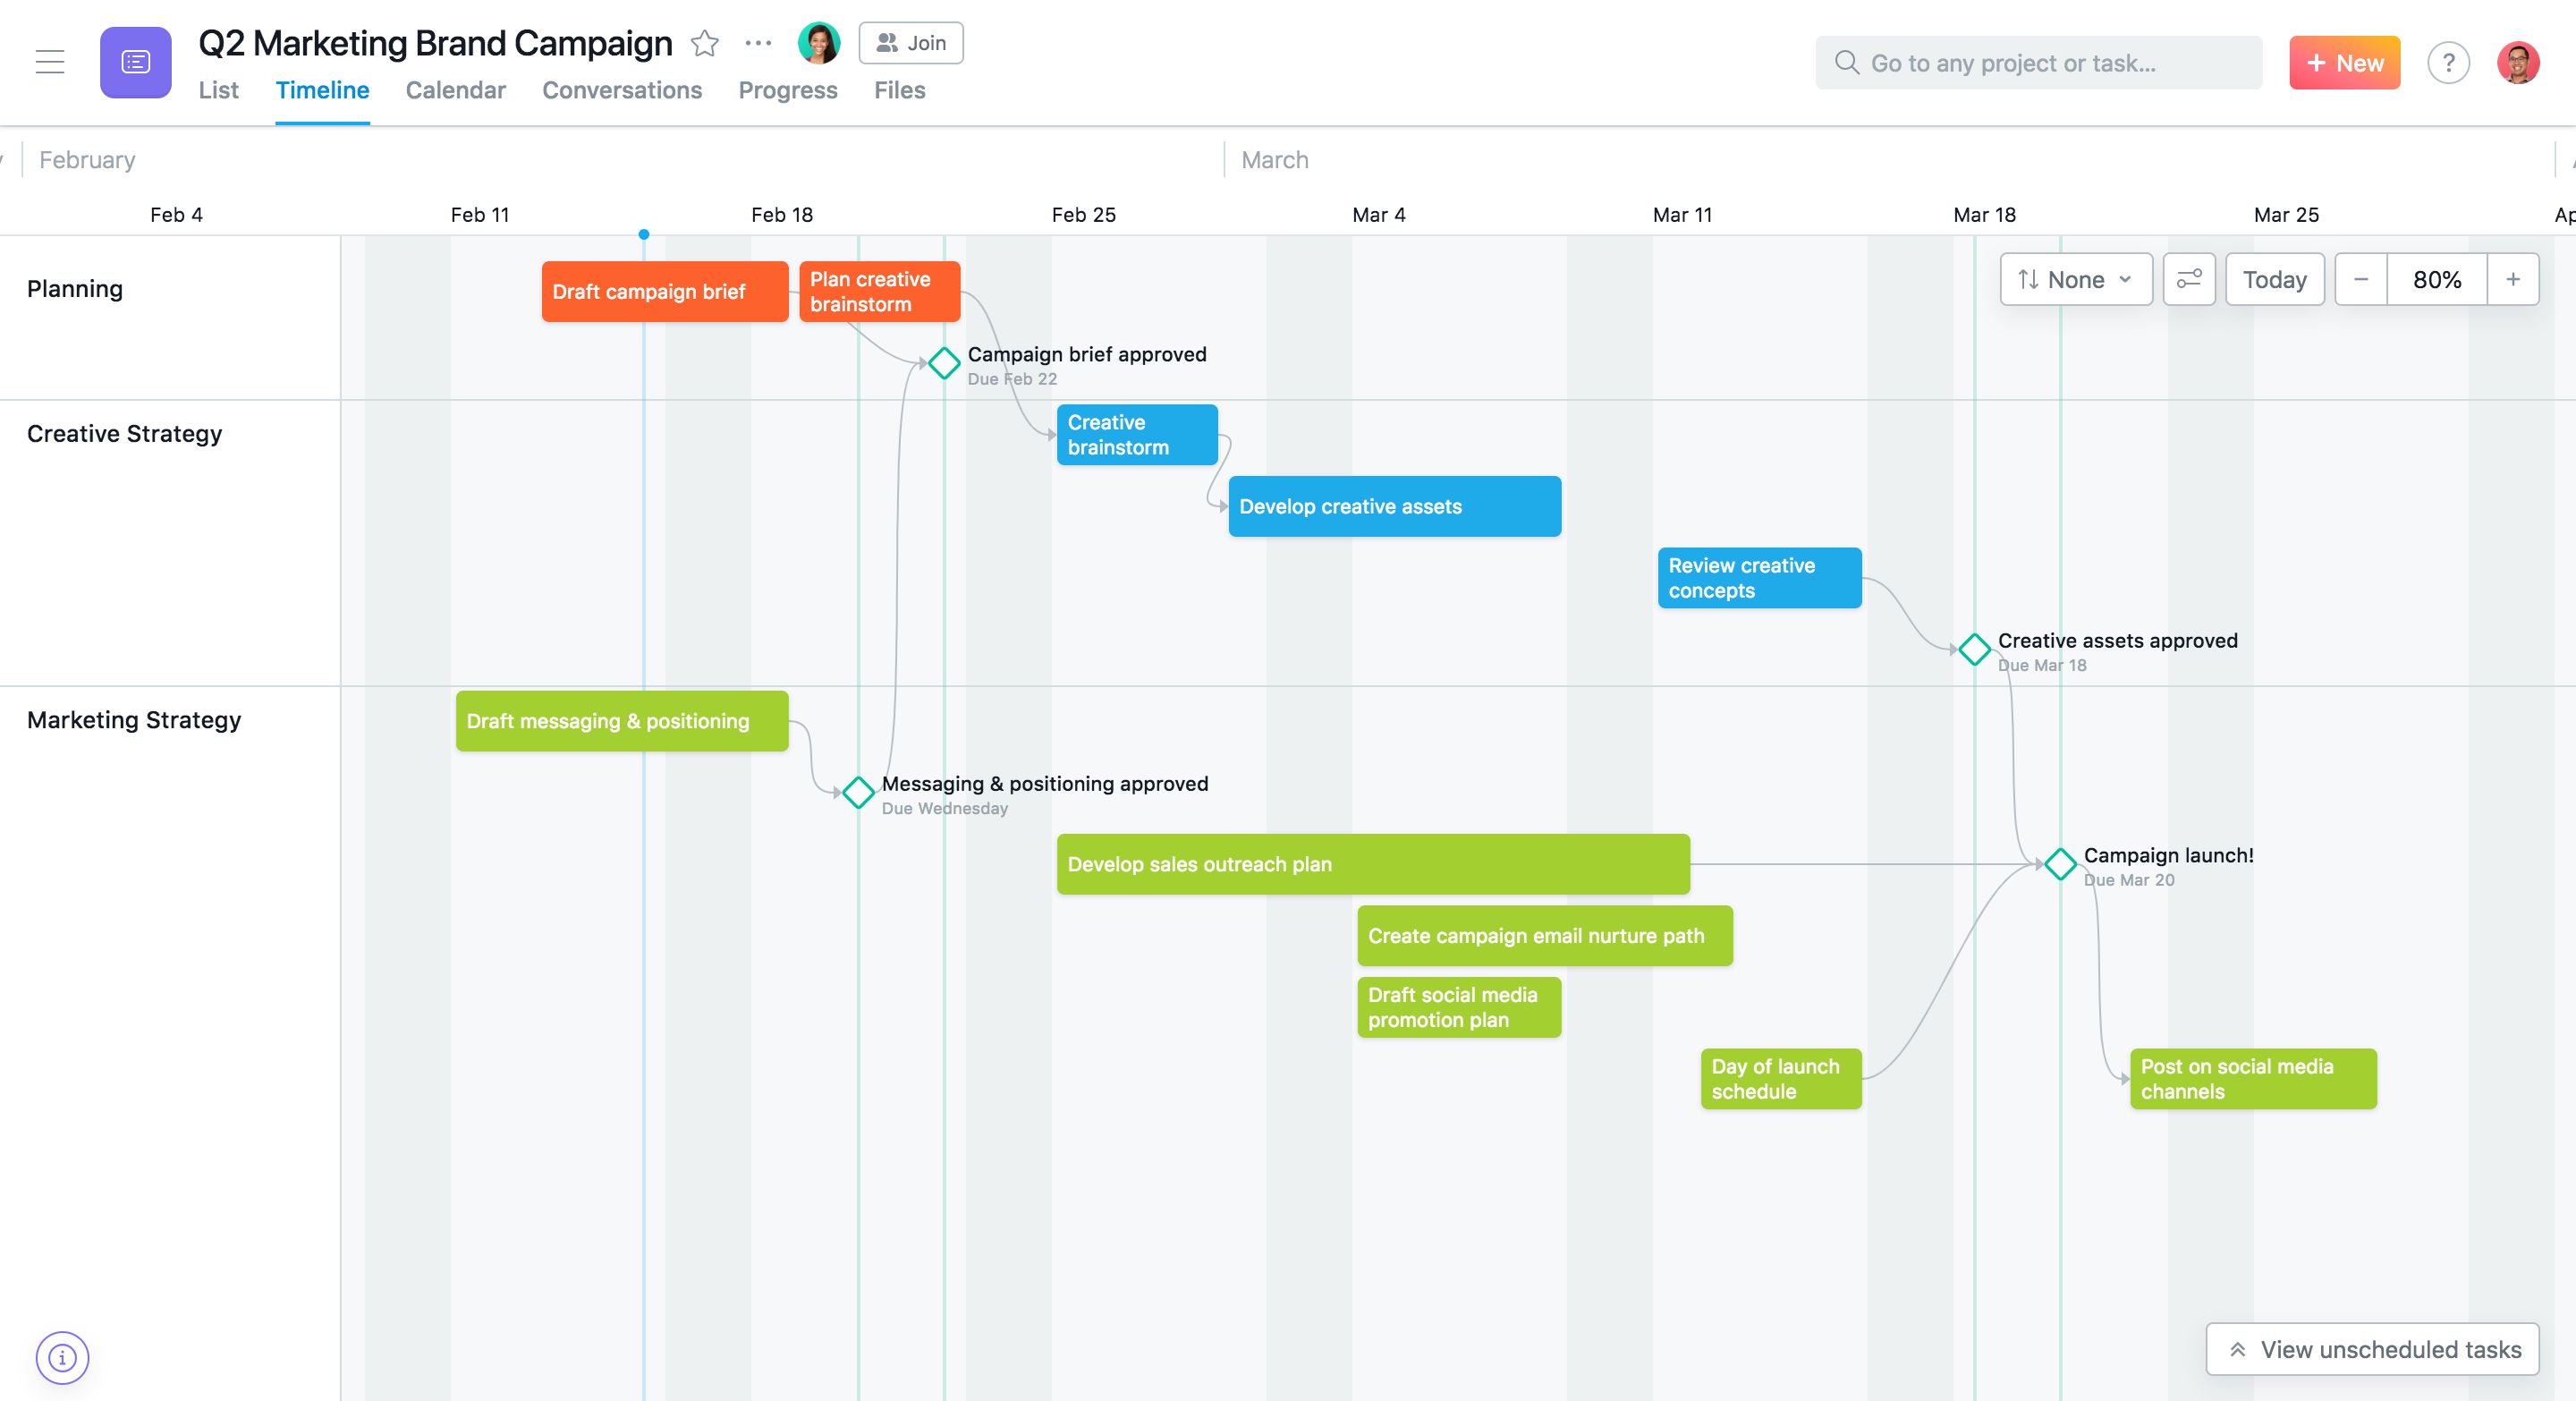
Furthermore, Asana provides various views to visualize and track progress. The Kanban board view allows users to move tasks across different stages of completion, while the calendar view provides a clear overview of upcoming deadlines. The timeline view is particularly useful for planning and visualizing project schedules.
Asana integrates seamlessly with other popular tools, such as Google Drive, Dropbox, and Slack, allowing for a streamlined workflow. This enables users to access and share files, send notifications, and communicate without switching between multiple platforms.
Whether you’re a freelance professional, a small business owner, or part of a large corporate team, Asana can help you streamline your work processes, enhance collaboration, and ensure that projects are completed on time and within budget. Its user-friendly interface and powerful features make it an ideal choice for individuals and teams looking to boost their productivity and achieve their project goals.
Why Merge Tasks?
Merging tasks in Asana can bring several benefits to your project management workflow. Let’s explore why merging tasks is a useful feature and how it can improve your productivity:
Reducing Duplicate Tasks: Duplicating tasks can happen by accident or when tasks are created separately before realizing they are essentially the same. Having duplicate tasks can lead to confusion, as team members may work on the same task separately or overlook one of the duplicates. By merging duplicate tasks, you consolidate all relevant information, updates, and discussions into one task, eliminating redundancy and ensuring everyone is on the same page.
Improving Task Organization: Sometimes, you may realize that two or more tasks are closely related or should be part of a larger task. In such cases, merging the tasks allows you to create a more comprehensive and organized view of the work at hand. By consolidating related tasks, you can streamline your project management and reduce clutter, making it easier for your team to focus and prioritize their efforts.
Clarifying Task Dependencies: In complex projects, tasks often depend on one another. When merging tasks, you can clearly establish the relationships and dependencies between them. This ensures that everyone involved understands the sequence in which tasks should be completed and the impact it may have on the overall project timeline.
Simplifying Updates and Communication: Merging tasks consolidates all comments, attachments, and updates into a single task. This simplifies communication by having all relevant information and discussions in one place. Team members can easily track progress, contribute to discussions, and access the necessary resources without having to navigate between multiple tasks or threads. This saves time, reduces confusion, and fosters more effective collaboration.
Enhancing Reporting and Analytics: Merging tasks allows for accurate reporting and analytics. When tasks are merged, all metrics, such as time spent, completed subtasks, and assigned resources, are combined. This gives you a comprehensive view of the progress and performance of the merged tasks and provides valuable insights into team productivity and project success.
Streamlining Workflows: By merging tasks, you simplify your project management workflows. It eliminates unnecessary repetition and minimizes the risk of overlooking or neglecting important tasks. With a clear and consolidated view of tasks, you can make more informed decisions, allocate resources effectively, and ensure that your team is working efficiently towards project goals.
Now that you understand the benefits of merging tasks in Asana, let’s dive into the step-by-step process of how to merge tasks in Asana!
How to Merge Tasks in Asana
Merging tasks in Asana is a straightforward process that can be done in just a few simple steps. Follow the guide below to merge tasks and streamline your project management:
Step 1: Select Tasks to Merge
Start by identifying the tasks that you want to merge. You can select multiple tasks by holding down the Ctrl or Command key and clicking on each task to be included in the merge. Make sure the tasks have similar or related content that you wish to consolidate.
Step 2: Click on the “More Options” Menu
Once the tasks are selected, locate the “More Options” menu at the top-right corner of the Asana interface. Click on it to open a dropdown menu with additional options.
Step 3: Select “Merge Tasks” from the Dropdown
In the dropdown menu, you will find the “Merge Tasks” option. Click on it to initiate the merging process.
Step 4: Select the Primary Task
After selecting “Merge Tasks,” a window will appear asking you to choose the primary task. The primary task is the one that will retain all the combined information and become the merged task. Review the selected tasks and choose the one that you want to designate as the primary task by clicking on it.
Step 5: Review and Confirm Merge
Before finalizing the merge, take a moment to review the information displayed in the confirmation window. Make sure you are merging the correct tasks and that you have selected the appropriate primary task. Once you are confident in your selection, click on the “Merge Tasks” button to proceed with the merge.
And that’s it! The selected tasks will be merged into a single task, with all the relevant information, comments, attachments, and updates consolidated into the primary task. You can now enjoy the benefits of a streamlined and organized project management workflow.
Note: It’s crucial to remember that merging tasks is a permanent action and cannot be undone. Take extra care when selecting the tasks and designating the primary task, as the merged tasks will no longer exist as separate entities.
Now that you know how to merge tasks in Asana, let’s explore some tips to make the process even smoother!
Step 1: Select Tasks to Merge
The first step in merging tasks in Asana is to identify and select the tasks that you want to merge. This can be done by following these simple steps:
1. Navigate to the Task List: Open Asana and go to the project or task list where the tasks you want to merge are located.
2. Hold Down Ctrl or Command Key: Review the list of tasks and identify the tasks you want to merge. Hold down the Ctrl key (Windows) or the Command key (Mac) on your keyboard.
3. Click on Each Task: While pressing the Ctrl or Command key, click on each task you want to include in the merge. As you click on each task, you will see that they are being selected.
4. Check Task Selection: Double-check that all the intended tasks are selected. You can confirm this by looking at the highlighted tasks in the task list. Make sure they have similar or related content that you wish to consolidate.
5. Release the Ctrl or Command Key: Once you have selected all the desired tasks, release the Ctrl or Command key on your keyboard.
6. Verify Task Selection: Take a moment to review the selected tasks and ensure that none have been accidentally excluded or included. This will help you avoid merging tasks that shouldn’t be merged.
7. Proceed to the Merge Process: After confirming the selection of tasks, you are ready to proceed to the next step of merging them in Asana.
By following these steps, you will successfully select the tasks that you want to merge in Asana. It’s important to choose tasks that have similar content or are closely related to ensure a seamless consolidation process. Once you have completed this step, you can move on to the next step of merging tasks in Asana.
Step 2: Click on the “More Options” Menu
Once you have selected the tasks that you want to merge in Asana, the next step is to click on the “More Options” menu. Follow these simple steps:
1. Locate the “More Options” Menu: Look for the “More Options” menu at the top-right corner of the Asana interface. It is represented by three vertically stacked dots. Click on it to open a dropdown menu with additional options.
2. Open the Dropdown Menu: After clicking on the “More Options” menu, a dropdown menu will appear with a list of additional actions and features available in Asana.
3. Explore the Available Options: Take a moment to familiarize yourself with the various options listed in the dropdown menu. This menu provides access to various functionalities that can enhance your project management experience in Asana.
4. Locate “Merge Tasks” Option: In the dropdown menu, scroll down and locate the “Merge Tasks” option. It should be listed among the available options.
5. Click on “Merge Tasks”: Once you have located the “Merge Tasks” option, click on it to initiate the merging process. This action will display a window where you can choose the primary task and review the merge details before finalizing the merge.
By following these steps, you will be able to locate and access the “More Options” menu in Asana, which is the key to initiating the merging of tasks. This menu provides access to a range of additional features and allows you to access the specific “Merge Tasks” option. Once you have completed this step, you are one step closer to seamlessly merging your tasks in Asana.
Step 3: Select “Merge Tasks” from the Dropdown
After clicking on the “More Options” menu in Asana, the next step in merging tasks is to select the “Merge Tasks” option from the dropdown menu. Here’s how you can accomplish this:
1. Open the “More Options” Dropdown: Locate the “More Options” menu at the top-right corner of the Asana interface. Click on it to open the dropdown menu that provides additional options and features.
2. Scroll Through the Dropdown Menu: Once the dropdown menu is open, scroll through the list of available options. Take a moment to familiarize yourself with the different actions and functionalities that can help you manage your tasks more effectively.
3. Find “Merge Tasks” Option: While scrolling through the dropdown menu, look for the “Merge Tasks” option. It is typically listed alphabetically, so you may need to scan the list to find it.
4. Click on “Merge Tasks”: Once you have located the “Merge Tasks” option in the dropdown menu, click on it to select it. This action will initiate the merging process and open a window where you can specify the primary task and review the merge details.
By following these steps, you will be able to select the “Merge Tasks” option from the dropdown menu in Asana. This option is essential for merging tasks and consolidating their information into a single task. Proceeding to the next step will allow you to designate the primary task and review the merge before finalizing it.
Step 4: Select the Primary Task
After selecting the “Merge Tasks” option in Asana, the next step is to choose the primary task. The primary task is the one that will retain all the combined information and become the merged task. Follow these steps to select the primary task:
1. Review the Selected Tasks: In the window that appears after selecting “Merge Tasks,” you will see a list of the tasks you previously selected for merging. Take a moment to review these tasks and ensure they are the correct ones that you want to consolidate.
2. Determine the Primary Task: Decide which task you want to designate as the primary task. The primary task will retain its original name, description, attachments, subtasks, comments, and other relevant details from the merged tasks.
3. Click on the Primary Task: Once you have determined the primary task, click on it in the list. The primary task will be highlighted or selected to indicate that it will be the main task after the merge.
4. Verify the Primary Task: Double-check that the primary task is correctly selected and that it is the one you want to retain as the merged task. This step is crucial to ensure that the right information is consolidated into the primary task.
5. Proceed to the Review and Confirmation: After selecting the primary task, you are now ready to review the merge details and confirm the merge process. Proceed to the next step to finalize the merge.
By following these steps, you will successfully select the primary task for the merge in Asana. Designating the primary task is crucial as it determines which task will serve as the consolidated version. Take your time during this step to ensure that the correct task is selected, and the merge will result in the desired outcome.
Step 5: Review and Confirm Merge
After selecting the primary task in Asana, the final step in merging tasks is to review and confirm the merge. This ensures that you have selected the right tasks and that you are ready to proceed with the consolidation. Follow these steps to complete the merge:
1. Review the Merge Details: In the merge window, carefully review the information displayed. This includes the primary task you have selected, as well as the list of tasks that will be merged into it. Verify that the tasks listed are the ones you intended to merge.
2. Confirm Merge Actions: Take note of the actions that will be taken during the merge. This may include combining comments, attachments, and other relevant information from the merged tasks into the primary task. Make sure you understand the implications of the merge actions.
3. Edit Primary Task (if necessary): If you need to make any changes to the primary task before merging, you can click on the task name or its associated fields to edit them. This allows you to refine the primary task’s details before finalizing the merge.
4. Verify Merge Details and Changes: Double-check that all the merge details and changes accurately reflect your intent. Make sure you are comfortable with the final outcome and that the merged task will contain the desired information from the selected tasks.
5. Confirm the Merge: Once you have reviewed and verified all the merge details, click on the “Merge Tasks” button or similar confirmation prompt. This action signifies your agreement to proceed with the merge process.
By following these steps and confirming the merge, the selected tasks will be consolidated into the primary task in Asana. This merged task will contain all the relevant information and updates from the original tasks, creating a streamlined and organized record of your project management efforts.
It’s important to note that the merge action is permanent and cannot be undone. Take the time to carefully review and confirm the merge to avoid any unintended changes or loss of data. By ensuring the accuracy and completeness of the merge, you can confidently proceed with your project management tasks in Asana.
Tips for Merging Tasks in Asana
Merging tasks in Asana can greatly streamline your project management workflow and improve overall organization. To make the most out of the merge feature, consider these helpful tips:
1. Evaluate Task Similarity: Before merging tasks, carefully assess their similarity and relevance. Only merge tasks that share common content, dependencies, or goals. Avoid merging tasks that have significantly different purposes or contexts.
2. Communicate with Team Members: If you are working in a team, it’s important to communicate the decision to merge tasks. Inform your team members about the merging process, especially if the tasks involve their contributions or if the merged task impacts their workflow.
3. Choose the Most Comprehensive Task: When designating the primary task, select the one with the most comprehensive details, attachments, or subtasks. Merging into a task with robust information ensures that no critical data is lost during consolidation.
4. Review Dates and Deadlines: Before merging tasks, review their due dates and deadlines. Make necessary adjustments to ensure that the merged task reflects accurate timelines and prioritization.
5. Define Task Dependencies: Identify task dependencies and relationships before merging. Ensure that the merged task accurately reflects these dependencies to maintain a clear understanding of the project’s sequence and flow.
6. Consolidate Comments and Discussions: Merging tasks means combining comments and discussions. Review the comments from each task and ensure that they make sense within the context of the merged task. Edit or remove any repetitive or unnecessary comments for clarity.
7. Check for Duplicate Information: During the merge process, be mindful of duplicate information. Remove any redundant data or attachments to maintain a streamlined and concise merged task.
8. Consider Task Ownership: Evaluate task ownership during the merge. Ensure that the merged task is assigned to the appropriate team member responsible for its completion. Update the assigned person if necessary.
9. Update Project Documentation: If your project includes documentation or reports, update them to reflect the merged task. Update any references or links to the merged task, ensuring consistency across all project-related materials.
10. Double-Check the Merged Task: After the merge, thoroughly review the merged task. Confirm that all desired information from the original tasks is present and that it accurately represents the consolidated work. Make any necessary adjustments or additions to ensure clarity and completeness.
By considering these tips, you can maximize the benefits of merging tasks in Asana. The merge feature becomes a powerful tool for organizing information, reducing duplication, and improving collaboration within your project management workflow.
Conclusion
Merging tasks in Asana is a valuable feature that allows you to consolidate related tasks, reduce duplication, and improve the overall organization of your project management workflow. Whether you are dealing with duplicate tasks, closely related tasks, or clarifying task dependencies, the merge feature in Asana can simplify your work processes and enhance team collaboration.
In this guide, we outlined the step-by-step process of merging tasks in Asana. We started by selecting the tasks to merge, followed by clicking on the “More Options” menu and selecting the “Merge Tasks” option. We then proceeded to select the primary task and reviewed the merge details before confirming the merge. These steps ensure a smooth and intuitive merging process within the Asana platform.
We also provided tips to help you make the most out of the merge feature in Asana. By evaluating task similarity, communicating with team members, choosing the most comprehensive task, and reviewing dates and deadlines, you can optimize the merge process to suit your project management needs.
Remember, merging tasks is a permanent action, so it is vital to carefully review and confirm your merge to avoid unintended consequences. Take the time to assess task similarity, communicate with your team, and ensure accurate task ownership and dependencies.
With the ability to merge tasks, Asana empowers you to streamline your project management, reduce clutter, and improve collaboration. By following the steps and tips outlined in this guide, you can harness the full potential of this feature and experience the benefits of a more organized and efficient workflow in Asana.